
Unboxing and Charging Apple Watch
So, you’ve just got your brand new Apple Watch and you can’t wait to start using it. Before you can start exploring all the features and capabilities of this sleek and stylish device, you need to go through the unboxing and charging process. Here’s a step-by-step guide to help you get started:
- Remove the Apple Watch from its packaging: Carefully open the box and take out your Apple Watch. You’ll find it securely nestled inside alongside some additional accessories.
- Charge the Apple Watch: Locate the included magnetic charging cable and connect it to the rear of the Apple Watch. The other end of the cable can be connected to a power adapter or USB port. Make sure the charging connectors are aligned properly for the charging to initiate.
- Switch on the Apple Watch: Once the watch is connected to the charging cable, the Apple logo should appear on the screen. If it doesn’t, press and hold the side button until the Apple logo appears.
- Pair with your iPhone: Unlock your iPhone and ensure that Bluetooth is enabled. Hold the Apple Watch close to the iPhone until the “Use your iPhone to set up this Apple Watch” message appears. Tap “Continue” and follow the on-screen instructions to complete the pairing process.
- Set up Apple Watch: After the pairing process is complete, follow the prompts on both your iPhone and Apple Watch to set up basic preferences such as language, region, and privacy settings.
- Customize watch face: Now that your Apple Watch is set up, you can choose a watch face that suits your style and preferences. Swipe left or right on the watch face to browse through the available options. Tap on a face to select it and customize it further with Complications, which are small widgets that display useful information.
- Put on your Apple Watch: With the Apple Watch charged and set up, it’s time to put it on your wrist. Adjust the band to ensure a comfortable fit.
- Explore the Apple Watch: Now that your Apple Watch is ready to go, take some time to explore its features and functionalities. You can access various apps, track your activity and fitness, receive notifications, and even make payments with Apple Pay.
That’s it! You’re now ready to enjoy the convenience and functionality of your new Apple Watch. Keep in mind that there’s so much more to discover, so don’t hesitate to dive deeper into the settings and explore all the features this impressive device has to offer.
Pairing Apple Watch with iPhone
Pairing your Apple Watch with your iPhone is an essential step to unlock the full potential of your wearable device. Not only does it allow you to receive notifications and access your favorite apps on your wrist, but it also enables seamless integration between your iPhone and Apple Watch. Here’s a step-by-step guide on how to pair your Apple Watch with your iPhone:
- Ensure iPhone and Apple Watch compatibility: Before beginning the pairing process, make sure that your iPhone and Apple Watch are compatible. Check the Apple website or consult the documentation that came with your Apple Watch to confirm compatibility.
- Turn on your Apple Watch: Press and hold the side button on your Apple Watch until the Apple logo appears on the screen. It may take a few seconds for the watch to power on.
- Unlock your iPhone: Ensure that your iPhone is unlocked and on the home screen. This is essential for the pairing process.
- Open the Apple Watch app: On your iPhone, navigate to the home screen and locate the Apple Watch app. It should be pre-installed on your device. Tap on the app to launch it.
- Select “Start Pairing”: In the Apple Watch app, you should see a “Start Pairing” option. Tap on it to begin the pairing process. Make sure that both your iPhone and Apple Watch are in close proximity to each other.
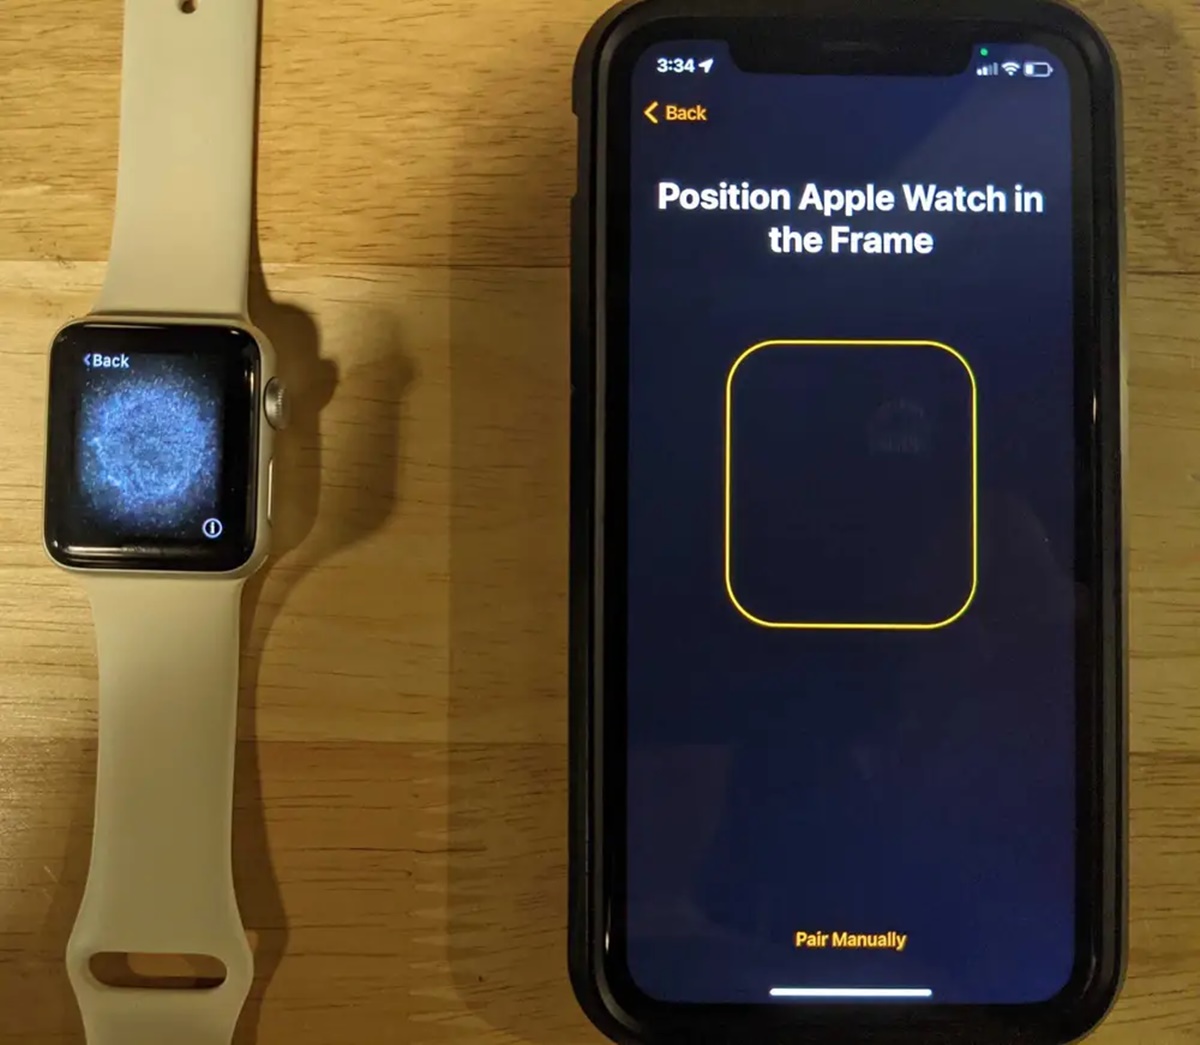
- Bring Apple Watch close to iPhone: Hold your Apple Watch close to your iPhone so that it is within the device’s Bluetooth range. This will prompt your iPhone to display a pairing animation.
- Align the viewfinder: On your iPhone, you will be prompted to align the viewfinder with the Apple Watch screen. Make sure that the Apple Watch screen is centered within the viewfinder to establish a proper Bluetooth connection.
- Enter the passcode: If prompted, enter the passcode displayed on your Apple Watch screen into the Apple Watch app on your iPhone. This is an added security measure.
- Sign in with your Apple ID: You will then be prompted to sign in with your Apple ID on your iPhone. Follow the on-screen instructions to complete the sign-in process.
- Set up Apple Pay: If you wish to use Apple Pay on your Apple Watch, you will be prompted to set it up during the pairing process. Follow the instructions to add your cards to Apple Pay.
- Choose settings and preferences: After the pairing process is complete, you can choose your preferred settings and customize various options such as app notifications, watch face complications, and activity tracking preferences through the Apple Watch app.
That’s it! After completing these steps, your Apple Watch is now successfully paired with your iPhone, and you can begin to enjoy the full range of features and functionalities that the Apple ecosystem offers. Don’t forget to explore the various watch face options, install your favorite apps, and personalize your Apple Watch settings to make it uniquely your own!
Configuring Basic Settings on Apple Watch
After pairing your Apple Watch with your iPhone, it’s time to configure the basic settings to personalize your experience and make the most out of your wearable device. Here’s a step-by-step guide on how to configure the basic settings on your Apple Watch:
- Access the settings: On your Apple Watch, locate and tap on the Settings app. The icon resembles a gear.
- Adjust brightness: Within the Settings app, scroll down and select “Display & Brightness”. Here you can adjust the brightness of the screen to your preference by sliding the brightness slider left or right.
- Manage notifications: To manage which notifications you receive on your Apple Watch, go to the Settings app and select “Notifications”. Here, you can enable or disable notifications for specific apps, customize their appearance, and choose how they are grouped or sorted.
- Configure Do Not Disturb: If you prefer not to be disturbed by notifications for a specific period of time, you can enable Do Not Disturb mode. In the Settings app, select “Do Not Disturb” and toggle it on. You can also set a schedule or allow calls from specific contacts while in Do Not Disturb mode.
- Customize haptic feedback: Haptic feedback provides subtle vibrations on your wrist to discreetly notify you of notifications and alerts. To customize the haptic feedback settings, go to the Settings app and select “Sounds & Haptics”. Here, you can adjust the intensity of haptic alerts by sliding the Haptic Strength slider.
- Configure sound settings: If you prefer to receive audible notifications, go to the Settings app and select “Sounds & Haptics”. Here, you can enable or disable sounds for various alerts, adjust the volume, and choose whether to use the silent mode or not.
- Set up passcode or unlock with iPhone: To enhance the security of your Apple Watch, you can set up a passcode. In the Settings app, select “Passcode” and follow the on-screen instructions to create a passcode. Alternatively, if you have an iPhone with Face ID or Touch ID enabled, you can choose to unlock your Apple Watch with your iPhone.
- Customize app layout: You can customize the layout of the apps on your Apple Watch’s home screen. Press the Digital Crown to go to the home screen and lightly press and hold the display until the apps start to jiggle. From here, you can move or delete apps by dragging them and adjust the app layout to your preference.
- Adjust wrist detection: Wrist detection allows your Apple Watch to automatically wake up when you raise your wrist and go into sleep mode when not in use. To adjust this setting, go to the Settings app, select “Passcode”, and ensure that the “Wrist Detection” toggle is enabled.
- Enable or disable app notifications: You have the flexibility to enable or disable app notifications individually. To do this, go to the Settings app, select “Notifications”, and scroll down to the “Notifications Indicator” section. From there, you can toggle notifications on or off for specific apps.
By following these simple steps, you can configure the basic settings on your Apple Watch and tailor it to your preferences. Take some time to explore the various options available to make your Apple Watch truly yours and enhance your overall experience with this remarkable wearable device.
Setting Up Notifications on Apple Watch
One of the key features of the Apple Watch is its ability to keep you connected and informed with notifications right on your wrist. By configuring your notification settings, you can ensure you receive the alerts that matter most to you. Here’s a step-by-step guide on how to set up notifications on your Apple Watch:
- Access the Settings app: On your Apple Watch, locate and tap on the Settings app, represented by a gear icon.
- Select “Notifications”: Within the Settings app, scroll down and tap on “Notifications.”
- Choose notification preferences: In the Notifications settings, you can customize several options, including:
- Allow Notifications: Toggle this on to enable notifications on your Apple Watch.
- Notification Privacy: Choose whether to display notification details on your watch when it’s unlocked or always show them.
- Notification Indicator: Enable or disable the red dot indicator that appears on the watch face when you have unread notifications.
- Manage app-specific notifications: To customize notifications for specific apps, scroll down to the “Notification Style” section. Here, you can select individual apps and configure their notification settings.
- Choose notification style: For each app, you can choose between several notification styles:
- None: No notifications will be shown for this app on your Apple Watch.
- Banners: Notifications will appear briefly at the top of the screen and then disappear.
- Alerts: Notifications will pop up and remain on the screen until you dismiss them.
- Customize notification alerts: You can further customize how notifications appear on your Apple Watch by selecting “Notification Alerts.” Here, you can adjust the following settings:
- Sound: Choose whether to play a sound when a notification arrives.
- Haptic Alerts: Toggle this on to receive subtle vibrations for notification alerts.
- Cover to Mute: Enable this feature to mute notification sounds by covering the Apple Watch with your hand.
- Enable or disable app notifications: If you choose to enable notifications for a specific app, you can customize the type of alerts it sends and whether it can play sounds or use haptic feedback. You can also adjust the order in which notifications are displayed by selecting “Notification Order”.
- Review and manage notification glances: Notification glances are handy summaries of information provided by certain apps. To manage glances, select “Notification Glances” in the Notifications settings. Here, you can enable or disable glances for specific apps.
- Use the Notification Center: Swipe down on the watch face to access the Notification Center. Here, you can view and interact with all your recent notifications. You can also customize the order of the notifications and clear them individually or all at once.
By following these simple steps, you can easily set up and customize notifications on your Apple Watch. Tailoring your notification preferences will ensure that you stay informed without being overwhelmed. Enjoy the convenience of receiving timely alerts directly on your wrist and streamlining your digital interactions with the help of your Apple Watch!
Customizing Watch Faces and Complications
One of the most exciting aspects of owning an Apple Watch is the ability to customize its appearance and make it uniquely yours. With a wide variety of watch faces and complications to choose from, you can personalize your Apple Watch to suit your style and display the information that matters most to you. Here’s a step-by-step guide on how to customize watch faces and complications on your Apple Watch:
- Access the watch face gallery: On your Apple Watch, firmly press the watch face to enter the watch face gallery. Alternatively, you can swipe left or right on the watch face to scroll through the available options.
- Select a watch face: Explore the various watch faces by swiping left or right. Each watch face has its own unique style and features. Tap on a watch face to select it.
- Customize the watch face: Once you’ve selected a watch face, you can further customize it according to your preferences. Swipe right or tap on the customize button (usually represented by a small “Edit” or “Customize” button) to enter the customization mode.
- Choose a color or style: In the customization mode, you’ll have options to choose different color schemes or styles for the watch face. For example, you can select a different color for the background, change the style of the hour markers, or add complications.
- Add complications: Complications are small widgets that display relevant information on the watch face. Tap on a location on the watch face where you want to add a complication. From the list of available complications, select the one you want to display. You can choose complications for various functions, such as weather, calendar, activity, stocks, and more.
- Arrange complications: After adding complications, you can arrange their order and position on the watch face. Press and hold a complication, then drag it to a new location. You can also resize complications by tapping and holding one, then selecting “Edit” and using the Digital Crown to adjust the size.
- Save the customized watch face: Once you’re satisfied with your customizations, tap “Done” to save the watch face and exit the customization mode. The watch face will now appear on your Apple Watch, reflecting the changes you made.
- Access additional watch faces: In addition to the default watch faces, you can explore and download more watch faces from the App Store or through third-party apps. To do this, open the Watch app on your iPhone, go to the Face Gallery section, and browse the available options.
- Switch between watch faces: To switch between different watch faces on your Apple Watch, simply swipe left or right on the watch face. This allows you to easily switch between different styles and complications depending on your needs and preferences.
- Repeat the customization process: You can repeat the customization process for each watch face you’d like to personalize. Experiment with different watch faces, color schemes, complications, and arrangements to find the perfect combination for your Apple Watch.
By following these steps, you can unlock a whole new level of personalization with your Apple Watch. Create watch faces that showcase your style and display the information that is most important to you. Have fun exploring the different customization options and make your Apple Watch truly unique!
Adding and Removing Apps on Apple Watch
One of the advantages of owning an Apple Watch is the ability to access and use various apps right from your wrist. Whether you want quick access to your favorite social media platform or need to track your fitness goals, adding and removing apps on your Apple Watch is a simple process. Here’s a step-by-step guide on how to add and remove apps on your Apple Watch:
- Add apps through the Apple Watch app on iPhone: Open the “Watch” app on your iPhone, which should be pre-installed. Tap on “My Watch” at the bottom of the screen, then tap on “App Store.”
- Browse and search for apps: In the App Store section of the Watch app, you can browse through various categories, featured apps, or use the search function to find specific apps. Once you find an app you want to install, tap on it to view its details.
- Install the app on your Apple Watch: On the app’s detail page, you’ll see an option to “Get” or “Download” the app. Tap on it to initiate the installation process. Depending on the size of the app and your internet connection, it may take a few moments to complete the download.
- Organize app layout: After installing an app, it will automatically appear on your Apple Watch’s home screen. To arrange the app layout, press the Digital Crown to go to the home screen and lightly press and hold the display until the apps start to jiggle. From here, you can move or delete apps by dragging them and adjust the app layout to your preference.
- Add apps directly on your Apple Watch: To add apps directly on your Apple Watch, press the Digital Crown to go to the home screen. Look for the App Store icon, which resembles a blue shopping bag, and tap on it to open the App Store.
- Browse and search for apps on Apple Watch: Use the touchscreen or the Digital Crown to scroll, zoom, and navigate through the App Store on your Apple Watch. Tap on an app to view its details.
- Install the app on your Apple Watch: Similar to the process on the iPhone, tap on the “Get” or “Download” button to initiate the installation of the app on your Apple Watch. The app will then download and install directly on your device.
- Remove apps from Apple Watch: If you want to remove an app from your Apple Watch, press the Digital Crown to go to the home screen, then lightly press and hold the display until the apps start to jiggle. Find the app you want to remove and tap the “X” icon that appears on the app’s icon. Confirm the deletion by tapping “Delete App”.
- Manage app layout on Apple Watch: After removing an app, the remaining apps will automatically rearrange to fill the gap. You can further customize the app layout by following the steps outlined earlier in this guide.
With these straightforward steps, you can easily add your favorite apps to your Apple Watch and remove any apps that you no longer need. Enjoy the convenience of having access to various functionalities right on your wrist and customize the app layout to suit your preferences and usage habits!
Using Siri on Apple Watch
Siri, Apple’s virtual assistant, brings convenience and hands-free functionality to your Apple Watch. With Siri, you can perform various tasks, get information, send messages, set reminders, and more, just by using your voice. Here’s a step-by-step guide on how to use Siri on your Apple Watch:
- Activate Siri: There are multiple ways to activate Siri on your Apple Watch. You can raise your wrist and say “Hey Siri” (if the feature is enabled), press and hold the Digital Crown, or simply tap on the Siri complication on the watch face.
- Speak your command: Once Siri is activated, you’ll see the Siri interface on your Apple Watch. When you see the waveform appear on the screen, start speaking your command or question clearly and concisely.
- Perform tasks and get information: You can ask Siri to perform a wide range of tasks and retrieve information for you. Some examples include:
- Sending messages or making calls: Say “Send a message to [contact name]” or “Call [contact name].” Siri will prompt you for the specific details.
- Setting reminders or alarms: Say “Set a reminder for [task]” or “Set an alarm for [time].” Siri will create the reminder or alarm based on your instructions.
- Checking the weather: Ask “What’s the weather like today?” or “Will it rain tomorrow?” Siri will provide you with the current weather conditions or the forecast.
- Opening apps: Say “Open [app name].” Siri will launch the app for you.
- Getting directions: Ask “How do I get to [location]?” Siri will provide you with step-by-step directions.
- Checking your calendar: Ask “What’s on my calendar for today?” or “Do I have any meetings tomorrow?” Siri will give you an overview of your upcoming events.
- Playing music: Say “Play [song/artist/playlist/album].” Siri will start playing the music you requested.
- Use follow-up commands: Siri on Apple Watch supports follow-up commands, allowing you to perform multiple tasks consecutively. For example, after sending a message, you can say “And remind me to buy groceries when I’m near the supermarket.” Siri will handle the commands in sequence.
- End the Siri session: After Siri completes a task or provides information, you can either wait for a few seconds for the session to automatically end, tap on the screen outside of the Siri interface, or press the Digital Crown to exit Siri manually.
- Customize Siri settings: To customize Siri settings on your Apple Watch, open the Settings app on your watch, scroll down, and tap on “Siri”. Here, you can enable or disable “Hey Siri”, change the voice gender, language, and more.
With Siri on your Apple Watch, you can accomplish tasks quickly and efficiently, making your daily activities more convenient. Remember to speak clearly and use natural language when interacting with Siri to get the best results. Explore the capabilities of Siri and leverage its power to enhance your Apple Watch experience!
Managing Health and Fitness Features on Apple Watch
Your Apple Watch is not only a stylish accessory but also a powerful tool for tracking and managing your health and fitness goals. Equipped with features such as activity tracking, heart rate monitoring, workout tracking, and more, it can help you stay motivated and maintain a healthy lifestyle. Here’s a step-by-step guide on how to manage the health and fitness features on your Apple Watch:
- Explore the Activity app: On your Apple Watch, locate and open the Activity app. This app is designed to help you monitor and improve your overall activity levels throughout the day.
- Set activity goals: Within the Activity app, you can set custom activity goals based on the number of calories you want to burn, the duration of exercise you aim for, and the number of times you want to stand up and move around throughout the day.
- Monitor and track activity rings: The Activity app uses three rings – Move, Exercise, and Stand – to visualize your daily progress. The Move ring shows the number of calories burned, the Exercise ring tracks your active minutes, and the Stand ring measures how often you stand up and move.
- Complete workouts with the Workout app: Open the Workout app on your Apple Watch to select and track specific types of exercises. Choose from a wide range of activities, including running, cycling, swimming, yoga, and more.
- View workout metrics: During a workout session, swipe right on the Apple Watch screen to access various workout metrics such as elapsed time, distance, heart rate, and calories burned. You can also customize the metrics to display the information that is most relevant to you.
- Track heart rate and resting heart rate: The Apple Watch continuously monitors your heart rate throughout the day, allowing you to keep an eye on your cardiovascular health. In the Heart Rate app, you can view your current heart rate, resting heart rate, and even set up high and low heart rate alerts.
- Practice mindfulness with Breathe app: The Breathe app guides you through short breathing exercises to help you relax and reduce stress. Open the Breathe app on your Apple Watch, follow the prompts, and take a moment to focus on your breathing patterns.
- Monitor sleep patterns: If you have a compatible Apple Watch model, you can track your sleep patterns using the Sleep app. Wear your Apple Watch while you sleep, and it will provide insights into your sleep duration and quality.
- Stay motivated with challenges and competitions: Take advantage of the Challenges feature to participate in activity competitions with friends and family. Compete in various challenges and earn awards to stay motivated and reach new fitness milestones.
- Use third-party health and fitness apps: Expand the capabilities of your Apple Watch by exploring and installing third-party health and fitness apps from the App Store. These apps can offer additional features and insights into your health and workout routines.
With these steps, you can effectively manage the health and fitness features on your Apple Watch. Utilize the Activity app, track your workouts, monitor your heart rate, practice mindfulness, and take advantage of additional features like sleep tracking to maintain a healthy lifestyle. Remember, your Apple Watch is a valuable companion on your wellness journey, providing you with the tools and motivation to achieve your health and fitness goals!
Using Apple Pay on Apple Watch
Apple Pay provides a convenient and secure way to make payments without the need for physical cards or cash. With Apple Pay on your Apple Watch, you can easily make purchases both in-store and online. Here’s a step-by-step guide on how to use Apple Pay on your Apple Watch:
- Add your cards to Apple Wallet: Open the Wallet app on your iPhone and tap on the “+” button to add your credit, debit, or prepaid cards. You can either manually enter the card details or use the camera to capture the information.
- Verify your cards: After adding a card, your issuing bank may require verification. Follow the instructions provided by your bank to complete the verification process.
- Enable wrist detection: To use Apple Pay on your Apple Watch, you must ensure that wrist detection is enabled. On your iPhone, go to the Apple Watch app, tap on “Passcode”, and check that the “Wrist Detection” toggle is enabled.
- Unlock your Apple Watch: Double-click the side button on your Apple Watch to bring up the default card for payment. Depending on your settings, you may need to enter your passcode or use Touch ID or Face ID to unlock the watch.
- Hold your Apple Watch near the payment terminal: Look for the contactless payment symbol on the payment terminal. Hold your Apple Watch near the terminal until you feel a gentle vibration and hear a sound confirming the transaction.
- Authorize the payment: Some transactions may require additional authorization. For example, you may need to enter your card’s PIN or provide a signature. Follow the prompts on the payment terminal as needed.
- Make online purchases: When shopping online using Safari on your iPhone, you can complete the transaction on your Apple Watch. When prompted to pay with Apple Pay, double-click the side button on your watch and hold it near the iPhone until you feel a vibration and hear a sound indicating the payment is complete.
- Manage your cards: To view and manage your cards on your Apple Watch, open the Wallet app. From here, you can select a default card for payments, remove or add cards, and update card details.
- View transaction history: You can review your Apple Pay transaction history by opening the Wallet app on your iPhone. Tap on the card you want to view, scroll down, and you’ll find a record of your recent transactions.
- Secure your transactions: Apple Pay utilizes a secure tokenization process that helps protect your card information. Your actual card number is not stored on your Apple Watch or shared with merchants, making it a secure and private payment method.
With these simple steps, you can maximize the convenience and security of using Apple Pay on your Apple Watch. Enjoy the freedom of making quick and secure payments with just a flick of your wrist. Leave your physical wallet behind and embrace the ease of digital payments with Apple Pay!
Configuring and Using the Apple Watch App on iPhone
The Apple Watch app on your iPhone serves as a central hub for configuring and managing your Apple Watch. It allows you to customize settings, install apps, organize watch faces, and more. Here’s a step-by-step guide on how to configure and use the Apple Watch app on your iPhone:
- Locate and open the Apple Watch app: The Apple Watch app is pre-installed on your iPhone. Look for the icon that resembles a watch and tap on it to launch the app.
- Pairing and setting up your Apple Watch: If you have not yet paired your Apple Watch with your iPhone, the Apple Watch app will guide you through the setup process. Ensure that your Apple Watch is nearby and follow the on-screen instructions to complete the pairing.
- Browse watch faces: From the main screen of the Apple Watch app, you can browse and select different watch faces for your Apple Watch. Swipe left or right to view the available options, then tap on a face to select and customize it further.
- Organize complications: Complications are small widgets that provide quick access to information on your watch face. In the Apple Watch app, you can customize which complications appear on your selected watch face. Tap on “Complications” within the app to manage and arrange them to your preference.
- Install and manage apps: In the “My Watch” tab of the Apple Watch app, you can view a list of apps that are available for your Apple Watch. From here, you can choose to install compatible apps and customize their settings. You can also rearrange the app layout by tapping “App Layout” and dragging the app icons to your desired order.
- Manage notifications: Notifications play a crucial role in keeping you informed on your Apple Watch. In the “My Watch” tab, tap on “Notifications” to customize which apps send notifications to your watch, adjust notification settings, and configure notification behavior.
- Adjust app settings: For certain apps that are installed on your Apple Watch, you can fine-tune their settings through the Apple Watch app. In the “My Watch” tab, scroll down to find the app you want to manage and tap on it to access its specific settings page.
- Customize general settings: The Apple Watch app provides a range of general settings for your device. From within the “My Watch” tab, you can adjust settings such as brightness, sound and haptics, privacy controls, language, and much more. Explore the different options and personalize your Apple Watch experience to your liking.
- Access tutorials and support: Need help or want to learn more about your Apple Watch? In the “My Watch” tab, scroll to the bottom and tap on “Learn More” or “Support.” These sections provide access to tutorials, FAQs, troubleshooting guides, and direct support from Apple.
The Apple Watch app on your iPhone is a powerful companion that allows you to configure, customize, and manage your Apple Watch experience. Take advantage of its features to personalize your watch faces, install and manage apps, fine-tune notifications, and explore a range of settings. Enjoy the seamless integration between your iPhone and Apple Watch, all through the convenience of the Apple Watch app!
Troubleshooting Common Apple Watch Setup Issues
Setting up your Apple Watch is usually a smooth process, but occasionally you may encounter some issues along the way. Here are some common problems that users face during Apple Watch setup and troubleshooting steps to help you resolve them:
- Unable to pair Apple Watch with iPhone:
- Ensure Bluetooth and Wi-Fi are enabled on both devices.
- Restart both your iPhone and Apple Watch.
- Make sure your devices are within close proximity during the pairing process.
- If the issue persists, reset network settings on your iPhone and try again.
- Apple Watch not showing up on the “Start Pairing” screen:
- Restart your Apple Watch by holding down the side button until the Apple logo appears.
- Force quit the Apple Watch app on your iPhone and relaunch it.
- If your Apple Watch is charged but still not showing up, contact Apple Support for further assistance.
- Stuck on “Set up your Apple Watch” screen:
- Restart both your iPhone and Apple Watch.
- Ensure that both devices are charged sufficiently.
- Try resetting your Apple Watch by pressing and holding both the side button and Digital Crown until the Apple logo appears.
- If the issue persists, contact Apple Support for further guidance.
- Issues with syncing data or notifications:
- Make sure that you have allowed the necessary permissions for apps to sync data and send notifications to your Apple Watch in the iPhone Settings app.
- Check the Bluetooth connection between your iPhone and Apple Watch.
- Verify that your iPhone has a working internet connection.
- If the issue persists, unpair your Apple Watch and then pair it again.
- Battery draining quickly:
- Ensure that your Apple Watch is updated to the latest software version.
- Disable features like Always-On Display and Background App Refresh if you notice excessive battery drainage.
- Consider adjusting your settings to conserve battery life, such as reducing screen brightness or disabling unnecessary notifications.
- If the battery issues persist, contact Apple Support for further assistance.
- Inaccurate heart rate or activity data:
- Ensure that your Apple Watch fits snugly on your wrist and is positioned correctly.
- Regularly clean the heart rate sensor on the back of your Apple Watch to remove any dirt or debris that may affect accuracy.
- Keep your software up to date, as Apple regularly releases updates to improve accuracy.
- If the issue persists, reach out to Apple Support for further guidance.
If you encounter any other issues during the setup or usage of your Apple Watch, visiting the Apple Support website or reaching out to Apple Support directly can provide valuable assistance and guidance. Remember, the Apple Watch is a sophisticated device and occasional troubleshooting may be necessary to ensure optimal performance.