
What is an email signature?
An email signature is a block of text, typically placed at the end of an email, that contains important contact information, branding elements, and sometimes additional promotional or legal details. It serves as a digital business card, providing recipients with a quick and convenient way to get in touch with the sender or learn more about their business or organization.
The purpose of an email signature is to provide recipients with all the necessary information they may need to contact or connect with the sender. This includes the sender’s name, job title, company or organization name, phone number, email address, and website. Some email signatures may also include social media icons and links, additional contact details like physical address or fax number, or even a brief marketing message or promotional banner.
Email signatures are not only practical, but they also serve as a branding tool. By including your company logo, tagline, or other visual elements, you can reinforce your brand identity and make your emails more professional and recognizable. Consistently using an email signature across all of your outgoing emails helps to establish brand consistency, which is crucial for creating a strong and memorable impression in the minds of your recipients.
Additionally, an email signature can also add a personal touch to your communication. Adding a professional headshot or a short and friendly message can make your emails more personable and create a sense of connection and trust with the recipients.
Why is an email signature important?
An email signature is an essential element of professional email communication. Here are several reasons why having an email signature is important:
1. Professionalism:
An email signature adds a professional touch to your emails and demonstrates that you take your communication seriously. It creates a positive impression on recipients by providing them with all the necessary contact information and showcasing your professionalism and attention to detail.
2. Contact Information:
An email signature allows you to easily share your contact information with recipients. By including your name, job title, company or organization name, phone number, and email address in the signature, you make it convenient for people to reach out to you for any queries or business inquiries.
3. Branding:
Using a consistent and well-designed email signature helps in establishing and reinforcing your brand identity. Including your company logo, tagline, or other visual elements in the signature creates brand recognition and increases brand visibility in every email you send.
4. Marketing Opportunities:
An email signature provides you with a valuable opportunity to promote your business or services. By adding promotional banners, links to your website or blog, or social media icons in the signature, you can drive traffic to your online platforms and increase engagement with your brand.
5. Legitimacy:
An email signature adds credibility and authenticity to your emails. It reassures recipients that the email is genuine and not spam or phishing attempts. By providing your complete contact information, you enable recipients to verify your identity and establish trust.
6. Efficiency:
An email signature saves time and effort for both the sender and the recipient. Instead of manually typing out your contact details in every email, you can simply set up your signature once, and it will automatically appear at the end of each email you send. This ensures consistency and professionalism in your correspondence.
How to access GoDaddy Webmail
GoDaddy Webmail is a convenient and user-friendly email service provided by GoDaddy, one of the leading web hosting and domain registration companies. To access and manage your GoDaddy email account, follow these simple steps:
Step 1: Visit the GoDaddy website
Open a web browser and go to the GoDaddy website at www.godaddy.com.
Step 2: Sign in to your account
Click on the “Sign In” button located at the top right corner of the website. Enter your GoDaddy username and password, and then click on the “Sign In” button.
Step 3: Navigate to Webmail
After signing in, you will be directed to your GoDaddy account dashboard. Look for the “Email” tab or icon and click on it. This will take you to the GoDaddy Webmail interface.
Step 4: Access your email
In the GoDaddy Webmail interface, you will see your inbox, where you can view and manage your emails. You can click on an email to open and read it, reply to or forward messages, and perform other common email functions.
Step 5: Explore additional features
GoDaddy Webmail offers various features and settings to enhance your email experience. You can create folders to organize your emails, set up filters to automatically sort incoming messages, and customize the appearance and behavior of your email interface.
Additionally, GoDaddy Webmail is mobile-friendly, allowing you to access your email account from any device with an internet connection. You can use a web browser on your smartphone or tablet to log in to your GoDaddy account and access your emails on the go.
By following these steps, you can easily access and manage your GoDaddy email account using the GoDaddy Webmail interface. Enjoy the convenience and efficiency of staying connected through your GoDaddy email.
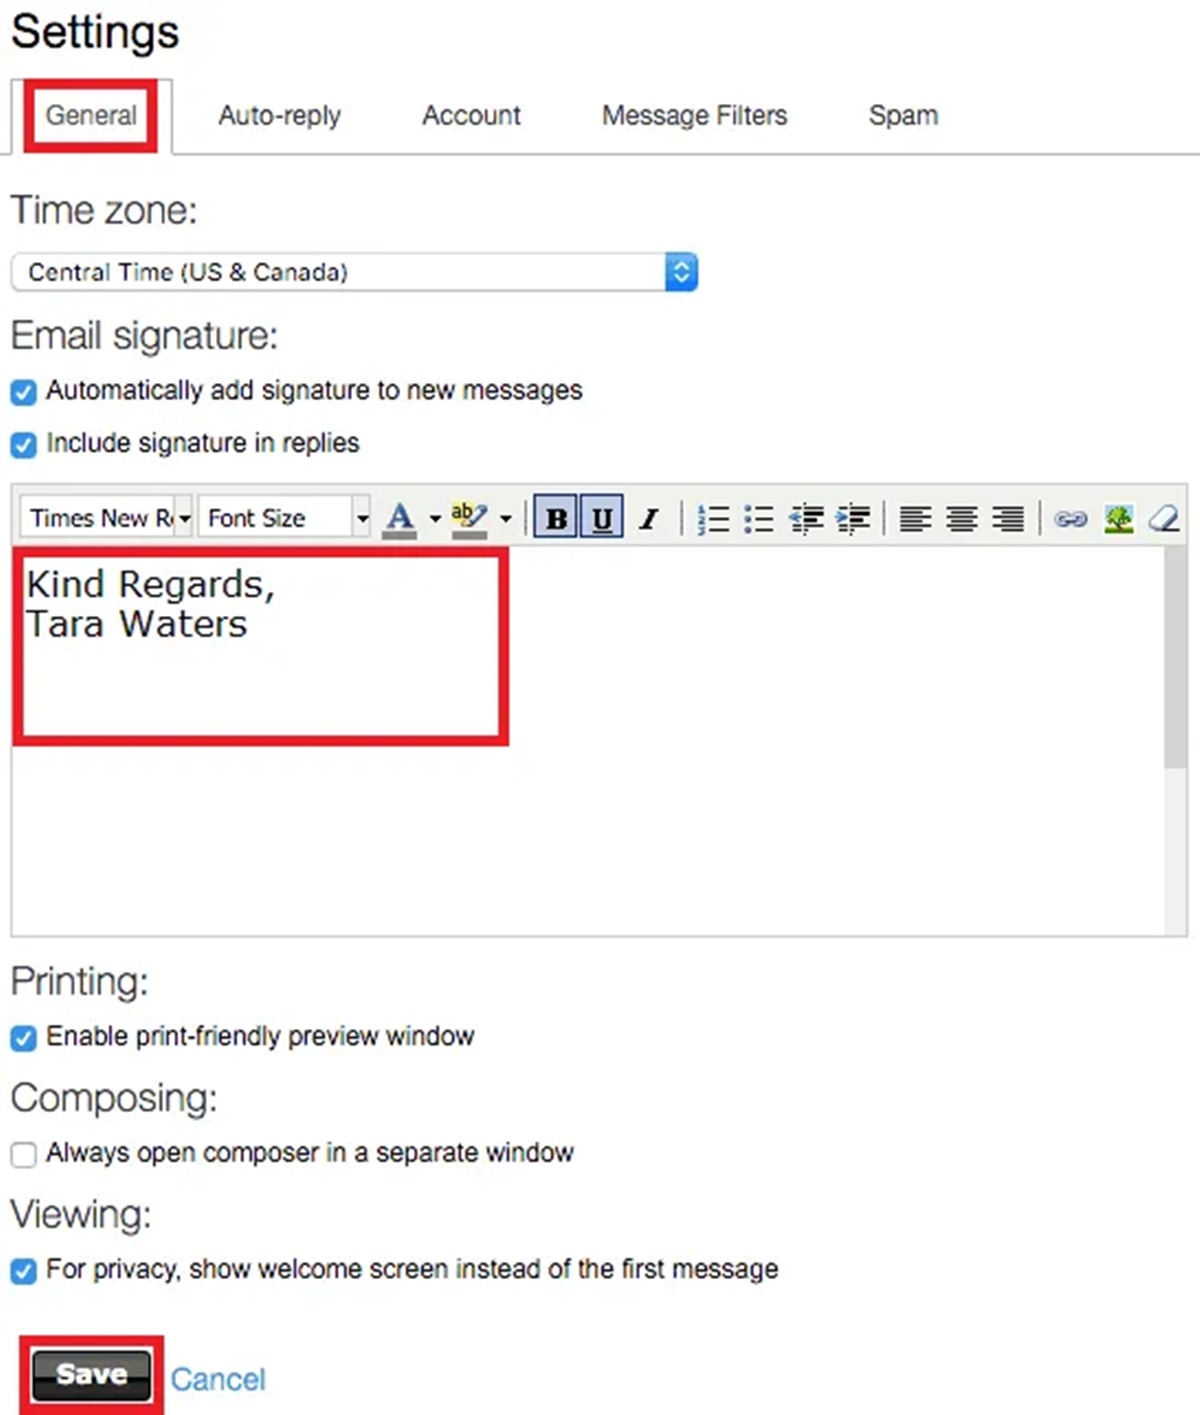
Step 1: Access the Settings
In order to set up an email signature in GoDaddy Webmail, you need to access the settings of your email account. Follow these steps to access the settings:
1. Open GoDaddy Webmail
Visit the GoDaddy website and sign in to your account. Once you are logged in, navigate to the GoDaddy Webmail interface.
2. Go to the Settings
Look for the “Settings” option, usually represented by a gear icon, in the top-right corner of the GoDaddy Webmail interface. Click on it to open the settings menu.
3. Choose “Email Signature”
In the settings menu, locate and click on the “Email Signature” option. This will take you to the email signature configuration page.
Note: The exact location and labeling of the settings may vary slightly depending on the version of GoDaddy Webmail you are using. However, you should be able to find the settings option easily within the interface.
Once you have successfully accessed the settings of your GoDaddy email account, you are ready to proceed to the next step of creating and customizing your email signature.
Step 2: Create a new signature
After accessing the settings of your GoDaddy email account, the next step is to create a new email signature. Here’s how you can do it:
1. Open the Email Signature Settings
In the settings menu, locate and click on the option for “Email Signature.” This will open the email signature configuration page.
2. Click on “New”
On the email signature configuration page, you will see a list of existing signatures (if any). Click on the “New” button to create a new signature.
3. Enter a Name for the Signature
In the new signature dialog box, enter a name for your signature. This can be anything that helps you identify the signature, such as your name or the purpose of the signature.
4. Customize the Signature
Next, you can start customizing your email signature. In the signature editor, you can add text, format it, and include any desired elements such as your name, job title, company name, phone number, and email address.
5. Add Formatting and Styling
Use the formatting options available in the signature editor to enhance the appearance of your signature. You can change the font, size, color, and alignment to match your preferences or your company’s branding guidelines.
6. Add Images or Logo
You can also insert an image or logo into your email signature to make it more visually appealing and recognizable. Click on the image icon in the signature editor to upload or choose an image from your computer.
7. Preview and Save the Signature
Once you are satisfied with the design and content of your signature, click on the “Preview” button to see how it will look. Make any necessary adjustments, and then click on the “Save” button to save your signature.
By following these steps, you can create a new email signature in GoDaddy Webmail. The next step is to customize your signature by adding contact information, social media icons, or promotional banners.
Step 3: Customize your signature
After creating a new email signature in GoDaddy Webmail, the next step is to customize it according to your preferences and branding. Here’s how you can customize your signature:
1. Edit the Text and Format
Within the signature editor, you can easily edit the text and format of your signature. Make sure to include your name, job title, and any other relevant information. Utilize the formatting options to align and style the text to match your desired look.
2. Customize the Font and Color
To make your signature visually appealing, you can customize the font style, size, and color. Choose fonts that are easily readable and reflect your brand’s personality. Make sure the color scheme complements your branding or personal preferences.
3. Add Contact Information
Include important contact information in your signature, such as your phone number, email address, and website. This makes it easy for recipients to get in touch with you directly or visit your website for more information.
4. Incorporate Social Media Icons and Links
If you have social media accounts related to your business or personal brand, consider incorporating social media icons and links into your signature. This allows recipients to connect with you on various platforms and expands your online presence.
5. Include Promotional Banners or Logos
If you want to highlight a special promotion or feature your company logo in your email signature, you can add promotional banners or logos. This can help drive traffic to your website or create brand recognition among recipients.
6. Add a Professional Headshot or Logo
To add a personal touch to your signature, you can include a professional headshot or a logo representing your brand. This helps create a sense of familiarity and builds trust with the recipients of your emails.
7. Test and Preview the Signature
Before finalizing your signature, it’s crucial to test and preview how it looks in different email clients and devices. Send test emails to yourself or colleagues to ensure the formatting, images, and links appear correctly.
By customizing your signature according to your preferences and brand image, you can create an email signature that is distinctive and impactful. The next step is to add your contact information, social media icons, and promotional banners to complete your signature.
Step 4: Add contact information
Once you have created and customized your email signature in GoDaddy Webmail, the next step is to add your contact information. Including this information ensures that recipients have the necessary details to get in touch with you. Here’s how you can add your contact information:
1. Name and Job Title
Start by adding your name and job title to your email signature. This allows recipients to quickly identify who you are and your role within the organization or company.
2. Phone Number
Include your phone number in your signature so that recipients can contact you directly. Make sure to format the phone number correctly, including the country code if applicable.
3. Email Address
Since you are sending an email, it may seem redundant to include your email address in the signature. However, it is still essential to provide this information in case recipients want to copy and paste your email address or use a different method to contact you.
4. Website URL
If you have a website, whether it’s a personal blog or a business website, include the URL in your email signature. This allows recipients to visit your website and learn more about your services or explore your content.
5. Physical Address
If your business has a physical location, consider including the address in your email signature. This is especially useful if you have local customers or clients who might need to visit your premises.
6. Additional Contact Details
Depending on your preferences and the nature of your business, you may want to add additional contact details. This could include your fax number, Skype username, or any other method through which recipients can reach you.
By including your contact information in your email signature, you make it easier for recipients to connect with you and provide them with various options for communication. The next step is to add social media icons and links to your signature to enhance your online presence.
Step 5: Add social media icons and links
Enhancing your email signature with social media icons and links can help expand your online presence and encourage recipients to connect with you on various platforms. Here’s how you can add social media icons and links to your GoDaddy Webmail email signature:
1. Choose the Social Media Platforms
Start by selecting the social media platforms that are relevant to you or your organization. Common platforms include Facebook, Twitter, LinkedIn, Instagram, YouTube, and Pinterest. Choose the platforms that you actively use and would like to promote.
2. Find Social Media Icons
To add social media icons to your email signature, you can perform a simple web search for “free social media icons.” There are many websites that offer royalty-free icon sets in various styles and sizes. Download the icons that match your branding or personal preference.
3. Add the Icons to Your Signature
Once you have obtained the social media icons, upload them to an image hosting platform or your website’s media library. Then, using the email signature editor in GoDaddy Webmail, insert the icons into your signature at appropriate places, such as below your contact information.
4. Link the Icons to Your Social Media Profiles
For each social media icon in your email signature, add a hyperlink that directs recipients to your respective social media profiles. In the email signature editor, highlight each icon and click on the link insert option. Paste the URL of your social media profile and save the changes.
5. Arrange the Icons and Fine-Tune the Design
Arrange the social media icons in a visually appealing and logical order. You can align them horizontally or vertically, depending on your preference. Ensure that the icons are well-spaced and visually balanced within your signature.
6. Test the Links and Appearance
Before finalizing your email signature, send a test email to yourself or a colleague to ensure that the social media icons are correctly linked and appear as expected. Test the signature on different email clients and devices to ensure compatibility.
By adding social media icons and links to your email signature, you make it convenient for recipients to visit your social media profiles, follow your updates, and engage with your content. The next step is to consider adding a promotional banner or logo to your signature for extra impact.
Step 6: Add a promotional banner or logo
Adding a promotional banner or logo to your email signature is an effective way to further enhance your brand presence and catch the attention of recipients. Here’s how you can add a promotional banner or logo to your GoDaddy Webmail email signature:
1. Create or Obtain a Promotional Banner or Logo
First, you need to create or obtain a promotional banner or logo that represents your brand or conveys your promotional message. This could be a special offer, a new product launch, or an event announcement. You can design it yourself using graphic design tools or hire a professional designer to create it for you.
2. Upload the Banner or Logo
Upload the promotional banner or logo to an image hosting platform or your website’s media library. Make sure the image is in a suitable format (e.g., JPEG or PNG), and its size is optimized for web display.
3. Insert the Banner or Logo in Your Signature
Using the email signature editor in GoDaddy Webmail, insert the promotional banner or logo into your signature. Place it in a visually appealing location within the signature, such as below your contact information or beside your social media icons.
4. Link the Banner or Logo to the Promotional Page
Highlight the promotional banner or logo and add a hyperlink that directs recipients to the relevant promotional page on your website. This could be a landing page, a product page, or a registration form. Make sure the link is accurate and fully functional.
5. Optimize the Size and Placement
Ensure that the size of the promotional banner or logo is optimized, so it loads quickly and does not overpower the rest of your email signature. Adjust the placement and alignment of the banner or logo to maintain a visually balanced and professional look.
6. Test the Links and Appearance
Before finalizing your email signature, send a test email to yourself or a colleague to confirm that the promotional banner or logo is correctly linked and appears as expected. Test the signature on different email clients and devices to ensure compatibility.
By adding a promotional banner or logo to your email signature, you can effectively grab recipients’ attention and promote your latest offerings or campaigns. The final step is to save and apply your signature so it appears in all your outgoing emails.
Step 7: Save and apply the signature
Once you have customized your email signature in GoDaddy Webmail, the final step is to save and apply it to your outgoing emails. Follow these steps to save and apply your signature:
1. Save the Signature
After creating and customizing your email signature, make sure to save your changes. Locate the “Save” or “Apply” button within the email signature settings or editor and click on it to save your signature.
2. Choose Default Signature
If you have multiple email addresses associated with your GoDaddy account, select the email address that you want to apply the signature to as your default signature. This ensures that the signature is automatically added to every email you send from that address.
3. Preview and Test the Signature
Before using the signature in your regular email communication, it’s crucial to preview and test it. Send a test email to yourself or a colleague to ensure that the signature appears correctly in various email clients and devices.
4. Make Adjustments if Needed
If the signature does not appear as expected or if there are any formatting issues, go back to the email signature settings or editor and make the necessary adjustments. Repeat the test process until you are satisfied with the appearance of your signature.
5. Start Using Your Signature
Once you have finalized and tested your email signature, you can start using it in all your outgoing emails. The signature will be automatically added to the bottom of every email you send from the associated email address.
6. Update Existing Emails (Optional)
If you want to add the signature to your existing emails, you may need to manually edit each email and insert the signature at the appropriate place. This step is optional and depends on your specific needs and preferences.
By saving and applying your custom email signature in GoDaddy Webmail, you ensure that your contact information, branding elements, and promotional messages are consistently included in your outgoing emails. Enjoy the professional and personalized touch your signature adds to your email communication.