
What is Nest Wi-Fi?
Nest Wi-Fi is a powerful wireless networking system developed by Google. It combines a high-performance router with mesh technology to provide seamless Wi-Fi coverage throughout your home or office. This innovative system helps eliminate dead zones and ensures a reliable internet connection in every corner of your space.
Unlike traditional routers, Nest Wi-Fi utilizes a mesh network, which consists of the main router and additional Wi-Fi points. These Wi-Fi points work together to extend the coverage and create a more stable network. With Nest Wi-Fi, you can enjoy fast and reliable internet access on your devices without interruptions.
One of the key features of Nest Wi-Fi is its compatibility with the Google Home app. Through the app, you can manage your network settings, set up guest networks, prioritize devices, and even perform speed tests. This user-friendly interface gives you control over your Wi-Fi network, allowing you to customize it according to your needs and preferences.
Another great benefit of Nest Wi-Fi is its support for smart home devices. With the Google Assistant built-in, you can control your connected devices with voice commands, from adjusting the thermostat to streaming music on your smart speakers. Nest Wi-Fi seamlessly integrates into your smart home ecosystem and enhances your overall user experience.
Moreover, Nest Wi-Fi employs advanced security features to protect your network and connected devices. With automatic updates and built-in security protocols, you can have peace of mind knowing that your network is secure from cyber threats.
Whether you’re a tech enthusiast looking for a robust and efficient networking solution or a homeowner in need of reliable Wi-Fi coverage, Nest Wi-Fi offers the perfect solution. With its mesh technology, user-friendly interface, smart home compatibility, and enhanced security features, Nest Wi-Fi is a top choice for creating a seamless and reliable wireless network.
Gathering the necessary equipment
Before setting up your Nest Wi-Fi system, it’s essential to ensure you have all the necessary equipment. Gathering the required items beforehand will save you time and help ensure a smooth installation process. Here are the items you’ll need:
- Nest Wi-Fi router: The Nest Wi-Fi router is the heart of your network. It provides the main Wi-Fi signal and connects to your internet service provider’s modem. Make sure you have the router included in your Nest Wi-Fi package.
- Nest Wi-Fi points: The Wi-Fi points are additional devices that work with the router to extend the coverage of your network. Depending on the size of your home or office, you may need one or more Wi-Fi points to ensure optimal coverage in every room.
- Ethernet cable: You’ll need an Ethernet cable to connect the Nest Wi-Fi router to your modem. Make sure the cable is long enough to reach from the modem to the location where you plan to place the router.
- Power adapters: Each Nest Wi-Fi device requires a power adapter. Ensure you have the necessary adapters for the router and Wi-Fi points. These adapters should be included in your Nest Wi-Fi package.
- Mobile device: To set up and manage your Nest Wi-Fi system, you’ll need a smartphone or tablet with the Google Home app installed. Make sure your device is compatible with the app and has a stable internet connection.
Once you have gathered all the necessary equipment, you’re ready to move on to the next step: connecting the Nest Wi-Fi router.
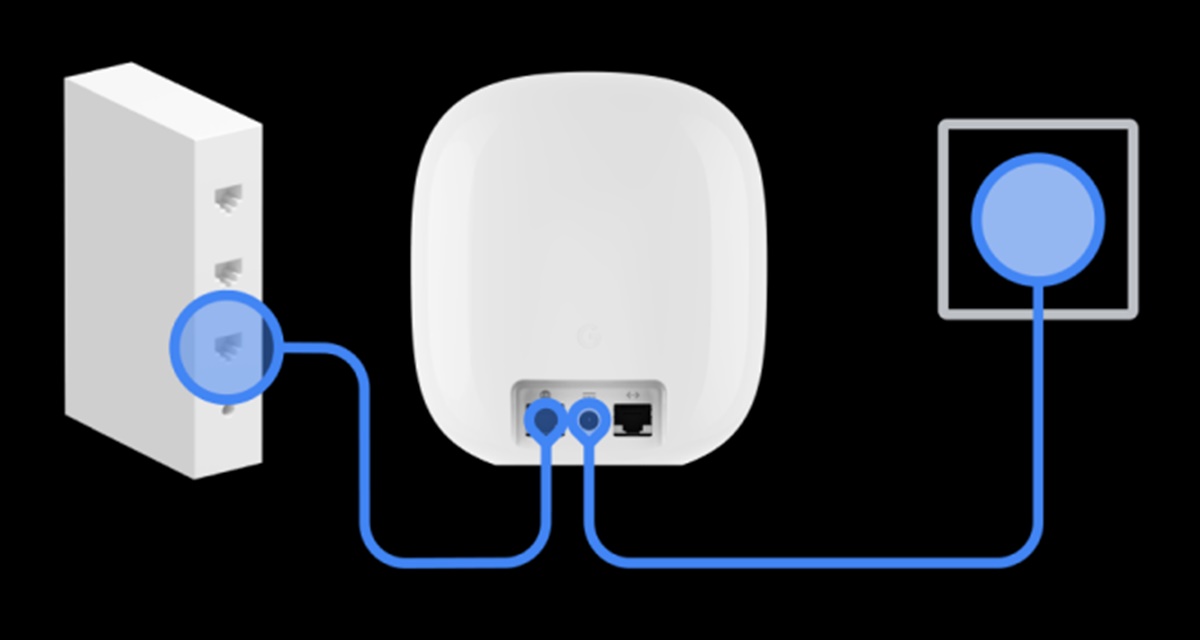
Connecting the Nest Wi-Fi router
Once you have gathered all the necessary equipment for your Nest Wi-Fi setup, it’s time to connect the Nest Wi-Fi router to your internet service provider’s modem. Follow these steps to ensure a successful connection:
- Find a suitable location: Choose a central location for your Nest Wi-Fi router. This will help ensure optimal coverage throughout your space. Avoid placing the router inside cabinets or behind objects, as this can interfere with the Wi-Fi signal.
- Disconnect your modem: Power off your internet service provider’s modem and disconnect any existing router or Wi-Fi equipment that you may have connected to it.
- Connect the Nest Wi-Fi router: Use the Ethernet cable to connect the Nest Wi-Fi router’s WAN port to your modem’s Ethernet port. Ensure the connection is secure at both ends.
- Power on the modem and Nest Wi-Fi router: Plug in your modem and wait for it to establish a connection. Then, connect the power adapter to the Nest Wi-Fi router and plug it into a power outlet. The router will power on automatically.
- Wait for the setup light: Once the Nest Wi-Fi router is powered on, the setup light will start blinking. This indicates that the router is ready to be set up using the Google Home app.
Congratulations! You have successfully connected your Nest Wi-Fi router. Next, you’ll use the Nest app to set up your network and configure your Wi-Fi settings.
Setting up the network using the Nest app
Now that you have connected your Nest Wi-Fi router, it’s time to set up your network and configure your Wi-Fi settings using the Nest app. Follow these steps to get started:
- Download and install the Nest app: Open the app store on your mobile device and search for the “Google Home” app. Download and install it onto your device.
- Launch the Nest app: Once the app is installed, open it and sign in with your Google account. If you don’t have an account, you can create one for free.
- Add your Nest Wi-Fi router: Tap on the “+” icon in the top left corner of the app’s main screen. Select “Set up device” and choose “Nest Wi-Fi” from the list. Follow the on-screen instructions to add your Nest Wi-Fi router to the app.
- Connect to your Nest Wi-Fi network: Once your router is added to the app, you’ll be prompted to connect your mobile device to the Nest Wi-Fi network. Follow the instructions provided to establish the connection.
- Choose your Wi-Fi network name and password: After connecting to the Nest Wi-Fi network, you’ll have the option to customize your Wi-Fi network name (SSID) and password. Enter the desired information and save the settings.
- Set up additional Wi-Fi points: If you have additional Nest Wi-Fi points, you can set them up using the app. Follow the on-screen instructions to add the Wi-Fi points to your network and extend the coverage.
- Perform a network test: Once your network is set up, the app will prompt you to perform a network test. This will help ensure that your Nest Wi-Fi system is working optimally. Follow the instructions to complete the test.
- Explore additional settings: The Nest app offers a range of additional settings and features for your Nest Wi-Fi system. Take some time to explore the app and customize your network according to your preferences.
Congratulations! You have successfully set up your network using the Nest app. Your Nest Wi-Fi system is now ready to provide fast and reliable internet access throughout your space.
Configuring the Wi-Fi settings
After setting up your Nest Wi-Fi network using the Nest app, you can configure the Wi-Fi settings to customize your network according to your preferences. Here’s how you can configure the Wi-Fi settings using the Nest app:
- Open the Nest app: Launch the Nest app on your mobile device and sign in with your Google account, if necessary.
- Tap on the Wi-Fi icon: On the app’s main screen, locate the Wi-Fi icon and tap on it. This will take you to the Wi-Fi settings page.
- Customize your network name (SSID): On the Wi-Fi settings page, you’ll see the current network name (SSID) of your Nest Wi-Fi network. If you wish to change it, tap on the “Network name” option and enter a new name. Remember to save the changes.
- Set up a guest network: To create a separate Wi-Fi network for guests, tap on the “Guest network” option. Follow the on-screen instructions to enable the guest network and set a password. This allows visitors to connect to the internet without accessing your main network.
- Configure network prioritization: If you have specific devices or activities that require higher priority, such as gaming or video streaming, you can set up network prioritization. Tap on the “Traffic prioritization” option and follow the instructions to prioritize certain devices or activities on your network.
- Adjust advanced settings: For more advanced users, the Nest app provides additional settings to customize your network. Tap on the “Advanced settings” option to access features like IP reservations, port forwarding, and DNS settings. Make any necessary changes and save the settings.
- Manage device profiles: With the Nest app, you can create device profiles to manage and monitor the devices connected to your network. Tap on the “Device profiles” option to create profiles, assign devices to profiles, and set parental controls if needed.
- Monitor your network: The Nest app allows you to monitor the performance and status of your network. You can check the connected devices, view network usage, and troubleshoot any issues that may arise. Navigate through the app to access these monitoring features.
By configuring the Wi-Fi settings through the Nest app, you can personalize your Nest Wi-Fi network to meet your specific needs and preferences. Take the time to explore the settings and make adjustments as desired.
Adding additional Nest Wi-Fi points
If you need to extend the Wi-Fi coverage in your home or office, you can easily add additional Nest Wi-Fi points to your existing network. These Wi-Fi points work together with your Nest Wi-Fi router to create a seamless mesh network. Here’s how you can add additional Nest Wi-Fi points:
- Ensure proper placement: Before adding additional Wi-Fi points, identify the areas in your space where you need better Wi-Fi coverage. Make sure to place the Wi-Fi points strategically to maximize their effectiveness.
- Connect the Wi-Fi point: Plug in the new Nest Wi-Fi point into a power outlet in the desired location. The Wi-Fi point will automatically power on and start looking for the existing network.
- Open the Nest app: Launch the Nest app on your mobile device and sign in with your Google account, if necessary.
- Add the Wi-Fi point: On the app’s main screen, tap on the “+” icon and select “Set up device”. Choose “Nest Wi-Fi” from the list, and the app will guide you through the process of adding the Wi-Fi point to your network.
- Follow the on-screen instructions: The app will instruct you to scan the QR code on the new Wi-Fi point using your mobile device’s camera. Follow the on-screen instructions to complete the setup process.
- Position the Wi-Fi point: Once the setup is complete, the app will help you determine the optimal location for the Wi-Fi point. Follow the instructions to find the best placement in your space.
- Verify the connection: After positioning the Wi-Fi point, the app will check the connection quality between the Wi-Fi point and the router. This ensures a strong and reliable connection.
- Repeat the process if needed: If you have multiple Wi-Fi points to add, repeat the above steps for each additional Wi-Fi point.
By adding additional Nest Wi-Fi points, you can extend the coverage of your network and eliminate any Wi-Fi dead zones in your home or office. The Nest app makes it easy to set up and manage these Wi-Fi points, ensuring a seamless and reliable mesh network experience.
Troubleshooting common issues
While the Nest Wi-Fi system is designed to provide a seamless and reliable internet connection, there may be times when you encounter common issues. Here are some troubleshooting steps you can follow to resolve these problems:
- No internet connection: If you’re experiencing a complete loss of internet connectivity, start by checking your modem’s connection. Ensure that all cables are securely connected and power cycle both the modem and the Nest Wi-Fi router. If the issue persists, contact your internet service provider for assistance.
- Wi-Fi signal drop or weak coverage: If you’re experiencing weak Wi-Fi signal or coverage issues, ensure that your Nest Wi-Fi router and additional Wi-Fi points are properly positioned. Avoid placing them near thick walls or other objects that may interfere with the signal. Consider repositioning or adding more Wi-Fi points to enhance coverage.
- Slow internet speed: If your internet speed seems slower than expected, perform a network speed test using the Nest app. If the test shows significantly lower speeds than your subscribed plan, contact your internet service provider to troubleshoot the issue.
- Intermittent connection: If you’re experiencing intermittent Wi-Fi connection, power cycle your Nest Wi-Fi router and Wi-Fi points. Also, ensure that your Wi-Fi devices are up to date with the latest firmware and drivers. If the problem persists, try resetting the Wi-Fi connections on your devices and re-establishing the connection.
- Device connectivity issues: If specific devices are having trouble connecting to the network, ensure that they are within range of the Nest Wi-Fi router or the nearest Wi-Fi point. Check if the device’s Wi-Fi settings are configured correctly and try reconnecting them to the network.
- App connectivity issues: If you’re experiencing difficulties connecting to the Nest app, verify that your mobile device is connected to the same Wi-Fi network as your Nest Wi-Fi. Restart your device and ensure that the app is up to date. If the issue persists, try reinstalling the app or contacting Nest support for assistance.
- Strange Wi-Fi network behavior: If you notice unusual behavior on your Wi-Fi network, such as unexpected devices connecting or slow speeds on specific devices, change your network password to prevent unauthorized access. You can also consider enabling additional security features like Advanced Protection in the Nest app.
- Resetting the Nest Wi-Fi system: If all troubleshooting steps fail, you may need to reset your Nest Wi-Fi system. To do this, locate the reset button on the router or Wi-Fi points and press and hold it for about 10 seconds. This will restore the devices to their default settings. Note that resetting the system will delete all customized settings, and you will need to set up the network again.
By following these troubleshooting steps, you should be able to resolve common issues with your Nest Wi-Fi system. However, if the problem persists or you encounter more complex issues, it may be helpful to contact Nest support for further assistance.
Optimizing your Nest Wi-Fi network
To ensure the best performance and coverage from your Nest Wi-Fi network, it’s important to optimize its settings and environment. Here are some tips to help you optimize your Nest Wi-Fi network:
- Position your Wi-Fi devices strategically: Place your Nest Wi-Fi router and additional Wi-Fi points in central locations, away from obstructions and interference sources like thick walls, appliances, and metal objects. This will help maximize Wi-Fi coverage and reduce signal interference.
- Minimize Wi-Fi congestion: In environments with many Wi-Fi networks, signal interference can lead to slower speeds. Use the Nest app to select the best Wi-Fi channel for your network, or enable the “Auto” channel selection option to automatically optimize channel selection based on network conditions.
- Ensure firmware updates: Regularly check for firmware updates for your Nest Wi-Fi devices. Keeping your devices up to date with the latest firmware ensures they have the latest performance improvements, bug fixes, and security enhancements.
- Enable network prioritization: The Nest app allows you to prioritize specific devices or activities on your network. Prioritize devices like gaming consoles or streaming devices to ensure they receive the highest bandwidth, delivering a smoother and uninterrupted experience for those activities.
- Create separate Wi-Fi networks: If you have many connected devices, consider creating separate Wi-Fi networks for different device categories. For example, you can have one network for smart home devices and another for personal devices. This can help streamline network traffic and improve overall performance.
- Regularly monitor network usage: Use the Nest app to monitor the devices connected to your network and identify any bandwidth-hungry devices or activities. This can help you identify which devices may be impacting network performance and take appropriate actions to optimize their usage or limit their bandwidth.
- Optimize Wi-Fi device settings: For devices connected to your Nest Wi-Fi network, ensure that their Wi-Fi settings are optimized. Check for firmware updates, adjust power-saving settings, and ensure Wi-Fi security protocols are enabled for the best performance and security.
- Consider adding Wi-Fi points: If you notice areas with weak Wi-Fi signal or coverage, consider adding additional Wi-Fi points to your network. These points seamlessly integrate into your existing Nest Wi-Fi system and help extend coverage, ensuring a more reliable connection throughout your space.
- Regularly restart your devices: To maintain optimal performance, it’s beneficial to restart your Nest Wi-Fi devices, including the router and Wi-Fi points, periodically. This can help clear out any temporary glitches or memory buildup that may affect performance.
By following these optimization tips, you can enhance the performance, coverage, and overall user experience of your Nest Wi-Fi network. Regularly monitoring and adjusting settings, as well as keeping your devices up to date, will help ensure you’re getting the most out of your Nest Wi-Fi system.