
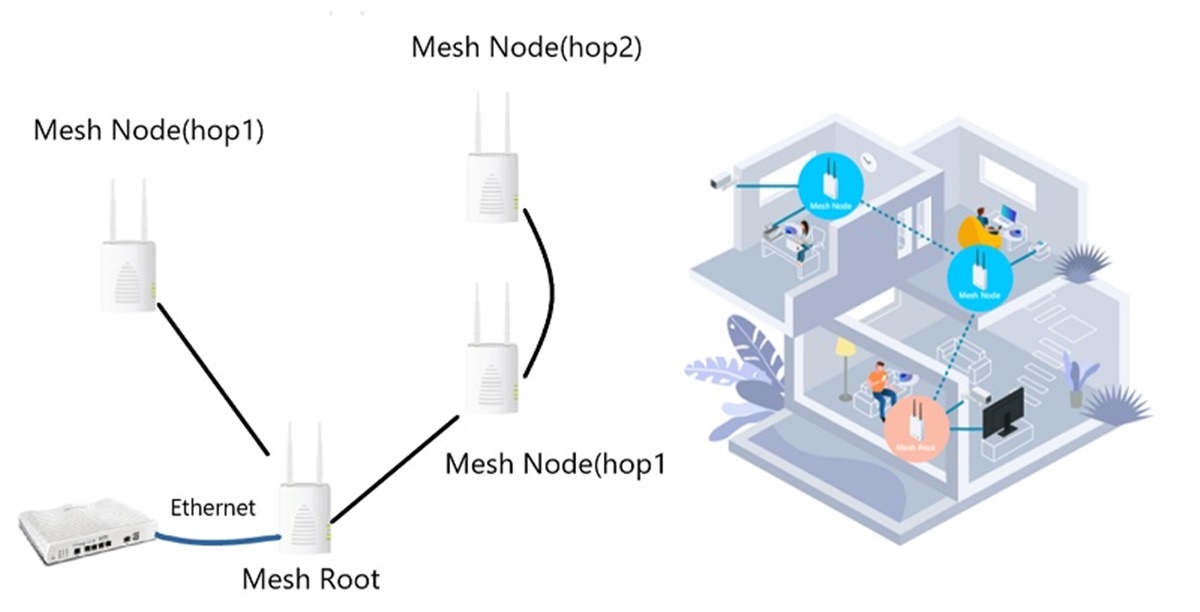
What is a Mesh Network?
A mesh network is a type of wireless network that is designed to provide seamless connectivity and coverage throughout an entire area. Unlike traditional Wi-Fi networks that rely on a single router to transmit the signal, a mesh network uses multiple access points, also known as nodes, to create a network that extends the signal coverage and eliminates dead zones.
The nodes in a mesh network communicate with each other, forming a self-healing and self-optimizing network. This means that if one node fails or encounters interference, the other nodes will automatically reroute the signal to maintain a strong and continuous connection. This dynamic routing capability ensures that every device within the network receives the best possible signal strength and bandwidth.
Mesh networks are particularly useful in large homes or in buildings with multiple floors as they can cover a larger area and provide a more consistent signal throughout the space. Additionally, mesh networks are highly scalable, allowing you to expand the coverage by simply adding more nodes as needed.
Mesh networks also have the advantage of being easy to set up and manage. Most modern mesh network systems come with user-friendly apps or web interfaces that guide you through the installation process and allow you to control and monitor your network settings.
Overall, the key benefit of a mesh network is its ability to provide reliable and extended coverage, making it an ideal solution for homes or businesses where a strong and consistent Wi-Fi connection is essential.
Benefits of Using a Mesh Network
Mesh networks offer several advantages over traditional single-router Wi-Fi setups. Here are some key benefits of using a mesh network:
- Improved Coverage: One of the main advantages of a mesh network is its ability to extend the Wi-Fi coverage throughout your home or office. With multiple nodes placed strategically, a mesh network can eliminate dead zones and ensure a strong and stable connection in every corner of the space.
- Seamless Roaming: Mesh networks provide seamless roaming capabilities, allowing devices to connect and switch between different nodes without experiencing any interruption. As you move around your home, your device will automatically connect to the nearest node, ensuring a smooth and uninterrupted internet experience.
- Scalability: Unlike traditional Wi-Fi networks, which may require additional routers or range extenders to expand coverage, mesh networks are highly scalable. You can easily add more nodes to the network as your coverage needs grow, without the need for complex configuration or additional equipment.
- Self-Healing Network: Mesh networks are designed to be self-healing. If one node fails or encounters an issue, the other nodes in the network will automatically pick up the slack and reroute the traffic, ensuring that the network remains operational.
- Easy Setup and Management: Setting up a mesh network is typically much easier compared to traditional Wi-Fi setups. Most mesh network systems come with intuitive mobile apps or web interfaces that guide you through the installation process and allow you to manage and monitor your network settings with ease.
- Consistent Performance: With a mesh network, you can expect consistent and reliable performance throughout your entire space. The dynamic routing capabilities of a mesh network ensure that each device connects to the best available node, optimizing signal strength and minimizing latency.
Whether you have a large home, a multi-story office building, or simply want to eliminate Wi-Fi dead zones, a mesh network can provide the coverage and performance you need for a seamless online experience.
Assessing Your Internet Needs
Before setting up a mesh network, it’s important to assess your internet needs to ensure that you choose the right system and configuration. Here are some factors to consider:
- Size of Coverage Area: Determine the size of the area that needs Wi-Fi coverage. Consider any obstacles or interference that may affect signal strength, such as thick walls or interference from other electronic devices.
- Number of Devices: Take into account the number of devices that will be connected to the network. If you have a large number of devices, such as smartphones, tablets, smart TVs, and smart home devices, you may need a mesh network with higher capacity and performance.
- Internet Speed: Check your internet plan and the maximum internet speed that your service provider can deliver. Make sure the mesh network system you choose can support the speed you need without any bottlenecks.
- Bandwidth Requirements: Consider the activities that will be performed on the network, such as streaming 4K videos, online gaming, or file sharing. Determine the necessary bandwidth to support these activities and ensure that the mesh network can handle the required throughput.
- Future Expansion: Think about any future expansion or changes to your network. If you anticipate adding more devices or expanding your coverage area, choose a mesh network system that is scalable and can easily accommodate these changes.
- Security Needs: Evaluate your security requirements. Look for mesh network systems that offer advanced security features, such as WPA3 encryption, guest network support, and parental controls.
By taking the time to assess your internet needs, you can make an informed decision when selecting a mesh network system that will meet your specific requirements. This ensures that you set up a network that provides reliable coverage, fast speeds, and the necessary security for your connected devices.
Choosing the Right Mesh Network Kit
When it comes to choosing the right mesh network kit, there are a few factors to consider to ensure that it meets your specific needs. Here’s what to look for:
- Compatibility: Check the compatibility of the mesh network kit with your existing router and internet service provider. Make sure that the kit is compatible with your router’s protocols (such as Wi-Fi 5 or Wi-Fi 6) and supports the internet connection speed provided by your ISP.
- Number of Nodes: Consider the number of nodes that come with the kit. The number of nodes needed will depend on the size of your coverage area and the number of devices you have. Larger homes or offices may require more nodes to ensure adequate coverage throughout the space.
- Performance and Speed: Look for mesh network kits that offer high-performance capabilities and fast speeds. Check the maximum throughput and bandwidth capacity of the kit to ensure that it can handle your internet needs without any performance issues.
- Ease of Setup: Consider the ease of setup and installation. Look for kits that come with user-friendly mobile apps or web interfaces that guide you through the setup process. Some kits may even include features like QR code scanning or automatic configuration to simplify the installation process.
- Advanced Features: Evaluate the additional features and functionalities offered by the mesh network kit. Features like parental controls, VPN support, QoS (Quality of Service), and guest network options can enhance the versatility and security of your network.
- Budget: Determine your budget for the mesh network kit. Compare prices and features of different kits to find one that offers the best value for your money. Keep in mind that investing in a higher-end kit may provide better performance and future-proof your network.
By considering these factors, you can select the right mesh network kit that is compatible, scalable, and capable of providing the performance and coverage you need for your home or office.
Finding the Ideal Router Placement
The placement of your router plays a crucial role in the performance and coverage of your mesh network. Here are some tips to help you find the ideal router placement:
- Central Location: Place your router in a central location within your home or office. This will help ensure that the Wi-Fi signal is evenly distributed throughout the space, minimizing dead zones and maximizing coverage.
- Avoid Obstacles: Keep your router away from thick walls, metal objects, and other potential sources of interference. These obstacles can weaken the Wi-Fi signal and reduce coverage. Try to position the router in an open area for the best signal propagation.
- Elevated Position: Position the router at an elevated location, such as on a shelf or wall mount. A higher placement helps in ensuring that the Wi-Fi signals propagate downwards, covering a larger area effectively.
- Keep Away from Electronics: Avoid placing the router near other electronic devices, especially those that emit electromagnetic signals or operate on the same frequency as Wi-Fi, such as cordless phones, baby monitors, or microwave ovens. These devices can interfere with the Wi-Fi signal and degrade its performance.
- Minimize Interference: If possible, choose a wireless channel that has less interference from neighboring networks. Most modern routers offer an automatic channel selection feature, but you can also manually select the channel with the least interference using the router’s configuration settings.
- Consider Multi-Story Placement: If you have a multi-story building, consider placing additional nodes on each floor to ensure optimal coverage throughout the entire area. This helps in extending the signal range vertically and minimizing dead zones on different floors.
- Experiment and Test: Lastly, experiment with the router placement and test the signal strength in different areas of your space. Use a Wi-Fi analyzer app or the signal strength display on your devices to identify areas with weak coverage and adjust the router placement accordingly.
Choosing the right placement for your router is essential for maximizing the performance and coverage of your mesh network. By following these tips, you can ensure that your Wi-Fi signal reaches every corner of your home or office with minimal interference and optimal performance.
Connecting the Base Station
After selecting the ideal router placement, the next step is to connect the base station of your mesh network. Here’s how you can do it:
- Power Up the Base Station: Start by connecting the base station to a power source. Ensure that you have a stable power supply and that the base station’s power indicator is on.
- Connect to the Modem: Use an Ethernet cable to connect the WAN (Wide Area Network) or Internet port on the base station to the Ethernet output on your modem or gateway. This establishes the connection between your mesh network and the internet.
- Power Cycle the Modem and Base Station: To ensure a smooth connection, power cycle your modem and base station. Turn off the modem, base station, and any other devices connected to them. Wait for a few seconds and then turn them back on, starting with the modem, allowing them to reboot and establish a fresh connection.
- Wait for the Base Station to Sync: After turning on the base station, wait for it to sync with the modem or gateway. This process may take a couple of minutes, during which the base station’s status lights will indicate the progress. Once the sync is complete, the base station is ready for further configuration.
- Access the Configuration Interface: Use the instructions provided by the manufacturer to access the configuration interface of your mesh network system. This is often done through a web browser or a dedicated mobile app.
- Follow the Setup Wizard: The setup wizard will guide you through the initial configuration process. It will usually ask for basic information, such as network name (SSID) and password, for your Wi-Fi network. Follow the instructions and provide the required details to set up the network.
- Confirm the Connection: Once the setup wizard is completed, verify that the base station is connected to the internet by checking for an active internet connection on your devices. Ensure that you can browse the web and access online services without any issues.
By following these steps, you can successfully connect the base station of your mesh network to your modem or gateway and establish a solid connection to the internet. This lays the foundation for expanding and optimizing your mesh network further with the addition of mesh nodes.
Adding Mesh Nodes
Once you have connected the base station of your mesh network, you can expand its coverage by adding mesh nodes. These nodes work together to create a seamless and extended network. Here’s how you can add mesh nodes to your network:
- Choose Node Placement: Assess the areas of your home or office that have weak coverage or dead zones. Identify locations where additional mesh nodes are needed to improve the signal strength and extend the network’s coverage.
- Power Up the Mesh Node: Plug in the mesh node to a power source in the chosen location. Make sure the power indicator is on to confirm that the node has sufficient power.
- Pair the Mesh Node: Use the manufacturer’s instructions to pair the mesh node with the base station. This process usually involves pressing a button on the base station and mesh node simultaneously or using a mobile app to initiate the pairing process.
- Wait for Syncing: Allow the mesh node to sync with the base station. This may take a few minutes as the node establishes a connection and optimizes its position within the network. The status lights on the node will indicate the syncing progress.
- Test the Signal Strength: Use your devices to test the signal strength in the area covered by the newly added mesh node. Ensure that the network signal is strong, and there are no dead zones or connectivity issues.
- Repeat for Additional Nodes: If you need to add more nodes, repeat the process of choosing node placement, powering up, pairing, syncing, and testing the signal strength. Add as many nodes as necessary to achieve the desired coverage throughout your space.
By strategically adding mesh nodes to your network, you can eliminate Wi-Fi dead zones and ensure a strong and consistent connection in every area of your home or office. The nodes work together seamlessly to extend the network’s coverage and provide reliable internet connectivity to all your devices.
Configuring Mesh Network Settings
After connecting the base station and adding mesh nodes to your network, it’s time to configure the settings of your mesh network. Here are the key steps to follow:
- Access the Configuration Interface: Use the web browser or mobile app provided by the manufacturer to access the configuration interface of your mesh network system. You may need to enter the IP address of the base station or connect to the network through a dedicated app.
- Network Name and Password: Customize the network name (SSID) and password for your Wi-Fi network. Choose a unique and secure password to prevent unauthorized access to your network.
- Channel Selection: Verify that the mesh network is operating on a channel with minimal interference. The configuration interface may provide options to manually select the Wi-Fi channel or allow the system to automatically optimize the channel selection.
- Guest Network: If desired, set up a guest network to provide Wi-Fi access to visitors without granting them access to your main network. Enable guest network features and set a separate password for guest use.
- Parental Controls and QoS: Explore the options to manage parental controls, which allow you to restrict access to specific websites or devices. Additionally, configure Quality of Service (QoS) settings to prioritize certain devices or activities that require a higher bandwidth.
- Device Prioritization: Assign priority to specific devices on the network that require fast and stable connections, such as gaming consoles or streaming devices. This ensures a reliable connection for these devices, even when multiple devices are connected to the network simultaneously.
- Security Settings: Review and adjust the security settings of your mesh network system. Look for options to enable WPA3 encryption, which provides enhanced security for your network, and consider enabling automatic firmware updates to ensure your system is protected against the latest security threats.
- Save and Apply Settings: Once you have configured the desired settings, save the changes and apply them to your mesh network. The system will take a moment to apply the new settings, and you may need to reconnect your devices to the network using the updated network name and password.
By configuring the settings of your mesh network, you can customize it to meet your specific needs and enhance its performance, security, and functionality. Make sure to periodically review and update the settings as needed to optimize the performance and security of your network.
Securing Your Mesh Network
Securing your mesh network is essential to protect your personal data and ensure that only authorized devices can access your network. Here are some important steps to take to enhance the security of your mesh network:
- Change Default Passwords: The first step is to change the default login credentials for your mesh network system. This includes changing the default username and password used to access the configuration interface. Choose strong and unique passwords to prevent unauthorized access.
- Enable Encryption: Ensure that your mesh network is utilizing strong encryption to protect your data. Ideally, enable WPA3 encryption, which provides the highest level of security. If your devices do not support WPA3, use WPA2 encryption as a minimum.
- Guest Network: If you have enabled a guest network, establish a separate password for it and limit its access to the internet only. Isolating guest devices from your main network adds an additional layer of security.
- Disable WPS: Check your mesh network settings and disable Wi-Fi Protected Setup (WPS). Although WPS provides convenience for connecting devices, it can also be a security vulnerability and should be turned off.
- Regular Firmware Updates: Keep your mesh network system up to date by installing the latest firmware updates provided by the manufacturer. These updates often include performance improvements and security patches to protect against known vulnerabilities.
- MAC Filtering: Consider implementing MAC (Media Access Control) filtering, where you manually whitelist specific devices by their MAC addresses. This restricts network access to only approved devices.
- Disable Remote Management: If your mesh network allows for remote management, consider disabling this feature. Disabling remote access prevents unauthorized individuals from accessing and altering your network settings remotely.
- Regularly Monitor Device Activity: Monitor the connected devices on your mesh network through the configuration interface or app. Regularly review the list of connected devices to ensure that only authorized devices are accessing your network.
- Secure Administrative Access: If your mesh network system allows for multiple user accounts, create separate accounts for administrative access. This ensures that only authorized individuals have administrative privileges on the network.
- Physical Security: Finally, physically secure your mesh network devices. Place them in a secure location to prevent unauthorized physical access, and consider labeling the devices to easily identify any tampering attempts.
By implementing these security measures, you can enhance the protection of your mesh network and ensure that your personal data remains secure. Regularly review and update your security settings to stay ahead of potential threats and keep your network safe.
Troubleshooting Common Issues
While mesh networks are designed to provide seamless connectivity, you might encounter occasional issues. Here are some common problems you may encounter with your mesh network and how to troubleshoot them:
- Slow or Intermittent Connection: If you experience slow or intermittent internet connection, start by checking your internet service provider’s speed. If the issue persists, try rebooting the base station and mesh nodes, or adjusting the location of the nodes for better signal strength.
- Mesh Node Connectivity: If one or more mesh nodes are not connecting to the network, bring the node closer to the base station or move it to a different location within range. Verify that the node is powered on and in sync with the base station.
- Interference: If you notice performance issues due to interference from other devices or neighboring networks, change the Wi-Fi channel settings on your mesh network’s configuration interface to find a channel with less interference.
- Compatibility Issues: Check if there are any compatibility issues between your mesh network and specific devices. Update the firmware of the devices or contact the manufacturer for any necessary compatibility updates.
- Node Placement: Inadequate node placement can result in weak signal coverage. Experiment with different node placements to find the optimal positions that maximize coverage and minimize dead zones within your space.
- Network Congestion: If you have multiple devices connected to the network, high network congestion can occur. Enable Quality of Service (QoS) settings on your mesh network to prioritize specific devices or activities that require a higher bandwidth.
- Device Compatibility: Some older devices may not be compatible with certain mesh network features or encryption protocols. In such cases, consider creating a separate Wi-Fi network specifically for these devices.
- Configuration Issues: Review the configuration settings of your mesh network, ensuring that important settings such as network name (SSID) and password are correctly entered. Verify that the settings match across all devices within the network.
- Resetting Devices: As a last resort, if you encounter persistent issues, you can try resetting your base station and mesh nodes to their factory default settings. This will erase all configurations, and you will need to set up the network again from scratch.
By troubleshooting these common issues, you can resolve connectivity problems and ensure that your mesh network performs optimally for all your devices. If the issues persist, consult the manufacturer’s support documentation or contact their customer support for further assistance.
Expanding and Scaling Your Mesh Network
As your Wi-Fi coverage needs grow or change, you may want to expand and scale your mesh network. Here are some key considerations and steps to take when expanding your mesh network:
- Assess Coverage Area: Evaluate the areas in your home or office where you need to extend Wi-Fi coverage. Identifying areas with weak signal strength or connectivity issues will help determine where additional mesh nodes are required.
- Choose Additional Mesh Nodes: Select the appropriate number of additional mesh nodes based on the size of the area you need to cover. Consider the capabilities and compatibility of the mesh nodes with your existing base station.
- Node Placement: Place the additional mesh nodes strategically to ensure optimal coverage and avoid overlapping signals. Experiment with different placements to find the positions that provide the best signal strength and minimize dead zones.
- Pair and Sync Nodes: Follow the manufacturer’s instructions to pair and sync the new mesh nodes with the existing network. This process typically involves pressing a button on the base station and the new node or using a mobile app to initiate the pairing process.
- Test Signal Strength: After adding and syncing the new mesh nodes, test the signal strength and connectivity in the areas they are intended to cover. Verify that there are no dead zones and that devices can seamlessly roam between nodes without losing connectivity.
- Optimize Network Placement: Adjust the placement of existing mesh nodes if necessary to ensure optimal signal propagation. Consider relocating nodes that are too far from the base station or repositioning them to maximize coverage and minimize signal interference.
- Monitor Network Performance: Regularly monitor the performance of your expanded mesh network to identify any areas with weak signal strength or connectivity issues. Use the configuration interface or app provided by the manufacturer to check the status and performance of each node.
- Future Expansion: Keep in mind the potential for future expansion. Consider the scalability of your mesh network system and its ability to accommodate additional nodes as your coverage needs grow or change in the future.
By following these steps, you can effectively expand and scale your mesh network to meet the growing or changing demands of your home or office. Whether you need to enhance coverage in specific areas or expand the network throughout the entire space, a well-planned and properly scaled mesh network can provide reliable and seamless Wi-Fi connectivity.