
Choosing the Right Router for Your Guest Network
When setting up a guest network, one of the essential decisions you’ll need to make is choosing the right router. The router you select will determine the overall performance, security, and features of your guest network. Here are some factors to consider when making your choice.
1. Dual-Band or Tri-Band: Look for a router that supports dual-band or tri-band functionality. Dual-band routers operate on both the 2.4GHz and 5GHz frequency bands, allowing you to allocate different devices to different bands for improved performance and less congestion.
2. Wireless Standards: Ensure that the router supports the latest wireless standards such as 802.11ac or 802.11ax (also known as Wi-Fi 5 and Wi-Fi 6, respectively). These standards provide faster speeds and better connectivity.
3. Guest Network Features: Check if the router offers specific guest network features. These can include a separate network name (SSID) and password for guests, the ability to set time limits or usage restrictions, and the option to customize the login page.
4. Security Measures: Look for routers with robust security features, such as WPA3 encryption, firewall protection, and the ability to isolate guest devices from your main network to prevent unauthorized access.
5. Range and Coverage: Consider the size of your property and the coverage area required. Look for routers with strong signal strength and range, or consider using additional Wi-Fi extenders or mesh systems to ensure coverage throughout your space.
6. Brand Reputation and Support: Research and choose a reputable brand known for producing reliable routers. Additionally, check for available customer support and firmware updates to ensure ongoing performance and security improvements.
By considering these factors, you can choose a router that meets the specific requirements of your guest network. Keep in mind that investing in a high-quality router will lead to a more stable, secure, and efficient guest network experience for your visitors.
Configuring Your Router Settings
Once you have selected the right router for your guest network, the next step is to configure its settings. By following these steps, you can ensure that your guest network is properly set up and optimized for performance and security.
1. Accessing the Router Interface: Connect your computer to the router either via an Ethernet cable or wirelessly. Open a web browser and enter the router’s IP address in the address bar. This will take you to the router’s admin interface, where you can make changes to the settings.
2. Changing Default Login Credentials: For security reasons, it is important to change the default username and password of your router. Look for the “Administration” or “Management” section in the router settings and create a strong, unique password.
3. Renaming the Guest Network: Locate the section related to wireless settings or SSID. Here, you can change the name of your guest network to something easily recognizable for your visitors. Avoid including any personal information or identifying details.
4. Setting Up a Strong Password: In the same wireless settings section, set a strong password for your guest network. Make sure to use a combination of upper and lowercase letters, numbers, and special characters. This will prevent unauthorized users from accessing your network.
5. Enabling Network Encryption: Look for the security settings section and enable the appropriate encryption method, such as WPA2 or WPA3. Encryption will protect the data transmitted over your guest network and ensure that only authorized users can access it.
6. Enabling Guest Network Access: Find the guest network or guest access settings and enable this feature. Some routers may have dedicated options for guest network functionality, while others may require you to create a separate virtual network.
7. Setting Time Restrictions or Usage Limits: Depending on your router, you may have the option to set time restrictions or usage limits for your guest network. This can be useful if you want to limit guest access during certain hours or prevent bandwidth hogging.
8. Customizing Login and Captive Portal: If available, take advantage of any customization options for your guest network’s login page or captive portal. You can add your own branding, provide additional information or terms of use, and enhance the overall user experience for your guests.
9. Testing and Troubleshooting: Once you have made the necessary changes, test the guest network from a separate device to ensure that it is functioning correctly. If you encounter any issues, refer to the router’s user manual or seek assistance from the manufacturer’s support resources.
By following these steps, you can configure your router settings effectively and create a secure and user-friendly guest network for your visitors. Regularly review and update the settings as needed to ensure the ongoing performance and security of your guest network.
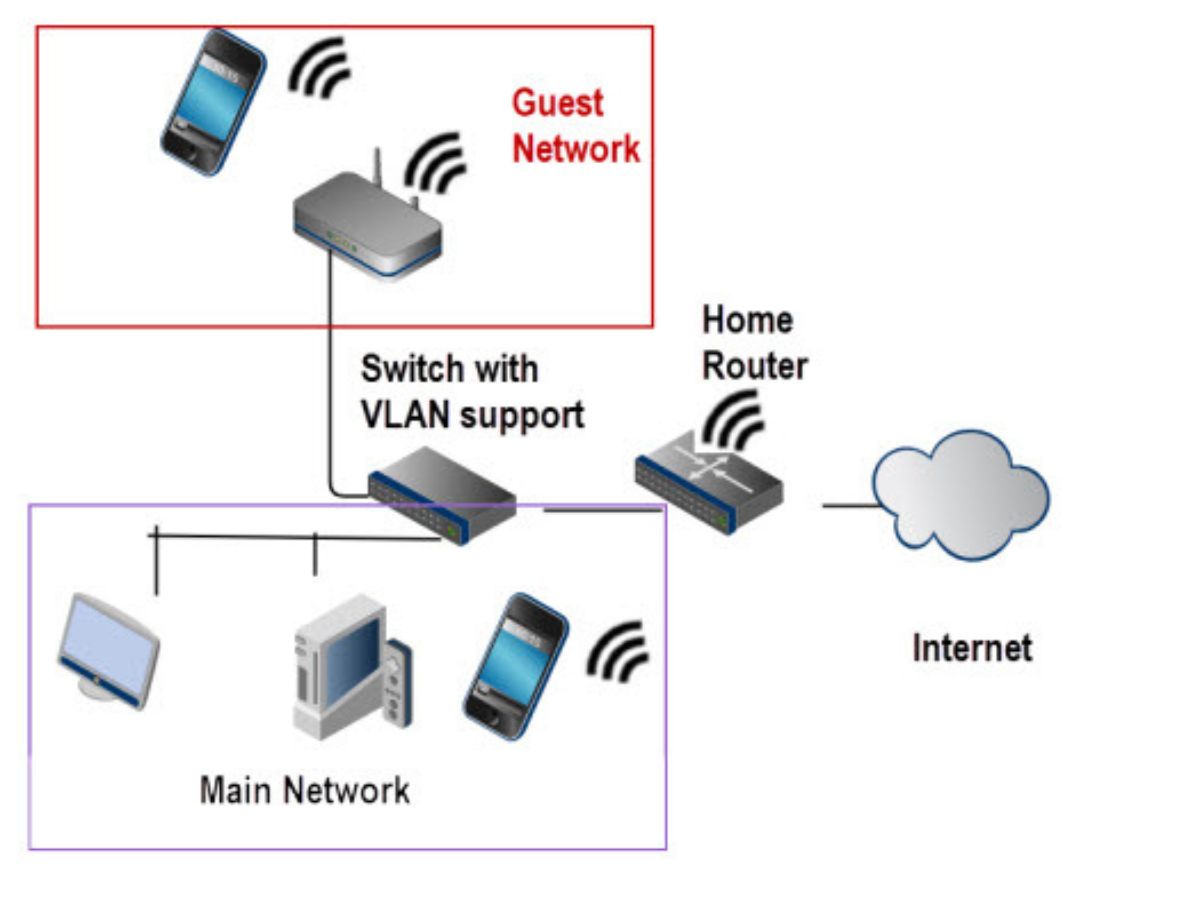
Creating a Separate Network for Guests
One of the most important steps in setting up a guest network is creating a separate network specifically for your guests. By separating the guest network from your main network, you can enhance security and prevent unauthorized access to your personal devices and data. Follow these steps to create a dedicated network for your guests.
1. Accessing the Router Interface: Connect your computer to the router and log in to the router’s admin interface, as mentioned in the previous section.
2. Configuring Virtual LAN (VLAN): Look for the VLAN settings in the router’s configuration page. VLAN allows you to create virtual networks within a physical network infrastructure. Create a new VLAN specifically for the guest network.
3. Assigning LAN Ports: Specify which LAN ports on the router will be associated with the guest network. This ensures that guest devices are isolated from devices connected to other LAN ports.
4. Configuring IP Address Range: Set up a separate IP address range for the guest network. This will prevent guests from accessing devices on your main network and minimize the risk of unauthorized access to your personal data.
5. Enabling Firewall Rules: To further enhance security, configure firewall rules that allow communication within the guest network but restrict access to the main network. This helps protect your devices from potential threats originating from guest devices.
6. Configuring DHCP Settings: Set up the DHCP (Dynamic Host Configuration Protocol) settings for the guest network. DHCP automatically assigns IP addresses to devices connecting to the network, ensuring smooth connectivity for your guests.
7. Testing Connectivity: Connect a device to the guest network and verify that it is able to access the internet. If any issues arise, double-check the configuration settings or consult the router’s documentation for troubleshooting guidance.
8. Repeating the Process for Mesh Systems or Extenders: If you are using a mesh system or Wi-Fi extenders to extend your network coverage, repeat the above steps for each additional device to ensure that the guest network is available across your property.
By creating a separate network for guests, you can provide them with a secure and isolated environment to connect to the internet without compromising the privacy and security of your main network. It’s an essential step in maintaining control and protecting your data while offering a convenient and reliable guest network experience.
Setting a Strong Password for the Guest Network
When setting up a guest network, one crucial aspect to consider is setting a strong password. A weak or easily guessable password puts your network and connected devices at risk of unauthorized access. Follow these guidelines to ensure that your guest network password is strong and secure.
1. Length and Complexity: Choose a password that is at least 12 characters long. Include a combination of uppercase and lowercase letters, numbers, and special characters. The longer and more complex the password, the stronger it is.
2. Avoid Personal Information: Don’t use easily guessable information such as your name, birthdate, or address. Hackers can easily obtain this information and use it to try and access your network.
3. Unique Password: Don’t reuse passwords from other accounts or networks. If one password is compromised, it could potentially give hackers access to multiple accounts or networks.
4. Randomization: Use a combination of random characters to make the password harder to guess. You can use a password manager to generate and store random passwords, ensuring that they are complex and unique.
5. Regular Updates: Change your guest network password regularly, preferably every few months or if you suspect any security breaches. This helps mitigate the risk of unauthorized access and improves the overall security of your network.
6. Sharing Privileges: Limit the number of people who have access to the guest network password. Only provide it to trusted individuals or guests who require access to the network. This reduces the chances of unauthorized users gaining access to your network.
7. Avoid Dictionary Words: Avoid using common dictionary words, as these are susceptible to dictionary-based attacks. Hackers often use software that systematically tries different dictionary words as passwords.
8. Store Passwords Securely: If you need to store guest network passwords for reference, make sure to store them securely. Use a trusted password manager that employs strong encryption to protect your passwords.
9. Educate Guests: Make sure to inform your guests about the importance of using a strong password and encourage them to follow best practices for securing their own devices.
By setting a strong and secure password for your guest network, you greatly reduce the risk of unauthorized access and protect both your network and connected devices. Remember to regularly update your password and follow other security measures to keep your network safe from potential threats.
Enabling Guest Network Access
Enabling guest network access is a crucial step in setting up a guest network. It allows your visitors to connect to the internet without gaining access to your main network or sensitive information. Follow these steps to enable guest network access on your router.
1. Accessing the Router Interface: Connect your computer to the router and log in to the router’s admin interface, as mentioned in the earlier sections.
2. Locating the Guest Network Settings: Look for the guest network or guest access settings in the router’s configuration page. The location may vary depending on the router model and manufacturer, but you can typically find it in the wireless or network settings.
3. Enabling Guest Network: Toggle the option to enable the guest network. Some routers provide separate options for enabling the 2.4GHz and 5GHz guest networks. If available, consider enabling both for better compatibility with a wider range of devices.
4. Configuring Network Name (SSID) and Password: Enter a unique network name (SSID) and a strong password for the guest network. The network name should be easily recognizable for your visitors, but avoid using any personal or identifying information.
5. Customizing Guest Network Settings: Depending on your router, you may have the option to customize additional settings for the guest network. This can include setting time restrictions, limiting bandwidth, or applying other usage policies.
6. Validating and Saving Changes: Review the configuration settings for the guest network to ensure accuracy. Once you are satisfied, save the changes. The router will apply the settings and make the guest network available for access.
7. Sharing Guest Network Details: When your guests arrive, provide them with the guest network name (SSID) and password. Be cautious about how you share this information, ensuring that it is only given to trusted individuals who require access to the network.
8. Informing Guests of Usage Guidelines: Consider providing your guests with any usage guidelines for the guest network. This could include limitations on the number of devices, restrictions on certain activities, or guidelines on responsible internet usage.
9. Monitoring Guest Network Activity: Keep an eye on the guest network to ensure that only authorized users are accessing it. Monitor the number of connected devices and watch for any suspicious or unauthorized activity that may require further investigation or action.
Enabling guest network access not only provides convenience for your visitors but also helps protect your main network and sensitive data. By following these steps, you can create a separate network that ensures a secure and seamless browsing experience for your guests.
Configuring Network Security Settings
Configuring network security settings is vital to protect your guest network from potential threats and unauthorized access. By implementing the right security measures, you can ensure the privacy and integrity of both your guests’ browsing activity and your own network. Follow these steps to configure network security settings for your guest network.
1. Encryption: Enable encryption for your guest network to safeguard data transmitted between devices and the router. Use WPA2 or WPA3, which are considered secure encryption protocols. Avoid using the outdated WEP encryption, as it is vulnerable to attacks.
2. Authentication: Set up a strong authentication method for accessing the guest network. Avoid using an open network or a network with weak or no password protection. Provide a unique and secure password that guests must enter to connect to the network.
3. Network Isolation: Enable network isolation between the guest network and your main network. This ensures that devices connected to the guest network cannot access or interact with devices on your primary network, enhancing security and privacy for both networks.
4. MAC Filtering: Consider implementing MAC filtering, which allows you to specify the MAC addresses (unique identifiers) of devices that are allowed to connect to the guest network. This adds an extra layer of control and security by limiting access only to authorized devices.
5. Firmware Updates: Regularly check for firmware updates for your router. Manufacturers often release updates that address security vulnerabilities and strengthen the overall security of the device. Apply these updates promptly to ensure your router is protected from the latest threats.
6. Intrusion Detection and Prevention Systems (IDS/IPS): Consider using IDS/IPS to monitor network traffic and identify suspicious activities or potential attacks. These systems can help detect and prevent unauthorized access and mitigate security risks in real-time.
7. Disable Remote Management: Disable remote management features on your router to prevent unauthorized access and tampering. This ensures that only individuals physically connected to the local network can make changes to the router settings.
8. Guest Network Timeouts: Set guest network timeouts to automatically disconnect idle devices after a defined period of inactivity. This helps conserve bandwidth and protects against unauthorized devices staying connected to the network indefinitely.
9. Regular Security Audits: Periodically review and audit your network security settings to ensure they are still effective and aligned with best practices. Stay informed about new threats and security measures and make necessary adjustments or enhancements to your guest network’s security settings.
By configuring network security settings properly, you can create a secure environment for your guest network, protecting both your guests and your own network from potential threats. These measures greatly reduce the risk of unauthorized access, data breaches, and other security vulnerabilities.
Limiting Bandwidth for Guest Users
Limiting bandwidth for guest users on your network can help ensure fair and efficient distribution of internet resources, prevent bandwidth abuse, and maintain a satisfactory browsing experience for all users. By following these steps, you can effectively manage bandwidth allocation for your guest network.
1. Access the Router Settings: Log in to your router’s admin interface using a web browser, as explained earlier. Navigate to the settings section related to bandwidth management.
2. Set a Maximum Bandwidth Limit: Look for the bandwidth management options and set a maximum limit for guest users. This limit should be reasonable to prevent congestion but still provide sufficient bandwidth for normal internet usage.
3. Prioritize Essential Services: Consider prioritizing essential services such as web browsing and email so that they receive adequate bandwidth allocation. This helps ensure that important tasks are not compromised by bandwidth-intensive activities.
4. Implement Quality of Service (QoS): Use QoS settings to prioritize certain types of traffic or applications over others. Allocate bandwidth based on the type of traffic, giving higher priority to critical applications and lower priority to non-essential ones.
5. Set Time-Based Restrictions: If desired, configure time-based restrictions to limit the bandwidth available for guest users during specific periods. For example, you may reduce the bandwidth during peak hours to prevent network congestion.
6. Monitor Bandwidth Usage: Regularly monitor the bandwidth usage of the guest network to identify any unusual or excessive consumption. This can help you identify bandwidth abusers and take appropriate actions to mitigate the impact on other users.
7. Implement Bandwidth Throttling: Consider implementing bandwidth throttling for certain applications or protocols that tend to consume a significant amount of bandwidth. Set specific limits to control the maximum bandwidth they can use.
8. Educate Guests: Inform your guests about the bandwidth limitations and the importance of responsible internet usage. Encourage them to avoid activities that consume excessive bandwidth, such as streaming high-definition videos or large downloads.
9. Regularly Review and Adjust: Periodically review your bandwidth management settings and make necessary adjustments based on the usage patterns and requirements of your guest network. Flexibility in managing bandwidth allocation can help optimize the network experience for all users.
By limiting bandwidth for guest users, you can prevent network congestion and maintain a satisfactory internet experience for all guests. These measures ensure fair distribution of internet resources while allowing guests to enjoy reliable connectivity during their stay.
Customizing Guest Network Features
Customizing the features of your guest network allows you to tailor the user experience, enhance security, and provide added convenience for your guests. By following these steps, you can customize various aspects of your guest network to meet your specific requirements.
1. Network Name (SSID): Personalize the network name (SSID) of your guest network to make it easily recognizable for your visitors. Avoid using personal or sensitive information in the SSID and opt for a generic and friendly name.
2. Custom Landing Page: Some routers provide the option to create a custom landing page for users connecting to the guest network. Use this feature to display important information, terms of use, or even your branding to enhance the user experience.
3. Captive Portal: Implement a captive portal, a web page that guests must access before connecting to the guest network. You can require guests to agree to terms and conditions or provide login credentials before granting them access.
4. Setting Time and Usage Limits: If your router supports it, customize time and usage limits for guest users. This can help ensure fair usage and prevent bandwidth abuse.
5. Guest Network Password: Choose a unique and strong password for your guest network, separate from your main network password. Consider setting a password that is easy for guests to remember but still secure enough to prevent unauthorized access.
6. Network Speed Restrictions: Some routers allow you to modify the maximum speed available to guest users. Lowering the speed can ensure fair usage and prevent any single device from monopolizing the available bandwidth.
7. Guest Device Isolation: Enable guest device isolation to separate devices connected to the guest network. This prevents guests from accessing each other’s devices and adds an additional layer of security for individual users.
8. Custom Network Policies: If your router supports it, customize specific policies for the guest network. This may include restrictions on certain websites or applications to ensure that guests comply with any legal obligations or internal policies.
9. Guest User Authentication: For added security, require guests to enter a username or provide additional information when connecting to the guest network. This helps monitor and track guest network usage, if needed.
By customizing various features of your guest network, you can create a tailored and secure experience for your guests. These settings allow you to strike the right balance between convenience, usability, and security to meet the unique needs of your visitors.
Monitoring and Managing Guest Network Usage
Monitoring and managing guest network usage is essential to ensure optimal performance, maintain security, and enforce fair usage policies. By implementing effective monitoring and management techniques, you can proactively address any issues and ensure a smooth experience for both guests and your main network. Follow these steps to effectively monitor and manage guest network usage.
1. Network Activity Logs: Enable network activity logging on your router to keep track of guest network usage. This can help you identify any suspicious or unauthorized activities and troubleshoot any performance issues that may arise.
2. Bandwidth Monitoring: Use bandwidth monitoring tools, either built-in to the router or external software, to track the bandwidth usage of guest devices. This helps identify any devices that may be consuming excessive bandwidth and take appropriate actions.
3. Set Bandwidth Limits: If desired, set specific bandwidth limits for each guest or the entire guest network. This ensures fair distribution of available resources and prevents any single user from monopolizing the network’s bandwidth.
4. Monitor Connected Devices: Regularly check the list of connected devices on your router’s admin interface. This allows you to identify any unauthorized or unfamiliar devices connected to the guest network and take appropriate actions, such as blocking or disconnecting them.
5. Usage Alerts and Notifications: Configure alerts and notifications on your router to receive notifications when there is unusual network activity, exceeding bandwidth limits, or the presence of unrecognized devices. This helps you stay informed and take prompt actions if necessary.
6. Guest Network Time Limits: If desired, set time limits for guest network access. This can ensure that guests have access to the network only during specified hours, preventing excessive usage or unauthorized access outside of the designated time frame.
7. Regular Policy Review: Regularly review and update the policies and guidelines for guest network usage. This includes any usage restrictions, acceptable use policies, and rules governing network behavior. Communicate these policies to your guests to ensure compliance and a positive user experience.
8. Educate Guests: Educate your guests about responsible internet usage and the importance of adhering to the policies and guidelines set for the guest network. Provide clear instructions on what is acceptable and unacceptable, ensuring that they understand their responsibility for maintaining network integrity.
9. Provide Support and Assistance: Offer assistance to guests who may be experiencing connectivity issues or require help with configuring their devices. Establish clear channels of communication where they can seek support, such as a dedicated email address or support phone number.
By effectively monitoring and managing guest network usage, you can ensure optimal performance, maintain network security, and provide a positive experience for your guests. Regularly review and update your monitoring practices to stay on top of emerging threats and changes in network usage patterns.
Troubleshooting Guest Network Issues
Encountering issues with your guest network can be frustrating for both you and your visitors. However, with some troubleshooting techniques, you can quickly identify and resolve common problems to ensure a smooth and uninterrupted experience. Follow these steps to troubleshoot guest network issues effectively.
1. Check Network Connectivity: Verify that your main network is functioning correctly. If there is an issue with your main network, it may impact the performance of the guest network. Ensure that your internet service is active and that there are no disruptions in connectivity.
2. Restart Router: Power cycle your router by unplugging it from the power source, waiting for a few seconds, and then plugging it back in. Restarting the router can often resolve minor connectivity issues and refresh the network settings.
3. Verify Router Configuration: Review the router settings related to the guest network. Double-check the network name (SSID), password, and any other customization options you have set. Ensure that the configuration aligns with the settings you intended.
4. Troubleshoot Device Connectivity: If specific devices are experiencing connection issues, troubleshoot those devices individually. Restart the device, ensure it is within range of the router, and validate that the correct password is entered for the guest network.
5. Check Network Range: Verify that the range of your router is sufficient to cover the area where guests need internet access. If necessary, consider using Wi-Fi extenders or mesh systems to expand coverage and enhance signal strength throughout your property.
6. Reset Router: As a last resort, you can perform a factory reset on your router. Keep in mind that this will reset all settings and configurations to their default values, so make sure to have a backup of important configurations before proceeding.
7. Update Router Firmware: Check for any available firmware updates for your router. Outdated firmware can sometimes cause compatibility issues and affect network performance. Update the firmware if needed, following the manufacturer’s instructions.
8. Consult Manufacturer Support: If you have tried the above steps and are still experiencing issues, reach out to the manufacturer’s support resources for further assistance. They can provide specific guidance based on your router model and help troubleshoot any complex issues.
9. Maintain Communication: Keep your guests informed about the progress of resolving the issue. Provide updates on the status and expected resolution time, ensuring they are aware that you are addressing the problem.
Troubleshooting guest network issues requires patience and a systematic approach. By following these steps, you can swiftly identify and resolve common problems, ensuring a seamless and reliable guest network experience.