
Overview
Email filters are an essential tool in managing your inbox and ensuring that important messages don’t get lost in the shuffle. Yahoo! Mail provides a convenient and customizable filter system that allows you to automatically organize and prioritize incoming emails based on specific criteria. Whether you want to categorize messages, forward them to another address, or mark them as spam, setting up filters in Yahoo! Mail can help streamline your email management process.
In this tutorial, we will guide you through the step-by-step process of setting up filters in Yahoo! Mail. We will cover how to access the settings, navigate to the filters section, create a new filter, set the filter criteria, configure the filter actions, save the filter, and manage, edit, enable, disable, test, and adjust filters as needed.
By following these instructions, you will have the necessary skills to efficiently manage your Yahoo! Mail account and stay organized, saving you time and reducing the headache of sorting through a cluttered inbox.
So, let’s get started with the process of setting up filters in Yahoo! Mail!
Step 1: Accessing Settings in Yahoo! Mail
To begin setting up filters in Yahoo! Mail, you’ll first need to access the settings menu. Here’s how:
- Open your Yahoo! Mail account by signing in with your username and password.
- Once you’re logged in, locate the gear icon in the upper-right corner of your inbox. This is the settings icon.
- Click on the gear icon to open the settings menu.
A dropdown menu will appear with various options. This is where you’ll find the settings you need to configure your email filters.
It’s worth mentioning that Yahoo! Mail has different versions, such as Basic Mail and Full-Featured Mail. The steps may vary slightly depending on the version you are using. However, the general process of accessing settings remains the same.
Now that you’ve accessed the settings menu, you’re ready to move on to the next step of setting up filters in Yahoo! Mail.
Step 2: Navigating to the Filters Section
Once you have accessed the settings menu in Yahoo! Mail, the next step is to navigate to the filters section. Here’s how:
- From the dropdown menu after clicking the gear icon, locate and click on the “More Settings” option. This will open the additional settings options in a new window.
- In the new window, you will see a menu on the left side. Scroll down and find the “Filters” option. Click on it to access the filters section.
Upon clicking the “Filters” option, Yahoo! Mail will display a list of any existing filters that you have already set up. This section is where you can manage and edit your filters, as well as create new ones.
If you haven’t set up any filters before, the list will be empty. That’s okay! In the upcoming steps, we will guide you through the process of creating your first filter.
Now that you have successfully navigated to the filters section, it’s time to move on to the next step: creating a new filter.
Step 3: Creating a New Filter
Once you have accessed the filters section in Yahoo! Mail, you’re ready to create a new filter to help organize your incoming emails. Here’s how you can do it:
- Click on the “Add” or “Create a new filter” button. This will open the filter creation form.
- In the filter creation form, you will need to provide a name for the new filter. Choose a descriptive name that will help you identify its purpose.
- Next, you have the option to specify the filter criteria. This is where you define the conditions that incoming emails must meet for the filter to be applied. You can set criteria such as sender, recipient, subject, specific words or phrases in the email, and much more.
- As you customize the filter criteria, Yahoo! Mail will provide a preview of the emails that match the conditions you’ve defined. This allows you to ensure that the filter will work as intended.
- Once you are satisfied with the filter criteria, you can proceed to configure the filter actions. Here, you can choose what actions should be taken on the emails that match the filter criteria. You can move them to a specific folder, mark them as read, forward them to another email address, or even delete them, among other options.
- After setting up the filter actions, review your settings to make sure everything appears as you intended.
With the filter creation form completed, you are now ready to save your new filter and put it into action. In the following steps, we will cover how to save the filter and manage it.
Congratulations! You have now successfully created a new filter in Yahoo! Mail. Feel free to repeat this process to create additional filters to further automate your email organization.
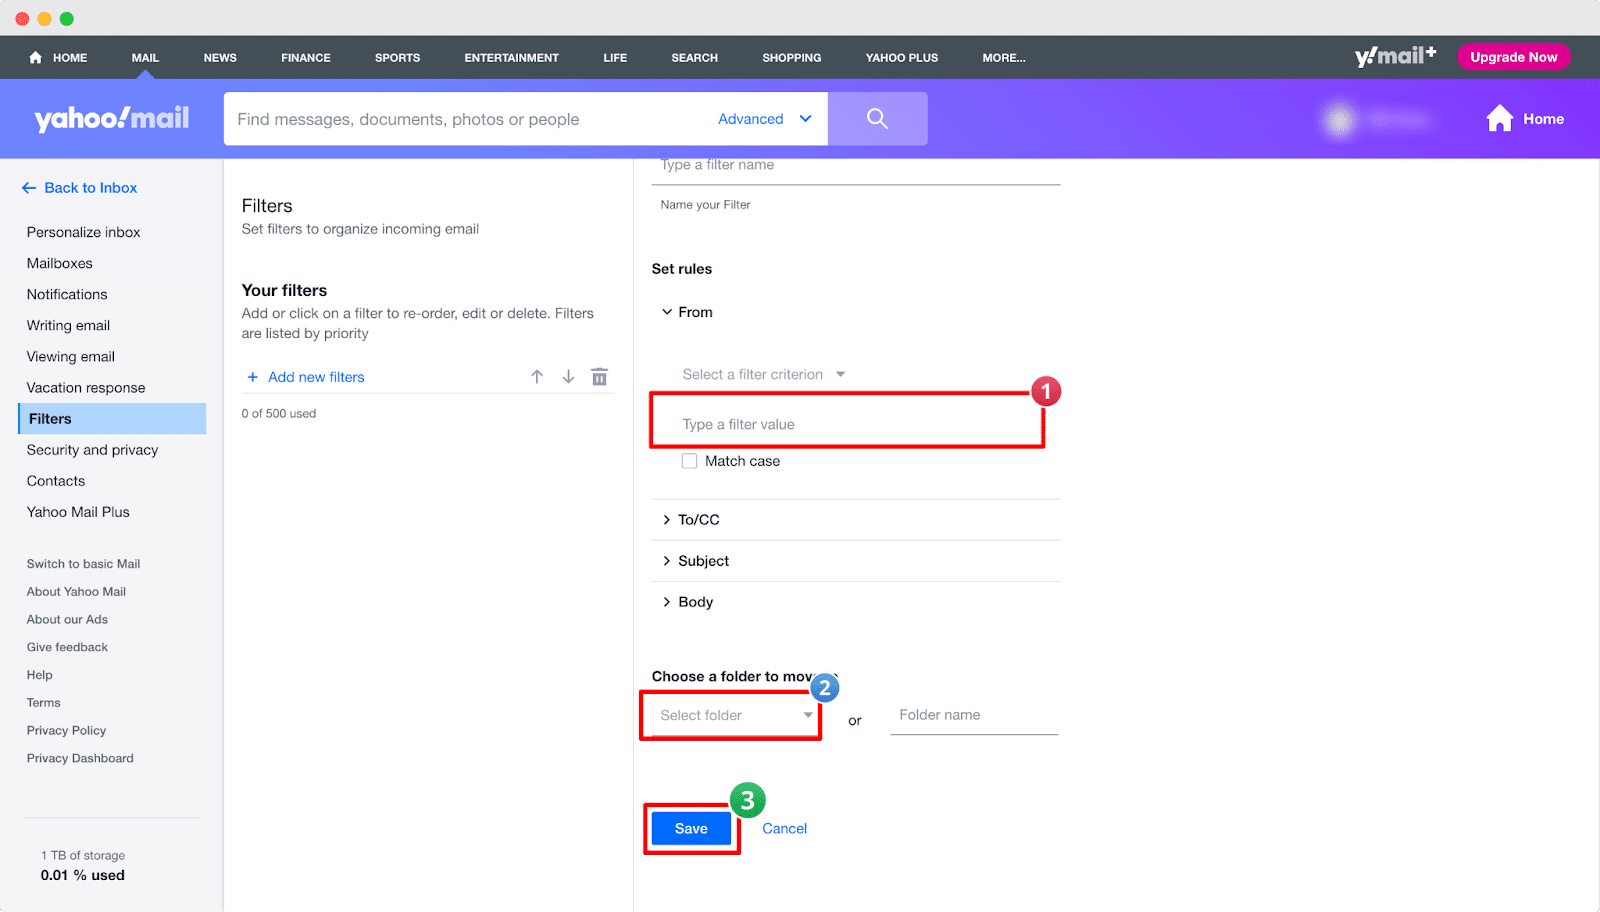
Step 4: Setting the Filter Criteria
Setting up the filter criteria is a crucial step in creating an effective filter in Yahoo! Mail. The filter criteria determine the conditions that incoming emails must meet for the filter to be applied. Here’s how you can set the filter criteria:
- In the filter creation form, you will find a section dedicated to specifying the filter criteria.
- Start by selecting the criteria you want to use from the available options. These options include sender, recipient, subject, specific words or phrases in the email, and more.
- Depending on the criteria you choose, you will be prompted to provide additional information. For example, if you select the sender criteria, you will need to enter the email address of the sender you want to filter.
- You can add multiple criteria to further refine the filter. This way, you can create more specific rules and ensure that only the emails that meet all the specified criteria are filtered.
- As you set the filter criteria, Yahoo! Mail will provide a preview of the emails that match your conditions. This allows you to verify that the criteria are correctly defined and will capture the desired emails.
Remember to be specific when setting the filter criteria to avoid unintended filtering of important emails. And if you find that the preview doesn’t match your expectations, you can always go back and adjust the criteria until you achieve the desired results.
Once you have defined the filter criteria, you can move on to the next step: configuring the filter actions. We will cover this in the next section.
Step 5: Configuring the Filter Actions
Configuring the filter actions in Yahoo! Mail is an important step to determine what happens to the emails that match the filter criteria. Here’s how you can configure the filter actions:
- In the filter creation form, you will find a section dedicated to setting the filter actions.
- Choose the desired action from the available options. Yahoo! Mail offers various actions, such as moving the emails to a specific folder, marking them as read, forwarding them to another email address, or even deleting them.
- If you choose to move the emails to a folder, you can either select an existing folder or create a new one specifically for the filtered emails. This helps keep your inbox organized and allows you to easily locate the filtered emails in the future.
- For forwarding actions, enter the email address to which you want the filtered emails to be forwarded. This can be useful if you want to redirect specific types of emails to another account or to a different team member.
- Make sure to review your selected actions and ensure they align with the purpose of the filter.
Remember, you can configure multiple actions for a single filter. This allows you to perform multiple actions on the emails that match the filter criteria, providing greater flexibility and customization.
Once you’ve configured the filter actions, you’re almost ready to finalize your filter. In the next step, we’ll cover how to save the filter and put it into action.
Step 6: Saving the Filter
Now that you have defined the filter criteria and configured the desired actions in Yahoo! Mail, it’s time to save the filter and put it into action. Here’s how you can save your filter:
- Once you have set the filter criteria and configured the actions, review the settings to ensure they align with your intentions.
- Make any necessary adjustments if needed. You can go back and modify the filter criteria or actions before saving it.
- When you are satisfied with the filter settings, click on the “Save” or “Done” button. This will save your filter and activate it immediately.
Upon saving the filter, Yahoo! Mail will start applying it to incoming emails that match the defined criteria. Any new emails that meet the filter’s conditions will be processed based on the configured actions.
It’s important to note that the order in which filters are listed can affect their functionality. Yahoo! Mail processes filters from top to bottom, so make sure to arrange your filters in the desired order to achieve the desired results. You can easily reorder filters by using the drag-and-drop functionality in the filters section.
Congratulations! You have successfully saved your filter in Yahoo! Mail. The filter will now automatically sort and manage your incoming emails based on the specified criteria and actions. Feel free to create additional filters to further organize your inbox according to your preferences.
Step 7: Managing and Editing Filters
Managing and editing filters in Yahoo! Mail allows you to fine-tune your email organization and make adjustments as needed. Here’s how you can manage and edit your filters:
- To manage your filters, go back to the filters section in Yahoo! Mail. You can access this section by clicking on the gear icon, selecting “More Settings,” and then choosing “Filters.”
- Here, you will see a list of all your existing filters. Each filter will be displayed with its name, the filter criteria, and the actions associated with it.
- To edit a filter, simply click on the filter you want to modify. This will open the filter editing form, where you can make changes to the criteria and actions.
- Update the filter criteria or actions as needed. You can add new criteria, remove existing ones, modify the actions, or rearrange the order of the filters.
- After making the necessary adjustments, click on the “Save” or “Done” button to save the changes to the filter.
Additionally, you have the option to disable or enable filters without deleting them. Disabling a filter temporarily suspends its functionality, while enabling it restores its functionality. This can be useful when you want to adjust the filtering behavior without permanently deleting the filter.
Remember to regularly review and manage your filters to ensure they are still serving their intended purpose. From time to time, you may need to update or delete filters that are no longer relevant or effective.
By actively managing and editing your filters in Yahoo! Mail, you can maintain a well-organized inbox and ensure that your email management system is tailored to your specific needs.
Step 8: Deleting Filters
In Yahoo! Mail, you have the flexibility to delete filters that are no longer necessary or relevant to your email management system. Deleting filters helps declutter your filters list and maintain a streamlined workflow. Here’s how to delete filters in Yahoo! Mail:
- Access the filters section by clicking on the gear icon, selecting “More Settings,” and then choosing “Filters.”
- In the filters list, locate the filter you want to delete.
- Click on the filter to open the editing form for that specific filter.
- At the bottom of the editing form, you will find the option to delete the filter. It is typically labeled as “Delete,” “Remove,” or represented by a trash bin icon.
- Confirm the deletion when prompted. Note that deleting a filter cannot be undone, so make sure to double-check before proceeding.
By deleting filters that are no longer useful, you can keep your filters section organized and maintain a clear overview of the active filters.
However, exercise caution when deleting filters, especially if they have been in use for a while. Make sure to consider the potential impact on email organization and workflow before removing any filters.
Now that you know how to delete filters, feel free to remove any filters that have become obsolete or are no longer serving their intended purpose.
Step 9: Disabling or Enabling Filters
In Yahoo! Mail, you have the flexibility to disable or enable filters based on your current email management needs. Disabling a filter temporarily suspends its functionality, while enabling it restores its functionality. Here’s how to disable or enable filters in Yahoo! Mail:
- Go to the filters section in Yahoo! Mail by clicking on the gear icon, selecting “More Settings,” and then choosing “Filters.”
- In the filters list, locate the filter you want to disable or enable.
- If the filter is currently enabled, you will see a toggle switch or checkbox indicating the enabled status of the filter.
- To disable the filter, simply toggle the switch or uncheck the checkbox. The filter will now be inactive and will not process any incoming emails.
- To enable a disabled filter, toggle the switch back or check the checkbox. The filter will become active again and will apply its defined criteria and actions to incoming emails.
Disabling or enabling filters can be useful when you want to temporarily adjust the filtering behavior without permanently deleting the filter. This allows you to fine-tune your email organization and adapt to changing needs or circumstances.
Remember to periodically review your filters and determine if any need to be disabled or re-enabled based on your evolving email management requirements.
Now that you know how to disable or enable filters in Yahoo! Mail, you can efficiently control the filtering behavior and optimize your email workflow.
Step 10: Testing and Adjusting Filters
After setting up filters in Yahoo! Mail, it is important to test and adjust them to ensure they are working as intended. Testing and adjusting filters helps fine-tune the filtering behavior and optimize your email management system. Here’s how you can test and adjust filters in Yahoo! Mail:
- Send test emails to your Yahoo! Mail account that match the criteria set for your filters.
- Observe how the filters process the incoming test emails and verify that they are being sorted and managed according to your desired criteria and actions.
- If the filters are not behaving as expected, go back to the filters section and review the filter criteria and actions.
- Make any necessary adjustments to the criteria or actions to refine the filter’s behavior. You can add or modify criteria, change folder destinations, adjust forwarding addresses, or other filter settings.
- After making adjustments, send additional test emails to see if the filters are now functioning as desired. Continue testing and adjusting until the filters are working optimally.
When adjusting filters, keep in mind that small changes can have a significant impact on the filtering behavior. It may take a few iterations of testing and adjustment to achieve the desired results.
Regularly testing and adjusting filters is important to ensure that your email management system remains efficient and effective. As your needs and preferences evolve, it may be necessary to modify or create new filters to accommodate those changes.
By actively testing and adjusting your filters in Yahoo! Mail, you can maintain a well-organized inbox and streamline your email management process.