
What is an Internet Security Zone?
With the increasing reliance on the internet for various activities, it has become crucial to ensure the safety and security of our online experiences. One effective way to protect ourselves from potential threats is by setting up internet security zones.
An internet security zone is a defined area or boundary in your web browser that determines the level of security and permissions for websites and web applications. These zones help to classify websites into different categories based on their trustworthiness and potential risks.
There are typically four different types of security zones:
- Internet Zone: This zone includes all websites that are not assigned to any other specific security zone. By default, it has the lowest security settings.
- Intranet Zone: This zone includes websites hosted within your organization’s network. It usually has higher security settings to prevent unauthorized access.
- Trusted Sites Zone: This zone includes websites that you explicitly trust and want to provide higher security settings. These can be sites that require active content or special permissions.
- Restricted Sites Zone: This zone includes websites that you consider potentially dangerous or untrustworthy. It applies the highest level of security settings to protect your system from potential threats.
By setting up internet security zones, you can have greater control over your online activities and protect your computer and personal information from malicious websites, malware, and other cyber threats. Each security zone has its own default settings, but you have the flexibility to customize them to meet your specific needs.
Internet security zones play a crucial role in enhancing your overall online safety. They act as a barrier between your computer and potentially harmful websites, allowing you to browse the internet with peace of mind.
Now that we understand what internet security zones are, let’s explore the importance of setting them up and how to do so in different web browsers.
Different Types of Internet Security Zones
When it comes to setting up internet security zones, it is essential to understand the different types available and their specific characteristics. Let’s take a closer look at the four main types of internet security zones:
- Internet Zone: The Internet Zone is the default zone for websites that are not assigned to any other specific security zone. It is designed for public and untrusted websites. By default, the Internet Zone has the lowest security settings, allowing for easy browsing but potentially exposing your system to risks.
- Intranet Zone: The Intranet Zone is for websites hosted within your organization’s network. It is a trusted zone with higher security settings. Intranet sites often require authentication and access permissions, ensuring a safer browsing experience within your organization’s boundaries.
- Trusted Sites Zone: The Trusted Sites Zone includes websites that you explicitly trust and want to provide higher security settings. These can be sites that require active content or special permissions to function correctly. By adding websites to this zone, you can control which sites have access to your system and ensure a secure browsing experience.
- Restricted Sites Zone: The Restricted Sites Zone is for websites that you consider potentially dangerous or untrustworthy. It applies the highest level of security settings to protect your system from potential threats. Adding sites to this zone ensures that they are heavily restricted, preventing them from executing scripts or accessing certain functionalities on your computer.
Each type of internet security zone serves a specific purpose and allows you to customize the security settings based on your browsing needs and preferences. It is recommended to review and adjust these zone settings to strike a balance between security and functionality.
By understanding the different types of internet security zones, you can make informed decisions when configuring your browser’s security settings. Now that we know the types of zones available, let’s delve into the importance of setting up internet security zones.
Importance of Setting Up Internet Security Zones
Setting up internet security zones is crucial for safeguarding your online activities and protecting your computer from potential threats. Here are some key reasons why it is important to configure internet security zones:
1. Protection against Malicious Websites: Internet security zones provide a defense mechanism against websites that may contain malware, phishing scams, or other harmful content. By categorizing websites into different zones, you can control the level of access and permissions granted to each site, minimizing the risk of falling victim to online attacks.
2. Preventing Unauthorized Access: With internet security zones, you can establish boundaries for your system and define which websites are deemed trustworthy. This helps prevent unauthorized access to your computer, as websites outside of your trusted zones will have limited privileges and will not be able to interact with your system without your explicit permission.
3. Customized Security Levels: Internet security zones allow you to customize the security settings for different types of websites. You can set stricter security measures for potentially risky websites, while allowing more freedom for trustworthy sites that you frequently visit. This flexibility ensures that you maintain a balance between security and usability.
4. Protection for Personal Information: By setting up appropriate internet security zones, you can minimize the risk of your personal information being compromised. This is particularly important when dealing with online transactions, sensitive data, or confidential information. Configuring the correct security settings ensures that your personal information remains encrypted and protected from prying eyes.
5. Enhanced Overall Online Safety: Internet security zones serve as a critical layer of protection for your overall online safety. By segmenting websites into different zones and applying appropriate security measures, you significantly reduce the chances of encountering harmful content, malicious scripts, or unauthorized activities on the internet.
By taking the time to properly set up and configure your internet security zones, you can enjoy a safer and more secure browsing experience. Now let’s explore the step-by-step process of setting up internet security zones in popular web browsers.
Steps to Set Up Internet Security Zones in Different Browsers
Configuring internet security zones in your web browser is a straightforward process. Here are the general steps to set up internet security zones in popular browsers:
1. Google Chrome:
- Open Google Chrome on your computer.
- Click on the three-dot menu icon located in the top-right corner of the browser window.
- From the drop-down menu, select “Settings”.
- Scroll down and click on “Advanced” to expand the advanced settings options.
- Under the “Privacy and security” section, click on “Site Settings”.
- Scroll down and click on “Additional content settings” to access the advanced site settings.
- From here, you can manage various security settings such as pop-ups, cookies, and permissions for websites. Adjust the settings according to your preferences and trust levels.
- Click on “Back” to return to the site settings, and then repeat the process for each desired security zone.
2. Mozilla Firefox:
- Launch Mozilla Firefox on your computer.
- Click on the three-line menu icon located in the top-right corner of the browser window.
- From the drop-down menu, select “Options”.
- In the left-hand sidebar, click on “Privacy & Security”.
- Scroll down to the “Permissions” section and click on “Settings” next to “Notifications”, “Location”, or “Camera” to configure site-specific permissions.
- Under the “Cookies and Site Data” section, click on “Manage Permissions” to customize settings for specific websites.
- Adjust the settings as per your desired security level for each security zone.
- Click on “Save Changes” to apply the settings.
3. Internet Explorer:
- Open Internet Explorer on your computer.
- Click on the gear icon located in the top-right corner of the browser window.
- From the drop-down menu, select “Internet Options”.
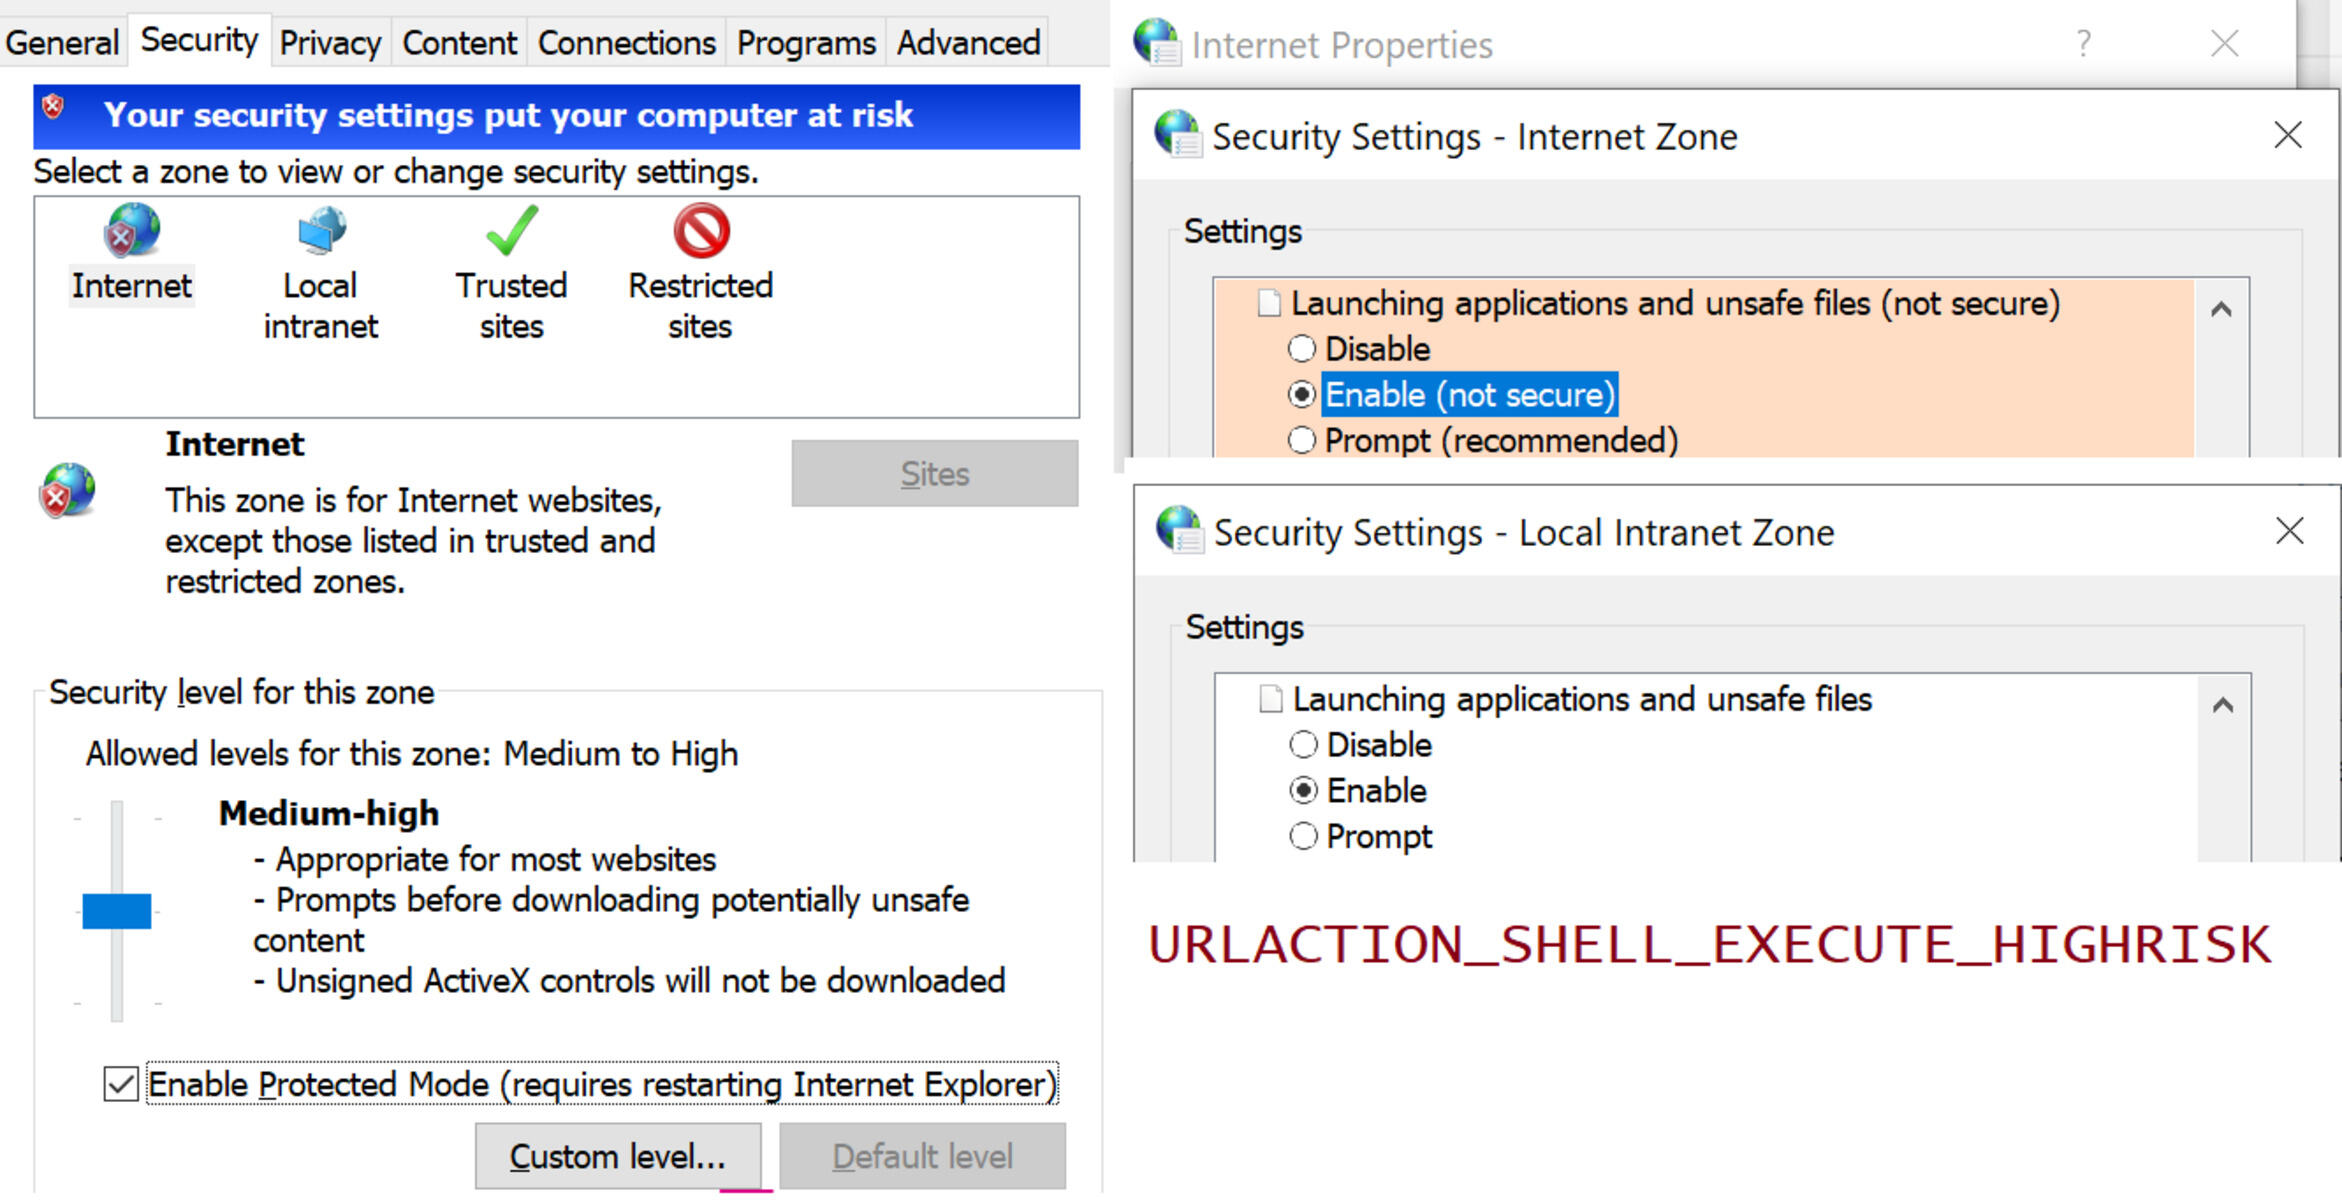
- In the Internet Options window, go to the “Security” tab.
- Here, you will find different security zones categorized by the URL.
- Click on the desired zone, and then click on the “Custom Level” button. This will allow you to configure specific security settings for each zone.
- Adjust the settings based on your preferences and trust levels.
- Click on “OK” to save the changes.
Please note that these are general steps to set up internet security zones in the respective browsers. The actual steps and options may vary slightly depending on the browser version and settings on your computer.
Now that you know how to set up internet security zones in different browsers, let’s dive into the specific steps for Google Chrome, Mozilla Firefox, and Internet Explorer in the upcoming sections.
How to Set Up Internet Security Zones in Google Chrome
Google Chrome provides a user-friendly interface to configure internet security zones. Follow these steps to set up internet security zones in Google Chrome:
- Open Google Chrome on your computer.
- Click on the three-dot menu icon located in the top-right corner of the browser window.
- From the drop-down menu, select “Settings”.
- Scroll down and click on “Advanced” to expand the advanced settings options.
- Under the “Privacy and security” section, click on “Site Settings”.
- Scroll down and click on “Additional content settings” to access the advanced site settings.
- Here, you will find options to manage various security settings such as pop-ups, cookies, JavaScript, and more.
- Click on the desired option to customize the settings for each specific security zone.
- For example, to modify pop-up settings, click on “Pop-ups and redirects” and toggle the switch to allow or block pop-ups for each zone.
- Similarly, click on “Cookies” to manage cookie settings for different zones.
- Adjust the settings as per your desired security level for each security zone.
- Click on “Back” to return to the site settings, and then repeat the process for each desired security zone.
By following these steps, you can effectively customize the security settings for specific websites and establish internet security zones in Google Chrome to enhance your browsing experience.
Remember to regularly review and update these settings as needed to ensure your internet security zones are up to date. Now, let’s explore how to set up internet security zones in Mozilla Firefox.
How to Set Up Internet Security Zones in Mozilla Firefox
Mozilla Firefox offers a comprehensive set of options for configuring internet security zones. Here’s how you can set up internet security zones in Mozilla Firefox:
- Launch Mozilla Firefox on your computer.
- Click on the three-line menu icon located in the top-right corner of the browser window.
- From the drop-down menu, select “Options”.
- In the left-hand sidebar, click on “Privacy & Security”.
- Scroll down to the “Permissions” section and click on “Settings” next to “Notifications”, “Location”, or “Camera” to configure site-specific permissions.
- Under the “Cookies and Site Data” section, click on “Manage Permissions” to customize settings for specific websites.
- In the “Cookies and Site Data” section, click on “Manage Exceptions” to add websites to the trusted or blocked lists.
- Adjust the settings as per your desired security level for each security zone.
- For example, you can allow or block specific websites from accessing your location or displaying notifications by modifying the settings under “Permissions”.
- If needed, click on “Exceptions” to add websites to the trusted or blocked lists for cookies and site data.
- Repeat the process for each desired security zone.
- Click on “Save Changes” to apply the settings.
By following these steps, you can customize the security settings for specific websites and establish internet security zones in Mozilla Firefox to enhance your browsing experience.
Remember, periodically reviewing and updating these settings is important to ensure your internet security zones are properly maintained. Now, let’s take a look at how to set up internet security zones in Internet Explorer.
How to Set Up Internet Security Zones in Internet Explorer
Internet Explorer provides options to configure internet security zones, allowing you to define the level of security for different websites. Here’s how you can set up internet security zones in Internet Explorer:
- Open Internet Explorer on your computer.
- Click on the gear icon located in the top-right corner of the browser window.
- From the drop-down menu, select “Internet Options”.
- In the Internet Options window, go to the “Security” tab.
- Here, you will find different security zones categorized by the URL.
- Click on the desired zone, and then click on the “Custom Level” button. This will allow you to configure specific security settings for each zone.
- In the Security Settings dialog box, you can adjust various settings such as ActiveX controls, scripting, downloads, and more.
- Customize the security settings based on your preferences and trust levels for each security zone.
- Click on “OK” to save the changes.
- Repeat the process for each desired security zone.
By following these steps, you can effectively set up internet security zones in Internet Explorer, ensuring that different websites are categorized and provided with appropriate security levels.
Remember to review and update these settings regularly to ensure your internet security zones remain effective against potential threats. Now that we have covered how to set up internet security zones in different browsers, let’s move on to some tips for choosing the right security level for your internet security zones.
Tips for Choosing the Right Security Level for Internet Security Zones
Choosing the appropriate security level for your internet security zones is essential to strike a balance between protection and functionality. Here are some tips to help you choose the right security level:
1. Assess Website Trustworthiness: Consider the reputation and trustworthiness of a website before assigning it to a specific security zone. Websites that you know and trust, such as online banking portals or trusted e-commerce platforms, can be assigned to the Trusted Sites Zone. On the other hand, websites with suspicious or unknown origins should be placed in the Restricted Sites Zone.
2. Analyze Website Functionality: Evaluate the functionality requirements of websites you frequently visit. Some websites may require more extensive access and permissions to function correctly. In such cases, you can assign them to the Trusted Sites Zone rather than the more restrictive Internet Zone.
3. Stay Up-to-Date with Security Software: Ensure that your antivirus software, anti-malware programs, and web browser are up-to-date. These tools often come with automated security settings that can help you choose appropriate security settings for your internet security zones.
4. Consider the Sensitivity of Data: If you regularly access or handle sensitive data, such as personal information or confidential documents, it is recommended to assign such websites to the Restricted Sites Zone. This provides an additional layer of protection against potential data breaches or unauthorized access.
5. Regularly Review and Update Settings: Technology and online threats are constantly evolving, so it’s important to review and update your internet security zone settings regularly. As websites and their security profiles change over time, you may need to adjust the security level of your security zones accordingly.
6. Seek Expert Advice: If you’re uncertain about the appropriate security level for a particular website or if you need guidance in configuring your internet security zones, consult with IT professionals or security experts who can provide valuable insights and recommendations.
By following these tips, you can make informed decisions when choosing the right security level for your internet security zones. It’s crucial to find the right balance between security and usability to ensure a safe and seamless browsing experience.
Now that we have covered tips for choosing the right security level, let’s address some common issues and troubleshooting techniques related to internet security zones.
Common Issues and Troubleshooting with Internet Security Zones
While setting up internet security zones can enhance your online security, you may come across certain issues or obstacles. Here are some common issues and troubleshooting techniques:
1. Website Compatibility: Certain websites may not function properly or display correctly due to restrictive security settings. If you encounter compatibility issues, try adding the website to the Trusted Sites Zone or adjusting the security level for that specific zone.
2. Permission Errors: In some cases, websites may require specific permissions to access certain features or functionality. If you receive permission errors when interacting with a website, review the security settings for that particular website’s security zone and ensure the necessary permissions are enabled.
3. Certificate Errors: When browsing websites with SSL/TLS certificates, you may encounter certificate errors if the website is not considered secure or if the certificate has expired. In such cases, exercise caution and consider assigning the website to the Restricted Sites Zone for added security.
4. Blocked Downloads or Pop-ups: Internet security zones may block downloads or display pop-up warnings for potentially malicious content. If you trust the website and need to download or allow pop-ups, navigate to the relevant security zone settings and modify the options accordingly.
5. Conflicting Security Software: Sometimes, conflicts between your browser’s security settings and third-party security software can cause issues. Ensure that your browser and security software are compatible and have updated versions installed to minimize conflicts.
6. Whitelisting and Blacklisting: While using the Restricted Sites Zone can offer added protection, it is essential to regularly review your blacklist and whitelist to ensure that legitimate websites are not inadvertently blocked or allowed. Adjust the settings as needed to maintain an accurate and updated list.
7. Clearing Cache and Cookies: If you experience persistent issues with certain websites, try clearing your browser’s cache and cookies. This can resolve conflicts or outdated data that may be causing the problem.
8. Seeking Professional Assistance: If you encounter persistent issues or are unsure how to resolve specific problems related to internet security zones, it is recommended to seek professional assistance from IT support or security experts who can provide expert guidance specific to your situation.
By leveraging these troubleshooting techniques, you can overcome common issues and ensure that your internet security zones function smoothly, providing you with reliable protection against online threats.
Now that we have addressed common issues and troubleshooting techniques, let’s conclude this guide on setting up internet security zones with some final thoughts.
Final Thoughts on Setting Up Internet Security Zones
Setting up internet security zones is a crucial step in safeguarding your online activities and protecting your computer from potential threats. By categorizing websites into different security zones, you can customize the security settings for each zone based on their trustworthiness and functionality.
Throughout this guide, we have explored the concept of internet security zones, the different types of zones, and the importance of setting them up. We have also provided step-by-step instructions for configuring internet security zones in popular web browsers, such as Google Chrome, Mozilla Firefox, and Internet Explorer.
In addition, we discussed tips for choosing the right security level for your internet security zones and offered troubleshooting techniques for common issues you may encounter along the way. It’s important to regularly review and update your security settings to ensure they align with the evolving threat landscape and your specific browsing needs.
Remember, internet security zones serve as a vital layer of protection against malicious websites, unauthorized access, and potential data breaches. By carefully configuring your security settings and assigning websites to appropriate zones, you can enjoy a safer and more secure browsing experience.
Lastly, stay vigilant while browsing the internet and be cautious of unfamiliar or suspicious websites. Regularly update your web browser and security software to benefit from the latest security enhancements. If you encounter persistent issues or require further assistance, don’t hesitate to consult with IT professionals or security experts.
With the knowledge and implementation of internet security zones, you are taking a proactive step towards safeguarding your digital presence. Enjoy a safer and more enjoyable online experience as you navigate the internet.