
Why Resetting IE Security Settings is Necessary
Internet Explorer (IE) is one of the most widely used web browsers, but over time, its security settings may get modified or compromised, leaving your computer and personal information vulnerable to cyber threats. Resetting the IE security settings to default levels is an essential step in maintaining a secure browsing experience. Here are a few reasons why resetting IE security settings is necessary:
- Security Breaches: Websites and malicious programs can alter the security settings in your browser, potentially exposing your system to various security risks. By resetting the security settings, you restore the browser to a safer default state.
- Unintentional Modifications: Sometimes, while attempting to customize or optimize IE, you may accidentally modify critical security settings. Resetting the security settings to default ensures that any unintended changes are undone.
- Protection Against Malware: Malware often targets vulnerabilities in web browsers, including Internet Explorer. Resetting the security settings can help mitigate the risk of malware infections by ensuring that the browser is using the latest security protocols.
- Enhanced Privacy: IE security settings play a crucial role in protecting your privacy while browsing the internet. Resetting the settings ensures that unwanted tracking and data collection are minimized, providing you with a safer online experience.
- Compatibility Issues: At times, incompatible or conflicting security settings can cause issues with certain websites or applications. By resetting the security settings to the default level, you can resolve compatibility problems and ensure smooth browsing.
It is important to note that while resetting the security settings to default offers an added layer of protection, it does not guarantee complete immunity against all cyber threats. It is still advisable to implement other security measures, such as keeping your operating system and antivirus software up to date.
In the next sections, we will guide you through the step-by-step process to reset the security settings in Internet Explorer, ensuring a more secure browsing experience.
Step 1: Open Internet Explorer
To begin the process of resetting the security settings in Internet Explorer, you need to first open the browser. Here’s how:
- Click on the Start menu or press the Windows key on your keyboard.
- Type “Internet Explorer” in the search bar.
- Click on the Internet Explorer app from the search results to open the browser.
Alternatively, you can also navigate to the desktop and double-click on the Internet Explorer icon if it is available there.
Once you have successfully opened Internet Explorer, you are ready to proceed to the next step.
It’s worth mentioning that Internet Explorer might not come pre-installed on some newer versions of Windows, as Microsoft Edge has replaced it as the default browser. In such cases, you can still install Internet Explorer if you need to use it specifically for certain websites or applications.
Now that you have Internet Explorer open, let’s move on to the next step of resetting the security settings.
Step 2: Access Internet Options
After opening Internet Explorer, the next step to reset the security settings is to access the Internet Options menu. Follow these instructions to access the Internet Options:
- Click on the gear icon located in the top-right corner of the browser window. This is the Tools menu button.
- A drop-down menu will appear. From the menu, select “Internet options”.
Alternatively, you can access the Internet Options by pressing the Alt key on your keyboard to display the menu bar, and then selecting “Tools” followed by “Internet options”.
By selecting the “Internet options” menu, you will open a new window that provides a variety of settings and options for customizing your Internet Explorer experience.
Please note that the appearance and organization of the Tools menu may vary slightly depending on the version of Internet Explorer you are using. However, regardless of the version, you should be able to find the Internet Options menu within the Tools menu.
Now that you have accessed the Internet Options menu, you can proceed to the next step to reset the security settings in Internet Explorer.
Step 3: Navigate to the Security Tab
Once you have opened the Internet Options window, the next step is to navigate to the Security tab. The Security tab allows you to view and adjust the security settings for different zones in Internet Explorer. Here’s how you can find the Security tab:
- In the Internet Options window, you will see several tabs at the top. Click on the tab labeled “Security”.
After clicking on the Security tab, you will notice that the Internet Options window will display various security settings categorized into different zones.
The zones typically included in Internet Explorer are:
- Internet Zone: This zone includes websites that are accessed directly from the Internet.
- Local Intranet Zone: This zone includes websites on your local network.
- Trusted Sites Zone: This zone includes websites that you consider to be trustworthy and safe for browsing.
- Restricted Sites Zone: This zone includes websites that you want to restrict or block.
Each zone has its own set of security settings that you can modify accordingly. To reset the security settings for a specific zone, you need to select the corresponding zone in the Security tab.
Now that you have successfully navigated to the Security tab, you are ready to proceed to the next step of resetting the security settings in Internet Explorer.
Step 4: Select the Appropriate Zone
After accessing the Security tab in the Internet Options window, the next step is to select the appropriate zone for which you want to reset the security settings. Each zone represents a different level of trust and has its own set of security settings. Here’s how you can select the zone:
- In the Security tab, you will see a list of zones such as Internet, Local Intranet, Trusted Sites, and Restricted Sites. Click on the zone for which you want to reset the security settings.
For example, if you want to reset the security settings for websites accessed directly from the Internet, you would select the “Internet” zone. If you want to reset the security settings for websites on your local network, you would select the “Local Intranet” zone.
It is important to note that resetting the security settings will affect all websites within the selected zone. Therefore, it is crucial to select the appropriate zone based on your specific requirements.
The selected zone will be highlighted, indicating that you are about to modify the security settings for that particular zone. You can now proceed to the next step to reset the security settings for the chosen zone.
Step 5: Reset Security Settings
Once you have selected the appropriate zone for which you want to reset the security settings in Internet Explorer, the next step is to actually reset the security settings. Resetting the security settings will restore them to their default levels, ensuring a safer browsing experience. Follow these steps to reset the security settings:
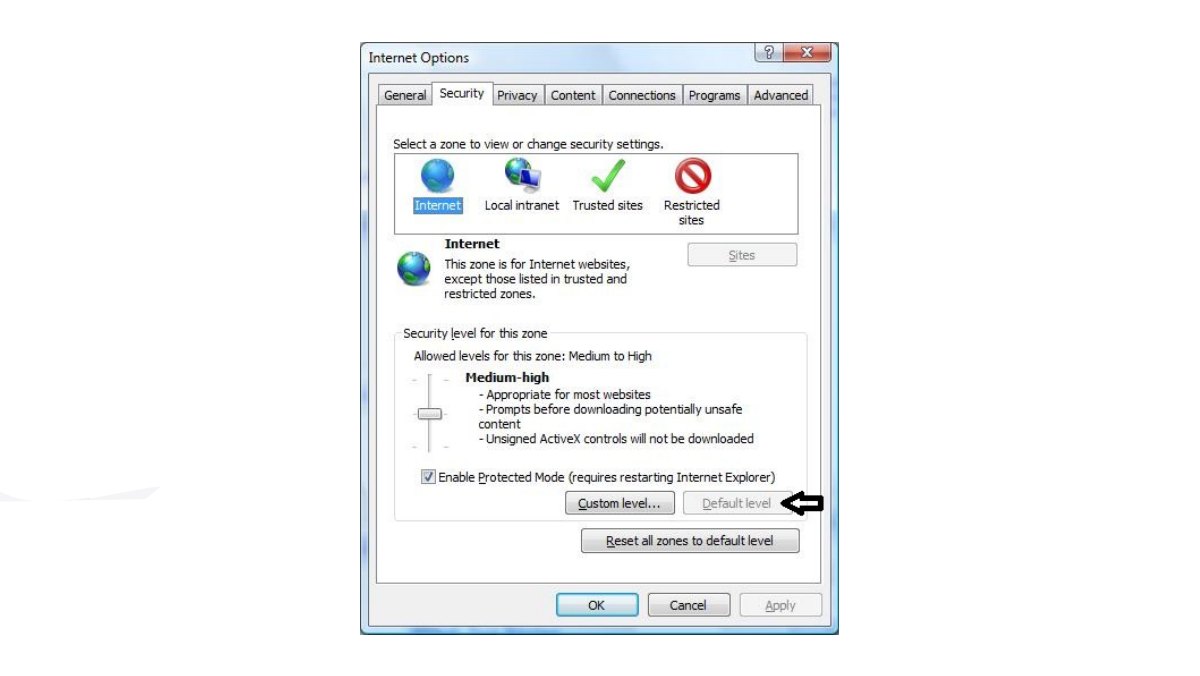
- In the Security tab of the Internet Options window, you will notice a button labeled “Default level” or “Reset all zones to default level.” Click on this button.
- A confirmation dialog box may appear, asking if you want to reset the security settings for the selected zone. Read the message carefully and ensure that you have selected the correct zone. If you are certain, click “Yes” to proceed with resetting the security settings.
Once you click “Yes,” Internet Explorer will reset the security settings for the chosen zone to their default levels. This process may take a few seconds to complete, depending on the number of settings being reset.
After the security settings have been successfully reset, you will be automatically directed back to the Security tab of the Internet Options window.
Repeat these steps for each zone you wish to reset the security settings for. Remember that resetting the security settings for a particular zone will affect all websites within that zone.
Now that you have reset the security settings, you can move on to the next step to confirm the changes and ensure they have been applied successfully in Internet Explorer.
Step 6: Confirm Resetting Security Settings
After resetting the security settings in Internet Explorer, it is important to confirm that the changes have been applied successfully. This step will help ensure that the security settings have been reset to their default levels as intended. Here’s how you can confirm the resetting of the security settings:
- Go to any website within the zone for which you reset the security settings. For example, if you reset the security settings for the Internet zone, visit any website accessed directly from the internet.
- Observe the behavior of the website. If the security settings have been reset successfully, you should no longer encounter any unexpected security warnings or errors.
If you can browse the website without any disruptions or warnings, it indicates that the security settings for the selected zone have been reset successfully.
It is important to note that after resetting the security settings, some websites or web applications that rely on specific security settings may behave differently or require additional permissions. In such cases, you may need to adjust the security settings for specific websites or consult the website’s support or documentation for guidance.
By confirming the resetting of the security settings, you can ensure that Internet Explorer is now using the default security levels that offer a balanced mix of protection and functionality.
Once you have confirmed that the security settings have been reset successfully, you can proceed to the final step: restarting Internet Explorer.
Step 7: Restart Internet Explorer
The final step in the process of resetting the security settings in Internet Explorer is to restart the browser. Restarting Internet Explorer allows the changes to take effect and ensures that the reset security settings are fully applied. Follow these steps to restart Internet Explorer:
- Close all open tabs and windows of Internet Explorer.
- Click on the gear icon located in the top-right corner of the browser window to access the Tools menu.
- From the drop-down menu, select “Exit” or “Close” to close the Internet Explorer application completely.
After closing Internet Explorer, wait for a few moments to ensure that all processes associated with the browser have fully terminated.
Next, you can restart Internet Explorer by following these steps:
- Click on the Start menu or press the Windows key on your keyboard.
- Type “Internet Explorer” in the search bar.
- Click on the Internet Explorer app from the search results to open the browser.
Alternatively, you can navigate to the desktop and double-click on the Internet Explorer icon if it is available there.
By restarting Internet Explorer, you allow the browser to load with the newly reset security settings. This ensures that the changes made to the security settings are in effect and ready for use.
Now that you have successfully restarted Internet Explorer, you can begin using the browser with the reset security settings. Enjoy a safer and more secure browsing experience!
Additional Tips for Internet Explorer Security
While resetting the security settings in Internet Explorer is an important step in securing your browsing experience, there are additional measures you can take to enhance your Internet Explorer security. Consider the following tips:
- Keep Internet Explorer Updated: Regularly update your Internet Explorer browser to ensure that you have the latest security patches and updates. This helps protect against newly discovered vulnerabilities.
- Use a Reliable Antivirus Software: Install and regularly update a reputable antivirus software to safeguard your system against malware and other threats that can exploit browser vulnerabilities.
- Enable Automatic Updates: Enable automatic updates for your operating system to ensure that your computer receives the latest security updates, including those for Internet Explorer.
- Exercise Caution When Downloading: Be wary of downloading and installing software from untrustworthy or unfamiliar websites, as they may contain malicious code that can compromise your computer’s security.
- Be Mindful of Pop-ups and Phishing Attempts: Be vigilant and avoid clicking on suspicious pop-up windows or providing personal information on unsecured websites. These may be attempts to deceive you or steal your confidential data.
- Regularly Clear Cache and Cookies: Clearing your browser cache and cookies on a regular basis can help remove stored data that could be accessed by unauthorized individuals.
- Use Strong, Unique Passwords: Create strong and unique passwords for online accounts to minimize the risk of unauthorized access. Avoid using the same password for multiple accounts.
- Enable Enhanced Protected Mode: Consider enabling Enhanced Protected Mode in Internet Explorer, if available. This feature adds an extra layer of security by strengthening the browser’s isolation from other processes on your computer.
By implementing these additional security measures, you can further enhance the security of your Internet Explorer browser and reduce the risk of falling victim to online threats.
Remember, maintaining a secure browsing environment is an ongoing process. Stay informed about the latest security practices, technologies, and updates to ensure the maximum level of protection while using Internet Explorer.