
Why set SD card as default storage in Android?
In the world of smartphones, storage space is a precious resource. With the ever-increasing file sizes of photos, videos, and apps, it’s easy to run out of internal storage on your Android device. Thankfully, Android provides the flexibility to set an SD card as the default storage location, offering a simple solution to expand your device’s storage capacity.
By setting the SD card as the default storage, you can free up valuable space on your internal memory for essential system files and apps. This not only helps to optimize the performance of your device but also allows you to store a larger number of files without worrying about running out of space.
There are several reasons why you might want to consider setting an SD card as the default storage on your Android device. Let’s explore some of the benefits:
- Increased storage capacity: SD cards can provide additional storage ranging from a few gigabytes to several terabytes. By utilizing the SD card as default storage, you can significantly expand your device’s storage capacity.
- Economical alternative: Compared to the cost of upgrading to a device with larger internal storage, an SD card is a more affordable solution. It allows you to get more space without breaking the bank.
- Ease of data transfer: If you frequently switch between devices or need to transfer files, having the SD card as default storage makes it easier to move files between devices by simply removing the SD card.
- Separation of data: By storing your files on the SD card, you can keep them separate from your device’s internal storage. This can be useful if you need to perform a factory reset or troubleshoot issues, as your data will remain safely stored on the SD card.
Setting the SD card as the default storage is a straightforward process. However, it is important to note that not all Android devices support this feature. Before proceeding, it’s essential to check if your device supports setting an SD card as the default storage.
Checking if your device supports SD card as default storage
Before you can set an SD card as the default storage on your Android device, it’s crucial to confirm if your particular device supports this feature. While most Android devices have the option to move apps and files to an SD card, not all of them allow you to set the SD card as the default storage location.
To check if your device supports setting an SD card as default storage, follow these steps:
- Go to the “Settings” app on your Android device. You can usually find it in your app drawer or by swiping down and tapping the gear icon.
- Scroll down and look for the “Storage” or “Storage & USB” option. This may be located under the “Device” or “Device Maintenance” section, depending on your device’s manufacturer and Android version.
- Tap on “Storage” or “Storage & USB” to access the storage settings.
- Look for the option to change the default storage location. It may be labeled as “Default Storage” or “Preferred install location.” If you see this option, it indicates that your device supports setting an SD card as the default storage.
If you don’t find the option to set the default storage location, don’t worry. It means that your device doesn’t support this feature. However, you can still move apps and files to your SD card manually by following the steps below.
- Go to the “Settings” app on your Android device.
- Scroll down and tap on “Apps & notifications” or a similar option depending on your device.
- Select the app you want to move to the SD card.
- Tap on the “Storage” option.
- If the “Change” button is available, it means you can move the app to the SD card. Tap on it and follow the on-screen instructions to complete the process.
Keep in mind that moving an app to the SD card may prevent it from working properly if the SD card is removed or if the app relies on specific internal storage permissions. It’s recommended to only move compatible apps to the SD card and be cautious when removing the SD card from your device to avoid any disruptions.
Now that you’ve confirmed whether your device supports setting an SD card as default storage, let’s move on to the next steps: inserting and mounting the SD card.
Inserting and mounting the SD card
Once you have verified that your Android device supports setting an SD card as the default storage, the next step is to physically insert the SD card into your device and mount it. This will allow your device to recognize and access the SD card for storage purposes.
Here’s how to insert and mount an SD card on your Android device:
- Turn off your device by pressing and holding the power button until the power menu appears. Select “Power off” or a similar option to shut down your device.
- Locate the SIM card tray or the SD card slot on your device. Depending on your device, this can be located on the side or on top of the device.
- Using a SIM card ejector tool or a small paperclip, gently push it into the small hole next to the SIM card slot. This will release the tray or slide the slot out.
- Place the SD card into the tray or slot, making sure that the gold contacts on the SD card are facing downwards.
- Carefully slide the tray back into the device or push the slot back in until it’s securely in place.
- Power on your device by pressing and holding the power button. Your device will detect the newly inserted SD card.
- To mount the SD card, go to the “Settings” app, then navigate to “Storage” or “Storage & USB”. Look for the option to “Mount SD card” or a similar label. Tap on this option to mount the SD card.
Once the SD card is successfully mounted, your Android device will recognize it as an external storage option. You can then proceed to change the default storage location and start using the SD card for storing files and apps.
It’s important to handle the SD card with care and avoid removing it while your device is powered on or actively using the card. If you need to remove the SD card, make sure to unmount it first through the device settings to prevent data corruption or loss.
Now that you have successfully inserted and mounted the SD card, let’s move on to the process of changing the default storage location on your Android device.
Changing the default storage location
Now that you have inserted and mounted the SD card on your Android device, it’s time to set it as the default storage location. This will ensure that new apps, photos, videos, and other files are automatically saved to the SD card instead of the device’s internal storage.
Here’s how you can change the default storage location on your Android device:
- Go to the “Settings” app on your Android device.
- Scroll down and tap on “Storage” or “Storage & USB”. This may be located under the “Device” or “Device Maintenance” section, depending on your device’s manufacturer and Android version.
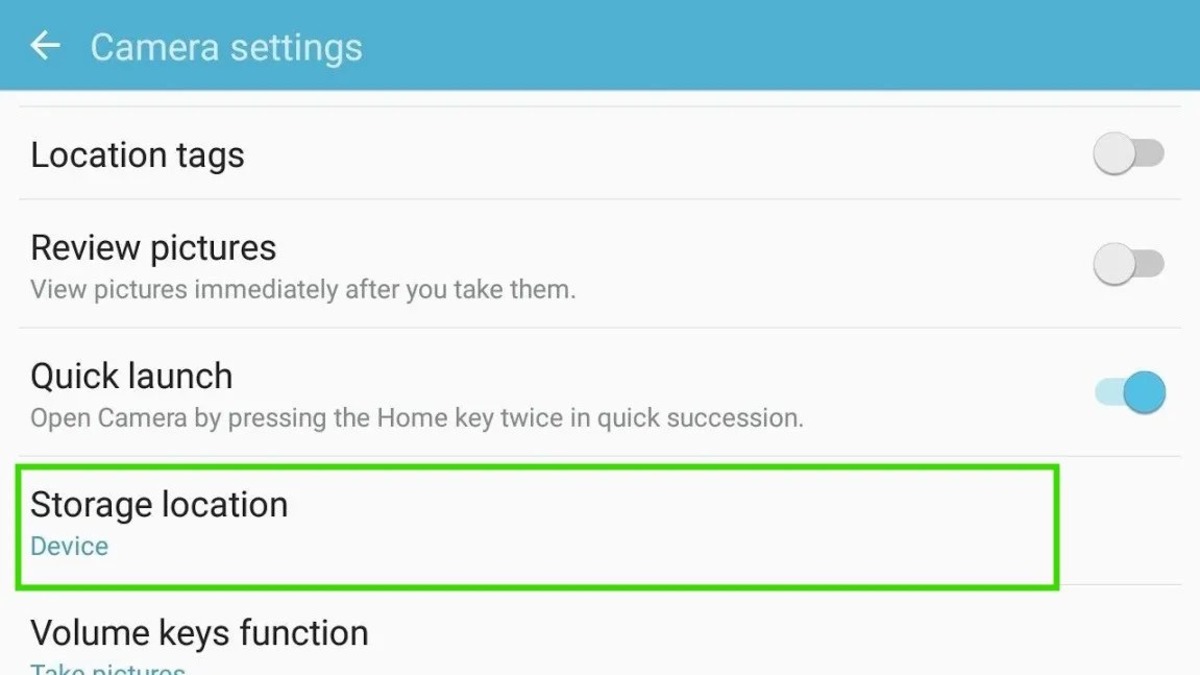
- Look for the option labeled “Default Storage” or “Preferred install location”. Tap on it.
- Select the “SD card” option from the available choices. This will set the SD card as the default storage location for your device.
After changing the default storage location, any new files and apps you download will be automatically saved to the SD card. Existing apps and files stored in the internal storage can be manually moved to the SD card to free up space.
To move existing files to the SD card, follow these steps:
- Open the “File Manager” or “File Explorer” app on your device. If your device doesn’t have a pre-installed file manager, you can download one from the Google Play Store.
- Navigate to the location where your files are stored, such as the “Pictures” or “Videos” folder.
- Long-press on the file or folder you want to move. A menu will appear with various options.
- Tap on the “Move” or “Cut” option.
- Navigate to the SD card location by tapping on the “SD card” or “External storage” option.
- Select the desired folder on the SD card where you want to move the file or folder.
- Tap on “Move here” or “Paste” to complete the process. The file or folder will now be moved to the SD card.
Remember to periodically free up space on the internal storage by moving files to the SD card or deleting unnecessary files. This will help to optimize the performance of your device and ensure you have enough storage space for new files and apps.
Now that you have changed the default storage location and moved files to the SD card, let’s explore how to manage apps and their storage locations on your Android device.
Moving files to the SD card
By default, when you change the storage location on your Android device to the SD card, new files and apps will be saved there automatically. However, existing files that are already stored in the internal storage will need to be manually moved to the SD card to free up space and ensure a smoother storage management experience.
Here’s how you can move files to the SD card on your Android device:
- Open the “File Manager” or “File Explorer” app on your device. If your device doesn’t have a pre-installed file manager, you can download one from the Google Play Store.
- Navigate to the location where the file or folder you want to move is stored, such as the “Pictures”, “Videos”, or “Downloads” folder.
- Long-press on the file or folder you want to move. This will select the item and open a selection menu.
- Tap on the “Move” or “Cut” option. This will allow you to move the selected files or folders to a new location.
- Navigate to the SD card location by tapping on the “SD card” or “External storage” option. This will take you to the root directory of the SD card.
- Select the desired folder on the SD card where you want to move the file or folder. If needed, you can create a new folder on the SD card by tapping on the “New Folder” option.
- Tap on “Move here” or “Paste” to complete the process. The file or folder will now be moved to the selected location on the SD card.
It’s important to note that not all files can be moved to the SD card. Certain system files and app data may remain stored in the internal storage to ensure the proper functioning of your device and apps. Additionally, some apps may not be designed to work properly when installed or moved to the SD card.
To manage and move apps to the SD card, you can follow these steps:
- Go to the “Settings” app on your Android device.
- Scroll down and tap on “Apps” or “Applications” depending on your device.
- Select the app you want to move to the SD card from the list of installed apps.
- Tap on the “Storage” option.
- If the “Change” button is available, it means you can move the app to the SD card. Tap on it and follow the on-screen instructions to complete the process.
Remember to regularly review and manage the files on your SD card to keep it organized and ensure optimal usage of available space. Moving files to the SD card not only frees up internal storage but also provides a convenient location for storing media files, documents, and other data.
In the next section, we will discuss managing apps and their storage locations on your Android device.
Managing apps and their storage locations
On an Android device, certain apps may take up a significant amount of storage space, especially those that store cache files, offline data, or large media files. To optimize your device’s storage and ensure efficient app management, it’s helpful to understand how to manage the storage locations of your installed apps.
Here are some methods to manage apps and their storage locations on your Android device:
- Moving apps to the SD card: If your device allows it, you can move certain apps from internal storage to the SD card to free up space. However, keep in mind that not all apps can be moved to the SD card, as it depends on the app’s design and compatibility. To move an app to the SD card, go to “Settings”, then “Apps” or “Applications”, select the app you want to move, and tap on the “Storage” option. If the option to “Change” or “Move to SD card” is available, you can proceed with moving the app.
- Clearing app cache: Over time, apps accumulate cache files that can take up a significant amount of storage space. To clear app cache, go to “Settings”, then “Apps” or “Applications”, select the app, and tap on the “Storage” option. Look for the “Clear cache” button and tap on it to free up space occupied by unnecessary cache files. Be aware that clearing app cache may result in the app losing temporary data or saved preferences.
- Uninstalling unused apps: If you have apps that you no longer use, uninstalling them can free up storage space. To do this, go to “Settings”, then “Apps” or “Applications”, select the app you want to uninstall, and tap on the “Uninstall” button. Consider removing apps that are rarely used or have alternatives available.
- Restricting background data: Some apps consume data and storage space in the background, even when you’re not actively using them. To manage app background data usage, go to “Settings”, then “Apps” or “Applications”, select the app, and tap on the “Data usage” or “Background data” option. From there, you can choose to restrict or disable background data usage for specific apps.
Taking the time to manage your apps and their storage locations can significantly improve your device’s performance and free up valuable storage space. By moving apps to the SD card, clearing app cache, uninstalling unused apps, and restricting background data, you can optimize your Android device’s storage usage.
In case you encounter any issues or errors related to the SD card as the default storage or app management, refer to the next section for troubleshooting common issues.
Troubleshooting common issues with SD card as default storage
While setting an SD card as the default storage on your Android device can greatly enhance your storage capacity and organizational capabilities, there may be some common issues that can arise during the process. Fortunately, these issues can often be resolved with a few simple troubleshooting steps. Here are some common issues you may encounter and how to troubleshoot them:
1. SD card not detected: If your SD card is not being detected by your device, there are a few potential causes. First, ensure that the SD card is properly inserted and mounted in your device. Remove the SD card, clean the contacts, and reinsert it to ensure a proper connection. Additionally, check if the SD card is compatible with your device, as some older devices may only support specific types or capacities of SD cards.
2. Unable to set as default storage: If you’re having trouble setting the SD card as the default storage location, make sure your device supports this feature (as explained in an earlier section). If your device doesn’t have this option, you can still manually move files and apps to the SD card, but they won’t automatically be saved there by default. If your device does support setting the SD card as default storage and the option is not available in the settings, try formatting the SD card in your device and then try again.
3. Apps not working properly from the SD card: While many apps can be moved to the SD card, not all apps are designed to work flawlessly from external storage. If you experience issues with certain apps after moving them to the SD card, try moving them back to the internal storage and see if the problem resolves. Alternatively, you can try updating the app to the latest version or contacting the app developer for support if you encounter any persistent issues.
4. Slow performance or data loss: In some cases, using an SD card as the default storage may result in slower performance compared to using internal storage. This is especially true if you’re using a low-speed or low-capacity SD card. To mitigate this, ensure that you’re using a high-quality and high-speed SD card that meets the requirements of your device. It’s also advisable to regularly back up your data stored on the SD card to prevent any potential data loss due to card failure or corruption.
5. Compatibility issues with certain apps: While most apps will work smoothly with an SD card as the default storage, some apps may not function properly due to the way they’re designed or due to limitations of external storage. If you encounter any compatibility issues, consider moving only compatible apps to the SD card or storing app-specific data on the internal storage.
If you’re still experiencing issues after attempting the troubleshooting steps mentioned above, you may need to seek further assistance from your device’s manufacturer or consult with a professional technician. They will be able to provide more advanced troubleshooting options specific to your device.
Now that you’re familiar with troubleshooting common issues with SD card as default storage, let’s explore some useful tips and recommendations for using an SD card as the default storage on your Android device.
Tips and recommendations for using SD card as default storage
Now that you have successfully set your SD card as the default storage on your Android device, here are some tips and recommendations to help you make the most out of this expanded storage capacity:
- Choose a high-quality SD card: Invest in a reliable SD card from a reputable brand. Look for cards with higher storage capacities and faster read and write speeds to ensure optimal performance.
- Regularly back up your SD card: To protect your data and prevent loss, create regular backups of the files on your SD card. You can do this by transferring files to a computer or cloud storage service.
- Organize files on the SD card: Keep your files organized by creating folders and subfolders on the SD card. This will make it easier to locate and manage specific files when needed.
- Be cautious when removing the SD card: Before removing the SD card from your device, ensure that you unmount it properly through the device settings to prevent data corruption or loss. Abruptly removing the SD card while the device is powered on or actively using the card can cause damage to files or the card itself.
- Regularly clean up unnecessary files: Periodically review and delete files that are no longer needed to free up space on the SD card. This will ensure that you have enough storage for new files.
- Keep up with software updates: Stay updated with the latest software updates for your Android device. These updates often include bug fixes and improvements that can enhance compatibility with the SD card as default storage.
- Use caution when purchasing apps: When downloading and installing apps from the Google Play Store or other sources, be aware that some apps may not be compatible with an SD card as the default storage. Read reviews and check the app’s specifications to ensure compatibility before installing.
- Monitor available storage: Keep an eye on the available storage space on both your device’s internal memory and the SD card. This will help you maintain a balance between the two and avoid filling up one storage option completely.
- Consider using a hybrid storage approach: Some Android devices offer a hybrid storage approach, where both internal storage and an SD card can be used simultaneously. Consider utilizing this feature to make the most of both storage options and maximize your device’s storage capacity.
By following these tips, you can optimize your experience with an SD card as the default storage on your Android device. Whether you’re freeing up space on your internal memory, expanding storage capacity, or organizing files more efficiently, the SD card can provide a versatile and convenient storage solution.
Remember to regularly maintain and manage your SD card to ensure its longevity and reliable performance. With proper care, your SD card can serve as a valuable asset in managing your digital files and enhancing the overall functionality of your Android device.
Now you’re equipped with the knowledge to effectively use an SD card as the default storage in your Android device. Enjoy the expanded storage space and the flexibility it brings to your multimedia experience.