
Why Use Self-Destructing Messages?
Sending self-destructing messages can be a useful tool for privacy-conscious individuals and businesses alike. In an era where data privacy is a growing concern, the ability to send messages that automatically disappear after being read can help protect sensitive information and maintain confidentiality.
Here are a few reasons why you might want to consider using self-destructing messages:
- Enhanced Privacy: Self-destructing messages ensure that your conversations remain private and secure. By setting an expiration date on your messages, you can limit the time others have access to your sensitive information.
- Data Protection: Self-destructing messages add an extra layer of security by preventing the message from being forwarded, copied, or saved. This reduces the risk of your content being shared without your consent or falling into the wrong hands.
- Confidentiality: When dealing with confidential business information, self-destructing messages can help ensure that sensitive details are only accessible for a limited time. This can be particularly useful for sharing financial data, intellectual property, or trade secrets.
- Compliance: Many industries, such as healthcare and legal, require strict confidentiality measures. Self-destructing messages can help businesses comply with regulatory requirements by limiting data retention and access to sensitive information.
- Peace of Mind: Using self-destructing messages eliminates the worry of your message getting lost, intercepted, or stored indefinitely. You can communicate with confidence, knowing that your messages will cease to exist after a designated period.
Whether you are discussing personal matters, sharing confidential documents, or conducting sensitive business discussions, self-destructing messages offer a secure and convenient way to protect your privacy and ensure that your communications remain temporary and confidential.
Step 1: Enable Confidential Mode in Gmail
Gmail’s Confidential Mode allows you to send self-destructing messages directly from your Gmail account. By enabling this mode, you gain control over the sharing options and expiration settings of your emails. Here’s how you can enable Confidential Mode:
- Open Gmail and click on the “Compose” button to start a new email.
- In the compose window, look for the padlock icon with a clock at the bottom toolbar. Click on it to enable Confidential Mode.
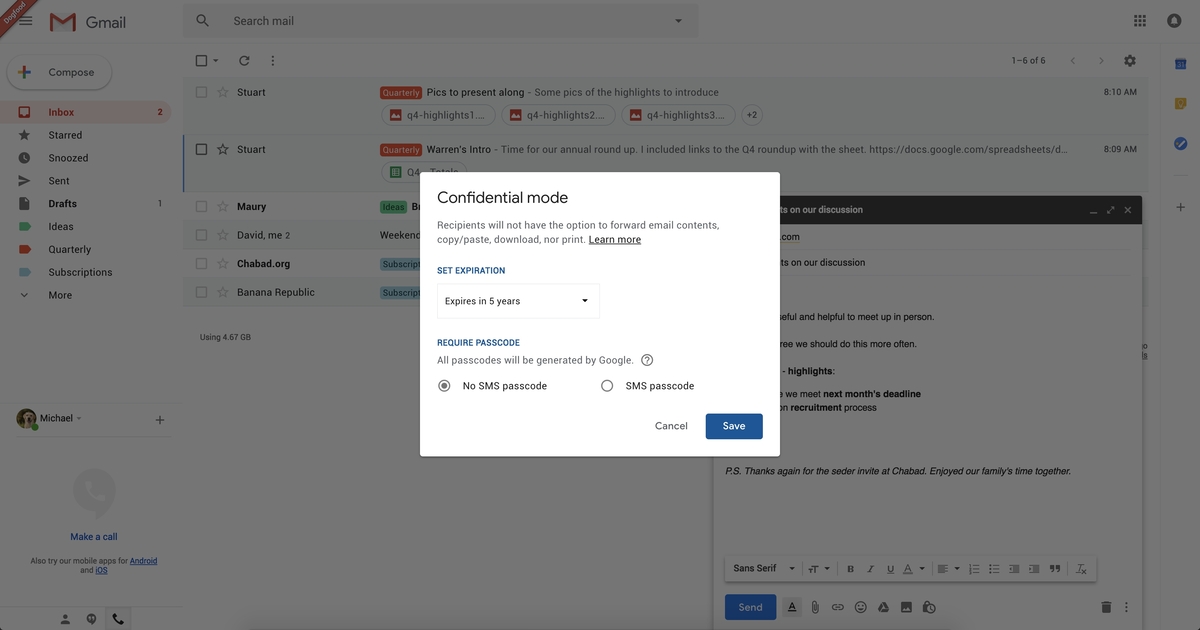
- A new window will appear, allowing you to set the expiration date and passcode for your self-destructing message. We will discuss these settings in more detail later.
- Once you’ve made the necessary adjustments, click on the “Save” or “Send” button to proceed. If you choose to save the email as a draft, you can access it later and send it when you’re ready.
It’s worth noting that the recipient does not need to have a Gmail account to receive and open self-destructing messages. They will receive an email notification with a link that will redirect them to a secure web page to view the message.
By enabling Confidential Mode in Gmail, you have taken the first step towards sending self-destructing messages. In the next section, we will explore how you can compose your message and add recipients.
Step 2: Compose Your Message
Once you have enabled Confidential Mode in Gmail, you can now start composing your self-destructing message. Although the process is similar to composing a regular email, there are a few key things to keep in mind:
- Open Gmail and click on the “Compose” button to create a new email.
- Fill in the recipient’s email address in the “To” field, just like you would for a regular email.
- Add a subject line that clearly indicates the purpose or topic of your message.
- In the email body, type out your message, and feel free to format it using the available options such as bold text, italics, and bullet points. Remember that the content of the email will still be temporary and will disappear once it reaches the expiration date.
- If necessary, you can also attach files to your self-destructing message by clicking on the paperclip icon and selecting the files you want to include.
- Take a moment to review your message for any errors or missing information before moving on to the next step.
It’s important to remember that while self-destructing messages offer privacy and security, they are not foolproof. Recipients can still take screenshots or photos of the message, so it’s crucial to exercise caution when sharing sensitive or confidential information.
With your message composed and reviewed, you’re now ready to move on to the next step: setting the expiration and passcode options for your self-destructing message. We will explore these settings in detail in the following section.
Step 3: Set Expiration and Passcode (Optional)
When sending a self-destructing message in Gmail, you have the option to set an expiration date and even add an extra layer of security with a passcode. These settings provide additional control over the lifespan and accessibility of your message. Here’s how you can set the expiration and passcode:
- After composing your message, click on the padlock icon with a clock at the bottom toolbar to open the Confidential Mode settings.
- In the settings window, you’ll find options to set the expiration date for your message. You can choose from predefined expiration periods like 1 day, 1 week, 1 month, or you can set a custom expiration date.
- If you want to add an extra layer of security, you can enable the passcode option. By enabling this, the recipient will need to enter a passcode to open the message. You can choose to send the passcode via SMS to the recipient’s phone number or directly to their email address.
- Once you’ve set the expiration and passcode options, click on the “Save” or “Send” button to proceed.
By setting an expiration date, you ensure that your message will automatically disappear after the specified time. This prevents the recipient from accessing the message indefinitely. Additionally, the passcode option adds another level of protection, ensuring that only the intended recipient can view the message by entering the correct passcode.
It’s important to note that while these options provide added security, they are not foolproof. Recipients can still take screenshots or photos of the message and its content. Therefore, it is crucial to exercise caution when sharing sensitive information and only use self-destructing messages in situations where they are appropriate.
Now that you’ve set the expiration and passcode options for your self-destructing message, it’s time to move on to the next step: adding recipients and sending the message. We will explore this process further in the following section.
Step 4: Add Recipients and Send the Message
Now that you have composed your self-destructing message and set the expiration and passcode options (if desired), it’s time to add recipients and send the message. Here’s how you can do it:
- In the compose window, you will notice that the “To” field is already filled with the recipient’s email address that you entered earlier.
- If you need to add more recipients, click on the “Add Recipients” button. You can add multiple recipients by entering their email addresses or selecting contacts from your address book.
- Additionally, you can choose whether or not to allow recipients to forward, copy, or download the self-destructing message. Click on the small inverted triangle next to the recipient’s email address to access these options. By default, recipients cannot forward, copy, or download the message.
- Once you have added all the recipients and made the necessary settings, click on the “Send” button to send the self-destructing message. If you have chosen the passcode option, the recipient will be prompted to enter the passcode to access the message.
It’s important to double-check the recipient’s email address and ensure that you have added the correct recipients before sending the message. Once sent, the self-destructing message cannot be retrieved or modified.
After sending the self-destructing message, you will receive a confirmation that it has been sent successfully. You can also find a copy of the sent message in your “Sent” folder in Gmail, but remember that the recipient’s access to the message is still subject to the expiration settings you have configured.
Now that you have added recipients and sent the self-destructing message, it’s time to learn about managing access and revoking messages, which we will cover in the next section.
Step 5: Managing Access and Revoking Messages
Once you have sent a self-destructing message in Gmail, you may want to manage the access and revoke access to the message if needed. Here are the steps to manage access and revoke messages:
- Open your Gmail account and navigate to the “Sent” folder to locate the self-destructing message that you want to manage.
- Find the email in question and open it. You will notice that at the top of the email, there will be a message stating the expiration date and the option to “Remove Access”.
- If you want to revoke access to the message before it expires, click on the “Remove Access” button. This action will prevent the recipient from accessing the message, even if the expiration date has not yet been reached.
- If you have enabled the passcode option for the message, you can also change or update the passcode by clicking on the “Change Passcode” button. This can be useful if you suspect that the original passcode has been compromised or shared with unauthorized individuals.
- It’s important to note that once you have removed access or changed the passcode, these changes are immediate and cannot be undone. The recipient will no longer be able to access the message or its content.
By managing access and revoking messages, you have the ability to maintain control and protect your private conversations and confidential information. It’s a useful feature if you realize that the message was sent to the wrong recipient or if you want to ensure that the message remains confidential after a certain period.
Remember to use self-destructing messages responsibly and consider the sensitivity of the information being shared. While these messages offer privacy, recipients can still capture screenshots or photos of the message, so exercise caution when sharing sensitive or confidential content.
With these steps, you now know how to manage the access and revoke self-destructing messages in Gmail. This concludes our guide on sending self-destructing messages, and we hope it helps you maintain privacy and confidentiality in your communication.