
Why would you want to select all messages in Gmail?
Gmail is one of the most popular email platforms used by millions of people worldwide. Whether you have been using Gmail for personal or professional purposes, there may be instances where you need to select all messages in your inbox. Understanding the reasons for this need can help you effectively manage your emails and simplify your workflow.
One of the primary reasons you may want to select all messages in Gmail is to perform bulk actions. By selecting all messages, you can quickly mark them as read, archive them, move them to a specific folder, or delete them. This saves you valuable time and effort, especially when dealing with a large number of emails.
Another scenario where selecting all messages can be beneficial is when you are organizing your inbox. If you want to categorize or label all your emails at once, selecting all messages allows you to apply the desired labels or categories uniformly. This ensures consistency in your email organization and makes it easier to locate specific emails in the future.
Furthermore, selecting all messages can be helpful if you need to export or backup your emails. Whether you want to create a local backup or migrate to a different email service, selecting all messages enables you to export or download them in bulk. This ensures that you have a secure copy of all your important emails.
Lastly, selecting all messages can be useful if you want to perform a comprehensive search or apply filters. By selecting all messages, you can narrow down your search criteria and apply filters to find specific emails that meet certain criteria. This allows you to efficiently locate and manage emails based on your preferences.
In summary, selecting all messages in Gmail can significantly simplify email management and streamline your workflow. From performing bulk actions to organizing your inbox and exporting emails, there are various situations where this feature proves to be invaluable. Understanding the benefits of selecting all messages can empower you to make the most of Gmail’s functionalities and effectively manage your email communication.
How to select all messages on Desktop:
Selecting all messages on Gmail’s desktop version is a straightforward process. There are multiple methods you can use, depending on your preference and the number of messages you want to select.
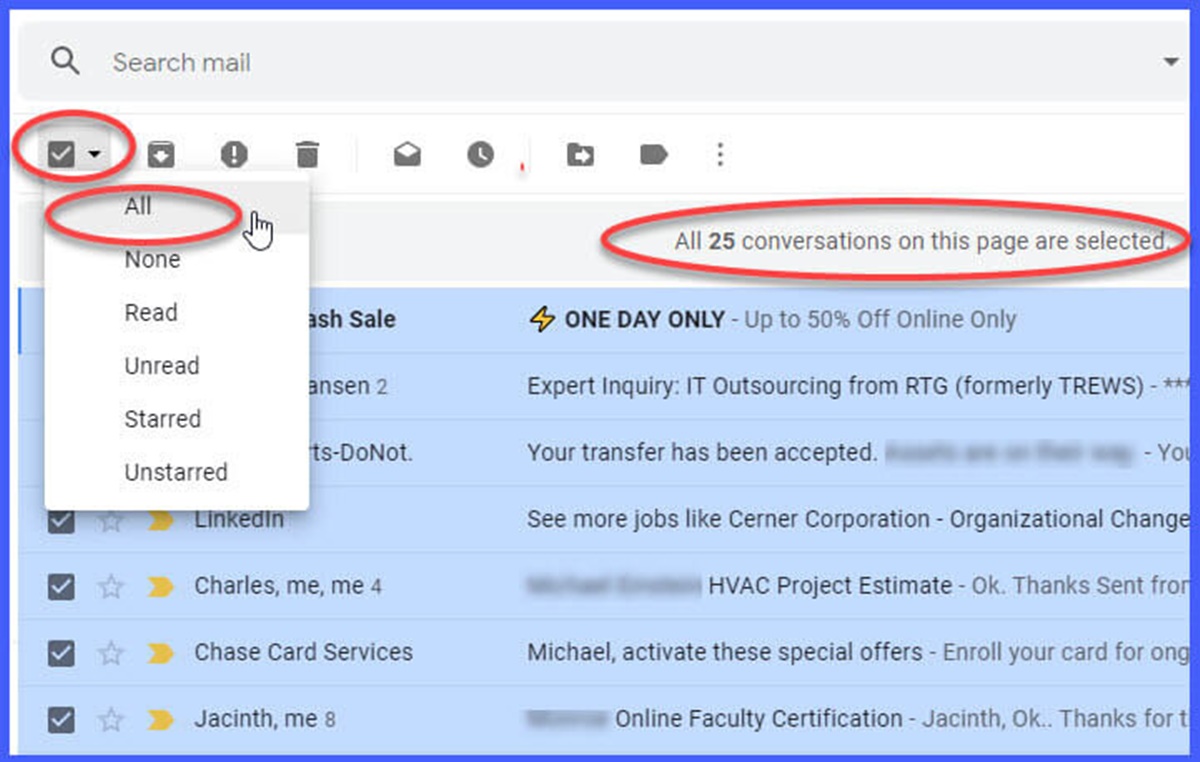
Method 1: Selecting all messages on Desktop with the checkbox
The first method involves using Gmail’s checkbox feature to select all messages. To do this, follow these steps:
- Open Gmail in your web browser and navigate to your inbox.
- Find the checkbox at the top-left corner, just above the first email in your inbox. Clicking on this checkbox will select all visible messages on the current page.
- If you want to select all messages in your entire inbox, click on the checkbox that appears at the top of the list of emails, right below the search bar. This will select all messages across multiple pages.
Method 2: Selecting all messages on Desktop using keyboard shortcuts
Gmail offers convenient keyboard shortcuts to facilitate navigation and action selection. To select all messages using keyboard shortcuts, follow these steps:
- Ensure that the keyboard shortcuts are enabled in your Gmail settings.
- With your inbox open, press the ” * ” (Shift + 8) key on your keyboard to select all visible messages on the current page.
- If you want to select all messages in your entire inbox, press ” * ” (Shift + 8) followed by the “a” key. This will select all messages across multiple pages.
Method 3: Selecting all messages on Desktop using the “All Mail” label
If you prefer a more direct approach, using the “All Mail” label can help you select all messages in Gmail. Here’s how:
- Click on the “All Mail” label from the left-hand menu in Gmail.
- This will instantly select all messages in your inbox, regardless of the labels they have applied.
By using any of these methods, you can easily select all messages in Gmail’s desktop version. Whether you prefer the checkbox, keyboard shortcuts, or the “All Mail” label, these options provide flexibility and efficiency for managing your messages.
Method 1: Selecting all messages on Desktop with the checkbox
One of the easiest ways to select all messages on Gmail’s desktop version is by using the checkbox feature. By following a few simple steps, you can quickly select all visible messages or all messages in your entire inbox.
- Open Gmail in your web browser and navigate to your inbox.
- Locate the checkbox at the top-left corner, just above the first email in your inbox. This checkbox acts as a master selector for the visible messages on the current page.
- To select all visible messages, simply click on the checkbox. This will mark all the emails on that particular page.
- If you want to select all messages in your entire inbox, click on the checkbox that appears at the top of the list of emails, right below the search bar. This checkbox is labeled “Select all” and selecting it will mark all messages across multiple pages.
Once you have selected all the desired messages, you can perform various actions on them. You can mark them as read, archive them, apply labels, move them to a different folder, or delete them altogether. These actions can be accessed through the icons or buttons located above the email list.
It is important to note that the checkbox feature on Gmail allows you to select all messages that are currently visible on the page. If you have a long list of emails and need to select all of them, you may need to navigate through multiple pages and repeat the selection process for each page. This may be time-consuming, but it ensures that you have complete control over which messages are selected.
In summary, Method 1 involves using the checkbox feature to select all messages on Gmail’s desktop version. With a few clicks, you can easily select all visible messages or all messages in your entire inbox. This method provides a convenient way to perform bulk actions and streamline your email management process.
Method 2: Selecting all messages on Desktop using keyboard shortcuts
Gmail offers a range of keyboard shortcuts that make navigating and performing actions quicker and more efficient. Method 2 involves using these shortcuts to select all messages on Gmail’s desktop version.
- Before you start, ensure that keyboard shortcuts are enabled in your Gmail settings. To do this, click on the gear icon in the top-right corner of the Gmail interface, select “Settings,” and navigate to the “Keyboard shortcuts” tab. Make sure the option is set to “Keyboard shortcuts on.”
- With your Gmail inbox open, you can press the asterisk key “*” on your keyboard to select all visible messages on the current page.
- If you want to select all messages in your entire inbox, you can press the asterisk key followed by the letter “a.” This will select all messages across multiple pages.
Keyboard shortcuts offer a quick and efficient way to select all messages without having to rely on the mouse or trackpad. By memorizing and incorporating these shortcuts into your workflow, you can save valuable time and streamline your email management process.
Additionally, Gmail provides a list of keyboard shortcuts that you can access for reference. To view the complete list, press the “?” key while in your Gmail inbox. This will open a pop-up window displaying all available shortcuts.
With method 2, you can easily select all messages on Gmail’s desktop version using keyboard shortcuts. Whether you need to select all visible messages on the page or all messages in your entire inbox, these shortcuts provide a convenient and efficient way to manage your emails.
Method 3: Selecting all messages on Desktop using the “All Mail” label
If you prefer a more direct approach to select all messages in Gmail’s desktop version, you can utilize the “All Mail” label. This method allows you to select all messages in your inbox, regardless of the labels they have applied.
- To begin, open Gmail in your web browser and ensure you are signed in to your account.
- On the left-hand side, you will find a list of labels. Scroll down until you locate the “More” option and click on it.
- Among the expanded labels, you should see the “All Mail” label. Click on it to view all the messages in your inbox, including archived and labeled emails.
Once you are on the “All Mail” view, all messages will be selected by default. You can now perform various actions on the selected emails, such as marking them as read, applying labels, moving them to other folders, or deleting them.
It is important to note that selecting all messages using the “All Mail” label can be useful when you want to apply a specific action to a large number of emails at once, regardless of their label or category. This method provides a straightforward way to manage your entire inbox without having to navigate through multiple pages.
By using the “All Mail” label, you can easily select all messages in Gmail’s desktop version. Whether you need to perform bulk actions or organize your inbox on a more comprehensive level, this method offers a direct and efficient way to manage your emails.
How to select all messages on Mobile:
Gmail’s mobile app provides users with the convenience of managing their emails on the go. If you are using Gmail on your mobile device and need to select all messages, there are a couple of methods available to accomplish this task.
Method 1: Selecting all messages on Mobile using the checkbox
The first method involves using the checkbox feature in the Gmail mobile app. To select all messages using this method, follow these steps:
- Open the Gmail app on your mobile device and navigate to your inbox.
- On the top-left corner of the screen, you should see a small circle or square beside each email. Tap on this checkbox to select the desired email.
- If you want to select all messages in your inbox, look for the “Select all” checkbox, usually located above or below the email list. Tapping on this checkbox will select all visible messages in your inbox.
Method 2: Selecting all messages on Mobile using the “All Mail” label
Another method to select all messages on your mobile device is by utilizing the “All Mail” label. Here’s how you can do it:
- Open the Gmail app and tap on the menu button, usually represented by three horizontal lines, in the top-left corner of the screen.
- Scroll down the menu and find the “All Mail” option. Tap on it to access your entire inbox, including archived and labeled emails.
- Once you are on the “All Mail” view, all messages will be selected by default, and you can perform actions on them as needed.
By following either of these methods, you can easily select all messages on the Gmail mobile app. Whether you prefer using the checkbox feature or accessing the “All Mail” label, these methods provide efficient ways to manage your emails on the go.
Method 1: Selecting all messages on Mobile using the checkbox
Selecting all messages in the Gmail mobile app can be easily done using the checkbox feature. This method allows you to select individual emails or all messages in your inbox with just a few taps.
- Open the Gmail app on your mobile device and navigate to your inbox.
- In the top-left corner of the screen, you will find a small circle or square beside each email. Tapping on this checkbox will select the desired email.
- If you want to select all messages in your inbox, look for the “Select all” checkbox, typically positioned above or below the email list. Tapping on this checkbox will instantly select all visible messages on the page.
Once you have selected the desired messages, you can perform various actions on them. Options such as marking them as read, archiving, deleting, or moving them to a specific folder are available to streamline your email management process.
It is worth noting that the checkbox feature in the Gmail mobile app allows you to select all messages that are currently visible on the screen. If you have a long list of emails and need to select all of them, you may need to scroll down to load additional messages and continue selecting.
This method provides a convenient and efficient way to manage your emails on mobile devices. By utilizing the checkbox feature, you can easily select individual messages or all messages in your Gmail inbox, allowing for quick and effective email management on the go.
Method 2: Selecting all messages on Mobile using the “All Mail” label
If you prefer a more direct approach to select all messages on the Gmail mobile app, you can utilize the “All Mail” label. This method allows you to select all messages in your inbox, regardless of any labels or categories applied to them.
- To begin, open the Gmail app on your mobile device.
- Tap on the menu button located in the top-left corner of the screen, typically represented by three horizontal lines.
- Scroll down the menu and find the “All Mail” option. Tap on it to access your entire inbox, including archived and labeled emails.
- Once you are in the “All Mail” view, all messages will be selected automatically.
By using the “All Mail” label, you can easily select all messages in the Gmail mobile app. This method provides a straightforward way to manage your entire inbox without having to select individual emails or scroll through multiple pages.
After selecting all messages, you can perform various actions, such as marking them as read, applying labels, moving them to different folders, or deleting them. These options can be accessed through the icons or menus located within the Gmail app.
It is important to note that the “All Mail” label does not affect the original labels or categories applied to messages. This means that when you select all messages using this method, the labels and categories remain intact, ensuring a seamless organizational structure for your email communication.
With Method 2, you can easily select all messages on the Gmail mobile app using the “All Mail” label. Whether you need to apply bulk actions or manage your entire inbox comprehensively, this method offers a direct and efficient way to handle your emails on the go.