
What is TweetDeck?
TweetDeck is a comprehensive social media management tool specifically designed for Twitter. It provides users with an organized and customizable dashboard that allows for seamless management of multiple Twitter accounts.
With TweetDeck, users can monitor and engage with their Twitter feed, track specific hashtags or keywords, schedule tweets for future posting, and more. It offers a range of advanced features that are not available on the regular Twitter platform, making it a valuable tool for individuals and businesses looking to enhance their Twitter presence.
One of the key advantages of using TweetDeck is its ability to streamline the Twitter experience by displaying multiple columns that can be customized to suit your preferences. These columns can include your home feed, mentions, direct messages, trending topics, and more. This allows for efficient management of different aspects of your Twitter activity, all in one convenient interface.
Another noteworthy feature of TweetDeck is its real-time updates. As Twitter is a fast-paced platform with tweets being posted every second, staying updated is crucial. TweetDeck ensures that you don’t miss any important tweets by providing constant refreshes and live streaming of your feed, keeping you informed in real-time.
Furthermore, TweetDeck offers powerful filtering options, allowing you to create custom streams based on specific criteria. This means you can narrow down your feed to display only tweets that meet certain conditions, such as tweets from specific users, containing specific keywords, or coming from a specific location. This feature is particularly useful for businesses that want to monitor conversations related to their brand or industry.
Additionally, TweetDeck provides the ability to manage multiple Twitter accounts from a single dashboard. If you have several Twitter accounts for different purposes or clients, TweetDeck eliminates the need to constantly log in and out of each account. You can simply add all your accounts to the dashboard and easily switch between them, saving you time and effort.
Overall, TweetDeck is an invaluable tool for individuals and businesses looking to effectively manage their Twitter presence. Its array of features, including column customization, real-time updates, powerful filtering options, and multi-account management, make it a popular choice among Twitter enthusiasts.
How to Sign Up for TweetDeck
Signing up for TweetDeck is a straightforward process that can be completed in just a few simple steps. Follow the instructions below to get started:
- Visit the official TweetDeck website. You can access it by typing “tweetdeck.twitter.com” in your web browser’s address bar.
- Click on the “Get started” button located on the homepage. This will redirect you to the sign-up page.
- Choose whether you want to sign up with your Twitter account or your Google account. If you already have a Twitter account, it is recommended to sign up using that account for a seamless integration.
- If you select the Twitter account option, you will be prompted to enter your Twitter login credentials. Enter your username or email and password, then click on the “Authorize app” button to grant TweetDeck access to your Twitter account.
- If you prefer to sign up using your Google account, click on the Google icon and follow the on-screen instructions to log in with your Google credentials.
- Once you have successfully logged in, you will be asked to select the Twitter accounts you want to add to TweetDeck. Choose the accounts you want to manage through TweetDeck by clicking on the checkboxes next to their names.
- After selecting your accounts, click on the “Finish” button to complete the sign-up process.
That’s it! You have successfully signed up for TweetDeck and can now start exploring its features and customizing your dashboard. Take some time to familiarize yourself with the interface and layout to make the most out of this powerful Twitter management tool.
Navigating the TweetDeck Dashboard
Once you have signed up and logged in to TweetDeck, you will be greeted with its user-friendly dashboard. Navigating the TweetDeck dashboard is intuitive, allowing you to efficiently manage your Twitter accounts and stay updated with the latest tweets. Here’s a guide on how to effectively navigate the TweetDeck dashboard:
- Columns: The dashboard is organized into columns, which display different aspects of your Twitter activity. By default, you will have columns for your Home feed, Notifications, Mentions, and Direct Messages. You can add, remove, and customize columns based on your preferences.
- Adding Columns: To add a new column, click on the plus icon at the top left corner of the dashboard. A menu will appear, allowing you to choose from various column options such as Lists, Search, Trends, and more. Select the desired option and follow the on-screen instructions to customize the column.
- Customizing Columns: Each column can be customized to display specific Twitter content. For example, you can create a column that shows tweets from a particular user, a specific hashtag, or a list you have created. To customize a column, click on the three-dot menu icon at the top right corner of the column and select “Edit”. From there, you can adjust the column settings according to your preferences.
- Managing Multiple Accounts: If you have added multiple Twitter accounts to TweetDeck, you can easily switch between them using the accounts sidebar located on the left side of the dashboard. Simply click on the account name to switch to that account and view its associated columns.
- Column Navigation: When you have numerous columns on your dashboard, navigating between them is simple. Use the left and right arrows at the top of the dashboard to scroll through your columns or click on a specific column’s title at the top to jump directly to it.
- Tweet Actions: Each tweet within a column has a set of action buttons. These buttons allow you to reply, retweet, like, and engage with tweets directly from the dashboard. Hovering over a tweet will display these action buttons, making it easy to interact with the content without leaving the TweetDeck interface.
By mastering the navigation of the TweetDeck dashboard, you can efficiently manage your Twitter accounts, track important conversations, and stay connected with your Twitter community. Take some time to explore the various features and customization options available to personalize your TweetDeck experience and make it work best for you.
Connecting your Twitter Account to TweetDeck
To make the most of TweetDeck’s features and manage your Twitter accounts seamlessly, it is essential to connect your Twitter account(s) to your TweetDeck dashboard. Here’s a step-by-step guide on how to connect your Twitter account to TweetDeck:
- After signing in to TweetDeck, click on your profile icon located at the top right corner of the dashboard.
- In the drop-down menu, select “Accounts” to access the account management settings.
- On the Accounts page, you will see a list of your connected Twitter accounts, as well as an option to add another account. If you haven’t connected any accounts yet, you will see a prompt to “Add another Twitter account”. Click on this to proceed.
- A window will open, displaying the Twitter login page. Enter the username or email address and password for the Twitter account you want to connect, then click on the “Authorize app” button to grant TweetDeck access to your account.
- Once you have authorized TweetDeck to access your account, you will be redirected back to the TweetDeck dashboard. Your Twitter account will now be connected and visible in the Accounts section.
- If you have multiple Twitter accounts, you can easily switch between them by clicking on the account name in the sidebar located on the left side of the dashboard. This allows you to manage multiple accounts from a single TweetDeck dashboard.
- Repeat the above steps for each Twitter account you want to connect to TweetDeck, ensuring that you have authorized TweetDeck to access each account.
By connecting your Twitter account to TweetDeck, you gain access to powerful features that allow you to efficiently manage your Twitter presence and engage with your audience. This integration enables you to view and interact with your tweets, mentions, direct messages, and more, all in one centralized location.
Remember to keep your Twitter account credentials secure and avoid authorizing any suspicious or untrusted applications. TweetDeck is an official tool provided by Twitter and is a trusted platform for managing multiple Twitter accounts.
Now that your Twitter account(s) are connected to TweetDeck, you can fully utilize its features to customize your dashboard, schedule tweets, track hashtags, and make the most out of your Twitter experience.
Creating a New Tweet
Creating a new tweet on TweetDeck is a simple and efficient process. You can easily compose, customize, and post your tweets directly from the TweetDeck dashboard. Here’s a step-by-step guide on how to create a new tweet using TweetDeck:
- Click on the blue “New Tweet” button located at the top left corner of the TweetDeck dashboard. Alternatively, you can also use the keyboard shortcut “N” to start composing a new tweet.
- A tweet compose box will appear, allowing you to enter your tweet text. You have a maximum of 280 characters to work with, though Twitter now offers an extended character limit for certain types of tweets, such as replies and quoted tweets.
- In the compose box, you can add text, hashtags, and mentions as desired. You can also add emojis to make your tweet more expressive and engaging. Simply click on the smiley face icon at the bottom of the compose box to access a variety of emojis.
- Additionally, TweetDeck provides options to add images, GIFs, and polls to your tweets. To include media, click on the respective icons located at the bottom of the compose box. You can then upload an image or GIF from your computer, choose a GIF from the media library, or create a poll with multiple-choice options.
- If you manage multiple Twitter accounts on TweetDeck, make sure you have selected the desired account by checking the account name displayed next to the compose box. This ensures that your tweet will be posted from the correct account.
- Preview your tweet before posting by clicking on the “Preview” button located at the bottom-right corner of the compose box. This allows you to review how your tweet will appear to your followers and make any necessary edits.
- Once you are satisfied with your tweet, you can choose to send it immediately or schedule it for later. If you want to send the tweet immediately, click on the blue “Tweet” button. If you prefer to schedule the tweet, continue reading the next section for instructions on how to use the scheduling feature on TweetDeck.
By following these simple steps, you can quickly compose and publish tweets on TweetDeck. Take advantage of the various customization options to create engaging and visually appealing tweets that capture the attention of your followers.
Remember to follow Twitter’s guidelines and policies when composing your tweets, and respect the platform’s rules regarding content, hashtags, mentions, and media usage.
Now that you know how to create a new tweet on TweetDeck, let’s explore the functionality of the scheduling feature to effectively manage and automate your tweet posting.
Using the Scheduling Feature on TweetDeck
The scheduling feature on TweetDeck allows you to plan and automate your tweet posting by specifying the date and time you want your tweets to be published. This feature is especially useful for time-sensitive content, promotional announcements, or when you want to maintain a consistent posting schedule. Here’s how you can use the scheduling feature on TweetDeck:
- Compose your tweet by following the steps mentioned earlier. Enter your tweet text, add any desired hashtags, mentions, or media, and ensure you have selected the correct Twitter account.
- Instead of clicking on the “Tweet” button, click on the small arrow next to it. A drop-down menu will appear with multiple options, including “Schedule Tweet”. Click on that option.
- A scheduling window will open, displaying a calendar and time picker. Select the desired date and time for your scheduled tweet.
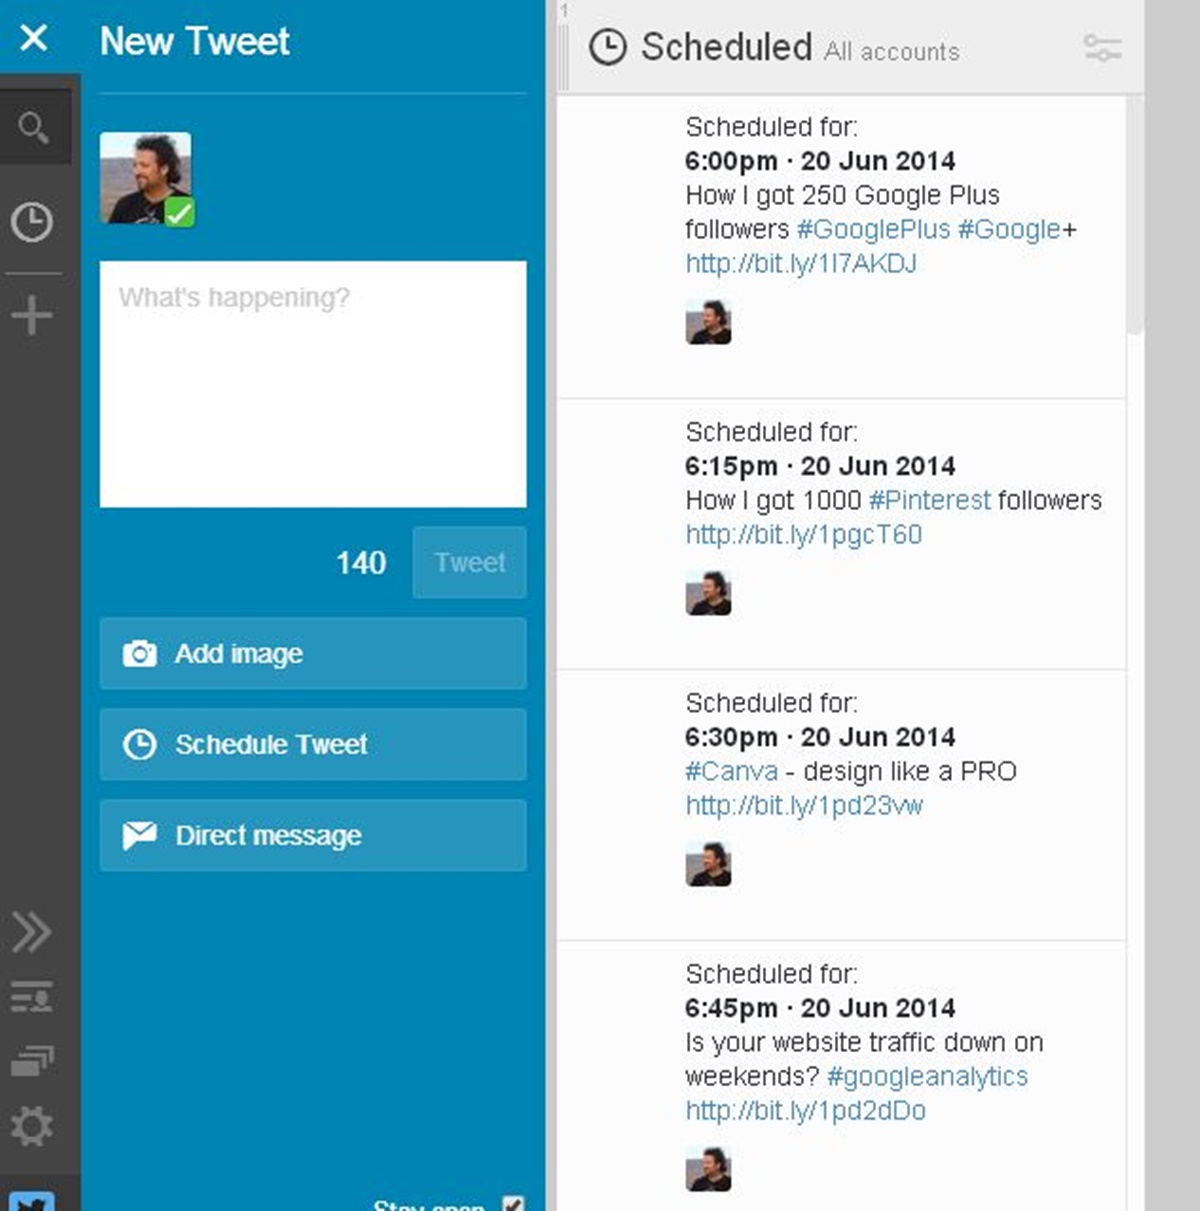
- Once you have chosen the schedule, click on the “Schedule” button. Your tweet will be added to the Scheduled column on your TweetDeck dashboard, and it will be published at the specified date and time.
- To view and manage your scheduled tweets, click on the “Scheduled” column on your TweetDeck dashboard. This column will display all the tweets that you have scheduled for future posting. From there, you can edit, delete, or reschedule your tweets as needed.
- If you need to make changes to a scheduled tweet, simply click on the tweet within the “Scheduled” column. The tweet compose box will appear, allowing you to adjust the text, media, or schedule. Once you have made the necessary changes, click on the “Update” or “Reschedule” button to save your changes.
Using the scheduling feature on TweetDeck gives you the flexibility to plan your tweet content in advance and ensures that your tweets are posted at the most optimal times. It eliminates the need to manually post tweets and enables you to maintain an active presence on Twitter even when you’re busy or unable to access your dashboard in real-time.
Make sure to consider your target audience’s time zones and engagement patterns when scheduling your tweets. By posting during peak activity periods, you can increase the visibility and reach of your tweets, ultimately boosting your engagement and followers.
Experiment with different scheduling strategies to find what works best for your specific audience and goals. It’s also important to regularly evaluate the performance of your scheduled tweets and make adjustments as necessary to optimize your Twitter presence.
Now that you know how to effectively use the scheduling feature on TweetDeck, let’s explore some tips to enhance the effectiveness of your scheduled tweets.
Choosing the Date and Time for Your Scheduled Tweets
Choosing the right date and time for your scheduled tweets can significantly impact their reach and engagement. By strategically timing your tweets, you can increase the likelihood of reaching your target audience and maximizing the impact of your content. Here are some factors to consider when choosing the date and time for your scheduled tweets:
- Audience demographics: Understand your target audience and their geographic location. Consider their time zones to ensure your tweets are posted when they are most likely to be active on Twitter. Analyze your followers’ engagement patterns and identify the times when they are most active and receptive to your content.
- Peak activity periods: Research industry or niche-specific data to determine the peak activity periods on Twitter. These are the times when Twitter users are most active and engaged. Schedule your tweets during these periods to increase visibility and maximize the potential for interactions.
- Avoiding competition: Take note of when your competitors are most active on Twitter and try to schedule your tweets at different times to avoid direct competition. By posting when your competitors are less active, you can increase the chances of your tweets standing out and capturing the attention of your target audience.
- Testing and experimentation: Conduct experiments to identify the optimal times for your specific audience. Test different posting schedules and track the performance of your scheduled tweets. Analyze metrics such as engagement rates, retweets, likes, and click-through rates to determine which times are most effective for your Twitter content.
- Time zone considerations: If your target audience is spread across different time zones, it’s crucial to consider this when scheduling your tweets. Adjust your posting schedule to accommodate multiple time zones, ensuring that your tweets are seen by a wider range of followers.
- Relevancy and timeliness: Consider the nature of your content and its timeliness. If you are sharing time-sensitive information or news, schedule your tweets to coincide with the events or industry-specific trends to increase relevance and optimize engagement with your audience.
Keep in mind that determining the ideal timing for your scheduled tweets may require some trial and error. It is an ongoing process that involves monitoring the performance of your tweets, analyzing audience behavior, and adapting your posting schedule accordingly.
By carefully selecting the date and time for your scheduled tweets, you can increase the visibility, reach, and engagement of your content, ultimately driving meaningful interactions and achieving your Twitter marketing goals.
Now that you understand the importance of choosing the right date and time for your scheduled tweets, let’s explore some practical tips for effective tweet scheduling on TweetDeck.
Editing or Deleting Scheduled Tweets
Once you have scheduled a tweet on TweetDeck, you may need to make changes or delete it altogether if circumstances change or you want to update the content. TweetDeck provides convenient options to edit or delete your scheduled tweets. Here’s how you can manage your scheduled tweets on TweetDeck:
- Click on the “Scheduled” column on your TweetDeck dashboard. This column displays all the tweets that you have scheduled for future posting.
- Within the “Scheduled” column, locate the tweet that you want to edit or delete. Hover your mouse over the tweet to reveal a set of action buttons.
- To edit the tweet, click on the “Edit” button, which is represented by a pencil icon. This will open the tweet compose box, allowing you to make changes to the text, hashtags, mentions, or media. Once you have made the desired modifications, click on the “Update” or “Reschedule” button to save your changes.
- If you no longer wish to publish the scheduled tweet, you can delete it. Click on the “Delete” button, represented by a trash bin icon. A confirmation window will appear asking you to confirm the deletion. Click on “Delete” to permanently remove the tweet from your scheduled tweets list.
- If you want to reschedule the tweet for a different date and time, you can edit the tweet as mentioned earlier and select a new schedule within the tweet compose box. Click on the “Update” or “Reschedule” button to save the changes.
- Make sure to review your scheduled tweets periodically and adjust or delete any that are no longer relevant or align with your goals. This ensures that your content remains up-to-date and valuable to your audience.
By providing the flexibility to edit or delete your scheduled tweets, TweetDeck allows you to maintain control over your content and adapt to changing circumstances. Whether you need to correct a typo, update information, or remove a tweet altogether, TweetDeck’s editing and deletion options make it easy.
Remember to be mindful of any dependencies or engagements associated with the tweet you plan to edit or delete. If the tweet has already received interactions such as retweets or likes, editing or deleting it may affect the user experience and engagement metrics. Use your discretion and consider the impact before making any changes.
Scheduling tweets in advance can greatly streamline your social media management efforts, and being able to edit or delete them gives you the flexibility to adjust your strategy as needed. Take advantage of these features to maintain an effective and up-to-date Twitter presence.
Now that you know how to edit or delete your scheduled tweets on TweetDeck, let’s explore some tips to enhance your tweet scheduling strategy.
Tips for Effective Tweet Scheduling
Mastering the art of tweet scheduling can significantly boost your Twitter presence and engagement. By strategically planning and scheduling your tweets, you can maximize the impact of your content and reach your target audience at the right time. Here are some tips to enhance your tweet scheduling strategy:
- Consistency is key: Maintain a consistent schedule by posting tweets at regular intervals. This helps establish a routine for your followers and keeps your content fresh in their minds. Experiment with different posting frequencies to find what works best for your audience.
- Understand your audience: Gain insights into your target audience’s behavior and preferences. Analyze the times when they are most active on Twitter and schedule your tweets accordingly. Consider factors like time zones and demographics to optimize engagement with your content.
- Utilize analytics: Take advantage of Twitter analytics or third-party tools to monitor the performance of your scheduled tweets. Analyze metrics such as engagement rates, retweets, likes, and click-through rates to identify trends and patterns. Use this data to refine your scheduling strategy and optimize your content distribution.
- Test different times: Experiment with different posting times to determine the optimal moments for engagement with your audience. Test during weekdays, weekends, mornings, evenings, and late nights to identify when your tweets receive the highest levels of interaction. Customizing your schedule to these peak times can help maximize visibility and engagement.
- Consider content relevance: Tailor your scheduled tweets to be timely and relevant. Take advantage of trends, events, or industry-specific topics to capture your audience’s attention. Align your content with current conversations to increase the chances of sparking engagement and generating interest.
- Balance promotion and value: While it’s important to promote your products, services, or content, ensure that your scheduled tweets offer value to your audience. Strike a balance between promotional tweets and tweets that educate, entertain, or provide insights. This helps build trust, credibility, and a loyal following.
- Engage with your audience: Scheduling tweets doesn’t mean disconnecting from your audience. Allocate time to actively engage with users who interact with your scheduled tweets. Respond to mentions, reply to comments, and participate in relevant conversations. Building a strong online presence includes being actively involved and fostering connections.
- Monitor and adapt: Keep a close eye on the performance of your scheduled tweets. Track metrics and performance indicators to identify patterns and trends. Adapt your scheduling strategy based on the insights gained, making informed decisions on future tweet scheduling.
Remember that tweet scheduling is a continual process of refinement and adjustment. Regularly assess your strategy, analyze data, and adapt your approach as needed to ensure optimal results.
By implementing these tips, you can optimize your tweet scheduling strategy and create meaningful interactions with your audience. Tailor your tweets to their preferences, provide valuable content, and build a strong presence on Twitter.
Now that you have a deeper understanding of effective tweet scheduling, let’s delve into the advantages of using TweetDeck for tweet scheduling.
Advantages of Using TweetDeck for Tweet Scheduling
TweetDeck offers several advantages that make it an excellent choice for managing and scheduling tweets. Its robust features and user-friendly interface provide numerous benefits to individuals and businesses. Here are some key advantages of using TweetDeck for tweet scheduling:
- Centralized management: TweetDeck allows you to manage multiple Twitter accounts from a single dashboard. This eliminates the need to log in and out of different accounts, streamlining your social media management process.
- Customizable columns: With TweetDeck, you can create and customize columns to display specific content. This feature allows you to monitor your home feed, mentions, hashtags, and more, all in one place. Personalizing your dashboard based on your preferences and needs enhances your efficiency and ease of use.
- Real-time updates: TweetDeck provides real-time updates, ensuring that you stay up to date with the latest tweets and activities on Twitter. With live stream functionality and constant refreshes, you won’t miss any important tweets or engagements from your audience.
- Scheduling flexibility: The scheduling feature on TweetDeck enables you to plan and automate your tweet posting. This flexibility allows you to create an organized posting schedule, ensuring a consistent and timely presence on Twitter. It saves you time and effort by allowing you to prepare tweets in advance.
- Advanced filtering options: TweetDeck offers powerful filtering options, allowing you to create customized streams based on specific criteria. This feature is particularly useful for businesses that want to monitor conversations related to their brand or industry. It helps you stay informed and engaged with relevant discussions happening on Twitter.
- Enhanced engagement: With TweetDeck, you can easily engage with your audience by replying, retweeting, or liking tweets directly from the dashboard. This streamlined process enables you to promptly interact with your followers and build connections without having to navigate to the Twitter website or app.
- Third-party integration: TweetDeck supports integration with various third-party tools and applications. This allows you to enhance your tweeting experience by connecting additional tools for analytics, content curation, or social media management.
- Ease of use: TweetDeck’s user-friendly interface and intuitive navigation make it accessible to users of all experience levels. Whether you are a beginner or an advanced Twitter user, the layout and functionality of TweetDeck make it easy to navigate and manage your Twitter accounts effectively.
These advantages make TweetDeck a valuable tool for managing and scheduling tweets. It offers convenience, flexibility, and a wide range of features that improve your Twitter experience and boost your social media management efforts.
Whether you’re an individual, a small business, or a large corporation, integrating TweetDeck into your tweet scheduling strategy can enhance your productivity, engagement, and overall effectiveness on Twitter.
Now that you are familiar with the advantages of using TweetDeck for tweet scheduling, you can leverage this powerful tool to maximize your Twitter presence and achieve your social media goals.