
Overview of Chromebook Screen Rotation
One of the great features of Chromebooks is the ability to rotate the screen, allowing you to adjust the display orientation for different needs and preferences. Whether you want to read documents in portrait mode, watch videos in landscape mode, or simply change the screen orientation for a better viewing experience, Chromebooks offer multiple methods to rotate the screen quickly and easily.
In this article, we will explore various methods to rotate the screen on a Chromebook. From enabling the auto-rotate setting to using keyboard shortcuts and accessing display settings, you’ll learn how to modify the screen orientation effortlessly. Additionally, we’ll address troubleshooting tips if you encounter any issues while rotating your Chromebook screen.
Rotating the screen on a Chromebook is especially useful when utilizing the device in different modes, such as laptop, tablet, or tent mode. By adjusting the screen orientation to match your current usage, you can have a more comfortable and immersive experience with your Chromebook.
While the method of rotating the screen may vary slightly depending on the Chromebook model and version of Chrome OS, the general steps will be similar. Whether you have a touchscreen Chromebook or one without a touchscreen, there will be a suitable method to rotate the screen.
Now, let’s dive into the different methods you can use to rotate the screen on your Chromebook.
Method 1: Enabling Auto-Rotate Setting
One of the easiest ways to rotate the screen on a Chromebook is by enabling the auto-rotate setting. This feature allows your Chromebook to automatically adjust the screen orientation based on the device’s physical position.
To enable the auto-rotate setting on your Chromebook, follow these steps:
- Click on the system tray in the bottom-right corner of the screen. It is represented by the clock, Wi-Fi icon, and other system icons.
- Click on the gear icon to open the settings menu.
- In the settings menu, click on “Display”.
- Scroll down to find the “Screen rotation” option.
- Toggle the switch to enable the auto-rotate setting.
Once you have enabled the auto-rotate setting, your Chromebook’s screen will automatically rotate when you change the device’s orientation. For example, if you switch from laptop mode to tablet mode by folding the keyboard behind the screen, the display will adjust accordingly.
Note that the auto-rotate setting may not be available on all Chromebook models. If you don’t see the option in your settings menu, it means your device does not support this feature.
Enabling the auto-rotate setting provides a convenient way to ensure that your Chromebook’s screen is always aligned with your viewing angle. Whether you’re using your device in different modes or simply prefer a specific orientation, this feature eliminates the need for manual adjustments.
Now that you know how to enable the auto-rotate setting, let’s explore another method to rotate the screen on your Chromebook.
Method 2: Using Keyboard Shortcut to Rotate Screen
If you prefer a quick and convenient way to rotate the screen on your Chromebook, using a keyboard shortcut is the way to go. Chromebooks have a dedicated keyboard shortcut that allows you to rotate the screen with just a few key presses.
Here are the steps to rotate the screen using the keyboard shortcut:
- Hold down the “Ctrl” and “Shift” keys simultaneously.
- While holding down those keys, press the “Refresh” key. The “Refresh” key is typically located in the row above the number keys and has a circular arrow icon.
By following these steps, the screen on your Chromebook will rotate to the next available orientation. If you continue pressing the keyboard shortcut, the screen will cycle through the different display orientations, such as landscape to portrait and vice versa.
This method is especially useful when you want to quickly change the screen orientation without navigating through the settings menu or using touch gestures. Whether you’re using your Chromebook in laptop mode or as a tablet, the keyboard shortcut provides a convenient way to rotate the screen to match your needs.
It’s important to note that the availability of the keyboard shortcut may vary depending on the Chromebook model and version of Chrome OS. If the specific keyboard shortcut mentioned above doesn’t work on your device, it’s possible that a different key combination is assigned for screen rotation.
Now that you know how to rotate the screen using a keyboard shortcut, let’s move on to exploring another method.
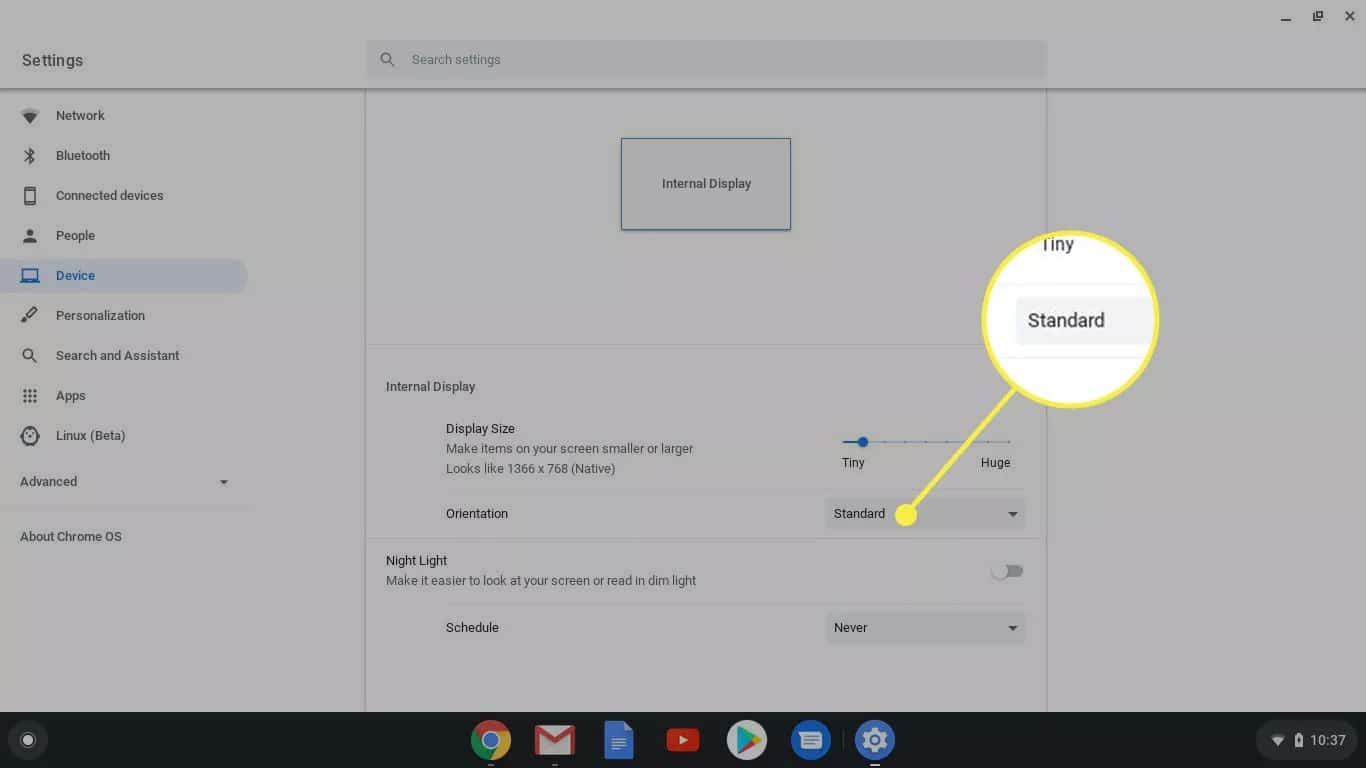
Method 3: Rotating the Chromebook Screen from Display Settings
If you prefer a more customizable approach to rotating the screen on your Chromebook, you can use the display settings to manually adjust the screen orientation. This method allows you to choose the desired display orientation from a list of options.
To rotate the Chromebook screen from the display settings, follow these steps:
- Click on the system tray in the bottom-right corner of the screen.
- Click on the gear icon to open the settings menu.
- In the settings menu, click on “Display”.
- Scroll down to find the “Orientation” section.
- Click on the drop-down menu and select the desired screen orientation, such as landscape, portrait, or inverted.
Once you’ve selected the desired screen orientation, your Chromebook’s display will adjust accordingly. This method allows you to fine-tune the screen orientation to match your specific needs, whether you’re working on documents, watching videos, or using the Chromebook in a different mode.
It’s important to note that not all Chromebook models support all screen orientations. Depending on your device, certain orientations may not be available. In such cases, the options in the drop-down menu will be limited to the supported orientations.
By using the display settings to rotate the screen, you have more control over the screen orientation and can easily switch between different modes without the need for physical adjustments. This method is particularly useful when you have specific requirements for the screen orientation based on the task at hand.
Now that you’re familiar with rotating the Chromebook screen from the display settings, let’s move on to exploring another method.
Method 4: Using Accessibility Settings to Rotate Screen
If you’re looking for alternative ways to rotate the screen on your Chromebook, utilizing the accessibility settings can provide additional options for screen orientation customization. The accessibility settings offer more flexibility and control over how the screen is displayed on your Chromebook.
Here’s how you can rotate the Chromebook screen using the accessibility settings:
- Click on the system tray in the bottom-right corner of the screen.
- Click on the gear icon to open the settings menu.
- In the settings menu, click on “Accessibility”.
- Scroll down to find the “Display” section.
- Click on the “Manage accessibility features” link.
- Note: Depending on your Chromebook model and version of Chrome OS, the accessibility settings may be located in a different section.
- In the “Manage accessibility features” menu, click on “Display” under the “Vision” category.
- Toggle the switch next to “Rotate screen” to enable screen rotation.
- Once enabled, you can use the “Rotate” button to manually rotate the screen to the desired orientation.
By utilizing the accessibility settings, you have more control over the screen rotation and can easily adjust it based on your preferences. This method is particularly useful for individuals with specific accessibility needs or for those who require a unique screen orientation for their Chromebook usage.
It’s important to note that the availability and location of accessibility settings may vary depending on your Chromebook model and version of Chrome OS. The steps provided above serve as a general guide, but you may encounter slight variations in the menu options and organization.
Now that you’re familiar with using the accessibility settings to rotate the screen on your Chromebook, let’s move on to exploring another method.
Method 5: Rotating the Screen in Tablet Mode
If you’re using a Chromebook with a 2-in-1 design or a detachable keyboard, you can easily rotate the screen by switching to tablet mode. Tablet mode is designed to provide a more intuitive touch experience, and it automatically adjusts the screen orientation accordingly.
To rotate the screen in tablet mode, follow these steps:
- If your Chromebook has a detachable keyboard, detach it to enter tablet mode. If you have a 2-in-1 Chromebook, fold the device into a tablet form factor.
- Once in tablet mode, the screen will automatically adjust its orientation based on the physical position of the device.
- If the screen doesn’t rotate, check your Chromebook settings to ensure that auto-rotate is enabled. You can follow the steps mentioned in Method 1 to enable the auto-rotate setting.
In tablet mode, the screen will rotate smoothly as you change the position of your Chromebook. Whether you’re using it in portrait mode for reading or landscape mode for watching videos, tablet mode provides a seamless screen rotation experience.
It’s important to note that not all Chromebook models support tablet mode or have a detachable keyboard. Therefore, this method may not be applicable to all devices. If your Chromebook doesn’t have a tablet mode or a detachable keyboard, you can still use the other methods mentioned earlier to rotate the screen.
Now that you know how to rotate the screen in tablet mode, let’s move on to exploring troubleshooting tips if you encounter any issues with screen rotation.
Troubleshooting: What to Do if Screen Rotation Doesn’t Work
While rotating the screen on a Chromebook is usually a straightforward process, you may encounter situations where the screen rotation doesn’t work as expected. If you’re experiencing difficulties with screen rotation, here are some troubleshooting tips to help you resolve the issue:
- Check the auto-rotate setting: Ensure that the auto-rotate setting is enabled. You can follow the steps mentioned in Method 1 to verify and enable this setting.
- Restart your Chromebook: Sometimes, simply restarting your Chromebook can fix minor software glitches that may be causing the screen rotation issue.
- Update Chrome OS: Make sure that your Chrome OS is up to date. Chrome OS updates often include bug fixes and improvements that can resolve issues related to screen rotation.
- Disable and re-enable auto-rotate: Try disabling the auto-rotate setting and then re-enabling it. This process can sometimes refresh the system and solve any temporary issues affecting screen rotation.
- Perform a hardware reset: If the software troubleshooting steps don’t resolve the problem, you can perform a hardware reset on your Chromebook. Refer to your device’s documentation or visit the manufacturer’s website for instructions specific to your model.
- Seek technical support: If none of the above steps resolve the screen rotation issue, it’s recommended to contact the manufacturer’s technical support or visit an authorized service center for further assistance. They can provide specialized guidance and troubleshooting for your specific Chromebook model.
By following these troubleshooting tips, you can often resolve screen rotation issues on your Chromebook. Remember to be patient and try these steps systematically to identify and fix the underlying cause of the problem.
Now that you’re equipped with troubleshooting knowledge, you can confidently tackle any screen rotation issues that may arise while using your Chromebook.