
Create a Backup of your Data
Before proceeding with restoring your desktop computer to factory settings, it is crucial to create a backup of all your important data. By doing so, you can ensure that no valuable files or documents will be lost during the process. Here’s how you can create a backup:
1. Identify the files and folders that you want to back up. This includes documents, photos, videos, and any other important data stored on your computer.
2. Connect an external storage device, such as a USB flash drive or an external hard drive, to your computer.
3. Open the file explorer on your computer and navigate to the location of the files you want to back up.
4. Select the files and folders you want to back up. You can do this by using the Ctrl or Shift key to select multiple files or folders.
5. Right-click on the selected files and choose the “Copy” option from the context menu.
6. Navigate to the external storage device, right-click, and choose the “Paste” option to transfer the files to the backup drive.
7. Wait for the transfer process to complete. The time it takes will depend on the size of the files being copied.
8. Once the backup is complete, safely eject the external storage device from your computer.
Creating a backup of your data is essential in case anything goes wrong during the factory reset process. It provides you with an extra layer of protection, ensuring that your important files and documents are safe and secure. Remember to double-check the backup to ensure that all necessary files have been copied successfully before proceeding with the factory reset.
Disconnect External Devices
Before initiating the factory reset process on your desktop computer, it is important to disconnect any external devices that are connected to it. This step will prevent any potential conflicts or issues during the restoration process. Follow these steps to disconnect external devices:
1. Shut down your computer completely. Ensure that all open programs and files are closed before proceeding.
2. Unplug any external devices connected to your computer, such as USB drives, external hard drives, printers, scanners, cameras, or any other peripherals.
3. Once you have unplugged all external devices, check the back panel of your computer for any additional connections. Some desktop computers may have audio cables, ethernet cables, or other miscellaneous cables connected to the back. Disconnect these as well.
4. Take a moment to inspect the cables for any damage or wear. If you notice any frayed or damaged cables, it is recommended to replace them before reconnecting the devices.
5. Ensure that your computer is now only connected to the power source using the power cable. All other external devices should be completely disconnected.
By disconnecting external devices, you minimize the risk of compatibility issues or driver conflicts during the factory reset process. This step also safeguards your peripherals from any potential data loss or damage. Remember to keep track of all the disconnected devices and their respective cables to reconnect them after the factory reset is complete.
Access the Restoring Options
After creating a backup of your important data and disconnecting external devices, you can now proceed to access the restoring options on your desktop computer. The process may slightly vary depending on your computer’s brand and operating system. Here’s a general guideline:
1. Power on your computer and wait for it to boot up completely. Make sure you are logged in with administrative privileges.
2. Access the “Settings” menu by clicking on the Start button or searching for it in the taskbar. Alternatively, you may need to access the BIOS or Recovery partition by pressing specific keys during the boot-up process. Consult your computer’s user manual or the manufacturer’s website for the appropriate key combination.
3. In the Settings menu, navigate to the “Update & Security” section. Here, you will typically find the options related to system restoration or recovery.
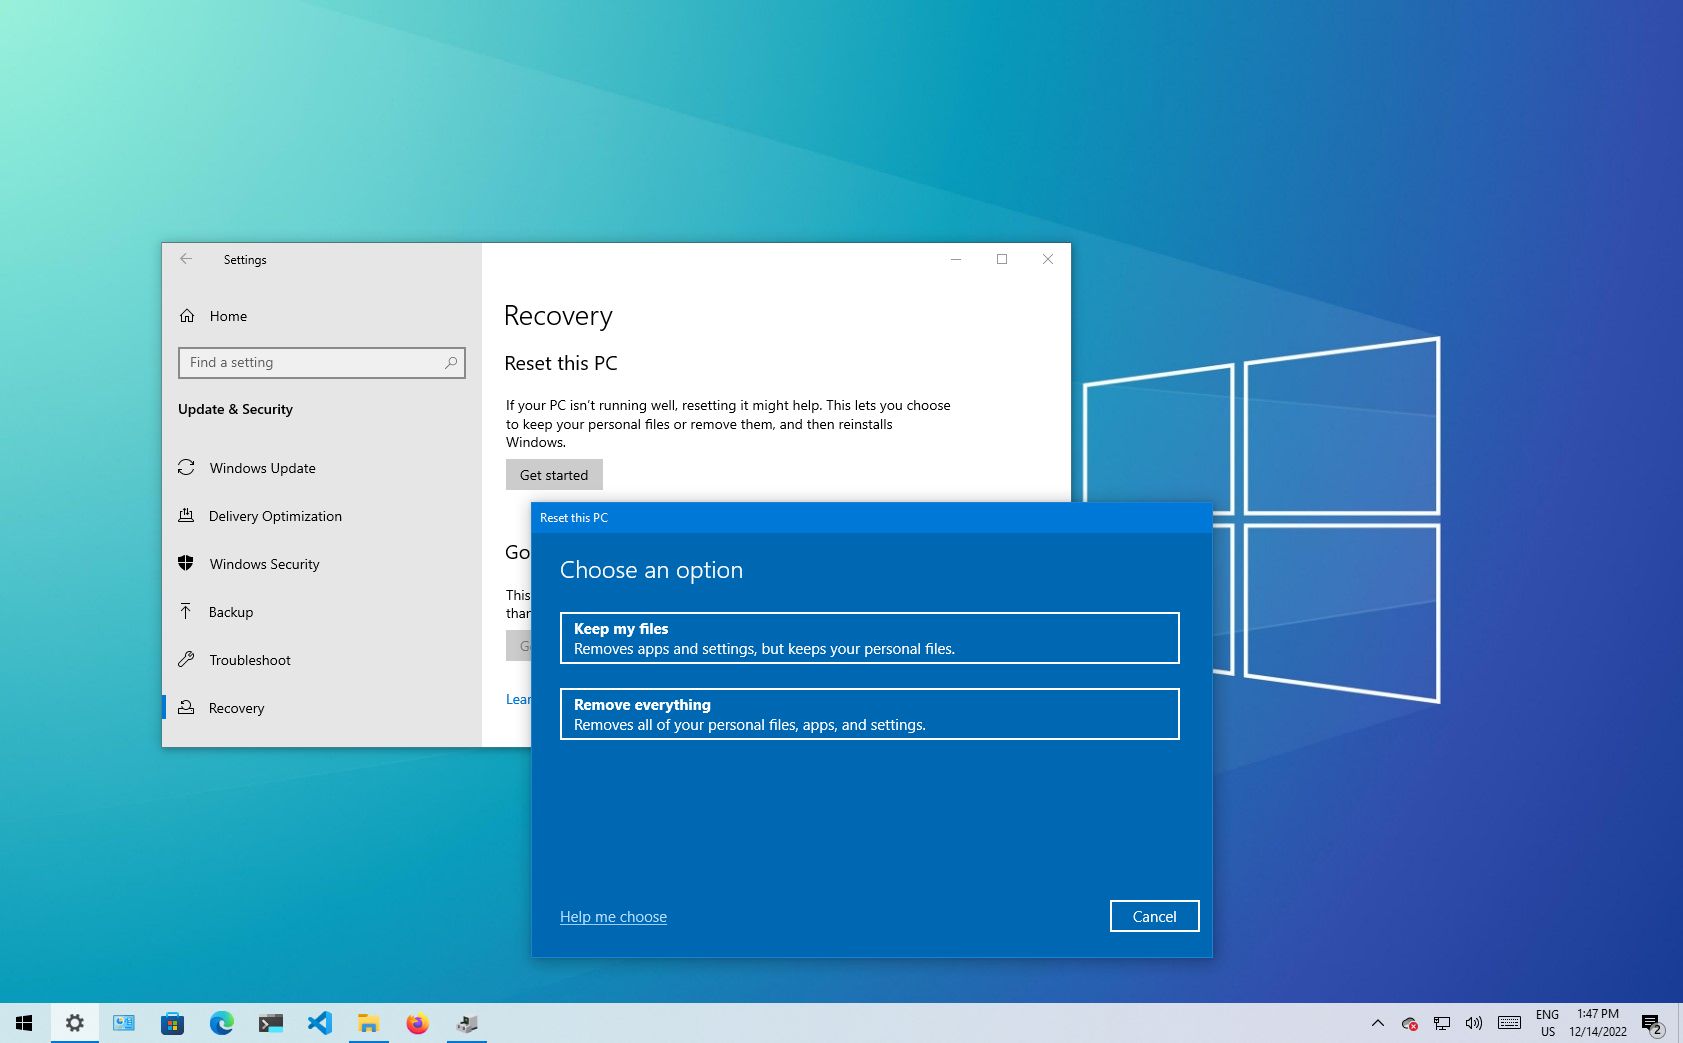
4. Look for the “Recovery” tab or similar options within the Update & Security section. Click on it to access the restoring options.
5. You may be presented with different recovery options, such as “Reset this PC,” “System Restore,” or “Advanced Startup.” Select the option that says “Reset this PC” or similar, as this will allow you to restore your computer to its factory settings.
6. Depending on your preference, you may have the option to keep your personal files or remove everything during the factory reset process. Choose the appropriate option based on your needs.
By accessing the restoring options, you are one step closer to restoring your desktop computer to its factory settings. It is important to note that the exact steps may vary depending on your computer’s make and model. If you encounter any difficulties during this process, it is recommended to refer to the user manual or seek assistance from the manufacturer’s support website.
Select the Factory Reset Option
Once you have accessed the restoring options on your desktop computer, the next step is to select the factory reset option. This will initiate the process of returning your computer to its original factory settings. Here’s how you can do it:
1. In the recovery options menu, you should see an option such as “Reset this PC,” “Factory Reset,” or something similar. Click on this option to proceed.
2. You may be prompted to choose between keeping your personal files or removing everything. Carefully consider your decision, as selecting the option to remove everything will erase all files and programs on your computer. If you have already created a backup of your data, it is generally recommended to choose the option to remove everything for a complete restoration.
3. Some computer models may require you to enter a password or confirm your selection before proceeding. If prompted, enter the necessary information and click on “Next” or “Reset” to continue.
4. At this point, the factory reset process will begin. Your computer will automatically restart and start the restoration process. The amount of time it takes to complete the process will depend on the speed of your computer and the amount of data being erased and reset.
5. During the factory reset process, it’s important not to interrupt or shut down your computer. Doing so may result in an incomplete restoration and potential system issues.
By selecting the factory reset option, you are initiating the restoration process that will bring your desktop computer back to its original factory state. It’s crucial to ensure that you have backed up all necessary files and made the appropriate preparations before proceeding with this step. Keep in mind that the exact steps and options may vary depending on your computer’s brand and model, so refer to the user manual or manufacturer’s support website for specific instructions if needed.
Follow the On-Screen Instructions
After selecting the factory reset option on your desktop computer, you will be guided through the restoration process via on-screen instructions. It is crucial to carefully follow these instructions to ensure a successful reset. Here’s what you need to do:
1. Once the factory reset process begins, your computer will display a series of on-screen instructions. Read these instructions carefully to understand the steps involved in the restoration process.
2. The on-screen instructions may prompt you to confirm your decision to reset your computer to its factory settings. Follow the provided prompts and click on the appropriate buttons to proceed.
3. Depending on your computer’s operating system and manufacturer, you may be asked to select various options during the reset process. These options can include language preferences, user account settings, or network configurations. Choose the desired options according to your preferences.
4. As the restoration process progresses, your computer may restart multiple times. This is a normal part of the factory reset process, so do not interrupt or turn off your computer during these restarts.
5. Throughout the reset process, keep an eye on the on-screen instructions for any additional prompts or actions required. Follow these instructions diligently to ensure a smooth and successful factory reset.
6. Once the restoration process is complete, your computer will typically reboot into a fresh installation of the operating system. At this point, you will have a clean slate on your desktop computer, with all previous user data and settings removed.
By following the on-screen instructions, you ensure that you are taking the necessary steps to restore your desktop computer to its factory settings accurately. It’s important to be patient and attentive during this process, as any deviation from the instructions may result in unexpected outcomes. If you encounter any difficulties or have any questions, consult the user manual or the manufacturer’s support website for further guidance.
Wait for the Process to Complete
After initiating the factory reset process on your desktop computer and following the on-screen instructions, the next step is to patiently wait for the process to complete. The duration of the reset process can vary depending on the speed of your computer and the amount of data being erased and reset. Here’s what you need to keep in mind:
1. During the factory reset process, your computer may restart multiple times. This is a normal part of the restoration process, as the computer is wiping the existing data and reinstalling the operating system.
2. It’s crucial not to interrupt or shut down your computer while the factory reset is in progress. Doing so may result in an incomplete restoration, system errors, or other issues.
3. Depending on the size of your hard drive and the complexity of the restoration process, the duration of the factory reset can vary. It can take anywhere from a few minutes to several hours. It’s important to be patient and allow the process to complete.
4. While waiting for the factory reset to finish, avoid performing any other tasks on your computer. This includes opening programs, browsing the internet, or accessing files on the computer. By keeping the computer idle, you ensure that the reset process can proceed without any interruptions.
5. It’s recommended to keep an eye on the progress indicators or messages displayed on the screen. This can give you an idea of how far along the process is and how much longer you may need to wait. However, avoid interfering or making changes to the reset process based on these indicators without clear instructions.
By patiently waiting for the factory reset process to complete, you allow the computer to restore itself to its original factory settings. This step is crucial in ensuring a clean and fresh start for your desktop computer. Once the process is finished, you can proceed to set up your computer again and reinstall any necessary software or drivers.
Set up your Computer Again
After the factory reset process is complete, you will need to set up your desktop computer again to personalize it according to your preferences. This includes configuring settings, creating user accounts, and customizing the system to suit your needs. Follow these steps to set up your computer:
1. Once the factory reset process is finished, your computer will typically reboot into a fresh installation of the operating system. You may be asked to choose a language, region, and keyboard layout. Select the appropriate options and click on “Next” to proceed.
2. Proceed through the initial setup screens, which may include accepting license agreements, setting up a new user account, and selecting privacy settings. Follow the prompts and provide the necessary information as required.
3. If you had previously created a backup of your data, you can now restore it to your computer. Connect the external storage device containing the backup and follow the instructions to retrieve and restore your files.
4. As you set up your computer, take the opportunity to customize various settings according to your preferences. This includes choosing a desktop wallpaper, adjusting display settings, configuring power settings, and personalizing the taskbar and start menu.
5. Install any necessary software applications that you require for your day-to-day operations. This can include productivity tools, multimedia applications, web browsers, and any other software you regularly use.
6. Ensure that your computer is connected to the internet and proceed to update your operating system and drivers. Keeping your computer up to date with the latest software patches and security updates is crucial for optimal performance and protection.
By going through the setup process and customizing your computer, you will be able to make it feel familiar and tailored to your needs. Take the time to configure settings, install necessary software, and personalize your computer to ensure a smooth and enjoyable user experience.
Remember, the exact steps to set up your computer may vary depending on the operating system and computer model. Refer to the user manual or the manufacturer’s support website for specific instructions if needed.
Reinstall your Software and Drivers
After setting up your computer again following a factory reset, the next step is to reinstall any necessary software applications and drivers. This will ensure that your desktop computer has all the essential programs and components to meet your needs. Here’s how you can reinstall your software and drivers:
1. Identify the software applications that you need to reinstall on your computer. Make a list of the programs and their installation files or download links.
2. Start by installing essential software applications such as antivirus software, web browsers, productivity suites, and media players. Use the installation files you have or download the latest versions from the official websites.
3. Follow the installation prompts and provide any required information or activation codes during the installation process. Be sure to read the license agreements and terms of service before accepting them.
4. If you had specific drivers installed for any peripherals or hardware components, such as printers, scanners, or graphics cards, you will need to reinstall them as well. Locate the driver installation files or download the latest drivers from the manufacturer’s website.
5. Run the driver installation files and follow the on-screen instructions. Make sure to select the correct driver versions compatible with your operating system and hardware specifications.
6. After reinstalling the necessary software applications and drivers, it is recommended to restart your computer. This will ensure that all changes and updates take effect properly.
7. Once your computer has restarted, check if all the software applications and drivers are functioning correctly. Test any hardware peripherals to ensure they are recognized and functioning as expected.
By reinstalling your software applications and drivers, you bring back the functionality and capabilities that you had before the factory reset. It is essential to keep your software and drivers up to date to ensure optimal performance and compatibility with your system. Regularly check for updates from the software and hardware manufacturers to ensure you have the latest versions installed.
Remember, the exact process of reinstalling software applications and drivers may vary depending on the specific programs and hardware components you need. Follow the provided instructions and consult the user manuals or documentation from the respective manufacturers if needed.
Restore your Backed up Data
One of the crucial steps after setting up your computer again following a factory reset is to restore your backed up data. This ensures that you regain access to your important files, documents, pictures, videos, and other data that you had previously saved. Here’s how you can restore your backed up data:
1. Connect the external storage device containing your backup files to your computer. This can be a USB flash drive, an external hard drive, or any other device used to store your backup.
2. Open the file explorer or the appropriate software to access the contents of the external storage device.
3. Locate the files and folders that you had previously backed up. Depending on the organization of your backup, you may need to navigate through different directories or folders to find the specific files you want to restore.
4. Select the files and folders you want to restore. You can do this by using the Ctrl or Shift key to select multiple files or folders.
5. Right-click on the selected files and choose the “Copy” option from the context menu.
6. Navigate to the location on your computer where you want to restore the files. This can be your documents folder, pictures folder, or any other location where you originally stored the files.
7. Right-click in the desired location and choose the “Paste” option to transfer the files from the external storage device to your computer.
8. The files will start to copy or transfer to your computer. This process may take some time depending on the size of your backup and the speed of your computer.
9. Once the file transfer is complete, you can access your restored data from their respective locations on your computer.
By restoring your backed up data, you ensure that you regain access to your important files and documents. It’s essential to keep backups of your data regularly to prevent any loss of information in case of system issues or accidents. Review your restored data to ensure that all necessary files have been successfully transferred, and make any necessary arrangements to organize and manage your files effectively.
Remember, the exact process of restoring data may vary depending on the method or software used for the backup. Follow the steps provided and consult any documentation or guides specific to the backup method you used if needed.
Update and Secure your Computer
After restoring your backed up data and setting up your computer following a factory reset, it is crucial to update and secure your computer to ensure optimal performance and protection against potential threats. Here are the key steps to update and secure your computer:
1. Install Operating System Updates: Check for and install any available updates for your operating system. These updates often include bug fixes, performance improvements, and security patches.
2. Update Software Applications: Update all the software applications you installed on your computer. Manufacturers release updates to address vulnerabilities, improve functionality, and enhance security. Enable automatic updates whenever possible for a seamless updating process.
3. Enable Firewall Protection: Ensure that your computer’s firewall is enabled. A firewall acts as a barrier between external threats and your system, monitoring and controlling incoming and outgoing network traffic.
4. Install Antivirus Software: Install reputable antivirus software and keep it up to date. Antivirus software helps detect, prevent, and remove malware and other threats. Regularly scan your system for any potential infections.
5. Enable Automatic Data Backup: Set up automatic backups of your important data to avoid data loss in the event of a system failure or malware attack. Use external storage devices or cloud-based backup services to securely store your data.
6. Use Strong and Unique Passwords: Make sure to use strong, unique passwords for all your accounts to minimize the risk of unauthorized access. Consider using a password manager to generate and store complex passwords securely.
7. Enable Two-Factor Authentication (2FA): Enable 2FA whenever possible for your online accounts. This adds an extra layer of security by requiring a second form of authentication, such as a verification code sent to your mobile device.
8. Regularly Update Drivers: Keep your hardware drivers up to date by regularly checking for updates on the manufacturer’s website. Updated drivers often provide performance improvements, bug fixes, and security enhancements.
9. Exercise Caution Online: Be vigilant while browsing the internet and downloading files. Avoid clicking on suspicious links or downloading files from untrusted sources. Use a reputable browser with built-in security features and carefully review permissions requested by installed applications.
10. Educate Yourself: Stay informed about the latest cybersecurity threats and best practices. Regularly educate yourself about phishing attempts, social engineering techniques, and common scams to better protect yourself and your computer.
By updating and securing your computer, you minimize the risk of security breaches, data loss, and system vulnerabilities. Regularly check for updates, install security software, and follow safe browsing practices to maintain a secure computing environment.
Remember, securing your computer is an ongoing process. Stay vigilant, update your system regularly, and adapt your security measures to the evolving threats in the digital landscape.
Troubleshooting Common Issues
While setting up and restoring your desktop computer to factory settings, you may encounter common issues that can hinder the process. It’s important to be prepared for these potential challenges and know how to troubleshoot them. Here are some common issues and troubleshooting steps:
1. Driver Compatibility Issues: If you experience problems with certain hardware components not functioning correctly after the factory reset, it could be due to outdated or incompatible drivers. Visit the manufacturer’s website and download the latest drivers specific to your computer model and operating system.
2. Internet Connection Problems: If you are unable to connect to the internet after the restoration process, check your network settings and ensure that your modem or router is functioning properly. Restarting these devices and updating their firmware may resolve connectivity issues.
3. Application Compatibility: Some software applications may not be compatible with the version of the operating system you have installed after the factory reset. Consider visiting the software vendor’s website to check for compatibility updates or alternatives.
4. Activation and Licensing: If you encounter activation or licensing issues with software programs, ensure that you have the necessary activation keys or licenses. Contact the software vendor’s support for assistance with licensing or activation problems.
5. System Performance: If you notice a sluggish or slow performance after the factory reset, it may be due to various factors such as insufficient system resources or unnecessary startup programs. Consider optimizing your computer’s performance by disabling unnecessary startup items and running disk cleanup and disk defragmenter tools.
6. Data Loss: While unusual, there is a slight risk of data loss during the factory reset process. If you encounter missing or lost files, double-check your backup and restore process to ensure all necessary files were successfully transferred. Consulting data recovery services may be necessary for critical data loss situations.
7. Blue Screen Errors: Blue screen errors, also known as the “Blue Screen of Death” (BSOD), may occur after the factory reset due to various reasons such as incompatible hardware, faulty drivers, or system errors. Record any error messages displayed and search online for troubleshooting steps specific to the error code.
8. System Not Booting: In rare cases, a factory reset may result in the computer being unable to boot up properly. Try booting into Safe Mode and attempt to diagnose and resolve the issue from there. If problems persist, seeking professional assistance may be necessary.
For specific issues encountered during the factory reset process, it can be helpful to consult the user manual for your computer or the support documentation provided by the manufacturer. Additionally, online forums and communities dedicated to computer troubleshooting may offer valuable insights and solutions.
Remember that troubleshooting can vary depending on the specific issue and computer model, so adapt the steps accordingly. Patience and careful problem-solving will help overcome any obstacles encountered during or after the factory reset process.