
Unplug and Reconnect the USB and HDMI Cables
When experiencing issues or errors with your Oculus Rift setup, one of the first troubleshooting steps is to unplug and reconnect the USB and HDMI cables. This straightforward process can help to resolve connectivity problems and ensure a stable connection between your Oculus Rift headset and your computer.
To begin, carefully unplug the USB and HDMI cables from both ends – at the back of your computer and from the Oculus Rift headset itself. Take a moment to inspect the connectors for any signs of damage or debris. If you notice any issues, gently clean the connectors using a soft cloth and an appropriate cleaning solution.
Next, reconnect the USB and HDMI cables firmly and securely. Ensure that they are plugged into their respective ports, making sure not to force the connectors. It’s important to note that the USB cable should be plugged into a USB 3.0 port for optimal performance. If you are unsure which ports are USB 3.0, refer to your computer’s documentation or consult the manufacturer’s website.
Once the cables are securely connected, take a moment to neatly arrange them to avoid any tangling or strain on the cables. This helps to prevent any accidental disconnection or damage during use.
After reconnecting the USB and HDMI cables, launch the Oculus software on your computer and check if the connection issue has been resolved. If not, try restarting the software or proceed to the next troubleshooting step.
By unplugging and reconnecting the USB and HDMI cables, you are effectively resetting the connection between your Oculus Rift headset and your computer. This can help to troubleshoot common connectivity issues and improve the overall performance of the device.
Check and Update Oculus Software
Regularly checking and updating the Oculus software is essential for maintaining optimal performance and ensuring compatibility with the latest features and games. By keeping the software up to date, you can often resolve common issues and improve your overall virtual reality experience.
To check for updates, open the Oculus app on your computer and navigate to the Settings section. Under the General tab, you should see an option to check for updates. Click on this button to initiate a check for any available updates to the Oculus software.
If an update is available, follow the prompts to download and install it. During the update process, it’s important to keep the Oculus app open and avoid disconnecting the Oculus Rift headset. Interrupting the update or disconnecting the headset prematurely may result in installation errors.
After the update is complete, restart your computer and relaunch the Oculus app. Check if the update has resolved any previous issues or errors you were experiencing. If not, continue with additional troubleshooting steps.
In some cases, the Oculus software may automatically update in the background without requiring manual intervention. However, it’s still worth checking for updates periodically to ensure you have the latest version installed.
In addition to updating the Oculus software, it’s also recommended to keep your graphics card drivers up to date. Virtual reality experiences rely heavily on your computer’s graphics processing power, and outdated drivers can lead to performance issues or compatibility problems.
Check the website of your graphics card manufacturer for any available driver updates. Download and install the latest version, following the installation instructions provided by the manufacturer.
By regularly checking and updating the Oculus software, as well as keeping your graphics card drivers up to date, you can help to ensure a smooth and enjoyable virtual reality experience.
Restart Your Computer
Restarting your computer is a simple yet effective troubleshooting step when encountering issues with your Oculus Rift setup. Sometimes, software conflicts or temporary glitches can be resolved by restarting your computer, allowing for a fresh start and the opportunity to resolve any underlying issues.
To restart your computer, follow these steps:
- Save any unsaved work and close all open applications.
- Click on the Start menu in the lower-left corner of your screen.
- Select the power icon, typically represented by a circle with a vertical line inside.
- Choose the “Restart” option from the power menu.
- Wait for your computer to shut down and fully restart.
Once your computer has restarted, launch the Oculus app and check if the previous issues you were experiencing with your Oculus Rift headset have been resolved. In many cases, a simple restart can clear temporary software hiccups and restore normal functionality.
If the issues persist after restarting your computer, you may need to proceed with further troubleshooting steps. However, restarting your computer is often a good first step in resolving common problems and should be attempted before moving on to more advanced troubleshooting methods.
Additionally, restarting your computer at regular intervals can help to maintain its overall performance and prevent any accumulated system errors or memory leaks from impacting your virtual reality experience.
Remember to save any unsaved work and close all applications before restarting your computer to avoid any data or work loss. Taking this precaution ensures that your computer restarts smoothly and minimizes the risk of encountering any further issues.
By restarting your computer, you provide a fresh start and an opportunity to resolve software conflicts or glitches that may be affecting your Oculus Rift setup. This simple step can often save you time and frustration and bring you one step closer to an optimal virtual reality experience.
Reset the Oculus Rift Headset
If you are experiencing persistent issues with your Oculus Rift headset, performing a reset may help to resolve software or firmware-related problems. Resetting the headset essentially clears any temporary data or settings that may be causing conflicts and restores the device to its default state.
Before proceeding with the reset, it’s important to note that performing a reset will remove any installed games or applications, as well as any personalized settings. It’s recommended to back up or take note of any important data or settings before proceeding.
To reset the Oculus Rift headset, follow these steps:
- Open the Oculus app on your computer.
- Click on the “Devices” tab at the top of the app.
- Select your Oculus Rift headset from the list of devices.
- Click on the “Settings” button represented by a gear icon.
- In the settings menu, scroll down and click on the “Reset” option.
- Follow the on-screen prompts to confirm the reset process.
Once the reset is complete, you will need to go through the initial setup process again. This includes calibrating the Oculus sensors and configuring the headset settings. Take your time to ensure that the setup is done correctly for the best possible experience.
After the reset and setup process, check if the previous issues with your Oculus Rift headset have been resolved. In many cases, a reset can solve software-related problems and restore the headset’s functionality.
If the issues persist after resetting the Oculus Rift headset, it may be necessary to proceed with further troubleshooting steps or seek assistance from Oculus support.
Resetting the Oculus Rift headset should be considered as a last resort when other troubleshooting methods have proven ineffective. It is important to only perform a reset if you are experiencing persistent and recurring issues that have not been resolved by other means.
By resetting the Oculus Rift headset, you can effectively clear any software or firmware-related problems and give your device a fresh start. This can help to resolve conflicts, improve performance, and bring you closer to a seamless and enjoyable virtual reality experience.
Reinstall Oculus Software
If you are still encountering issues with your Oculus Rift setup after trying other troubleshooting steps, reinstalling the Oculus software may be necessary to fix any underlying software problems or conflicts. Reinstalling the software essentially provides a clean installation, ensuring that all necessary files and components are properly installed.
Before proceeding with the reinstallation process, it is recommended to back up any important data or settings related to your Oculus Rift experiences. This will help to ensure that you can easily restore your settings and game data once the software is reinstalled.
To reinstall the Oculus software, follow these steps:
- Open the “Control Panel” on your computer.
- Click on “Uninstall a program” or “Programs and Features”.
- Find and select the Oculus software from the list of installed programs.
- Click on the “Uninstall” or “Remove” button and follow the prompts to complete the uninstallation process.
- Once the uninstallation is complete, restart your computer.
- Visit the official Oculus website and download the latest version of the Oculus software.
- Run the downloaded setup file and follow the on-screen instructions to reinstall the software.
- After the installation is complete, launch the Oculus app and go through the setup process again.
- Restore any backed-up data or settings to ensure a smooth transition.
After reinstalling the Oculus software, check if the previous issues you were experiencing with your Oculus Rift headset have been resolved. In many cases, a clean installation can help to resolve software conflicts and provide a stable foundation for your virtual reality experiences.
If the issues persist after reinstalling the Oculus software, it may be necessary to proceed with further troubleshooting steps or contact Oculus support for assistance.
Reinstalling the Oculus software is a more advanced troubleshooting step and should only be performed after trying other basic troubleshooting methods. It provides a fresh installation and can help to resolve software-related problems that may be affecting your Oculus Rift setup.
By reinstalling the Oculus software, you can ensure that all necessary files and components are properly installed, providing a stable and optimized environment for your virtual reality experiences.
Update Drivers for the Oculus Rift
Updating the drivers for your Oculus Rift hardware is an important step in troubleshooting and ensuring optimal performance. Drivers act as a bridge between your hardware components and the software running on your computer, allowing for seamless communication and functionality.
Outdated or incompatible drivers can often cause issues with your Oculus Rift setup, including poor performance, connectivity problems, or even crashes. Updating the drivers for your Oculus Rift hardware can resolve these issues and ensure a smooth virtual reality experience.
To update the drivers for your Oculus Rift, follow these steps:
- Identify the model and manufacturer of your Oculus Rift hardware, including the graphics card.
- Visit the manufacturer’s website, such as NVIDIA or AMD, and navigate to the driver download section.
- Enter the necessary information to identify your specific hardware model and operating system.
- Download the latest driver version available for your hardware.
- Once the driver file is downloaded, run it and follow the on-screen instructions to install the updated driver.
- Restart your computer to ensure the changes take effect.
After updating the drivers for your Oculus Rift, launch the Oculus app and check if the previous issues you were experiencing have been resolved. In many cases, updating the drivers can address compatibility issues and improve the overall performance of your virtual reality experiences.
In addition to updating the drivers for your Oculus Rift hardware, it’s also recommended to keep your operating system up to date. Regularly checking for and installing operating system updates ensures that your computer is running the latest software patches and improvements.
By updating the drivers for your Oculus Rift hardware, you can ensure that your virtual reality experiences are running smoothly and without any compatibility issues. It’s important to keep your drivers up to date to maintain optimal performance and enjoy the full potential of your Oculus Rift headset.
Check USB Power Management Settings
In some cases, USB power management settings can interfere with the proper functioning of your Oculus Rift headset. Adjusting these settings can help to ensure a stable power supply and prevent any connectivity issues or intermittent disconnects.
To check and modify the USB power management settings on your computer, follow these steps:
- Open the Control Panel on your computer.
- Click on “Hardware and Sound” or “Devices and Printers”.
- Under the “Device Manager” section, click on “Device Manager”.
- In the Device Manager window, expand the “Universal Serial Bus controllers” section.
- Right-click on each USB hub listed and select “Properties”.
- Switch to the “Power Management” tab.
- Uncheck the option that says “Allow the computer to turn off this device to save power”.
- Click on “OK” or “Apply” to save the changes.
- Repeat these steps for all the USB hubs listed in the Device Manager.
After adjusting the USB power management settings, restart your computer for the changes to take effect.
Checking and modifying the USB power management settings ensures a consistent power supply to your Oculus Rift headset, minimizing the chances of connectivity issues or sudden disconnections during use.
If you are using a laptop or a computer with a USB 3.0 port, it’s also worth considering disabling USB Selective Suspend, as this feature may affect the power supply to your Oculus Rift headset. USB Selective Suspend is a power-saving feature that can sometimes interfere with the stable operation of USB devices.
To disable USB Selective Suspend, follow these steps:
- Open the Control Panel on your computer.
- Click on “Hardware and Sound” or “Power Options”.
- Click on “Change plan settings” next to your active power plan.
- Click on “Change advanced power settings”.
- Expand the “USB settings” option in the advanced power settings window.
- Expand the “USB selective suspend setting” option.
- Select “Disabled” for both the “On battery” and “Plugged in” options.
- Click on “OK” or “Apply” to save the changes.
After disabling USB Selective Suspend, restart your computer to ensure the changes take effect.
By checking and modifying the USB power management settings and disabling USB Selective Suspend if necessary, you can ensure a consistent power supply to your Oculus Rift headset, promoting stable connectivity and an uninterrupted virtual reality experience.
Disable USB Selective Suspend
USB Selective Suspend is a power-saving feature in Windows that allows the operating system to selectively suspend USB devices to conserve power. However, this feature can sometimes interfere with the stable operation of USB devices, including the Oculus Rift headset. Disabling USB Selective Suspend can help to ensure a consistent power supply and prevent any connectivity issues or interruptions.
To disable USB Selective Suspend, follow these steps:
- Open the Control Panel on your computer.
- Click on “Hardware and Sound” or “Power Options”.
- Click on “Change plan settings” next to your active power plan.
- Click on “Change advanced power settings”.
- Expand the “USB settings” option in the advanced power settings window.
- Expand the “USB selective suspend setting” option.
- Select “Disabled” for both the “On battery” and “Plugged in” options.
- Click on “OK” or “Apply” to save the changes.
After disabling USB Selective Suspend, it is recommended to restart your computer for the changes to take effect.
Disabling USB Selective Suspend ensures that the power to your USB devices, including the Oculus Rift headset, remains constant and uninterrupted. This can help prevent any disconnections or intermittent issues that may be caused by the feature’s power-saving behavior.
It’s worth noting that USB Selective Suspend is typically more common on laptops, where power management is essential to prolong battery life. However, even on desktop computers, disabling USB Selective Suspend can still be beneficial to ensure the stable operation of USB devices.
If you continue to experience connectivity issues or interruptions with your Oculus Rift headset, it’s advisable to check and adjust other USB power management settings as well, such as disabling the option to allow the computer to turn off USB devices to save power. These additional steps can further enhance the stability and performance of your USB connections.
By disabling USB Selective Suspend and modifying other related power management settings, you can ensure a consistent and reliable power supply to your Oculus Rift headset, minimizing the risk of connectivity issues and interruptions during your virtual reality experiences.
Update Windows and Graphics Card Drivers
Updating your Windows operating system and graphics card drivers is crucial for ensuring a smooth and optimized performance with your Oculus Rift headset. Outdated drivers can cause compatibility issues and result in poor performance or connectivity problems. By keeping your software up to date, you can maximize the potential of your virtual reality experiences.
To update Windows and graphics card drivers, follow these steps:
- Update Windows:
- Open the “Settings” app on your computer.
- Click on the “Update & Security” option.
- In the Windows Update section, click on the “Check for updates” button.
- If updates are available, click on “Download” and “Install” to initiate the update process.
- Follow the on-screen instructions and restart your computer if prompted.
- Update Graphics Card Drivers:
- Identify the make and model of your graphics card. You can do this by checking the documentation or using third-party software like GPU-Z.
- Visit the website of the manufacturer, such as NVIDIA or AMD.
- Navigate to the drivers or support section on the website.
- Enter the necessary information to identify your specific graphics card model and operating system.
- Download the latest driver version available for your graphics card.
- Once the driver file is downloaded, run it and follow the on-screen instructions to install the updated driver.
- Restart your computer to ensure the changes take effect.
After updating both Windows and the graphics card drivers, launch the Oculus app and check if the previous issues you were experiencing with your Oculus Rift headset have been resolved. In many cases, outdated drivers can be the cause of performance problems and updating them can provide significant improvements.
Regularly updating your operating system and graphics card drivers ensures that your computer is equipped with the latest bug fixes, security patches, and optimizations. This helps to maintain compatibility and enhance the performance of your Oculus Rift headset.
Remember to periodically check for driver updates even if you are not experiencing any issues with your Oculus Rift setup. By keeping your software up to date, you can ensure a seamless and enjoyable virtual reality experience.
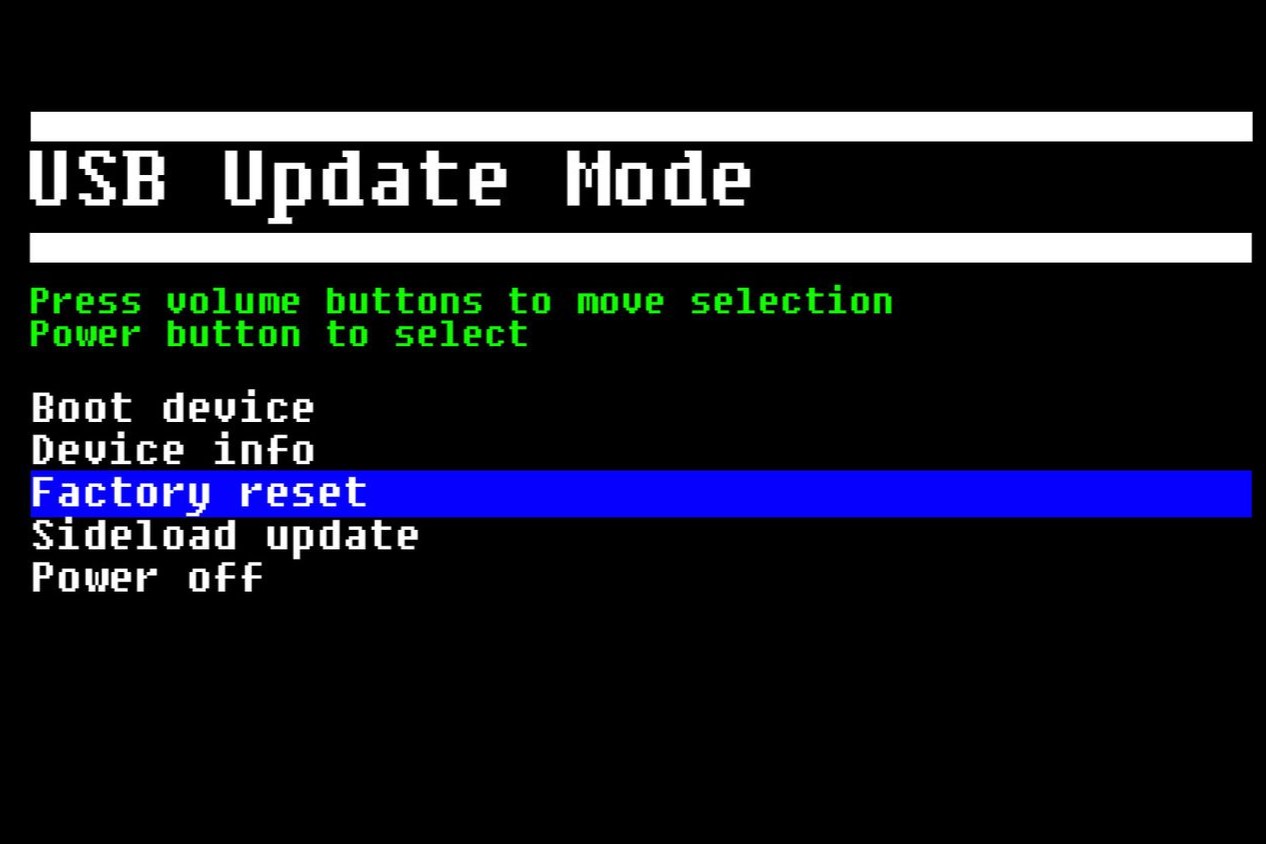
Perform a Factory Reset on the Oculus Rift
If you are still encountering persistent issues with your Oculus Rift setup and other troubleshooting methods have not provided a solution, performing a factory reset on the headset may be necessary. A factory reset will remove all data and settings from the device, essentially restoring it to its original out-of-the-box state.
It’s important to note that performing a factory reset will delete all installed games, applications, and personalized settings. Before proceeding, ensure that you have backed up any important data or settings related to your Oculus Rift experiences.
To perform a factory reset on the Oculus Rift headset, follow these steps:
- Open the Oculus app on your computer.
- Click on the “Devices” tab at the top of the app.
- Select your Oculus Rift headset from the list of devices.
- Click on the “Settings” button represented by a gear icon.
- In the settings menu, scroll down and click on the “Devices” option.
- Click on the “Reset Devices” button.
- Follow the on-screen prompts to confirm the factory reset.
Once the factory reset is complete, you will need to go through the initial setup process again. This includes calibrating the Oculus sensors and configuring the headset settings. Take your time to ensure that the setup is done correctly for the best possible experience.
After the factory reset and setup process, check if the previous issues you were experiencing with your Oculus Rift headset have been resolved. A factory reset can often eliminate any underlying software or configuration problems that may have been causing the issues.
If the issues persist after performing a factory reset, it is advisable to seek assistance from Oculus support or explore other advanced troubleshooting methods.
A factory reset should be considered as a last resort when other troubleshooting methods have proven ineffective. It is essential to back up any important data before proceeding to avoid any data loss.
By performing a factory reset on the Oculus Rift headset, you can eliminate any software or configuration problems that may be impacting its functionality. This reset provides a clean slate and can help to resolve stubborn issues, allowing you to enjoy a seamless and immersive virtual reality experience.