
Check for Power Issues
Before attempting any troubleshooting steps, it is crucial to ensure that there are no power-related issues causing your HP laptop to malfunction. Here are some steps to check for power issues:
- Verify the power source: Ensure that your laptop is properly connected to a power source. Check the power cable and the outlet to make sure they are functioning correctly. Consider trying a different outlet or power adapter to rule out any issues.
- Look for indicator lights: Most HP laptops have indicator lights that provide information about the power status. Check if the power LED light on your laptop is turned on. If it isn’t, try pressing the power button to see if it responds.
- Check the battery: If your laptop is not turning on or showing any signs of power, it could be a battery-related issue. Remove the battery from your laptop and try connecting the power adapter directly. If your laptop starts functioning normally without the battery, it might be time to replace it.
- Inspect the power button: Sometimes, the power button can become stuck or unresponsive, preventing the laptop from powering on. Carefully press the power button multiple times to check if it springs back into position. You can also try using a different key or method to power on your laptop.
- Reset the AC adapter: In some cases, the AC adapter might have a built-in reset feature. Refer to your laptop’s user manual or the manufacturer’s website to find instructions on how to reset the AC adapter. Resetting the adapter can help resolve power-related issues.
By following these steps, you can determine whether your HP laptop’s malfunction is caused by a power-related issue. If the problem persists even after checking for power issues, proceed to the next troubleshooting step.
Force Restart
If your HP laptop is unresponsive or frozen, performing a force restart can help resolve the issue. Here’s how to force restart your laptop:
- Press and hold the power button: Locate the power button on your laptop. Press and hold it for about 10 to 15 seconds. This action will forcefully shut down your laptop.
- Disconnect the power source: After the laptop is completely powered off, unplug the power adapter from the laptop and disconnect any other external power sources, such as docking stations or USB hubs.
- Remove the battery (if applicable): If your laptop has a removable battery, gently remove it by following the manufacturer’s instructions. Wait for about 30 seconds before reinserting the battery.
- Reconnect the power source: Plug the power adapter back into your laptop and ensure a secure connection. If you removed the battery, reinsert it into the laptop.
- Power on your laptop: Press the power button once to turn on your laptop. It should boot up normally and start functioning as expected.
A force restart can help resolve temporary software issues or unresponsiveness. However, if the problem persists or occurs frequently, further troubleshooting may be required.
Remove External Devices
If you are experiencing issues with your HP laptop, such as slow performance or freezing, it is worth checking if any external devices are causing conflicts. Here’s how to remove external devices:
- Disconnect all peripherals: Start by disconnecting any external devices connected to your laptop, such as USB drives, printers, scanners, or external monitors. Unplug all cables from the laptop.
- Remove memory cards and discs: If you have any memory cards or discs inserted into the laptop’s slots or optical drive, remove them as well. Sometimes, these devices can cause conflicts or prevent the laptop from functioning properly.
- Restart your laptop: After removing all external devices, restart your laptop. This step allows the laptop to boot up without any external interference or conflicts.
- Test your laptop’s performance: Once your laptop has restarted, assess its performance without the external devices connected. Check if the issues you were experiencing have been resolved or if the laptop is running more smoothly.
Removing external devices can help identify if any of them were causing conflicts or impacting your HP laptop’s performance. If the issues resolve after removing the external devices, you can reconnect them one by one to pinpoint the exact device causing the problem.
Perform a Hard Reset
If your HP laptop is experiencing persistent performance issues or unresponsive behavior, performing a hard reset can help resolve software glitches and restore your laptop to its default settings. Follow these steps to perform a hard reset:
- Shut down your laptop: Save any unsaved work and close all open programs. Click on the “Start” menu and select “Shut down” to power off your laptop.
- Disconnect all peripherals: Unplug any external devices, such as USB drives, printers, or external monitors, from your laptop.
- Remove the power source: If your laptop has a removable battery, like many HP models do, gently remove it. Then, unplug the power adapter from the laptop.
- Press and hold the power button: Press and hold the laptop’s power button for approximately 15 seconds. This action discharges any remaining electrical charge and clears the laptop’s memory.
- Reconnect the power source: If you removed the battery, reinsert it. Plug the power adapter back into your laptop and ensure a secure connection.
- Power on your laptop: Press the power button to turn on your laptop. It will boot up and start functioning with the default settings.
A hard reset is a useful troubleshooting step when your HP laptop is experiencing software issues or erratic behavior. It clears temporary configurations, allowing the laptop to start fresh. If the problem persists after a hard reset, further troubleshooting steps may be necessary.
Reinstall Battery
If you have encountered power-related issues or your HP laptop is not turning on, reinstalling the battery might help resolve the problem. Here’s how to reinstall the battery:
- Shut down your laptop: Save any unsaved work and close all open programs. Click on the “Start” menu and select “Shut down” to power off your laptop.
- Locate the battery compartment: Depending on the model of your HP laptop, the battery compartment is typically located on the bottom or back of the device. Consult your laptop’s user manual or the manufacturer’s website for specific instructions.
- Remove the battery: Once you have located the battery compartment, carefully remove the battery by sliding the release latch or pressing the release button. Gently lift the battery out of the compartment.
- Clean the battery contacts: Inspect the battery contacts on both the battery and the laptop’s battery compartment. If you notice any dirt or debris, use a soft cloth or cotton swab to gently clean the contacts. This will ensure a proper connection.
- Reinsert the battery: Align the battery with the compartment and carefully slide it back into place. Make sure it is securely inserted and the release latch or button clicks into position.
- Power on your laptop: Once the battery is reinstalled, connect your laptop to a power source using the power adapter. Press the power button to turn on your laptop and check if it powers up normally.
Reinstalling the battery can help resolve power-related issues by ensuring a proper connection and power supply. If the problem persists, further troubleshooting may be required.
Reset BIOS Settings
If you are encountering hardware or boot-related issues with your HP laptop, resetting the BIOS settings can help resolve the problem. The BIOS (Basic Input/Output System) contains essential configuration settings for your computer’s hardware. Here’s how to reset the BIOS settings:
- Access the BIOS menu: Start by shutting down your laptop. Turn it back on and immediately press the designated key to enter the BIOS menu. The key varies depending on the model of your HP laptop, but it is usually one of the function keys (F1, F2, F10, etc.) or the “Delete” key.
- Navigate to the Reset option: Once you are in the BIOS menu, use the arrow keys on your keyboard to navigate to the “Reset” or “Restore Defaults” option. It may be located under different menus, such as “Load Setup Defaults” or “Reset BIOS Settings”.
- Confirm the reset: Select the “Reset” option and follow the on-screen prompts to confirm the reset. Be aware that resetting the BIOS settings will revert any changes you have made, so it’s essential to back up any important settings before proceeding.
- Save and exit: After confirming the reset, navigate to the “Save and Exit” option in the BIOS menu. Press the specified key to save the changes and exit the BIOS. Your laptop will restart with the default BIOS settings.
Resetting the BIOS settings can help resolve issues such as incorrect hardware configurations or boot failures. If the problem persists, it may indicate a more significant hardware problem, and further troubleshooting may be necessary.
Run System Diagnostics
If you’re experiencing recurring issues or unusual behavior on your HP laptop, running system diagnostics can help identify and troubleshoot potential hardware or software problems. HP laptops typically come with built-in diagnostic tools that can help diagnose and fix common issues. Here’s how to run system diagnostics:
- Shut down your laptop: Save any unsaved work and close all open programs. Click on the “Start” menu and select “Shut down” to power off your laptop.
- Power on your laptop: Press the power button to turn on your laptop. As the startup logo appears, press the designated key or key combination to access the system diagnostics. The specific key may vary depending on your HP laptop model, but it is commonly one of the function keys (F2, F10, etc.) or the “Escape” key.
- Run the system diagnostics: Once you have entered the diagnostics menu, select the option to run system diagnostics or hardware diagnostics. The menu options may vary depending on your laptop model.
- Follow the on-screen instructions: The diagnostics tool will guide you through various tests to check the hardware components of your laptop, such as memory, hard drive, and CPU. It will also perform system scans to check for any software issues or conflicts.
- Review the test results: After the diagnostics tests are complete, you will be presented with a summary of the test results. Review the results to identify any hardware or software issues that were detected. The diagnostics tool may provide suggestions on how to resolve the identified problems.
Running system diagnostics is an effective way to pinpoint hardware or software issues on your HP laptop. It can help you determine the underlying cause of the problems you’re experiencing and guide you towards the appropriate troubleshooting steps or solutions.
Reset Windows 10
If your HP laptop is plagued by persistent software issues, resetting Windows 10 to its factory settings can help resolve many problems. This process reinstalls Windows while removing any personal files, installed applications, and custom settings. Here are the steps to reset Windows 10:
- Create a backup: Before proceeding with the reset, it is crucial to back up all your important files and data. You can use an external storage device, cloud storage, or a reliable backup tool to ensure you don’t lose any valuable information.
- Access the Settings menu: Click on the “Start” menu and select the small gear icon to open the Settings menu. Alternatively, you can press the Windows key + I keyboard shortcut to directly access the Settings menu.
- Select “Update & Security”: In the Settings menu, click on “Update & Security,” usually located towards the bottom.
- Choose the “Recovery” option: In the left sidebar of the Update & Security menu, select the “Recovery” tab.
- Click “Get started” under Reset this PC: In the “Recovery” section, locate the “Reset this PC” option and click on the “Get started” button located below it.
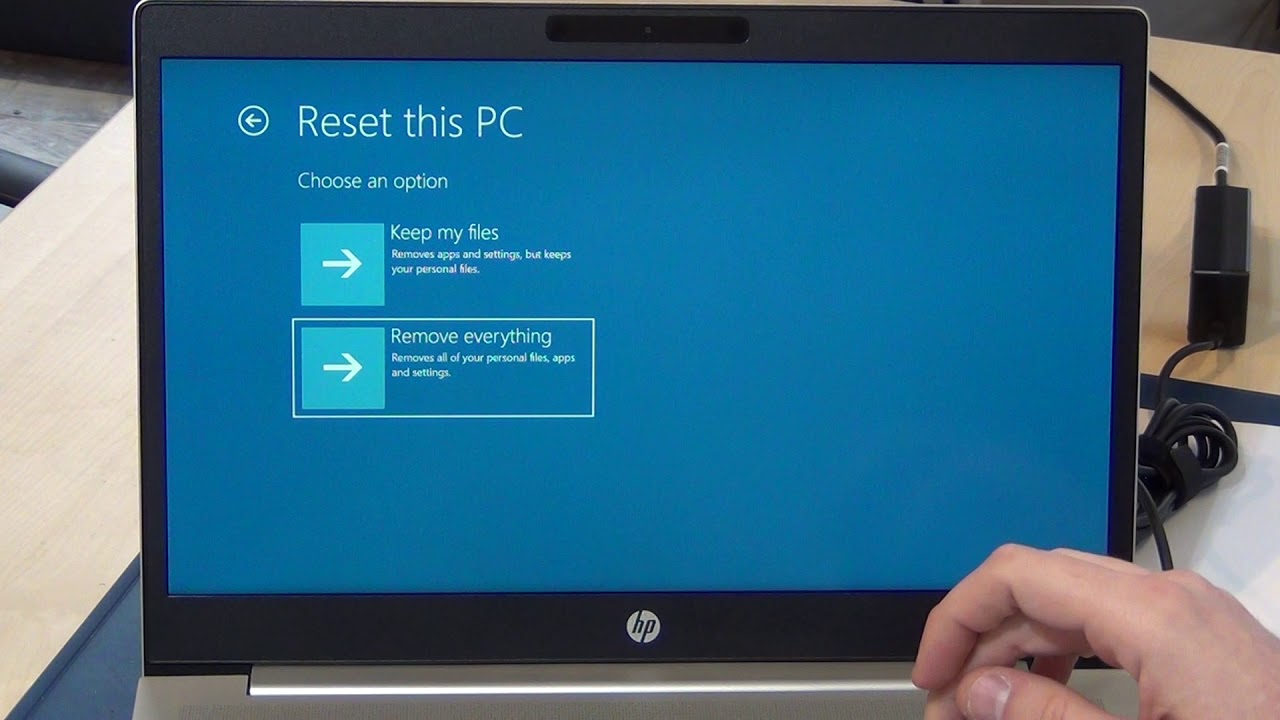
- Select an appropriate reset option: In the reset options window, you will be presented with two choices: “Keep my files” or “Remove everything.” Choose the option that suits your needs. Note that selecting “Remove everything” will delete all files, applications, and settings on your laptop.
- Follow the on-screen prompts: Once you have selected your preferred reset option, follow the on-screen prompts to initiate the reset process. Windows will guide you through the necessary steps and may ask for confirmation before proceeding.
- Wait for the reset to complete: The reset process may take some time to complete depending on the speed of your laptop and the amount of data being processed. Ensure that your laptop remains connected to a power source and be patient while Windows resets.
- Set up Windows: Once the reset is complete, you will be guided through the initial setup process, similar to when you first started using your HP laptop. Follow the instructions to configure your Windows settings and personalize your experience.
Resetting Windows 10 is a useful troubleshooting step to resolve persistent software issues on your HP laptop. It provides a fresh start by removing any problematic configurations or conflicts. Remember to reinstall necessary applications and restore your files from the backup you created earlier.
Perform a System Restore
If you have encountered software issues or errors on your HP laptop, performing a system restore can help revert your computer’s settings back to a previous state when it was functioning correctly. Here’s how to perform a system restore:
- Access the System Restore feature: Click on the “Start” menu, type “System Restore” in the search bar, and select “Create a restore point” from the results. This will open the “System Properties” window.
- Open System Restore: In the “System Properties” window, click on the “System Restore” button. This will launch the System Restore wizard, which allows you to choose a restore point.
- Select a restore point: In the System Restore wizard, you will be presented with a list of available restore points. These points correspond to previously saved states of your computer. Choose a restore point that predates the onset of the issues you’re experiencing.
- Review the details: Before proceeding with the system restore, take a moment to review the details of the selected restore point. The system restore process will uninstall programs and drivers installed after the chosen restore point, but it will not affect your personal files.
- Start the system restore: Once you are confident in your restore point selection, click the “Next” button and then “Finish” to begin the system restore process. Your computer will restart, and the restoration will commence.
- Wait for the restore to complete: The system restore process may take some time to complete, depending on the size of the restore point and the specifications of your HP laptop. It is crucial to allow the process to finish without interrupting it.
- Check your laptop’s functionality: After the system restore is complete and your laptop has restarted, verify if the software issues have been resolved. Test the applications and functionalities that were previously causing problems.
Performing a system restore is an effective way to undo recent changes that may have caused software issues on your HP laptop. It can help restore stability and functionality to your computer without affecting your personal files.