Reasons to Reset Your Roku Box or Streaming Stick
Your Roku device is a powerful streaming platform that brings endless entertainment options to your screen. From streaming movies and TV shows to playing games and accessing various apps, Roku offers a seamless and enjoyable streaming experience. However, there may be occasions when you need to reset your Roku to resolve issues or improve performance.
Here are some of the common reasons why you might consider resetting your Roku:
- Fixing Technical Glitches: Over time, your Roku device may experience technical glitches or encounter software bugs that can cause malfunctions or disruptions in streaming. Resetting your Roku can often resolve these issues and restore optimal performance.
- Clearing Cache and Memory: Regular use of your Roku device can cause its cache and memory to become overloaded with temporary files and data, which can impede its performance. Resetting your device can help clear the cache and free up memory, resulting in smoother streaming and faster response times.
- Resolving Network Connectivity Problems: If you’re experiencing connectivity issues with your Roku, such as frequent buffering, weak Wi-Fi signal, or difficulty connecting to your home network, a reset can help troubleshoot and resolve these network-related problems.
- Updating Software: Resetting your Roku device can sometimes be necessary when you want to update the software to the latest version. This ensures that you have access to the newest features, security patches, and bug fixes.
- Removing Personal Information: If you’re planning to sell or give away your Roku device, performing a reset is crucial to ensure that all your personal information, Wi-Fi network details, and account settings are completely removed from the device.
By understanding the reasons why you might need to reset your Roku, you can better troubleshoot issues and maintain a smooth streaming experience. Now, let’s explore different methods to reset your Roku device.
How to Reset Your Roku with the Remote Control
Resetting your Roku using the remote control is a simple and convenient method. Here’s how you can do it:
- Press the Home button on your Roku remote to navigate to the home screen.
- Using the arrow keys, scroll and highlight the “Settings” option.
- Press the OK button to enter the Settings menu.
- Scroll down and select “System.”
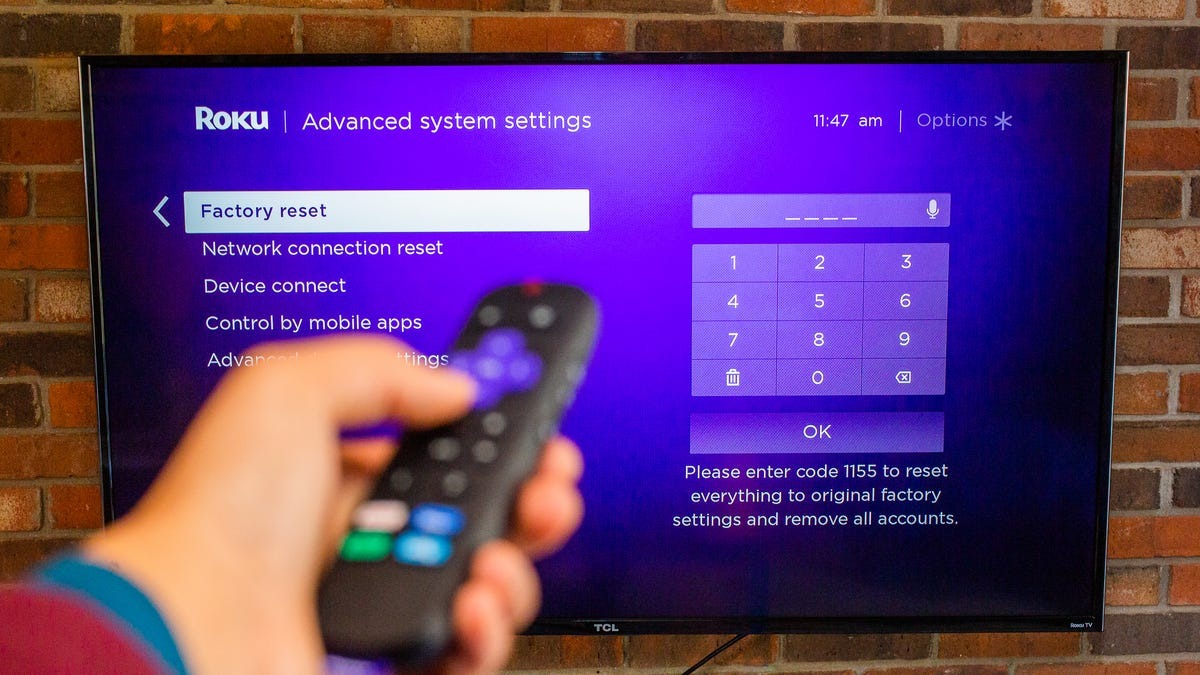
- Next, choose “Advanced system settings.”
- From the list of options, select “Factory reset.”
- A confirmation message will appear on the screen. Select “Factory reset” again to proceed.
- Your Roku device will now begin the reset process. This may take a few minutes.
- Once the reset is complete, your Roku device will restart and display the Roku logo.
That’s it! Your Roku has been successfully reset using the remote control. You can now set up your device again by following the on-screen instructions.
It’s important to note that this method will only reset your Roku to its factory settings, but it will not remove any installed channels. If you want to remove all channels and perform a complete factory reset, continue reading to learn how to do it.
How to Reset Your Roku with the Button on the Device
If you’re unable to navigate the Roku interface or facing issues with your remote control, you can still reset your Roku device using the button located on the device itself. Here’s how:
- Locate the Reset button on your Roku device. The exact location of the button may vary depending on the model.
- Using a paperclip or a similar small tool, press and hold the Reset button for about 10 seconds.
- Release the button once the LED lights on the device start flashing.
- Your Roku device will now begin the reset process. The LED lights will continue flashing for a few minutes.
- Once the reset is complete, the device will restart, and the Roku logo will appear on the screen.
After the device restarts, you can set up your Roku again by following the on-screen instructions.
By using the reset button on the device, you can overcome any issues related to the remote control or navigation. However, please note that this method will perform a standard factory reset and preserve your installed channels. If you want to remove all channels and perform a complete factory reset, let’s move on to the next method.
How to Reset Your Roku Using the Settings Menu
If you prefer to reset your Roku device without using the remote control or the physical button on the device, you can do so directly from the Roku settings menu. Here’s how:
- Ensure that your Roku device is powered on and connected to your TV.
- On your TV screen, go to the Roku home screen by pressing the Home button on your remote control.
- Using the arrow keys on your remote, navigate to the left-hand side of the screen and select the “Settings” option.
- Scroll down and select “System.”
- Next, choose “Advanced system settings.”
- Scroll down until you find the “Factory reset” option and select it.
- A confirmation message will appear on the screen to confirm the reset. Select “Factory reset” again to proceed.
- Your Roku device will now begin the reset process. This may take a few minutes.
- After the reset is complete, your Roku device will restart, and the Roku logo will appear on the screen.
Once the device restarts, you can go through the setup process again by following the on-screen instructions.
Resetting your Roku device using the settings menu provides a convenient option if you have access to the Roku interface but prefer not to use the remote control or the physical button on the device.
Now that you know how to reset your Roku using various methods, let’s explore how to perform a factory reset for a more comprehensive device reset.
How to Perform a Factory Reset on Your Roku
A factory reset on your Roku device will erase all settings, preferences, and installed channels, restoring it to its original factory state. This method is useful if you want to start fresh or if you’re experiencing persistent issues that can’t be resolved through regular resetting. Here’s how to perform a factory reset on your Roku:
- Power on your Roku device and ensure that it is connected to your TV.
- Locate the Reset button on your Roku device. The button is typically located on the back or side of the device.
- Using a paperclip or a similar small tool, press and hold the Reset button for about 20 seconds. Make sure to keep the button pressed throughout the entire process.
- Release the Reset button after 20 seconds. Your Roku device will begin the factory reset process.
- The device will restart, and the Roku logo will appear on the screen. This indicates that the factory reset has been successful.
After the factory reset is complete, you will need to set up your Roku device again by following the initial setup process. This includes connecting to your Wi-Fi network, signing in to your Roku account, and adding the channels and apps you want to stream.
Performing a factory reset should be done with caution as it erases all data and settings on your Roku device. Make sure to back up any important information or preferences before proceeding with the factory reset.
Once you’ve completed the factory reset, you can enjoy a fresh start with your Roku device, free from any previous issues or installed channels.
Now that you know how to reset your Roku device using different methods, it’s important to know what to do after resetting your Roku to ensure a smooth streaming experience. Let’s explore that next.
What to Do After Resetting Your Roku
After resetting your Roku device, there are a few important steps to take to ensure that you can resume streaming and enjoy a seamless experience. Here’s what you should do:
- Reconnect to Wi-Fi: During the setup process after a reset, you will need to reconnect your Roku device to your Wi-Fi network. Follow the on-screen instructions to select and connect to your network.
- Sign in to your Roku account: If you have a Roku account, sign in using your credentials to access your personalized settings, channels, and preferences. If you don’t have an account, you can create one during the setup process.
- Add channels: Once you’re signed in to your Roku account, you can start adding your favorite channels and apps. Browse through the Roku Channel Store and select the channels you want to install on your device.
- Update software: It’s always a good idea to check for software updates after resetting your Roku. Go to the Settings menu and select “System” followed by “System update” to check for any available updates. Installing the latest software ensures that you have access to new features and bug fixes.
- Customize settings: Take some time to personalize your Roku settings as per your preferences. Adjust display and audio settings, set up parental controls if needed, and explore other options available in the settings menu.
- Enjoy streaming: After you’ve completed the initial setup, you’re ready to start streaming your favorite content once again. Launch the channels you’ve installed, browse through the available content, and enjoy your Roku’s extensive entertainment options.
It’s important to note that resetting your Roku device will remove any previously installed channels and settings. However, all of your Roku account information, channel purchase history, and channel activation will still be associated with your account. This means you can easily reinstall your previously owned channels by visiting the Roku Channel Store and selecting “My Channels.”
By following these steps after resetting your Roku, you can quickly get back to enjoying your favorite movies, TV shows, and apps with a fresh and optimized streaming experience.
Remember, if you encounter any further issues or need assistance, you can always refer to Roku’s support website or contact their customer support for additional help.