
Reasons to Reset a Desktop Memory Module
Resetting a desktop memory module can often solve various issues related to system performance and stability. Here are some common reasons why you might consider resetting the memory module in your desktop:
- Improper installation: In some cases, memory modules may not have been properly installed during initial setup or while upgrading. This can lead to poor contact between the module and the memory slot, resulting in intermittent issues or failure to be recognized by the system. Resetting the module ensures a proper connection.
- Memory errors: Over time, memory errors may occur, leading to system crashes, frequent blue screens, or software instability. Resetting the memory module can help resolve these errors by re-establishing a stable connection and reinitializing the memory.
- Dust or debris accumulation: Dust or debris can accumulate on the connectors of the memory module or in the memory slot over time. This can result in poor contact and cause performance issues or intermittent errors. By resetting the module, you can remove any accumulated dust or debris and ensure a clean connection.
- Hardware conflicts: In some cases, hardware conflicts may arise between the memory module and other components in the system. This can lead to instability, system freezes, or unexpected reboots. Resetting the module can help resolve these conflicts by re-establishing proper communication with the system.
By addressing these issues through resetting the desktop memory module, you can effectively improve system stability, reduce errors, and enhance overall performance. Keep in mind that resetting the memory module should be considered as a troubleshooting step before exploring other hardware or software-related solutions.
Tools Needed for Reseating a Desktop Memory Module
Before you begin reseating a desktop memory module, it’s important to gather the necessary tools to ensure a smooth and safe process. Here are the tools you’ll need:
- Screwdriver: Depending on your desktop model, you may need a screwdriver to open the case and access the memory modules. Make sure to use the appropriate type and size to avoid damaging the screws.
- Cleaning supplies: To clean the memory slot and connectors, you’ll need some supplies. A can of compressed air can help remove dust and debris from the memory slots and module connectors. Additionally, consider using a soft, lint-free cloth and isopropyl alcohol to gently clean the connectors if needed.
- Anti-static wrist strap: To prevent static electricity from damaging the memory module or other sensitive components, consider wearing an anti-static wrist strap. This will help dissipate any static charge from your body, thus minimizing the risk of accidental damage.
- Replacement thermal paste (if applicable): In some cases, when reseating the memory module, you may need to remove the CPU cooler. If so, it’s a good practice to have replacement thermal paste on hand to reapply when reinstalling the cooler. This will help ensure efficient heat transfer between the CPU and the cooler.
By having these tools ready, you’ll be well-equipped to safely and effectively reseat a desktop memory module. Remember to follow proper safety precautions and consult your desktop’s user manual for any specific instructions or guidelines regarding the memory module installation process.
Step-by-Step Guide to Reseat a Desktop Memory Module
Resetting a desktop memory module is a relatively straightforward process that can be done in a few easy steps. Follow this step-by-step guide to reseat a memory module in your desktop:
- Power off your desktop: Before doing any work on your desktop, it’s crucial to power it off and unplug it from the electrical outlet. This will prevent any potential damage to the components or electrical shock.
- Open the desktop casing: Use a screwdriver to open the casing of your desktop. Make sure to remove any screws or fasteners that secure the case.
- Locate the memory modules: Locate the memory modules inside your desktop. They are usually long, rectangular-shaped modules attached to the motherboard. Note the slots where the memory modules are inserted.
- Remove the memory module: Gently press the clips or levers on the sides of the memory module to release it from the slot. Carefully lift it out of the slot, ensuring not to touch the gold contacts on the module.
- Clean the memory slot: Use a can of compressed air to blow out any dust or debris from the memory slot. If needed, use a soft, lint-free cloth and isopropyl alcohol to clean the slot and remove any stubborn residue.
- Clean the memory module connectors: Inspect the gold contacts on the memory module. If they appear dirty or tarnished, use a soft cloth lightly dampened with isopropyl alcohol to clean them. Ensure the contacts are completely dry before proceeding.
- Reinsert the memory module: Align the memory module with the slot, taking note of the notch on the connector. Insert it firmly and evenly into the slot until the clips or levers snap into place, securing the module.
- Close the desktop casing: Carefully close the desktop casing and secure it with the screws or fasteners you removed earlier.
- Power on your desktop: Plug your desktop back into the power outlet and power it on. Verify that the system recognizes the reseated memory module by checking the BIOS or operating system settings.
By following these steps, you can reseat a desktop memory module with confidence. Remember to handle the memory modules and components with care to avoid any damage, and refer to your desktop’s user manual for any specific instructions or guidelines.
Determine the Type of Memory Module in Your Desktop
Before reseating a desktop memory module, it’s important to determine the type of memory module that your desktop uses. This will ensure that you purchase compatible memory modules and perform the reseating process correctly. Here’s how you can determine the type of memory module in your desktop:
- Check the user manual: The easiest way to find out the type of memory module required for your desktop is by referring to the user manual. The manual usually includes detailed specifications of the desktop, including the supported memory types and configurations.
- Use online tools: If you don’t have access to the user manual or you’re unable to find the required information, you can use online tools to identify the memory type. There are various websites and software that can analyze your desktop’s specifications and provide you with detailed information about the memory modules it supports.
- Check the existing memory modules: If your desktop already has memory modules installed, you can open the case and check the labels or markings on the modules themselves. The labels may include information such as the module type (DDR, DDR2, DDR3, DDR4, etc.), speed, and capacity.
- Consult the manufacturer’s website: Visit the manufacturer’s website of your desktop or motherboard to find the official specifications. They often provide detailed information about the supported memory types and configurations for your specific model.
By following these steps, you can determine the type of memory module required for your desktop. It’s important to note that different desktop models may have different memory requirements, so it’s essential to ensure compatibility before purchasing or reseating a memory module.
Precautions to Take before Reseating a Memory Module
Before you begin reseating a memory module in your desktop, it’s important to take certain precautions to ensure your safety and prevent any damage to the components. Here are some precautions to keep in mind:
- Power off your desktop: Before working on any internal components of your desktop, make sure to power it off completely and unplug it from the electrical outlet. This will prevent any electrical shock or damage to the components.
- Ground yourself: To prevent any static electricity from damaging the memory module or other sensitive components, it’s crucial to ground yourself. Wear an anti-static wrist strap or regularly touch a grounded metal object to discharge any static charge from your body.
- Handle the memory module with care: Memory modules are delicate and can be easily damaged by excessive force or electrostatic discharge. Hold the memory module by its edges and avoid touching the gold contacts to prevent any damage or tarnishing.
- Work on a stable surface: Place your desktop on a stable surface, such as a desk or workbench, to prevent it from accidentally toppling over or getting damaged during the reseating process.
- Follow proper ESD precautions: Electrostatic discharge (ESD) can damage sensitive components, including memory modules. When handling the memory module, avoid working on carpeted surfaces or wearing clothing made of synthetic materials that can generate static electricity.
- Refer to the user manual: Consult your desktop’s user manual or the manufacturer’s website for specific instructions and guidelines on reseating memory modules. Different desktop models may have different procedures or requirements.
By taking these precautions before reseating a memory module, you can minimize the risk of damage to the components and ensure a safe and successful reseating process. Remember to handle the memory module gently and follow recommended guidelines to maintain the integrity of your desktop.
How to Open and Access the Memory Modules in Your Desktop
In order to reseat the memory modules in your desktop, you will need to open the casing and access the internal components. Here is a step-by-step guide on how to open and access the memory modules in your desktop:
- Power off your desktop: Before starting, make sure to turn off your desktop and unplug it from the power source. This is important for your safety and to prevent any damage to the components.
- Locate the screws or latches: Examine the sides or rear panel of your desktop’s casing for screws or latches that secure the case. These may be Phillips screws, thumbscrews, or latches that need to be released to open the casing.
- Remove the screws or release the latches: Use the appropriate screwdriver or release mechanism to remove the screws or release the latches. Set aside the screws in a safe place, as you will need them later.
- Slide or lift off the casing: Depending on your desktop model, you might need to slide the casing off or lift it upwards to access the internal components. Be gentle and ensure that the casing is fully removed before proceeding further.
- Locate the memory slots: Look for the memory slots on the motherboard. These slots are typically long and rectangular-shaped, with one or more memory modules already installed. Take note of the slots where the memory modules are housed.
- Remove any obstacles: Sometimes, other components such as cables, fans, or heat sinks might obstruct access to the memory slots. Carefully maneuver any necessary components out of the way to ensure easy access to the memory modules.
- Ground yourself: Before handling the memory modules, it’s important to ground yourself to prevent any static discharge that could potentially damage the components. Wear an anti-static wrist strap or touch a grounded metal object to discharge any static electricity.
Now that you have successfully opened the casing and accessed the memory slots, you are ready to proceed with reseating the memory modules in your desktop. Refer to the user manual or follow the instructions for safely removing and reinserting the modules to ensure a proper connection.
Removing the Desktop Memory Module
When reseating a desktop memory module, the first step is to safely remove the existing module from its slot. Here’s a step-by-step guide on how to remove a desktop memory module:
- Ensure the desktop is powered off: Before removing any components, make sure your desktop is completely powered off and unplugged from the electrical outlet. This ensures your safety and prevents any potential damage to the components.
- Ground yourself: To prevent any static discharge that could harm the memory module or other components, it’s essential to ground yourself before handling any internal parts. Use an anti-static wrist strap or touch a grounded metal object to discharge any built-up static electricity.
- Locate the memory module: Identify the memory module you want to remove. It is typically a rectangular-shaped module clipped into a slot on the motherboard. Note the retaining clips or levers on the sides of the module.
- Release the retaining clips: Gently press on the retaining clips or levers on both sides of the module. This will release the module from its locked position within the slot. Some modules may only have one retaining clip on a single side.
- Remove the memory module: Once the retaining clips are released, the memory module will pop up at a slight angle. Firmly grasp the module by its sides and gently pull it upward to remove it from the slot. Be careful not to touch the gold contacts on the module.
- Set the module aside: Place the removed memory module in an anti-static bag or on an anti-static surface. This will protect it from static electricity and prevent any damage or loss of data stored on the module.
After successfully removing the memory module, you can proceed with cleaning the memory slot and preparing for the reseating process. It’s important to handle the memory module with care and avoid any excessive force or contact with the gold contacts to prevent damage.
Cleaning the Memory Slot
Before reseating a desktop memory module, it is important to clean the memory slot to ensure optimal contact and performance. Here is a step-by-step guide on how to clean the memory slot:
- Remove any visible debris: Inspect the memory slot for any visible dust, debris, or obstructions. Use a can of compressed air to blow out any loose particles. Be sure to hold the can upright and use short bursts to avoid excessive moisture or force.
- Use a soft brush or cloth: If there are stubborn particles in the memory slot, use a small, soft brush or lint-free cloth to gently remove them. Be careful not to apply too much pressure or use abrasive materials that could damage the slot’s contacts.
- Clean the contacts: Inspect the contacts inside the memory slot for any dirt or corrosion. If necessary, use a clean, dry, and lint-free cloth to gently wipe the contacts. Alternatively, you can use a soft brush lightly dampened with isopropyl alcohol to clean the contacts. Ensure that the slot is completely dry before continuing.
- Ensure proper airflow: While cleaning the memory slot, take the opportunity to check the surrounding area for any blockages or dust buildup. Clear any obstructions and ensure proper airflow to prevent overheating issues.
- Recheck for debris: After cleaning, double-check the memory slot to ensure that no debris or lint remains. If needed, use compressed air or a soft brush to remove any remaining particles.
By following these steps, you can effectively clean the memory slot in your desktop. Cleaning the slot ensures a clean and secure connection when reseating the memory module, which can help improve system performance and stability.
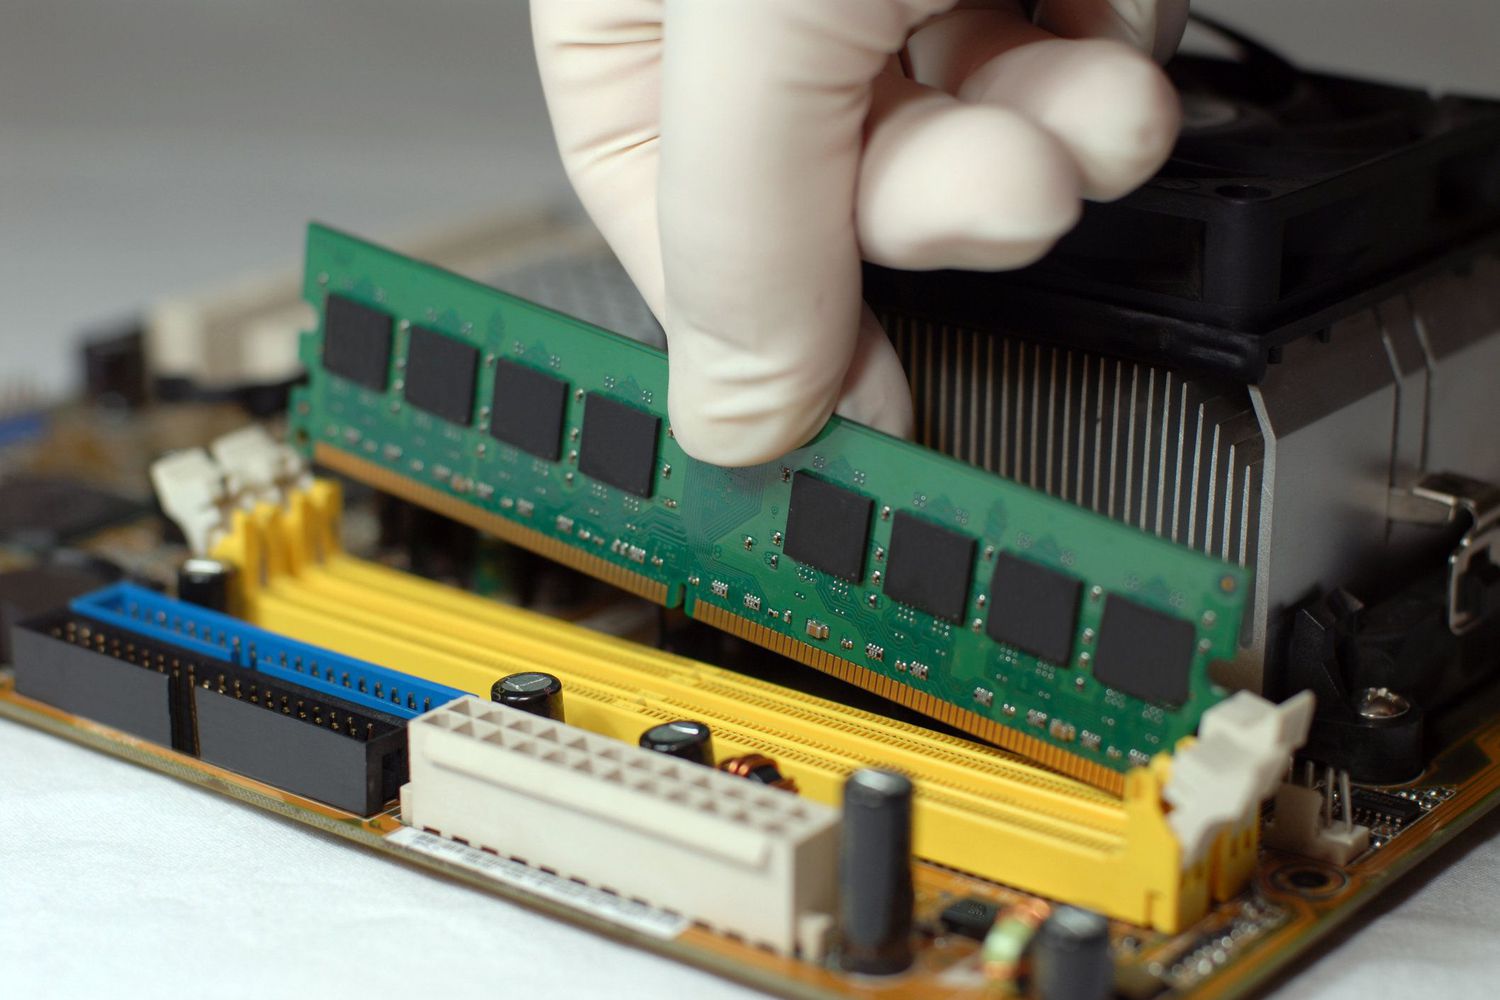
Placing the Memory Module Back into the Slot
After cleaning the memory slot, it’s time to place the memory module back into the slot. Follow these step-by-step instructions to ensure a proper and secure installation:
- Align the memory module correctly: Take a close look at the memory slot and module to ensure proper alignment. Check for a notch or keying mechanism on the module and slot that indicates the correct orientation.
- Hold the memory module by its edges: Avoid touching the gold contacts on the memory module. Line up the module with the slot, making sure it aligns with the notch or keying mechanism.
- Gently insert the module at an angle: Insert one edge of the memory module into the slot at a slight angle, ensuring that the gold contacts make contact with the pins inside the slot. Be cautious not to bend or force the module into the slot.
- Press the module down evenly and firmly: Once one edge of the module is properly inserted, use even and gentle pressure to lower the other edge into the slot. Make sure the module is fully seated and the retaining clips or levers on both sides snap into place.
- Double-check the module’s placement: After securing the memory module, visually inspect it to ensure it is aligned properly and fully inserted into the slot. The module should be parallel to the surface of the motherboard.
It’s important to note that different desktop models may have slightly varying mechanisms for securing the memory module. Always refer to the user manual or manufacturer’s guidelines for specific instructions. Additionally, take care not to apply excessive force when inserting the module, as this can cause damage to the module or slot.
Closing and Securing the Memory Modules in Your Desktop
Once you have reseated the memory module(s) in your desktop, it is important to properly close and secure the memory modules to ensure stability and performance. Follow these steps to close and secure the memory modules in your desktop:
- Align the desktop casing: Carefully align the casing with the screw holes or latches to ensure proper alignment for closing.
- Slide or lower the casing: Depending on your desktop model, slide the casing back into position or lower it gently over the internal components. Make sure the casing is aligned properly and slides smoothly into place.
- Secure the casing: Use the appropriate screws or latches that were previously removed to secure the casing. Tighten the screws evenly, being careful not to overtighten and risk damaging the casing or components.
- Ensure proper cable management: Take a moment to organize and secure any cables or wires inside the desktop. Proper cable management improves airflow and reduces the risk of accidental disconnection or damage to components.
- Plug in and power on: Reconnect any peripherals or devices that were previously disconnected, ensuring they are properly plugged in. Plug your desktop back into the power outlet and power it on to confirm that everything is functioning correctly.
By following these steps, you can ensure that the memory modules are securely closed and properly connected within your desktop. Proper closure and securement of the memory modules help maintain stability and performance, allowing your system to run smoothly and efficiently.
Testing the Reseated Memory Module
After reseating the memory module in your desktop, it is essential to test its functionality to ensure that it has been properly installed. Here are the steps to test the reseated memory module:
- Power on your desktop: Plug in your desktop and power it on. Allow it to fully boot up and load the operating system.
- Check the BIOS settings: During the boot-up process, press the appropriate key (e.g., Del, F2, Esc) to enter the BIOS settings. Navigate to the memory or system information section to verify that the reseated memory module is detected and recognized by the system.
- Run a memory diagnostic tool: To further ensure the stability of the reseated memory module, you can run a memory diagnostic tool. Many operating systems, such as Windows and macOS, have built-in memory diagnostic tools that can be accessed through the Control Panel or System Preferences.
- Perform system stress tests: To thoroughly test the functionality of the reseated memory module, you can also run system stress tests. These tests put a significant load on the memory and other components, allowing you to identify any potential issues or errors.
- Monitor system performance and stability: Keep an eye on your system’s performance and stability after reseating the memory module. Look for any signs of improved performance, such as faster loading times and smoother multitasking. Additionally, observe whether any previous issues, such as random crashes or BSOD (Blue Screen of Death) errors, have been resolved.
By following these steps, you can thoroughly test the reseated memory module to ensure that it is functioning properly and that any issues have been resolved. If you continue to experience problems, it is recommended to seek further assistance from a professional technician or the manufacturer’s support team.
Troubleshooting Common Issues with Resetting Desktop Memory Modules
While resetting desktop memory modules can often resolve various issues, there may be instances where problems persist or new issues arise. Here are some common issues that may occur when resetting desktop memory modules and possible troubleshooting steps:
- Memory module not detected: If the system does not recognize the reseated memory module, first ensure that it is properly seated in the slot. Check that the retaining clips or levers are securely locked. If the issue persists, try inserting the module into a different memory slot, as sometimes one slot may have functionality issues.
- System instability or crashes: If you experience system instability or frequent crashes after reseating the memory module, double-check that the module is compatible with your desktop. Check for any BIOS updates available for your motherboard that may improve compatibility. You can also run a thorough memory test using diagnostic software to identify any potential issues with the memory module itself.
- Blue Screen of Death (BSOD) errors: If you encounter BSOD errors after reseating the memory module, it could indicate compatibility issues or faulty memory. Check for any BIOS updates for your motherboard that address memory compatibility issues. Additionally, try reseating the memory module again, ensuring a secure connection. If the BSOD errors persist, consider testing the memory module in another compatible system or seeking professional assistance.
- Slower performance or system freezes: If you notice a decrease in performance or frequent system freezes after reseating the memory module, it may indicate a compatibility issue or an insufficient amount of memory. Ensure that the memory module meets the specifications recommended by your desktop’s manufacturer. If necessary, consider upgrading the memory to improve system performance.
- Intermittent errors or unusual behavior: If your desktop exhibits intermittent errors or unusual behavior after reseating the memory module, it could be a sign of an unstable connection. Try removing and reseating the module again, ensuring it is properly aligned and securely locked in place. If the issue persists, consider testing the module in another compatible system or seeking professional advice.
Remember that troubleshooting memory-related issues can sometimes be complex, and it may be necessary to consult experts or technicians for further assistance. They can provide specialized diagnosis tools or offer insights into specific hardware configurations or compatibility issues.