
Choosing the Right Image for Adding Text
Adding text to an image can be a powerful way to convey a message, make a statement, or enhance the overall visual impact. However, it is crucial to choose the right image that complements the text and creates a harmonious balance between the two elements.
When selecting an image for adding text, consider the following factors:
- Relevance: The image should be directly related to the message or theme of the text. It should visually support and reinforce the intended meaning. For example, if the text is about adventure, choose an image that depicts outdoor activities or exploration.
- Composition: Look for images with a clear focal point or subject that provides enough space to accommodate the text. Avoid images that are too cluttered or have distracting backgrounds, as they can make the text difficult to read.
- Color and Contrast: Consider the colors in the image and how they will interact with the text. Choose images with contrasting colors to ensure that the text remains legible. For instance, if the text is dark, select an image with a lighter background.
- Aesthetic Appeal: The image should be visually appealing and resonate with the target audience. Whether it’s a stunning landscape, an intriguing object, or a captivating portrait, the image should evoke an emotional response that aligns with the intended message.
Remember, the image and text should work together to create a cohesive visual narrative. Avoid using overly complex or busy images that overpower the text. The goal is to strike a balance that allows the text to stand out and be easily readable while complementing the overall aesthetic of the image.
By carefully choosing the right image, you set the foundation for effectively adding text that enhances the impact and communicates your desired message.
Opening the Selected Image in Adobe Photoshop
Once you have chosen the right image for adding text, the next step is to open it in Adobe Photoshop, a professional image editing software with a wide range of tools and features. Follow these steps to open your selected image:
- Launch Adobe Photoshop: Begin by opening Adobe Photoshop on your computer. If you don’t have it installed, you can download it from Adobe’s official website and install it before proceeding.
- Open a New Project: Once Photoshop is launched, go to the “File” menu and select the “Open” option. This will open a dialog box allowing you to browse your computer and select the image file you want to work with.
- Navigate to the Image File: In the dialog box, navigate to the location where the image file is stored. Click on the file to select it and then click the “Open” button.
Adobe Photoshop will now open the selected image, allowing you to view it and make changes as desired. You can zoom in or out to get a closer look at specific areas of the image and use the various tools provided to edit and enhance its appearance.
Adobe Photoshop supports a wide range of image file formats, including JPEG, PNG, TIFF, and more. It ensures that you can work with different types of images without any compatibility issues.
Opening the selected image in Adobe Photoshop marks the initial step towards adding text to your image. Now that you have your image open and ready, you can proceed to the next steps to create a new layer for the text and begin the process of adding your desired text overlay.
Creating a New Layer for the Text
Now that you have your selected image open in Adobe Photoshop, the next step in adding text to your image is to create a new layer specifically for the text. Creating a separate layer allows you to have more control over the placement and formatting of the text without affecting the original image.
Here’s how to create a new layer for the text in Adobe Photoshop:
- Select the Layers Panel: In Adobe Photoshop, locate the Layers panel, which is usually positioned on the right side of the interface. If you can’t see it, go to the “Window” menu and select “Layers” to make it visible.
- Create a New Layer: In the Layers panel, click on the “New Layer” button at the bottom. Alternatively, you can go to the “Layer” menu, hover over “New” and choose “Layer” from the dropdown menu. A new layer will be added above the background layer.
- Name the New Layer: Double-click on the layer name in the Layers panel to rename it. This step is optional but can be helpful for organization and clarity, especially when working with multiple layers.
After creating the new layer, it will appear as a transparent blank canvas on top of the original image. This is where you will add and format the text overlay.
Creating a new layer for the text allows you to experiment with different text styles, sizes, and positioning without making any permanent changes to the original image. It also provides flexibility in terms of adjusting the text layer’s opacity, blending modes, and other effects to achieve the desired visual impact.
Now that you have successfully created a new layer for the text, you can move on to selecting the Text Tool and choosing the desired font to begin typing the text onto the image.
Selecting the Text Tool and Choosing the Desired Font
With the new layer in place, it’s time to select the Text Tool in Adobe Photoshop and choose the font that best suits your desired text overlay. The Text Tool allows you to type and edit the text directly on the image.
Follow these steps to select the Text Tool and choose the desired font:
- Select the Text Tool: In the Photoshop toolbar, locate the “T” icon. Click on it or press the “T” key on your keyboard to activate the Text Tool.
- Set the Text Options: At the top of the screen, you will see the Options Bar, where you can customize the text properties. Choose the desired font by clicking on the font dropdown menu and exploring the available options. Select a font that aligns with the message and aesthetic you want to convey.
- Adjust Font Size: Next, set the font size to the preferred value using the font size dropdown or by manually typing in the desired size. Remember to choose a font size that is legible and appropriately scaled for the image.
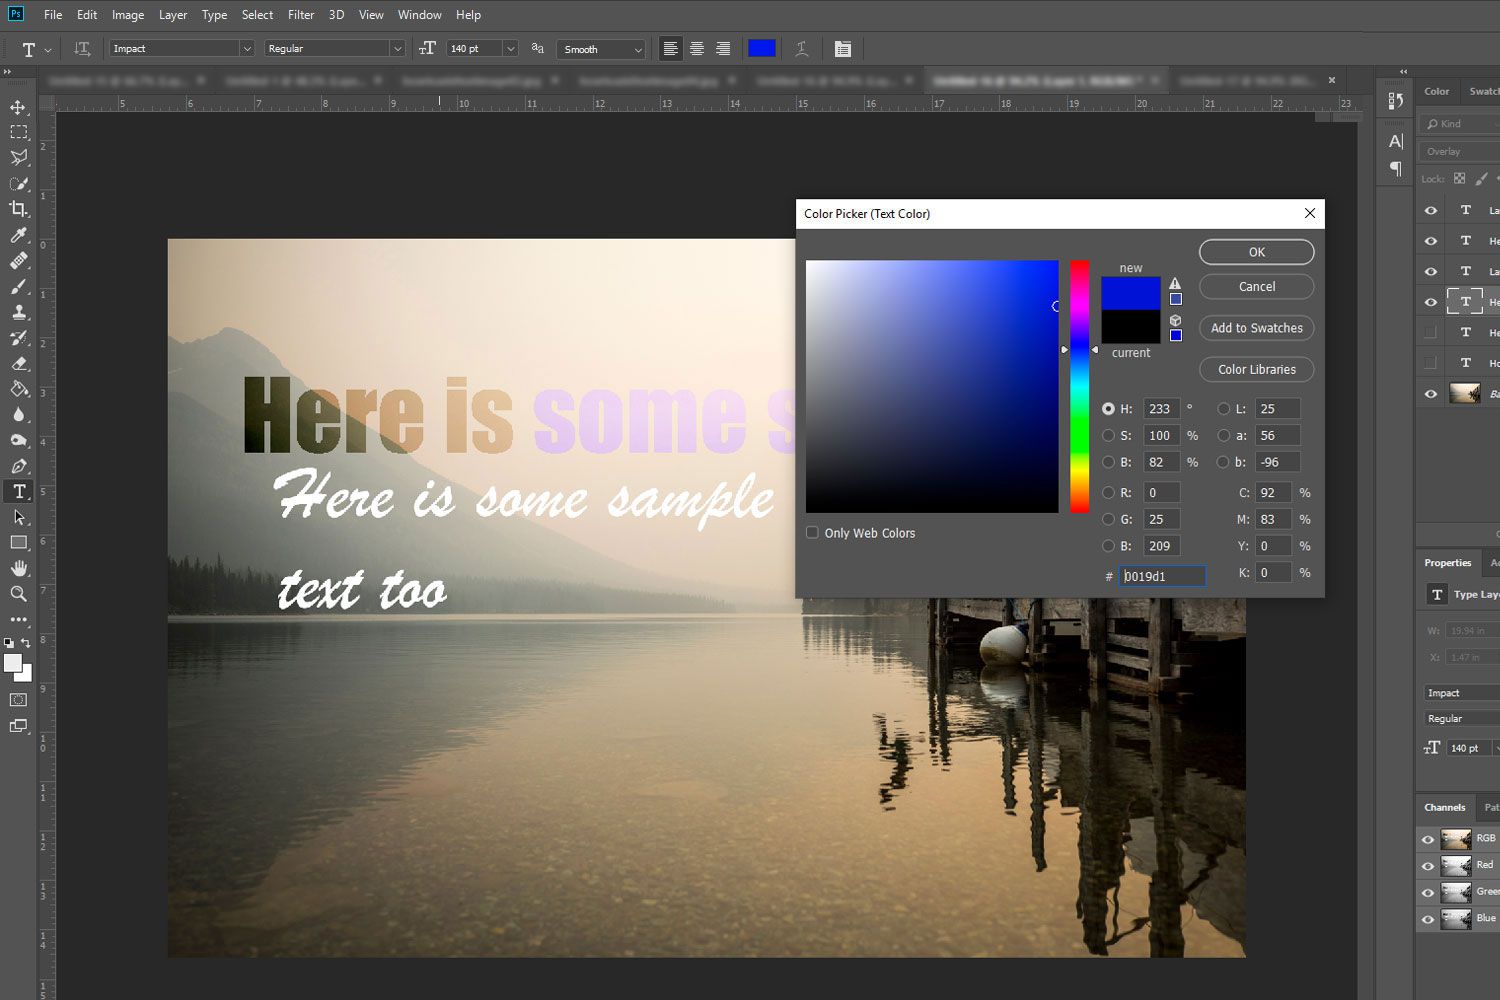
- Choose Font Color: Click on the color swatch in the Options Bar to select the font color. A color picker window will appear, allowing you to choose from a variety of colors or enter custom color values.
The chosen font will create the visual identity for the text overlay, setting the tone and style of your message. Consider the image’s mood and the purpose of the text when selecting a font. Choose a font that captures the essence of your message, whether it’s elegant, bold, playful, or professional.
Additionally, ensure that the font color stands out and contrasts well with the image. If necessary, experiment with different font colors to find the optimal combination that ensures readability without overshadowing the image itself.
By selecting the Text Tool and choosing the desired font in Adobe Photoshop, you are now ready to type the text onto the image and further customize its appearance to create a visually appealing and impactful text overlay.
Typing the Text on the Image
Now that you have selected the Text Tool and chosen the desired font, it’s time to type the actual text onto the image in Adobe Photoshop. This step allows you to input the message or caption that you want to display as part of the text overlay.
Follow these steps to type the text on the image:
- Select the Text Layer: In the Layers panel, click on the newly created text layer to make it active. This ensures that the text is typed on the correct layer.
- Click on the Image: Position your cursor on the desired area of the image where you want the text to appear. Click once to set the starting point of the text.
- Type the Text: Begin typing the text that you want to display on the image. Adobe Photoshop allows you to input multiple lines of text if needed, automatically adjusting the text box as you type.
- Adjust the Text Box: Resize and reposition the text box as desired. Drag the corner handles to make the text box larger or smaller, and click and drag within the box to reposition it on the image.
While typing the text, ensure that the font, size, and color chosen in the previous steps align with your vision for the text overlay. Consider the positioning of the text in relation to the image’s composition and focal points, as well as the legibility of the text itself.
Remember to keep the text concise, clear, and visually appealing. Depending on the purpose of the text overlay, you may want to avoid overcrowding the image with too much text. Instead, focus on delivering the intended message in a succinct and compelling way.
By typing the text onto the image, you are now one step closer to creating a visually engaging and informative text overlay. The next steps involve adjusting the size, color, and position of the text to achieve the desired visual impact and ensuring that it seamlessly integrates with the image.
Adjusting the Size, Color, and Position of the Text
Now that you have typed the text onto the image, the next step is to refine its appearance by adjusting the size, color, and position. This allows you to achieve the desired visual impact and ensure that the text seamlessly integrates with the image.
Follow these steps to adjust the size, color, and position of the text in Adobe Photoshop:
- Select the Text Layer: In the Layers panel, click on the text layer to make it active. This ensures that any changes made affect the text layer specifically.
- Resize the Text: To adjust the size of the text, go to the Options Bar and modify the font size by typing in a new value or using the size dropdown. Experiment with different sizes to find the one that is visually appealing and fits well within the image.
- Change the Text Color: Click on the color swatch in the Options Bar to access the color picker. Choose a new color that is visually contrasting or complementary to the image, making sure it enhances the readability and visual appeal of the text.
- Reposition the Text: Click and drag within the text box to move the text to a different position on the image. Ensure that the text aligns with the composition and focal points of the image, and consider the overall balance and visual flow.
As you adjust the size, color, and position of the text, keep in mind the overall design principles, such as hierarchy, balance, and contrast. Make sure the text is legible and stands out without overwhelming the image itself.
Don’t be afraid to experiment with different font sizes, colors, and positions until you achieve the desired effect. Remember to step back and review your adjustments from a viewer’s perspective to ensure the text enhances the image’s message and visual appeal.
By customizing the size, color, and position of the text, you can create a text overlay that seamlessly blends with the image, effectively conveying your message and capturing the viewer’s attention.
Adding Effects and Styling to the Text
After adjusting the size, color, and position of the text on the image, you can further enhance its visual impact by applying effects and styling options in Adobe Photoshop. These effects can help make the text more visually appealing and add an extra layer of creativity to your text overlay.
Follow these steps to add effects and style to the text in Adobe Photoshop:
- Select the Text Layer: In the Layers panel, click on the text layer to make it active. This ensures that any effects or styles are applied to the text layer specifically.
- Add Layer Styles: In the Layers panel, click on the “fx” icon at the bottom to access the Layer Styles menu. This menu offers a variety of effects, including Drop Shadow, Bevel and Emboss, Stroke, and more. Click on the desired effect to apply it to the text.
- Customize the Layer Styles: After applying a layer style, a Layer Style dialog box will appear. Adjust the settings for the selected effect, such as the size, opacity, angle, and color, to fine-tune the appearance of the text.
- Apply Text Effects: In addition to layer styles, you can also apply text-specific effects directly to the text layer. Select the text layer, go to the top menu, and navigate to “Layer” > “Layer Style” > “Blending Options.” Here, you can apply effects such as Inner Shadow, Satin, Gradient Overlay, and more.
Experiment with different effects and styles to achieve the desired look for your text overlay. Be mindful of the overall aesthetic and tone you want to convey, ensuring that the effects and styles enhance the message and complement the image.
Remember to strike a balance between creativity and readability. While adding effects and styles can be visually captivating, it’s important to maintain legibility so that the text can be easily understood by the viewers.
By adding effects and styling to the text, you can elevate its visual impact, create a more engaging text overlay, and align it with your desired aesthetic and message.
Aligning and Centering the Text on the Image
Aligning and centering the text on the image is a crucial step to ensure a visually balanced and aesthetically pleasing text overlay. Proper alignment helps to create a more polished and professional look, enhancing the overall visual impact of the image.
Follow these steps to align and center the text on the image in Adobe Photoshop:
- Select the Text Layer: In the Layers panel, click on the text layer to make it active. This ensures that any alignment changes are applied to the text layer specifically.
- Choose Alignment Options: In the Options Bar, you will find the alignment options. You can choose from left-align, center-align, right-align, or justify. Select the desired alignment option based on your preference and the visual impact you want to achieve.
- Adjust Text Box: If needed, click and drag within the text box to make adjustments to the overall size or position of the text on the image. This ensures the text is properly centered or aligned based on the chosen alignment option.
Properly aligning and centering the text helps to create a sense of harmony and balance within the text overlay. It ensures that the text is evenly spaced and visually balanced with the rest of the image.
In some cases, aligning the text to a specific point of interest within the image, such as a subject or a focal point, can enhance the visual impact and draw attention to the intended message or caption. Experiment with different alignment options to find the best visual arrangement for your text overlay.
Keep in mind that the alignment of the text should also be aligned with the overall design and composition of the image. It’s essential to consider the image’s elements, such as lines, shapes, and negative space, when determining the optimal alignment for the text.
By aligning and centering the text on the image, you create a visually appealing and balanced text overlay that enhances the overall impact and readability of your message.
Saving and Exporting the Final Image with Text Overlay
Once you have added the text overlay and made all the necessary adjustments, it’s time to save and export the final image with the text overlay in Adobe Photoshop. This step ensures that your work is preserved and ready to be shared or used in various digital or print mediums.
Follow these steps to save and export the final image with the text overlay:
- Review the Image: Take a moment to review the final image and make sure you are satisfied with the text placement, size, color, and any effects or styling that have been applied. Make any additional adjustments if needed.
- Save the Photoshop Project: If you want to preserve the ability to edit the image with its layers and settings intact, go to the “File” menu and choose “Save” or press “Ctrl+S” (Windows) or “Cmd+S” (Mac). Save the project file in the Photoshop format (.PSD) to allow for future modifications.
- Export as a Final Image: To create a final, flattened version of the image, go to the “File” menu and choose “Export” > “Export As” or “Save for Web” (older versions of Photoshop). Select the desired file format, such as JPEG or PNG, and specify the file name and location to save the image.
- Configure Export Settings: Depending on the chosen file format, you may have additional options to configure, such as image quality, color space, and transparency settings. Adjust these settings as needed, keeping in mind the intended use of the image.
- Export the Image: Once you have configured the export settings, click the “Export” or “Save” button to generate the final image with the text overlay. The image will be saved to the specified location in the chosen format.
At this stage, you have successfully saved and exported the final image with the text overlay. The exported image is now ready to be shared, printed, or used according to your needs.
Ensure that you keep a backup of the project file (.PSD) to retain the ability to make further changes or modifications in the future if required.
Congratulations! You have completed the process of adding text to an image in Adobe Photoshop and have a final image with the desired text overlay.