
Determine the Key Type
When it comes to putting a key back on a laptop keyboard, the first step is to determine the type of key you are dealing with. Laptop keyboards can vary in design and key type, so it’s important to know what you’re working with before proceeding.
Most laptop keyboards have two main types of keys: regular keys and larger keys, such as the spacebar or the enter key. Regular keys are generally easier to put back as they have a simple hinge mechanism. On the other hand, larger keys often have a more complex mechanism that requires extra steps for proper reinstallation.
To identify the type of key, look closely at the keycap and the surrounding area. Regular keys tend to have a small plastic hinge mechanism attached to the bottom of the keycap. Larger keys, on the other hand, might have additional support bars or clips that hold the key in place.
It’s also worth noting that laptop keyboards can differ between models and brands, so be sure to consult the manual or manufacturer’s website for specific instructions if available.
How to Determine the Key Type:
- Examine the keycap and surrounding area.
- Look for a small plastic hinge mechanism for regular keys.
- Identify any additional support bars or clips for larger keys.
- Consult the manual or manufacturer’s website for specific instructions if available.
Remove Surrounding Keys
Before you can put a key back on a laptop keyboard, it’s often necessary to remove the surrounding keys. This allows for easier access to the key mechanism and ensures a smooth reinstallation process. However, it’s important to proceed with caution and follow these steps to avoid causing any damage to the keyboard or other keys.
Step-by-step Guide to Removing Surrounding Keys:
- Start by locating the keys that are directly adjacent to the key you want to put back.
- Using a flat, thin tool such as a small screwdriver or a plastic pry tool, gently insert the tool between the key and the keyboard frame.
- Gently apply pressure to lift the surrounding keys. Be careful not to use excessive force to avoid breaking the keys or damaging the keyboard.
- Once the surrounding keys are lifted, carefully remove them from the keyboard. Some keys may have a small retaining clip that needs to be unhooked before they can be fully removed.
- Set the removed keys aside in a safe place to prevent them from getting lost or damaged.
Removing surrounding keys provides better access to the key mechanism, allowing you to properly align and install the key you want to put back. Remember to handle the keys with care and be mindful of any retaining clips or additional mechanisms that may be present.
By following these steps, you can safely and efficiently remove the surrounding keys on a laptop keyboard to prepare for putting the key back in its place.
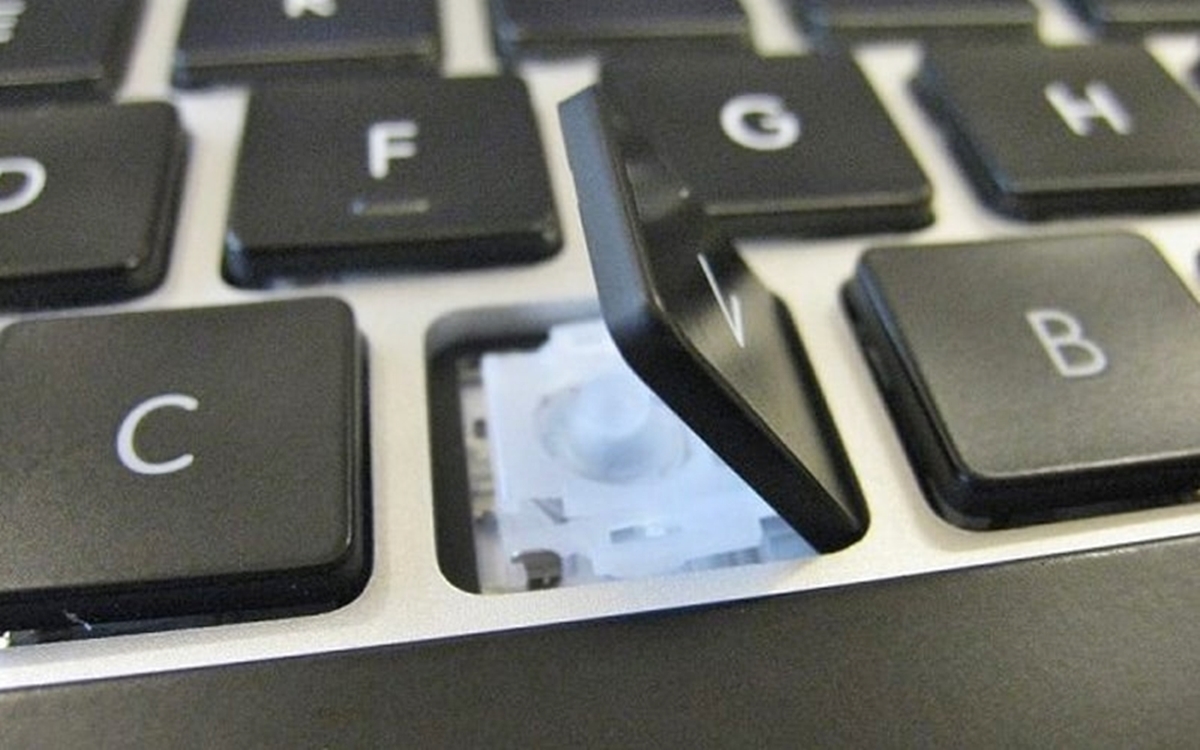
Access the Key Mechanism
Now that the surrounding keys have been removed, it’s time to access the key mechanism. This will allow you to properly align and attach the key you want to put back on the laptop keyboard. Follow these steps to access the key mechanism with ease:
Step-by-step Guide to Accessing the Key Mechanism:
- Take a closer look at the area where the key is missing. You should be able to see the key mechanism, which consists of a small plastic hinge.
- Inspect the keyboard frame and ensure that there are no obstructions or debris that may hinder the key’s installation.
- If you notice any dust or dirt around the key mechanism, gently clean it using a compressed air can or a soft brush.
- Ensure that the key mechanism is in good condition, without any signs of damage or breakage. If the mechanism is damaged, it may need to be replaced.
By accessing the key mechanism, you can ensure a smooth and hassle-free installation of the key. It’s important to clean the area and check for any damage to prevent any potential issues with the key’s functionality.
Take your time to carefully inspect and prepare the key mechanism before proceeding to the next step. This will help ensure that the key is securely attached and functions properly when put back on the laptop keyboard.
Align the Key with the Mechanism
After accessing the key mechanism, it’s time to align the key with the mechanism to ensure a proper fit and function. Proper alignment is crucial for the key to sit correctly and prevent any potential issues with typing or key responsiveness. Follow these steps to align the key with the mechanism:
Step-by-step Guide to Aligning the Key with the Mechanism:
- Take the keycap and closely examine the underside. You should see small clips or tabs that correspond to the plastic hinge on the keyboard.
- Align these clips or tabs with the corresponding slots or hooks on the key mechanism.
- Gently position the keycap over the mechanism, making sure it is centered and level.
- Apply light pressure to snap the keycap into place. You should hear or feel a slight click when the key is securely attached.
It’s important to be gentle when aligning the key with the mechanism to avoid any damage. Take your time to ensure that the keycap is positioned correctly, aligning the clips or tabs with the corresponding slots or hooks.
If you encounter any resistance or difficulties during the alignment process, double-check the alignment and try again. It’s essential to have a secure and proper alignment to ensure the key functions smoothly.
By methodically aligning the keycap with the mechanism, you can successfully position the key and move on to the next step of the installation process.
Press the Key Down Firmly
Once the keycap is aligned with the mechanism, the next step is to press the key down firmly to ensure a secure attachment. This step is crucial for the key to function properly without any wobbling or instability. Follow these steps to press the key down firmly:
Step-by-step Guide to Pressing the Key Down Firmly:
- Position your finger directly above the keycap.
- Apply steady and even pressure to the center of the keycap.
- Press down firmly until you hear or feel a definitive click or snap.
- Ensure that the keycap sits flush with the surrounding keys and does not have any noticeable wobbling or instability.
It’s important to use sufficient pressure when pressing the key down to ensure a secure attachment. However, be cautious not to exert excessive force as it may cause damage to the key or the mechanism.
If you find that the keycap is not snapping into place or feels loose, carefully remove the key and realign it with the mechanism. Ensure that the clips or tabs are properly aligned with their corresponding slots or hooks before pressing the key down again.
By firmly pressing the key down, you can ensure a stable and functional attachment, allowing for smooth typing and reliable key performance.
Test the Key for Proper Functioning
After successfully attaching the keycap, it’s important to test the key for proper functioning. Testing ensures that the key is responsive and registers keystrokes accurately. Follow these steps to test the key:
Step-by-step Guide to Testing the Key:
- Position your fingers above the key you just put back on the laptop keyboard.
- Press the key down to perform a keystroke.
- Observe if the key responds by registering the keystroke on the screen or the application you are using.
- Ensure that the key returns to its original position after releasing it.
- Repeat the process multiple times to ensure consistent performance.
During the testing process, pay attention to any irregularities such as unresponsiveness, sticking, or inconsistent behavior. If you encounter any issues, double-check the alignment of the keycap with the mechanism and repeat the steps from the previous sections.
If the key continues to exhibit problems, it may be necessary to seek professional assistance or contact the manufacturer for further guidance.
By thoroughly testing the key, you can ensure that it functions properly and integrates seamlessly with the rest of the laptop keyboard.
Replace Surrounding Keys
Now that the key you were working on is properly installed and functioning, you can proceed to replace the surrounding keys that were removed earlier. This step is essential for restoring the keyboard’s original layout and ensuring a consistent typing experience. Follow these steps to replace the surrounding keys:
Step-by-step Guide to Replacing Surrounding Keys:
- Take the first surrounding key and position it above its corresponding slot on the keyboard.
- Align the key with the slot, ensuring that any clips or retaining mechanisms match up properly.
- Press down on the key firmly until you hear or feel a click, indicating that it is securely in place.
- Repeat the process for each of the remaining surrounding keys, one at a time.
It’s important to ensure that each surrounding key is aligned correctly and securely attached. Take your time and double-check the alignment before pressing down on the keys.
If you encounter any resistance or difficulties while replacing the surrounding keys, gently remove the key and try again to ensure a proper fit. Pay attention to any retaining clips or mechanisms that may require specific alignment or manipulation.
By replacing the surrounding keys, you can restore the keyboard’s functionality and aesthetics, ensuring a seamless and satisfying typing experience.