
Overview of Upgrading a Laptop Graphics Card
Upgrading a laptop graphics card is a great way to enhance your computer’s performance and take your gaming or graphic-intensive tasks to the next level. A graphics card, also known as a video card or GPU (Graphics Processing Unit), is responsible for rendering images, videos, and animations on your laptop’s screen.
Before diving into the process, it’s essential to understand that not all laptops support graphics card upgrades. Many laptops come with integrated graphics, where the graphics card is soldered onto the motherboard and cannot be replaced. However, if you’re fortunate enough to own a laptop with a dedicated graphics card, you have the opportunity to improve your laptop’s graphical capabilities.
The benefits of upgrading a laptop graphics card are numerous. First and foremost, you can experience smoother and more immersive gameplay, particularly in graphically demanding games. It allows you to crank up the settings, achieve higher frame rates, and enjoy sharper and more detailed visuals.
Additionally, upgrading your graphics card can dramatically improve your laptop’s performance in graphic design, video editing, and 3D modeling applications. These tasks often rely heavily on the GPU’s processing power, and a more powerful graphics card can significantly reduce rendering times and increase productivity.
However, it’s essential to note that upgrading a laptop graphics card is not a simple task and requires a certain level of technical expertise. Opening up your laptop and accessing the internals can void your warranty if not done correctly. Therefore, it’s crucial to follow proper procedures and take necessary precautions.
In the following sections, we will guide you through the process of upgrading a laptop graphics card step by step. From checking compatibility and requirements to installing and testing the new graphics card, we will provide detailed instructions and tips to help you successfully upgrade your laptop’s graphics card.
Step 1: Check Compatibility and Requirements
Before you begin the process of upgrading your laptop graphics card, it’s crucial to ensure compatibility with your laptop and understand the requirements involved. Here’s what you need to consider:
1. Laptop Model and Manufacturer: Different laptop models have varying levels of compatibility with graphics card upgrades. Research your laptop model and manufacturer’s specifications to determine if it supports external GPU upgrades. Many manufacturers provide documentation or support articles that can assist you in identifying whether your laptop is upgradeable.
2. Interface Compatibility: Check the interface compatibility between your laptop and the graphics card you intend to purchase. Common interfaces include PCIe (PCI Express) and MXM (Mobile PCI Express Module). Each laptop model may have specific interface requirements, so verify compatibility to ensure a seamless installation.
3. Power Supply and Cooling: Upgrading to a more powerful graphics card may require additional power and cooling. Verify if your laptop’s power supply can handle the increased power consumption of the new card. Additionally, ensure sufficient cooling to prevent overheating. Insufficient power supply or inadequate cooling can result in performance issues and potential damage to your laptop.
4. Physical Space: Measure the physical space available in your laptop’s chassis for the new graphics card. Different graphics cards have different sizes, so it’s important to ensure that the card you choose will physically fit into your laptop. Keep in mind that some larger graphics cards may require modifications to the laptop’s case or cooling system.
5. Operating System Compatibility: Ensure that your operating system is compatible with the new graphics card and its drivers. Check if the manufacturer provides driver support for your specific operating system. Using the latest drivers will ensure optimal performance and compatibility.
6. Budget: Determine your budget for the graphics card upgrade. Research different models and compare prices to find the best option that suits your needs and budget. It’s essential to strike a balance between performance and cost to get the most value out of your upgrade.
By thoroughly checking compatibility and understanding the necessary requirements, you can avoid expensive mistakes and make an informed decision when choosing a graphics card for your laptop. Ensure that all the outlined criteria match before proceeding to the next steps of the upgrade process.
Step 2: Determine the Type of Graphics Card
Once you have confirmed the compatibility of your laptop for a graphics card upgrade, the next step is to determine the type of graphics card that is suitable for your specific needs and requirements. Here are some factors to consider:
1. Purpose: Define the primary purpose of your upgraded graphics card. Are you looking to enhance gaming performance, improve graphic design capabilities, or boost video editing speeds? Different types of graphics cards cater to specific needs, so identifying your purpose will help narrow down your options.
2. Performance Level: Consider the level of performance you require. Graphics cards are available in various tiers, ranging from entry-level to high-end. Higher-tier cards offer better performance, but they come at a higher cost. Assess your needs and budget to determine the appropriate performance level for your laptop.
3. VRAM Size: The VRAM (Video Random Access Memory) of a graphics card is crucial for handling graphics-intensive tasks. If you work with large image or video files, or play modern games with high-resolution textures, consider a graphics card with a larger VRAM size for smoother performance.
4. Cooling Solution: Graphics cards generate heat during operation, and adequate cooling is essential for optimal performance and longevity. Determine whether your laptop can accommodate the cooling requirements of the chosen graphics card. Consider options with efficient cooling solutions such as dual fans or advanced heat dissipation technology.
5. Manufacturer and Brand: Do some research on reputable graphics card manufacturers and brands. Look for reviews, customer feedback, and reliability ratings. Opting for a well-known and trusted brand ensures better customer support, driver updates, and overall satisfaction with your purchase.
6. Compatibility with Other Components: Ensure that the chosen graphics card is compatible with the other components of your laptop, such as the CPU, motherboard, and power supply. A well-balanced system will ensure optimal performance and prevent potential compatibility issues.
7. Future Upgradability: Consider any future upgrade plans you may have. If you plan to upgrade your laptop further down the line, ensure that the chosen graphics card allows for future upgrades and is compatible with potential hardware expansions.
By considering these factors, you can narrow down the options and make an informed decision when selecting the type of graphics card for your laptop. Take the time to research, compare specifications, and read reviews to find the best graphics card that meets your specific needs and budget.
Step 3: Gather Necessary Tools and Materials
Before you start the process of upgrading your laptop graphics card, it’s essential to gather all the necessary tools and materials. Having the right equipment on hand will make the installation process smoother and ensure that you have everything you need to complete the upgrade. Here are the tools and materials you’ll need:
1. Screwdriver Set: A set of precision screwdrivers is crucial for disassembling your laptop. Different screws may be used to secure the laptop case or the graphics card itself, so having a variety of screwdriver sizes will help you remove them with ease.
2. Thermal Paste: When installing a new graphics card, it’s recommended to apply fresh thermal paste to ensure optimal heat transfer between the GPU and the cooling system. Purchase a high-quality thermal paste from a reputable brand to help maintain lower temperatures during intensive tasks.
3. Anti-static Wrist Strap: Static electricity can damage sensitive electronic components, so it’s important to use an anti-static wrist strap to ground yourself before working inside your laptop. This will help prevent electrostatic discharge that could potentially harm the laptop’s internals.
4. Cleaning Materials: It’s a good idea to have some cleaning materials on hand to remove dust and debris from the components and the laptop chassis. Compressed air or a soft brush can help clean the internal parts, while a microfiber cloth can be used to wipe down surfaces.
5. Replacement Thermal Pads or Thermal Tape: Depending on your laptop’s design, you may need replacement thermal pads or thermal tape if the existing ones are damaged or need to be replaced during the graphics card upgrade. Check the specifications of your laptop to determine if you require these materials.
6. Instructions and Documentation: Have a printed copy or a digital version of the laptop’s service manual, as well as any additional instructions or documentation specific to the graphics card upgrade. This will serve as a reference and guide you through the disassembly and installation process.
7. Workspace and Proper Lighting: Choose a clean and well-lit workspace where you can comfortably work on your laptop. This will help you see the components clearly and prevent accidental damage due to poor visibility or cluttered surroundings.
By gathering these tools and materials ahead of time, you’ll be well-prepared to proceed with the graphics card upgrade. Having everything you need at your fingertips will streamline the process and minimize any potential delays or complications that may arise.
Step 4: Precautions and Safety Measures
Before you begin the process of upgrading your laptop’s graphics card, it’s crucial to take necessary precautions and prioritize safety. Handling delicate computer components requires careful consideration to avoid damage and protect your investment. Here are some precautions and safety measures to keep in mind:
1. Power Off and Disconnect: Make sure your laptop is powered off and unplugged from the power source before you start the upgrade process. This will prevent any electrical accidents and protect both you and your laptop from potential harm.
2. Eliminate Static Electricity: Static electricity can damage sensitive electronic components. To mitigate this risk, wear an anti-static wrist strap and ground yourself by touching a grounded metal object before handling any components.
3. Work in a Clean Environment: Choose a clean and well-organized workspace to minimize the risk of dust and debris entering your laptop. This will help keep your components clean and reduce the chance of overheating due to blockages in the cooling system.
4. Take Note of Cable and Screw Locations: As you disassemble your laptop, make note of the locations and connections of cables and screws. Take pictures or label them if necessary. This will help you during reassembly and ensure that everything is properly connected.
5. Handle Components Gently: Exercise caution when handling your laptop components. Avoid applying excessive force or putting pressure on fragile areas. Be mindful of sensitive connectors and delicate pins to prevent bending or breaking.
6. Follow Manufacturer Guidelines: Refer to the manufacturer’s guidelines and service manual for your laptop model. These resources will provide specific instructions and precautions for your laptop’s disassembly and graphics card installation.
7. Clean and Reapply Thermal Paste: When removing the old graphics card and installing the new one, remember to clean off the old thermal paste using isopropyl alcohol and apply fresh thermal paste. This will ensure optimal heat transfer and prevent overheating issues.
8. Keep Track of Screws and Small Parts: Use a small container or magnetic tray to store screws and small parts during the disassembly process. This will prevent loss and make it easier to find the correct components when reassembling your laptop.
9. Check for BIOS and Driver Updates: It’s essential to check for any BIOS updates or driver updates for your new graphics card. Keeping your system up to date will ensure compatibility and optimize performance.
By following these precautions and safety measures, you can minimize the risk of damage to your laptop and ensure a successful graphics card upgrade. Remember to take your time and be patient throughout the process to avoid any unnecessary errors or mishaps.
Step 5: Backup Data and Prepare for Disassembly
Before proceeding with the disassembly of your laptop for the graphics card upgrade, it’s crucial to back up any important data and prepare your laptop for the process. This will ensure that your important files are protected and you can easily restore your system if needed. Here are the steps to follow:
1. Back Up Your Data: Create a backup of all your important files, documents, and media. This can be done using an external hard drive, cloud storage, or a reliable backup software. It’s essential to have a copy of your data in case of any unexpected issues or data loss during the upgrade process.
2. Make a List of Installed Programs: Take note of the programs installed on your laptop and gather any necessary installation files or product keys. This will make it easier to reinstall your software after the upgrade.
3. Organize and Label Cables: Take a moment to organize and label the cables connected to your laptop. Use small cable ties or labels to mark each cable’s location or take pictures as a reference. This will help you reconnect everything correctly during reassembly.
4. Remove External Devices: Disconnect any external devices such as USB drives, printers, or external monitors. This will prevent any accidental damage to these devices or interference during the disassembly process.
5. Power Off and Disconnect: Turn off your laptop and disconnect it from the power source. Remove the battery if it’s removable to ensure complete power isolation.
6. Ground Yourself: Ground yourself by touching a grounded metal object or wearing an anti-static wrist strap. This will discharge any static electricity and minimize the risk of damaging sensitive components.
7. Create a Workspace: Set up a clean and well-lit workspace where you can comfortably disassemble your laptop. Make sure you have enough space to lay out the components and tools without any risk of damage or misplacement.
8. Gather Disassembly Tools: Double-check that you have all the tools needed for the disassembly process. This can include precision screwdrivers, pry tools, and any additional tools recommended by the laptop manufacturer.
9. Follow Safety Precautions: Review the safety precautions mentioned in the laptop’s service manual. Take note of any specific guidelines or warnings related to disassembly, such as avoiding certain areas or components.
By backing up your data and preparing your laptop for disassembly, you can proceed with peace of mind knowing that your important files are secure. This step is crucial as it sets the stage for the actual disassembly process, ensuring that you have everything in order and minimizing the risk of any complications during the upgrade.
Step 6: Open the Laptop Case
Now that you have backed up your data and prepared your laptop for disassembly, it’s time to open the laptop case to access the internal components. Follow these steps to safely open the laptop case:
1. Refer to the Service Manual: Consult the laptop’s service manual or manufacturer’s documentation for specific instructions on opening the laptop case. These resources will provide detailed guidance tailored to your laptop model.
2. Remove Screws: Use the appropriate screwdriver to remove the screws securing the laptop case. Take note of their placement and be sure to keep them in a safe place where they won’t get lost or mixed up.
3. Separate the Case Halves: Once the screws are removed, gently separate the two halves of the laptop case. Be cautious and apply even pressure to avoid any damage to the plastic clips or connectors that may be holding the case together.
4. Take Note of Cable Connections: As you open the laptop case, be mindful of any cables that are still connected to the motherboard or other components. Note the location and connections of these cables to ensure proper reassembly later on.
5. Lift the Keyboard and Palmrest Assembly (if necessary): Some laptop models may require lifting the keyboard and palmrest assembly to access the internal components. Follow the specific instructions for your laptop model to detach the assembly carefully.
6. Ground Yourself: Reaffirm that you are grounded by using an anti-static wrist strap or by touching a grounded metal object before touching any internal components. This will help prevent electrostatic discharge that could damage sensitive electronic parts.
7. Take Caution with Ribbon Cables: Ribbon cables are delicate and easily damaged. If you encounter any ribbon cables while opening the laptop case, handle them with care. Gently detach them by releasing the locking mechanisms, if present, or by carefully pulling them straight out.
8. Set Aside the Laptop Case: Once the laptop case is opened and you have accessed the internal components, set the case aside in a safe place where it won’t be accidentally damaged or bumped.
Remember, every laptop model may have a slightly different disassembly process, so it’s crucial to follow the manufacturer’s instructions and be attentive to the specific requirements of your laptop. Take your time and proceed with caution to ensure a successful and hassle-free opening of the laptop case.
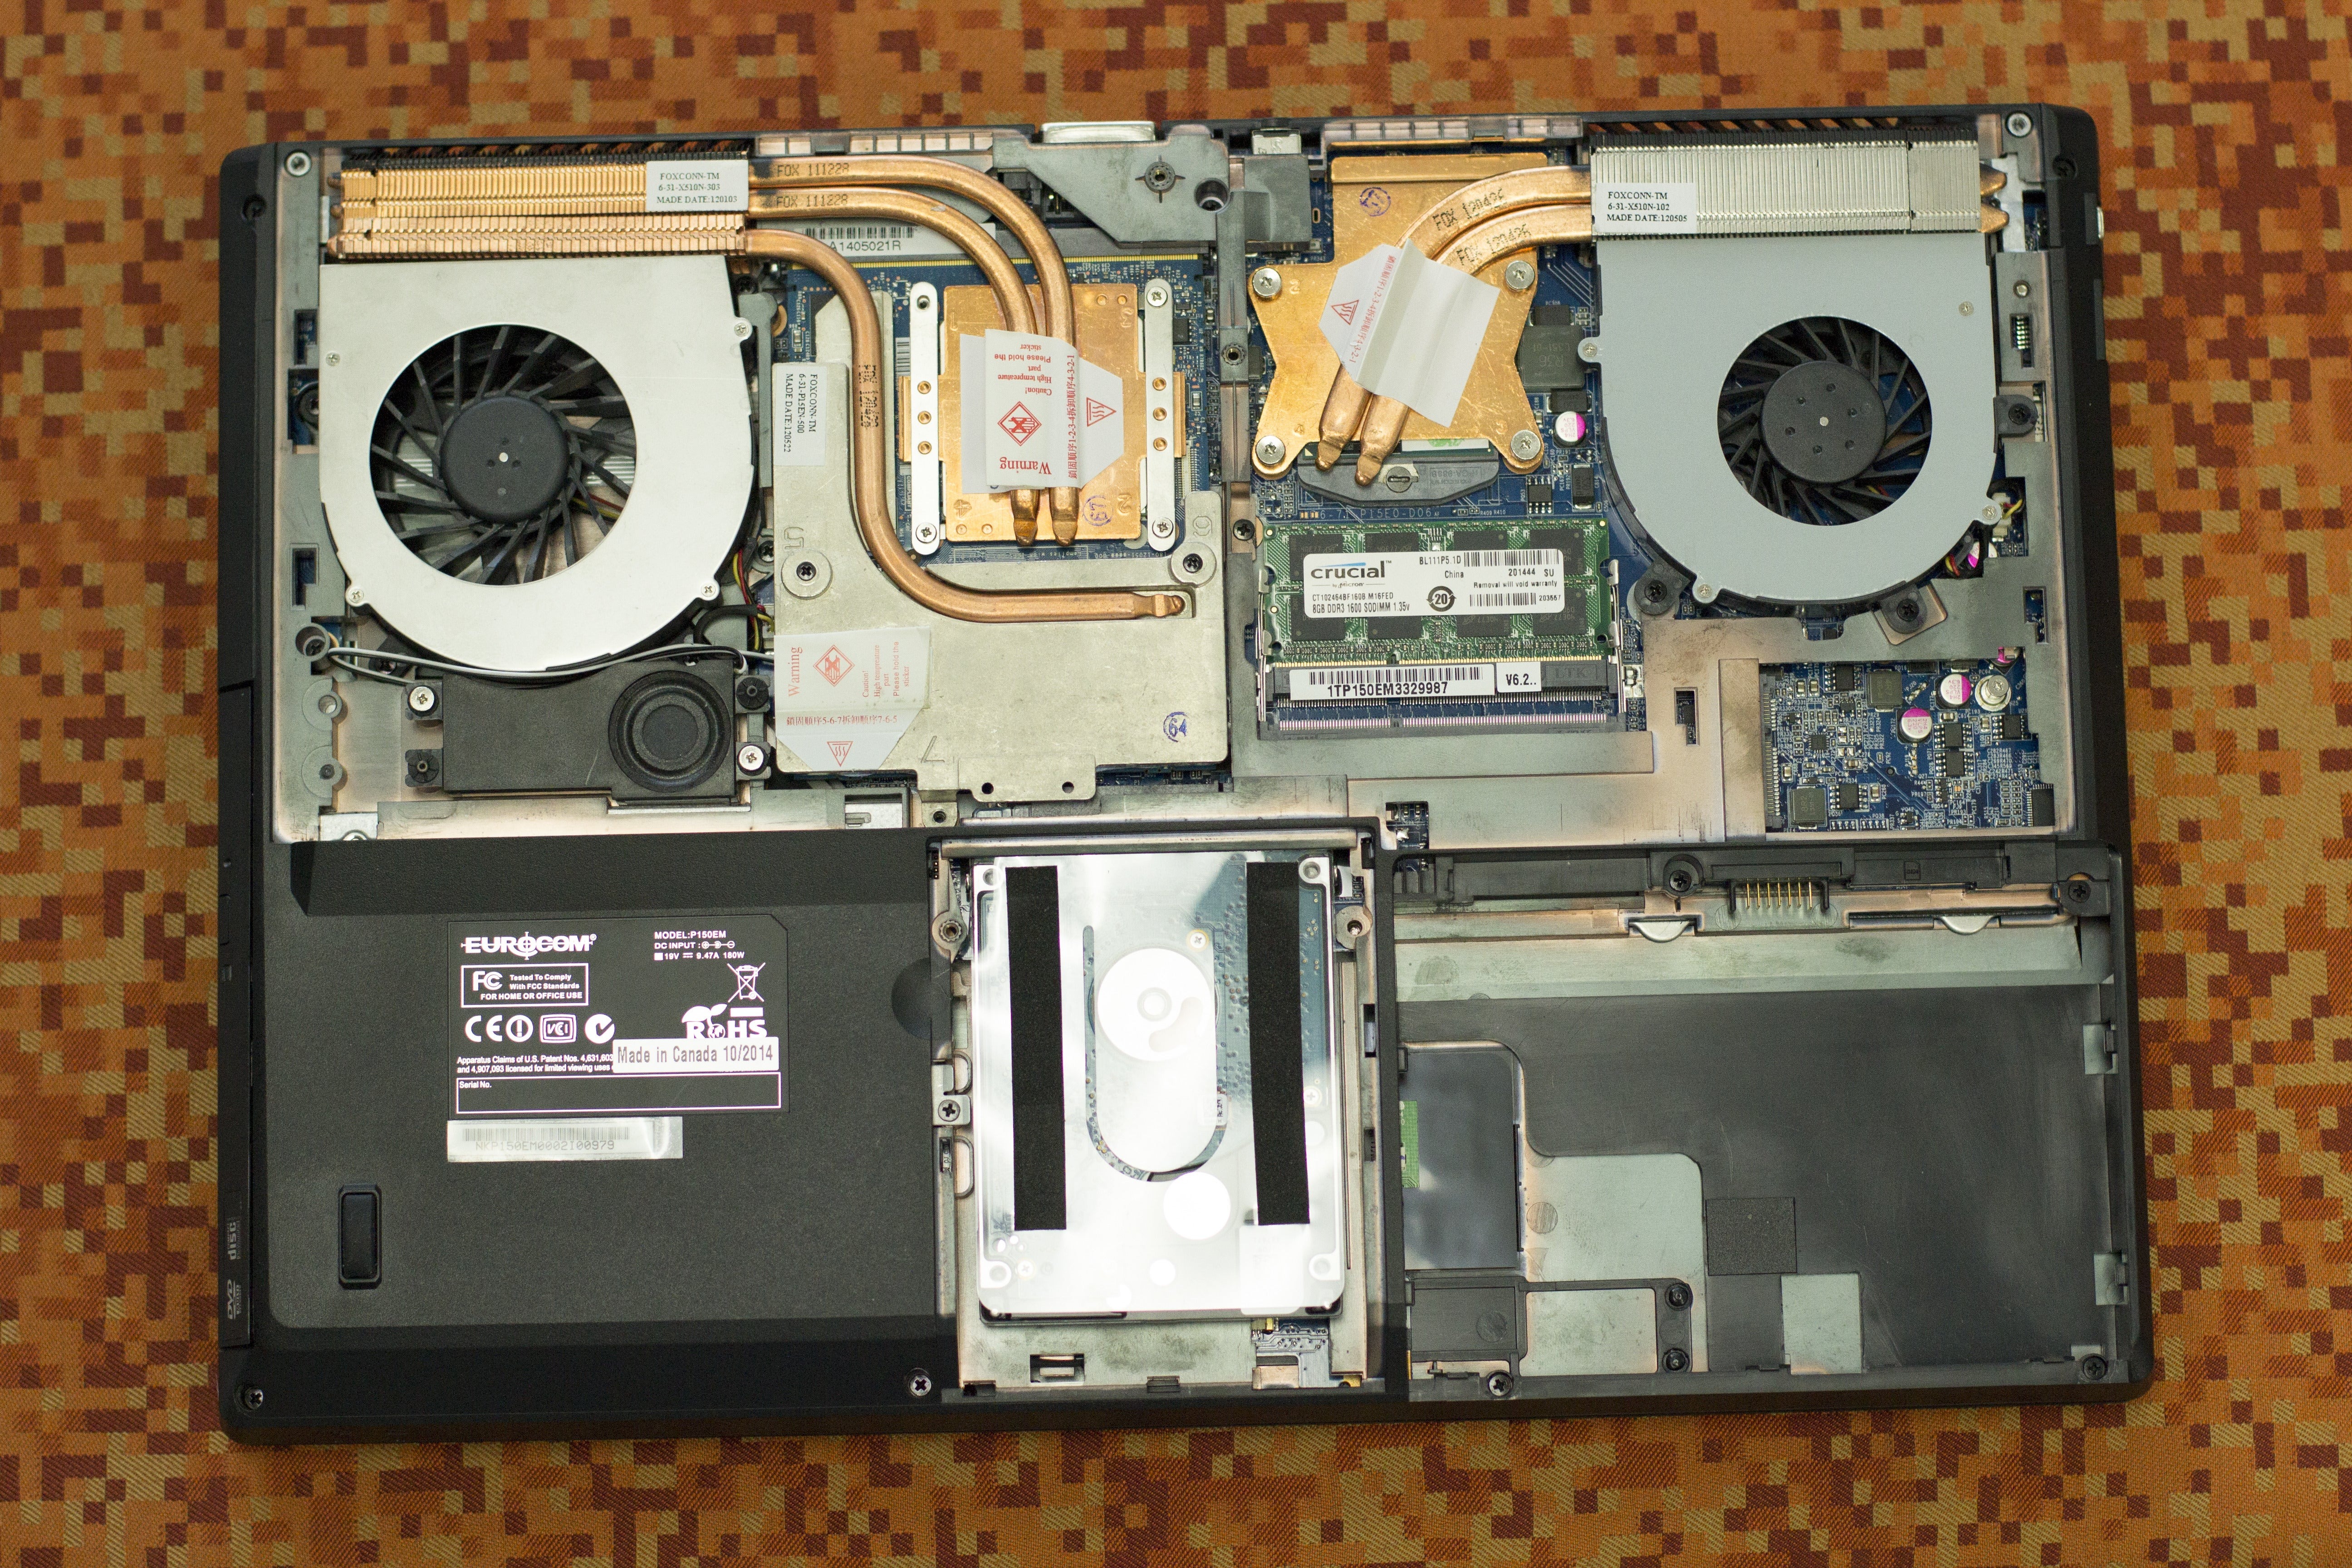
Step 7: Locate and Remove the Existing Graphics Card
With the laptop case open, the next step is to locate and remove the existing graphics card from your laptop. Follow these steps to safely locate and remove the graphics card:
1. Identify the Graphics Card: Locate the graphics card within the laptop’s internal components. It is usually a smaller, circuit-board-like component plugged into a dedicated slot on the motherboard. Consult the laptop’s service manual or manufacturer’s documentation if you are unsure about the graphics card’s location.
2. Unplug Power and Data Connectors: Before removing the graphics card, ensure that any power and data connectors are unplugged. These connectors may include PCIe power connectors or ribbon cables that attach the graphics card to the motherboard. Gently unplug these connections, taking care not to damage any pins or connectors.
3. Release the Securing Mechanism: Many laptops use securing mechanisms, such as screws or plastic clamps, to hold the graphics card in place. Carefully release these mechanisms to free the graphics card from its slot. Refer to the laptop’s documentation to determine the specific method used to secure the graphics card.
4. Remove the Existing Graphics Card: Once the securing mechanism is released, you can carefully lift the existing graphics card out of its slot. Be sure to handle it by the edges and avoid touching any sensitive components or connectors. Place the removed graphics card in a safe and static-free location.
5. Inspect the Graphics Card Slot: After removing the graphics card, take a moment to inspect the graphics card slot on the motherboard. Ensure that no dust, debris, or foreign objects are present that could hinder the installation of the new graphics card. Use compressed air or a soft brush to clean out any dust or particles if necessary.
6. Take Note of Serial Numbers and Labels: While the graphics card is removed, take note of any serial numbers, labels, or model information that may be important for future reference or warranty purposes. This information can be useful when installing and registering the new graphics card.
7. Store the Removed Graphics Card Securely: To protect the removed graphics card from potential damage, store it in an anti-static bag or a protective case. This will prevent electrostatic discharge and physical damage while you continue the upgrade process.
By safely locating and removing the existing graphics card, you have now completed an essential step in upgrading your laptop’s graphics capabilities. A cautious and precise approach will ensure that the process goes smoothly and that you can proceed to install the new graphics card without any complications.
Step 8: Install the New Graphics Card
After successfully removing the existing graphics card, it’s time to install the new graphics card in your laptop. Installing the new graphics card will improve your laptop’s performance and enhance its graphical capabilities. Follow these steps to ensure a smooth installation process:
1. Align the New Graphics Card: Carefully align the new graphics card with the dedicated slot on the motherboard. Take note of any notches or connectors on the graphics card that correspond to the slot. Ensure that it is properly oriented before proceeding.
2. Insert the New Graphics Card: Slowly and firmly insert the new graphics card into the slot. Apply light pressure until it is fully seated and the connectors are properly aligned. Do not force it; it should slide in smoothly. If it doesn’t easily fit, double-check the orientation and alignment.
3. Secure the Graphics Card: Once the new graphics card is properly inserted, secure it with the appropriate securing mechanism. This can involve tightening screws or engaging clamps to hold the card securely in place. Follow the manufacturer’s instructions for your specific laptop model.
4. Reconnect Power and Data Cables: Carefully reconnect any power and data cables that were disconnected from the previous graphics card. Ensure a proper and secure connection, taking care not to bend or damage any pins or connectors.
5. Check the Connections: Double-check all the connections to ensure that they are properly seated and secure. This includes power cables, data cables, and any other connectors related to the graphics card installation.
6. Reassemble Components: If you had to remove any additional components, such as the keyboard or palmrest assembly, carefully reassemble them according to the manufacturer’s instructions. Be mindful of any cables or connectors that need to be reattached and ensure proper alignment.
7. Replace the Laptop Case: Put the laptop case back together by aligning the two halves and reinserting the screws. Make sure all the screws are tightened but avoid over-tightening, as it may damage the laptop’s plastic frame or strip the screw threads.
8. Clean the Laptop Surface: Use a soft cloth or microfiber cloth to clean the laptop’s surfaces before powering it back on. This will remove any fingerprints, dust, or debris that may have been accumulated during the upgrade process.
By carefully following these steps, you can install the new graphics card in your laptop successfully. Take your time and be attentive to ensure that the installation is done correctly, allowing you to enjoy improved graphics performance on your laptop.
Step 9: Connect and Secure the New Graphics Card
Once you have installed the new graphics card in your laptop, the next step is to connect and secure it properly to ensure optimal performance. Follow these steps to effectively connect and secure the new graphics card:
1. Power Connections: Check if your new graphics card requires any additional power connections. This is typically done through PCIe power connectors. Ensure that all necessary power cables are connected securely to the graphics card and the power supply unit (PSU) of your laptop.
2. Data Connections: If your new graphics card requires any additional data connections, ensure that the appropriate cables are connected. This may include ports such as DisplayPort, HDMI, or DVI connectors. Double-check that these cables are securely attached to the graphics card and the respective displays or peripherals.
3. Secure the Graphics Card: Ensure that the new graphics card is securely fastened to the dedicated slot on the motherboard. This often involves tightening screws or engaging clamps to hold the card firmly in place. Make sure to follow the manufacturer’s guidelines for securing the graphics card properly.
4. Verify Connections: Carefully inspect all the connections, including power and data cables, to ensure that they are properly seated. Ensure that there are no loose or disconnected cables that could cause performance issues or interruptions.
5. Reassemble Components: If you had to disassemble any additional components during the installation, such as the keyboard or palmrest assembly, carefully reassemble them according to the manufacturer’s instructions. Be mindful of any cables or connectors that need to be reattached, ensuring they are properly aligned.
6. Replace the Laptop Case: Put the laptop case back together by aligning the two halves and reinserting the screws. Make sure all the screws are tightened, but be cautious not to over-tighten and damage the laptop’s plastic frame or strip the screw threads.
7. Perform a Final Inspection: Before proceeding further, perform a final inspection to ensure that all connections are secure and components are properly assembled. Verify that there are no loose cables or components that could interfere with the operation of the new graphics card.
8. Finalize the Assembly: Once you are satisfied that everything is properly reconnected and secured, finalize the assembly by ensuring all screws are tightened, cables are neatly organized, and the laptop case is closed securely.
By following these steps, you can confidently connect and secure the new graphics card in your laptop. Paying attention to detail and ensuring that all connections are properly aligned and secured will result in optimal performance and stability for your upgraded graphics card.
Step 10: Reassemble the Laptop
After successfully connecting and securing the new graphics card, it’s time to reassemble your laptop. Follow these steps to ensure a smooth and proper reassembly process:
1. Organize Screws: Ensure that you have organized all the screws according to their locations. Refer to any notes, labels, or pictures you took during the disassembly process to guide you in placing the screws in their proper positions.
2. Align the Case Halves: Carefully align the two halves of the laptop case to ensure they fit together properly. Pay attention to any tabs or notches that need to align. Apply even pressure and gently press the case halves together until they are snugly fit, ensuring no gaps or misalignments.
3. Reinsert Screws: Start reinserting the screws into their respective locations, following the order and positions noted during the disassembly process. Begin with the screws that secure the laptop case, then move on to additional screws for components such as the keyboard and palmrest assembly.
4. Verify Connections: Double-check all cable connections and ensure they are securely attached. Take caution not to accidentally bend or damage any pins or connectors while reconnecting cables.
5. Check for Proper Fit: As you reassemble the laptop, ensure that all components fit properly in their designated places. Pay attention to any clips, latches, or retaining mechanisms to ensure that they engage correctly.
6. Secure Keyboard and Palmrest Assembly: If you removed the keyboard and palmrest assembly, reattach it carefully, aligning it with the guide pins or connectors. Secure it into place using the designated screws or clips as required by your laptop model.
7. Perform a Final Inspection: Once the laptop is fully reassembled, perform a final inspection to ensure that all screws are tightened properly and all components are securely in place. Verify that there are no loose connections or cables that could cause issues.
8. Power On and Test: Finally, plug in the power adapter and battery, then power on the laptop to test if everything is functioning correctly. Check the display and verify that the new graphics card is detected and operating as expected.
By carefully reassembling your laptop, you can ensure that all components are properly put back together, providing stability and reliability to your upgraded system. Take your time during this step and pay attention to detail to ensure a successful reassembly.
Step 11: Update Drivers and BIOS
After reassembling your laptop, it’s crucial to update the drivers and BIOS (Basic Input/Output System) for your new graphics card. Updating these software components ensures compatibility, stability, and optimal performance. Follow these steps to update the drivers and BIOS:
1. Visit the Manufacturer’s Website: Go to the website of the graphics card manufacturer and locate the support or downloads section. Look for the latest driver and BIOS updates specific to your graphics card model and operating system.
2. Download the Latest Drivers: Download the most recent driver package for your graphics card. Often, the manufacturer provides an installer that simplifies the installation process, guiding you through the necessary steps.
3. Install the Graphics Card Drivers: Run the driver installer and follow the on-screen instructions to install the updated graphics card drivers. Restart your laptop if prompted to complete the installation process.
4. Update the BIOS: Check if there is a BIOS update available for your laptop model. Download the latest BIOS update file from the manufacturer’s website. Carefully follow the instructions provided to update the BIOS. It usually involves creating a bootable USB drive or executing the update from within the BIOS interface itself.
5. Restart the Laptop: After updating the BIOS, restart your laptop to apply the changes. This ensures that the updated BIOS is fully implemented and any compatibility issues are resolved.
6. Verify Driver and BIOS Updates: Once your laptop has restarted, verify that the graphics card drivers and BIOS have been successfully updated. Open the Device Manager and check if the graphics card is listed correctly without any warning symbols. Additionally, check the BIOS version in the BIOS setup menu to confirm the successful update.
7. Test Graphics Card Performance: After updating the drivers and BIOS, run some tests or use graphics-intensive applications to assess the performance of your new graphics card. Verify that everything functions as expected and that you notice improvements in performance and graphical capabilities.
8. Regularly Check for Updates: Graphics card drivers and BIOS updates are often released to address compatibility issues, improve performance, and fix bugs. Make it a habit to periodically check for updates and install them to keep your system up to date and working optimally.
Updating the drivers and BIOS for your new graphics card is crucial for ensuring compatibility, stability, and optimal performance. By following these steps, you can take full advantage of the capabilities of your upgraded graphics card and enjoy a seamless experience on your laptop.
Step 12: Test the New Graphics Card
After updating the drivers and BIOS, it’s essential to thoroughly test the new graphics card to ensure it is functioning correctly and meeting your performance expectations. Here are some steps to test your new graphics card:
1. Benchmarking Software: Download and install benchmarking software, such as 3DMark or Unigine Heaven, to put your new graphics card through its paces. These programs will stress test the graphics card and provide performance scores that you can compare to similar systems.
2. Gaming Tests: Play a variety of graphically demanding games to evaluate the performance of your new graphics card. Pay attention to frame rates, smoothness, and overall graphics quality. Make note of any improvements compared to your previous graphics card.
3. Graphic Design and Video Editing Software: If you utilize graphic design or video editing software, run some tasks or projects that put a heavy load on the GPU. Monitor the performance and rendering times to gauge the impact of the new graphics card on your workflow.
4. Temperature Monitoring: Install a program like HWMonitor or MSI Afterburner to monitor the temperatures of your new graphics card during different tasks. Ensure that the temperature remains within safe limits and doesn’t exceed the manufacturer’s recommendations.
5. Stability Testing: Run stability testing software, such as FurMark or Prime95, to ensure that the new graphics card can handle extended periods of high stress without crashing or exhibiting instability. This will help identify any potential issues with overclocking or power delivery.
6. Multiple Display Testing: If you use multiple displays, connect them all and test the functionality of the new graphics card across all monitors. Ensure that each display is properly recognized, and there is no flickering, tearing, or other display-related issues.
7. Driver Updates: Check for any new driver updates for your graphics card regularly. Manufacturers often release driver updates to enhance compatibility, performance, and fix bugs. Stay up to date with the latest drivers to ensure the best experience with your new graphics card.
8. Performance Comparison: Compare the performance of the new graphics card with your previous graphics card. Analyze benchmark scores and real-world performance across different tasks. Evaluate whether the upgrade has provided the desired improvements in graphics performance and smoothness.
Testing the new graphics card ensures that it is functioning as intended and meeting your expectations. Through benchmarking, gaming tests, stability testing, and monitoring temperatures, you can gain confidence in the performance and stability of your upgraded graphics card.
Step 13: Troubleshooting Common Issues
While upgrading a laptop graphics card can greatly enhance performance, it’s not uncommon to encounter some issues. Here are some common problems and troubleshooting steps to help you resolve them:
1. Driver Issues: If you experience graphical glitches, crashes, or poor performance, ensure that you have the latest graphics card drivers installed. Download and install the latest drivers from the manufacturer’s website, then restart your laptop.
2. Compatibility Problems: If the new graphics card is not recognized or you’re encountering compatibility issues, verify that your laptop meets the requirements for the graphics card. Double-check motherboard compatibility, power supply requirements, and any additional system requirements specified by the manufacturer.
3. Power Supply Insufficiency: If your laptop’s power supply is not enough to support the new graphics card’s power demands, you may encounter stability issues or crashes. Consider upgrading your laptop’s power supply to meet the requirements of the new graphics card.
4. Overheating: Excessive heat can affect the performance and longevity of your graphics card. Ensure proper airflow and cooling within your laptop, clean any dust build-up, and consider using a cooling pad or external fans to help keep temperatures in check.
5. Incorrect Installation: If you are experiencing issues after installing the new graphics card, double-check that it is firmly and correctly seated in its slot. Ensure all cables are properly connected, and there are no loose connections or components.
6. BIOS Settings: In some cases, updating the BIOS to the latest version or adjusting BIOS settings may resolve issues related to the new graphics card. Follow the manufacturer’s instructions to access the BIOS and modify settings if necessary.
7. Error Codes or Messages: If you encounter error codes or error messages, note them down and search for online resources or consult the manufacturer’s support documentation. Error codes can provide valuable information to help troubleshoot and find specific solutions.
8. Seek Professional Help: If you have exhausted all troubleshooting steps or are unsure about performing advanced troubleshooting, consider seeking professional help. Contact the manufacturer’s support team or consult a qualified laptop technician who can diagnose and resolve complex issues.
Keep in mind that troubleshooting may require a combination of software and hardware solutions, and the exact steps may vary based on the specific issue and your laptop’s configuration. Patience and thoroughness are key when troubleshooting, as it may take time to identify and resolve the problem.
Step 14: Optimizing Settings with the New Graphics Card
After successfully installing and testing the new graphics card, it’s time to optimize the settings to maximize its performance and take full advantage of its capabilities. Here are some steps to optimize the settings with your new graphics card:
1. Graphics Control Panel: Install the graphics card’s control panel software, such as NVIDIA Control Panel or AMD Radeon Settings. These control panels provide access to various settings and options to customize your graphics card’s performance and visuals.
2. Update Graphics Card Drivers: Ensure that you have the latest drivers installed for your graphics card. Regularly check for driver updates from the manufacturer’s website and install them for improved performance, stability, and compatibility with the latest games and applications.
3. Adjust Graphics Settings in Games: In game settings, optimize the graphics options based on your preferences and hardware capabilities. Adjust parameters such as resolution, texture quality, anti-aliasing, and other graphics-specific settings to strike a balance between performance and visual quality.
4. Enable V-Sync and Adaptive-Sync: Enabling V-Sync (Vertical Sync) can help reduce screen tearing by synchronizing the frame rate with the monitor’s refresh rate. Additionally, if your monitor supports it, consider enabling adaptive-sync technologies such as NVIDIA G-Sync or AMD FreeSync for smoother and tear-free gameplay.
5. Overclocking (Optional): If you are comfortable with overclocking, you can explore the possibility of increasing the clock speeds of your graphics card. This can provide a performance boost, but it should be done cautiously while closely monitoring temperatures and stability. Refer to the manufacturer’s guidelines and use reliable overclocking software.
6. Use Performance Monitoring Tools: Utilize performance monitoring tools, such as MSI Afterburner or GPU-Z, to keep an eye on temperature, clock speeds, and utilization of your graphics card. This will help you identify any bottlenecks or performance issues that may require further optimization or adjustment.
7. Customize Video Playback Settings: Use your graphics card’s control panel or media player settings to optimize video playback. Adjust settings related to color reproduction, video post-processing, and upscaling to enhance the visual quality of video content.
8. Regularly Update Software: Stay up to date with the latest updates for your games, applications, and graphics card drivers. Software updates often include bug fixes, performance improvements, and new features that can enhance your overall experience with the new graphics card.
Remember that every system and user preference is different, so the optimal settings may vary. Experiment with different configurations, monitor the impact on performance and visual quality, and find the settings that best suit your needs and preferences.
Step 15: Final Thoughts and Considerations
Congratulations on successfully upgrading your laptop’s graphics card! As you wrap up the process, here are some final thoughts and considerations to keep in mind:
1. Warranty: It’s important to note that performing a graphics card upgrade on your laptop may void the manufacturer’s warranty. Consider the potential trade-off between improved performance and the loss of warranty coverage.
2. Compatibility with Future Updates: While your new graphics card may provide a significant performance boost now, consider its compatibility with future software updates and advancements in gaming and design technologies. Ensure that your chosen card has the necessary features and capabilities to support future requirements.
3. System Balance: Remember that a graphics card upgrade is just one component that contributes to your overall system’s performance. Consider if other components, such as the CPU, RAM, and storage, need upgrades to achieve a well-balanced system and avoid potential bottlenecks.
4. Maintenance and Cleaning: Proper maintenance and regular cleaning of your laptop are essential to ensure optimal performance and longevity. Keep your laptop’s cooling system clean and monitor temperatures regularly to prevent overheating issues that can impact the graphics card’s performance.
5. Research and Stay Informed: Continuously research and stay informed about new graphics card releases, advancements in technology, and software optimizations that can enhance your overall experience. Join online communities, follow news sources, and participate in discussions to stay up to date with industry trends.
6. Enjoy Your Upgraded Experience: Finally, sit back, relax, and enjoy your upgraded laptop experience! Whether you’re gaming, designing, or tackling graphic-intensive tasks, appreciate the improved graphics performance and the enhanced capabilities your new graphics card brings to your laptop.
Always remember that upgrading a laptop’s graphics card requires technical expertise and careful consideration. If you feel uncertain or uncomfortable with the process, it’s recommended to seek assistance from a professional or experienced technician to ensure a smooth and successful upgrade.
By following these final thoughts and considerations, you can make the most of your upgraded laptop and enjoy the increased performance and graphical capabilities for years to come.