
Understanding Excel Printing Options
Understanding Excel Printing Options
One of the key features of Microsoft Excel is its ability to create and print professional-looking spreadsheets. When it comes to printing, Excel offers a wide range of options that allow you to customize your printouts according to your needs. Understanding these printing options will enable you to make the most out of Excel’s printing capabilities.
Before you start printing your spreadsheet, it’s important to familiarize yourself with the various Excel printing options. These options can be accessed through the Page Layout tab in the Excel ribbon. Here are some of the most common printing options you should be aware of:
- Print Area: This option allows you to select a specific range of cells that you want to print. By defining the print area, you can avoid printing unnecessary data and ensure that only the relevant part of the spreadsheet is printed.
- Print Titles: If your spreadsheet spans multiple pages, you may want to print row and column titles on every page for better readability. The Print Titles option allows you to specify which rows and columns should be repeated on each page.
- Page Setup: This option provides a range of settings for customizing the layout of your printed spreadsheet. You can modify the paper size, page orientation, and adjust margins to control how the spreadsheet will appear on paper.
- Scaling: Excel allows you to scale your spreadsheet to fit on a single page or adjust the size of the printout. This is particularly useful when dealing with large spreadsheets that may span multiple pages.
- Headers and Footers: You can add headers and footers to your printed spreadsheet to include information such as page numbers, workbook name, or a custom message. This can give a more professional look to your printouts.
Understanding these basic printing options will help you optimize your Excel printing experience. By utilizing these options effectively, you can ensure that your printouts are tailored to your specific needs, whether it’s for a professional report, a budget spreadsheet, or any other type of Excel document.
Now that you have a better understanding of Excel’s printing options, let’s explore how to set up your spreadsheet for printing.
Setting Up Your Spreadsheet for Printing
Setting Up Your Spreadsheet for Printing
Before you hit the print button in Excel, it’s important to take a few steps to ensure that your spreadsheet is appropriately set up for printing. By following these guidelines, you can optimize the layout and appearance of your printouts for better readability and presentation.
Here are some key steps to consider when setting up your spreadsheet for printing:
1. Adjusting Column Width and Row Height: It’s crucial to review and adjust the column widths and row heights in your spreadsheet before printing. This will ensure that your data is displayed clearly and does not get cut off when printed. You can manually adjust the width and height by selecting the columns or rows and adjusting the sizing options in the Format menu or by double-clicking the boundary lines between the columns or rows.
2. Formatting Page Breaks: If your spreadsheet is large and spans multiple pages, you may want to manually set page breaks to control how the data is divided between pages. To do this, navigate to the Page Layout tab, click on the Breaks dropdown, and choose “Insert Page Break.” This allows you to specify where the page breaks should occur.
3. Reviewing Print Area: Before printing, make sure that you have defined the print area. The print area is the range of cells that will be printed. You can set the print area by selecting the desired cells and choosing “Set Print Area” from the Page Setup group in the Page Layout tab. This ensures that only the necessary data will be printed.
4. Checking for Hidden Objects: Sometimes, hidden objects such as images, charts, or shapes can affect the layout of your printouts. Make sure to review your spreadsheet and unhide any objects that are intended to be included in the printout. You can do this by selecting the hidden objects and choosing the “Unhide” option from the Format menu.
5. Proofreading and Formatting: Before printing, double-check your spreadsheet for any errors or inconsistencies. Ensure that the data is properly formatted, spell-checked, and has appropriate column headers and labels. This will help to present a professional-looking printout that is easy to understand.
By following these steps, you can ensure that your spreadsheet is well-prepared for printing. Taking the time to set up your spreadsheet properly will result in more professional-looking printouts that convey your data accurately and effectively.
Now that you have learned how to set up your spreadsheet for printing, let’s move on to modifying the page layout for optimal print results.
Modifying Page Layout
Modifying Page Layout
When preparing to print your Excel spreadsheet, adjusting the page layout is essential to ensure that the content is displayed properly on paper. Modifying the page layout options allows you to control the size, orientation, margins, and other important settings that will affect the appearance of your printout.
Here are some key aspects of page layout that you should consider when printing your Excel spreadsheet:
1. Adjusting Margins: Margins determine the amount of blank space between the content and the edges of the printed page. To modify the margins, go to the Page Layout tab and click on the Margins dropdown. Here, you can choose from predefined margin options or set custom margins to meet your specific requirements. Keep in mind that wider margins provide more space for headers, footers, and annotations, while narrower margins allow you to fit more content on each page.
2. Changing Paper Orientation: The orientation of the paper can be set to either portrait or landscape. Portrait orientation is the default and is suitable for most types of documents. However, if your spreadsheet contains wide tables or charts, changing to landscape orientation may be more appropriate. To change the paper orientation, navigate to the Page Layout tab, click on the Orientation dropdown, and select either Portrait or Landscape.
3. Scaling the Spreadsheet to Fit on One Page: If your spreadsheet extends beyond a single page, you can adjust the scaling options to fit the content onto one page. To scale your worksheet, go to the Page Layout tab, click on the Scale to Fit dropdown, and choose the desired percentage to shrink or expand the content. Alternatively, you can select “Fit Sheet on One Page” or “Fit All Columns on One Page” to automatically adjust the scaling.
4. Printing Gridlines and Headings: Gridlines help to differentiate between cells on a spreadsheet and can aid in understanding the data. To print gridlines, go to the Page Layout tab, click on the Sheet Options group, and make sure the “Print” box next to “Gridlines” is checked. Similarly, if you want to print the row and column headings, ensure that the “Print” box next to “Headings” is checked.
5. Printing Row and Column Titles on Every Page: If your spreadsheet spans multiple pages, you might want to print the row and column titles on every page for better reference. To set up this option, go to the Page Layout tab, click on the Print Titles button, and specify the rows and columns that should be repeated on each page.
By modifying the page layout settings, you can customize the appearance of your printouts to meet your specific needs. Remember to preview your changes using the Print Preview option to ensure that the content is displayed correctly before committing to the final print.
Now that you have learned how to adjust the page layout, it’s time to explore additional printing options, such as adjusting margins and scaling the spreadsheet.
Adjusting Margins
Adjusting Margins
When printing an Excel spreadsheet, adjusting the margins is a crucial step in ensuring that your content is properly displayed and aligned on the printed page. Margins define the boundaries of your document, determining the amount of space between the content and the edges of the paper. By adjusting the margins, you can optimize the layout and improve the overall appearance of your printouts.
Here’s how you can adjust the margins in Excel:
1. Accessing the Page Setup: To modify the margins, navigate to the Page Layout tab in Excel and click on the Margins button in the Page Setup group. This will open a dropdown menu with predefined margin options.
2. Choosing Predefined Margin Options: Excel provides several predefined margin options, such as Normal, Wide, Narrow, and Custom. These options offer different margin sizes suitable for various printing purposes. You can simply choose a predefined margin option that fits your needs by clicking on it.
3. Setting Custom Margins: If the predefined margin options do not meet your requirements, you can set custom margins by choosing the “Custom Margins” option at the bottom of the dropdown menu.
4. Entering Custom Margins: When you select the “Custom Margins” option, the Page Setup dialog box will appear. In this dialog box, you can specify the top, bottom, left, and right margins manually. You can enter values in inches, centimeters, millimeters, or points. Excel also provides an option to apply the custom margin settings to the entire workbook or just the current worksheet.
5. Previewing Changes: As you make adjustments to the margins, you can check the preview pane in the Page Setup dialog box to see how the changes affect the layout of your spreadsheet. This allows you to visualize the impact of your margin adjustments before printing.
When adjusting margins, keep in mind that wider margins create more white space around the content, making your printouts appear cleaner and more professional. On the other hand, narrower margins can be useful when you need to fit more content on a single page.
By taking the time to adjust the margins, you can ensure that your Excel printouts are visually appealing and well-organized. Experiment with different margin settings until you find the perfect balance that suits your specific printing needs.
Now that you understand how to adjust the margins, let’s explore the next step of changing the paper orientation to further customize your printouts.
Changing Paper Orientation
Changing Paper Orientation
When printing an Excel spreadsheet, selecting the appropriate paper orientation is important to ensure that your content is displayed in the most readable and visually appealing way. The paper orientation determines whether the content is printed in portrait or landscape mode. By changing the paper orientation, you can optimize the layout and effectively present your data.
Here’s how you can change the paper orientation in Excel:
1. Accessing the Page Setup: To change the paper orientation, navigate to the Page Layout tab in Excel and click on the Orientation button in the Page Setup group. This will open a dropdown menu with two options: Portrait and Landscape.
2. Selecting Portrait Orientation: The portrait orientation is the default setting in Excel. It is suitable for most types of documents, such as reports, tables, and forms, where the content is generally tall rather than wide. To select portrait orientation, click on the “Portrait” option in the dropdown menu.
3. Selecting Landscape Orientation: The landscape orientation is ideal when you have wide tables, charts, or graphs that need to be printed. By selecting landscape orientation, you can maximize the horizontal space on the page and accommodate wider content. To choose landscape orientation, click on the “Landscape” option in the dropdown menu.
4. Previewing Changes: After selecting the desired paper orientation, you can preview the changes in the Print Preview pane to see how it affects the layout of your spreadsheet. This allows you to assess if the content fits well within the chosen orientation and if any adjustments are needed.
When deciding the paper orientation, consider the nature and structure of your data. If your spreadsheet contains more vertical data, such as lists or paragraphs, portrait orientation may be more suitable. However, if you have tables, charts, or other content that requires more horizontal space, landscape orientation would be a better choice.
By changing the paper orientation, you can optimize the use of space and present your data in a format that enhances readability and comprehension. Experiment with both portrait and landscape orientations to see which one best suits the content of your Excel spreadsheet.
Now that you know how to change the paper orientation, let’s move on to the next step of scaling the spreadsheet to fit on one page.
Scaling the Spreadsheet to Fit on One Page
Scaling the Spreadsheet to Fit on One Page
When printing an Excel spreadsheet, you may encounter situations where the content exceeds the boundaries of a single page. In such cases, scaling the spreadsheet to fit on one page becomes necessary to ensure that all the data is displayed without being cut off. Excel provides scaling options that allow you to adjust the size of the printout to fit within a specified page.
Here’s how you can scale your spreadsheet to fit on one page in Excel:
1. Accessing the Page Setup: To scale the spreadsheet, navigate to the Page Layout tab in Excel and click on the “Page Setup” dialog box launcher in the Page Setup group. This will open the Page Setup dialog box.
2. Scaling Options: Within the Page Setup dialog box, go to the “Page” tab. Here, you will find the “Scaling” section, which provides options for adjusting the size of the printout.
3. Fit Sheet on One Page: The first scaling option is “Fit Sheet on One Page.” This option automatically adjusts the size of the content to fit within the printable area of one page. It can shrink or expand the spreadsheet as needed to ensure that it fits within the available space.
4. Adjusting the Scaling Percentage: Alternatively, you can set a specific scaling percentage by choosing the “Adjust to” option in the Scaling section. This allows you to manually enter a percentage to shrink or enlarge the content, depending on your printing requirements. Experiment with different scaling percentages to find the optimal size.
5. Previewing Changes: As you make adjustments to the scaling, Excel provides a preview of how the data will be displayed on the printed page. You can review the preview pane in the Page Setup dialog box to ensure that the content fits neatly within the printable area.
Scaling the spreadsheet to fit on one page is particularly useful when dealing with large datasets or wide tables that would otherwise span multiple pages. By adjusting the scaling, you can ensure that the data remains legible and the overall layout is preserved.
Keep in mind that while scaling the spreadsheet can help fit the content on one page, it may result in smaller text or reduced detail. Thus, it’s important to strike a balance between fitting the content and maintaining readability. Preview the scaled printout and make any necessary adjustments before finalizing the print.
Now that you know how to scale your spreadsheet to fit on one page, let’s move on to printing gridlines and headings for better readability.
Printing Gridlines and Headings
Printing Gridlines and Headings
When printing an Excel spreadsheet, you have the option to include gridlines and headings. Gridlines help to visually differentiate cells, making it easier to read and interpret the data. Headings, on the other hand, provide labels for rows and columns, allowing for better organization and navigation of the printed document. Here’s how you can print gridlines and headings in Excel:
1. Printing Gridlines: To print gridlines, go to the Page Layout tab in Excel and look for the Sheet Options group. Within this group, make sure the “Print” box next to “Gridlines” is checked. Enabling this option ensures that the gridlines will be included in the printout, making your data easier to follow and comprehend.
2. Printing Headings: To print headings, go to the Page Layout tab and locate the Sheet Options group. Here, ensure that the “Print” box next to “Headings” is checked. By enabling this option, the row and column headings will be printed on each page, providing valuable context and reference for your data.
3. Previewing Changes: Before finalizing your print, it is a good practice to preview the changes to ensure that the gridlines and headings are displayed as desired. You can use the Print Preview option, accessible from the File tab, to see how the printout will look before committing to the print.
Printing gridlines and headings can significantly enhance the readability and structure of your Excel printouts. Gridlines help to maintain the visual structure of the spreadsheet, especially when there are borders or colored cells used for formatting. Headings assist in clearly identifying the categories and labels associated with the data, making it easier for viewers to understand the information being presented.
By including gridlines and headings in your printouts, you can create professional-looking documents that are easy to navigate and interpret. This is particularly helpful when sharing your spreadsheets with others or when using the printouts for presentations or reports.
Now that you know how to print gridlines and headings, let’s explore the option of printing row and column titles on every page for better reference.
Printing Row and Column Titles on Every Page
Printing Row and Column Titles on Every Page
When printing an Excel spreadsheet that spans multiple pages, it can be helpful to print row and column titles on every page. This ensures that crucial information, such as the labels and headers, is easily visible for reference. Excel provides a convenient option to repeat the row and column titles on every printed page. Here’s how you can accomplish this:
1. Accessing the Page Setup: To print row and column titles on every page, navigate to the Page Layout tab in Excel and click on the “Print Titles” button in the Page Setup group. This will open the Page Setup dialog box.
2. Specifying the Rows and Columns: In the Page Setup dialog box, go to the “Sheet” tab. Under the “Rows to repeat at top” section, click on the icon at the right-hand side. Then, select the rows that contain the desired titles in your spreadsheet. Similarly, under the “Columns to repeat at left” section, click on the icon and select the columns containing the desired titles.
3. Previewing Changes: After specifying the rows and columns to repeat, you can preview the changes in the Print Preview pane to ensure that the titles appear on every page. This allows you to verify that the titles align correctly and provide the desired reference points.
By printing row and column titles on every page, you ensure that viewers can easily identify and understand the data presented in your Excel printout. This is especially useful when working with large datasets or tables that span multiple pages.
This feature can be particularly beneficial when presenting reports or analysis, as it helps maintain clarity and context throughout the printout. Users can quickly locate the relevant information without having to flip back and forth between different pages.
Printing row and column titles on every page is just one of the many customization options available in Excel to enhance the readability and usability of your printed spreadsheets. Take advantage of this feature to deliver a professional and well-structured document.
Now that you know how to print row and column titles on every page, let’s explore additional printing options, such as printing multiple copies of the spreadsheet.
Printing Multiple Copies of the Spreadsheet
Printing Multiple Copies of the Spreadsheet
There may be occasions when you need to print multiple copies of your Excel spreadsheet, whether for distributing reports, creating handouts, or sharing information with others. Excel provides a straightforward option to print multiple copies of your spreadsheet with just a few clicks. Here’s how you can accomplish this:
1. Accessing the Print Dialog: To print multiple copies, go to the File tab in Excel and click on the “Print” option. This will open the Print dialog box.
2. Specifying the Number of Copies: Within the Print dialog box, locate the “Copies” section. Here, you can specify the number of copies you wish to print. You can either enter the desired value directly in the text box or use the up and down arrows to increase or decrease the number.
3. Previewing Changes: After specifying the number of copies, you can preview the changes in the Print Preview pane. This allows you to see how the printout will look with the intended number of copies.
By printing multiple copies of your spreadsheet, you can easily generate as many physical copies as you need for distribution or any other purpose. This saves you time and effort compared to manually printing individual copies one by one.
Additionally, printing multiple copies ensures consistency across all copies, as each copy will reflect the same data and formatting as the original spreadsheet. This can be particularly useful when sharing important information or presenting data-driven reports to clients or colleagues.
Remember to review the print preview to confirm that all the copies will be printed accurately before initiating the print. This allows you to catch any errors or inconsistencies and make any necessary adjustments if needed.
Now that you know how to print multiple copies of your spreadsheet, let’s move on to the next step of printing selected worksheets or a range of cells.
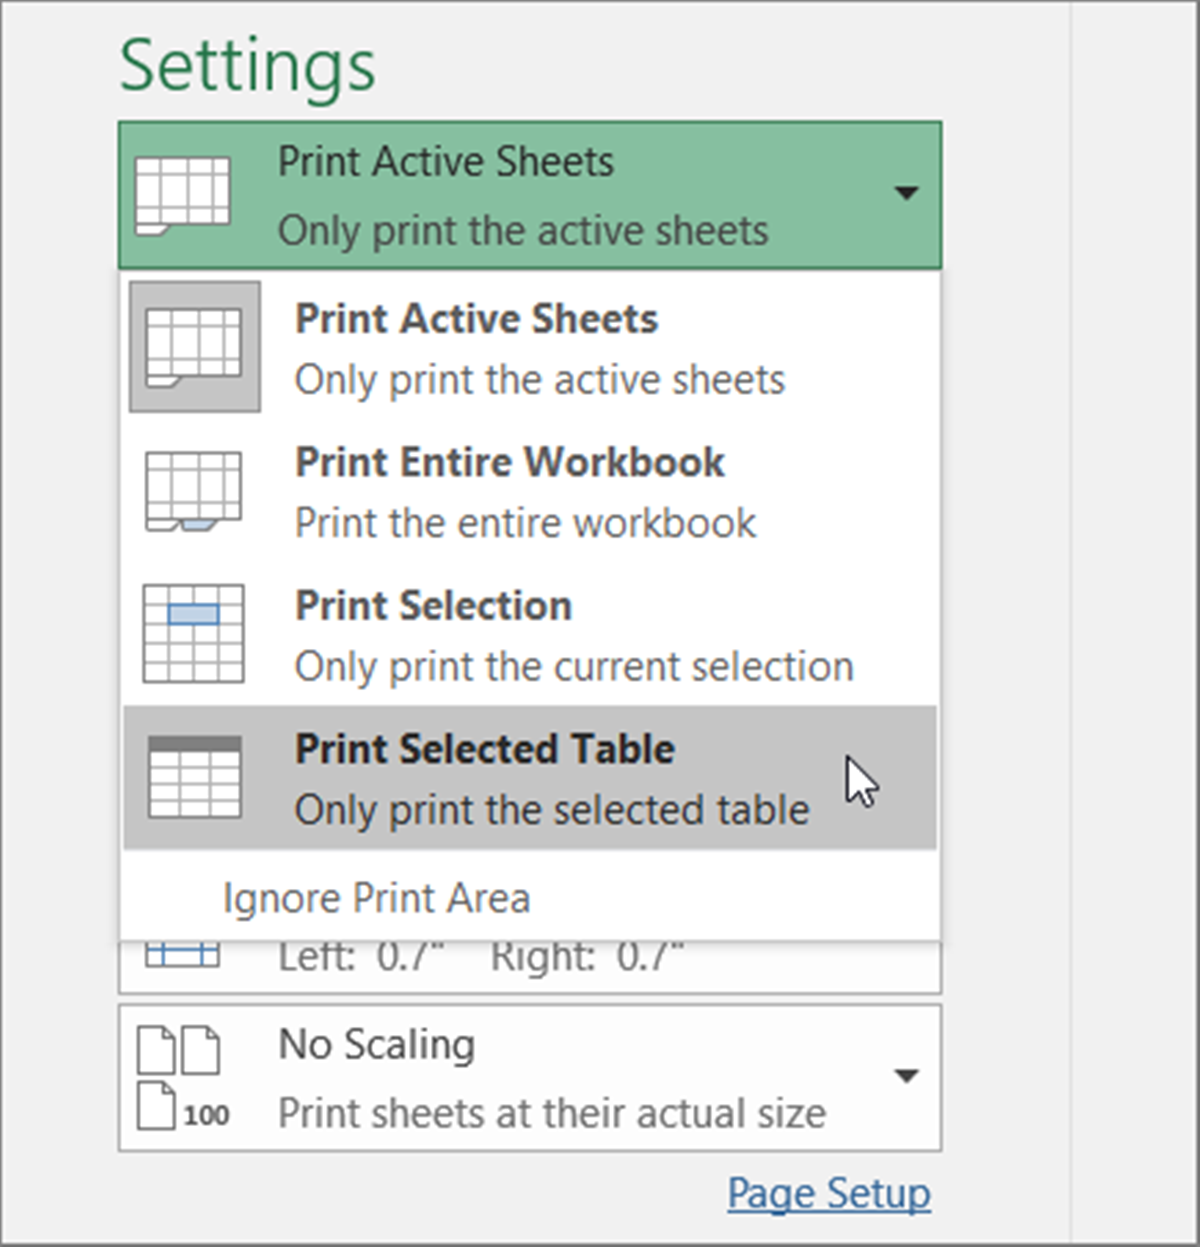
Printing Selected Worksheets or a Range of Cells
Printing Selected Worksheets or a Range of Cells
Excel allows you to print selected worksheets or specific ranges of cells within your workbook. This functionality is beneficial when you want to customize your printout and focus on specific data rather than printing the entire workbook. Here’s how you can print selected worksheets or a range of cells in Excel:
Printing Selected Worksheets:
1. Selecting Worksheets: To print specific worksheets, first, select the worksheets you want to print by holding down the Ctrl key and clicking on the sheet tabs at the bottom of the Excel window.
2. Opening the Print Dialog: With the desired worksheets selected, go to the File tab and click on the “Print” option. This will open the Print dialog box.
3. Choosing the Print Active Sheets Option: Within the Print dialog box, under the “Settings” section, select the “Print Active Sheets” option. This ensures that only the selected worksheets will be printed.
Printing a Range of Cells:
1. Selecting the Range: To print a specific range of cells, select the cells you want to print by clicking and dragging the mouse cursor over the desired range. You can also hold down the Shift key to select multiple ranges.
2. Opening the Print Dialog: With the desired range selected, go to the File tab and click on the “Print” option. This will open the Print dialog box.
3. Choosing the Print Selection Option: Within the Print dialog box, under the “Settings” section, select the “Print Selection” option. This ensures that only the selected range of cells will be printed.
By printing selected worksheets or ranges of cells, you have greater control over which data gets printed and can focus on the specific information that is most relevant to your needs. This allows you to tailor your printouts to the requirements of your audience, whether it’s for in-depth analysis or sharing concise summaries.
Remember to preview your printout using the Print Preview option to ensure that the selected worksheets or range of cells will be printed as desired. This allows you to verify the content, layout, and formatting before sending it to the printer.
Now that you know how to print selected worksheets or a range of cells, let’s move on to previewing and adjusting print settings for optimal results.
Previewing and Adjusting Print Settings
Previewing and Adjusting Print Settings
Before finalizing the printout of your Excel spreadsheet, it’s important to preview and adjust the print settings to ensure that the document will be printed exactly as you desire. Excel provides a convenient Print Preview feature that allows you to see a digital representation of your printout before sending it to the printer. Here’s how you can preview and adjust print settings in Excel:
1. Accessing Print Preview: To preview your printout, go to the File tab in Excel and select the “Print” option. This will open the Print dialog box, where you can view a preview of the document.
2. Navigating Print Preview: In the Print Preview pane, you can navigate through the pages of your printout using the arrow icons or the page number input. This allows you to see how the content is distributed across multiple pages and how it will appear when printed.
3. Adjusting Page Size: If necessary, you can modify the page size within the Print Preview pane to ensure that the content fits properly. Click on the “Page Setup” button to access options for tweaking the page size, including selecting standard page sizes or setting a custom size.
4. Making Layout Adjustments: Within the Print Preview pane, you can also make other layout adjustments, such as changing margins, scaling the content, or enabling/disabling the printing of gridlines and headings. These changes can be done by selecting the corresponding options within the Print Preview pane.
5. Print Quality and Printer Properties: If you need to make changes to the print quality or access advanced printer properties, click on the “Printer Properties” or “Print Settings” button within the Print Preview pane. This will open up additional options related to the specific printer being used.
Previewing your printout allows you to catch any potential errors or formatting issues before wasting time and resources on unnecessary printing. It gives you an opportunity to make necessary adjustments and ensures that the final printout is accurate and visually appealing.
Take advantage of the Print Preview feature to ensure that your Excel spreadsheet is optimized for printing. This step further enhances the professionalism and polish of your printed documents.
Now that you know how to preview and adjust print settings, you’re ready to print your Excel spreadsheet with confidence.
Troubleshooting Printing Issues
Troubleshooting Printing Issues
While printing an Excel spreadsheet, you may occasionally encounter various issues that can hinder the printing process. These issues can range from misaligned content to incomplete printouts or even printer-related errors. The good news is that Excel provides several troubleshooting steps that can help address these problems and ensure successful printing. Here are some common troubleshooting tips to resolve printing issues:
1. Check Print Preview: Before printing, always utilize the Print Preview feature to assess how your spreadsheet will look when printed. This can help identify any formatting or layout issues that need attention. Make sure that all the desired data is visible and properly aligned within the printable area.
2. Review Page Breaks: Page breaks can cause content to be cut off or split between pages. To adjust page breaks, go to the Page Layout tab, click on the Breaks dropdown, and choose “Remove Page Breaks” to clear existing breaks. You can also manually adjust page breaks by dragging them to desired positions or by selecting specific rows or columns where you want page breaks to occur.
3. Verify Print Area: Ensure that the print area is correctly set to include all the necessary data. You can do this by selecting the desired range of cells and clicking on the “Set Print Area” option in the Page Layout tab. If the print area is not properly defined, the printout may exclude important content or print unnecessary data.
4. Check Printer Connection: Ensure that your printer is properly connected to your computer and turned on. Check if there are any error messages or notifications indicating issues with the printer. You may need to troubleshoot printer connectivity or consult the printer manufacturer’s support documentation for further assistance.
5. Update Printer Drivers: Outdated printer drivers can cause compatibility issues and hinder the printing process. Check if there are any updates available for your printer drivers and install them if necessary. Updating the drivers can often resolve printing problems and ensure proper communication between Excel and the printer.
6. Restart Excel and the Printer: Sometimes, restarting both Excel and the printer can solve temporary glitches or software conflicts. Close Excel, turn off your printer, wait for a few seconds, and then turn it back on. Restart Excel and attempt to print again to see if the issue is resolved.
7. Seek Professional Help: If the troubleshooting steps mentioned above do not resolve the printing issues, it may be helpful to contact your IT department or seek assistance from a professional printer technician. They can provide specific guidance based on your printer model and help diagnose and resolve any hardware or software-related printing problems.
By following these troubleshooting tips, you can address common printing issues in Excel and ensure successful printouts of your spreadsheets. Remember to double-check your settings, preview your printout, and verify printer connections before attempting to print again.
Now that you are equipped with troubleshooting techniques, you’ll be able to overcome any potential printing obstacles that may arise.