What are Pinned Sites?
A pinned site is a feature in Safari and Mac OS that allows you to easily access your favorite websites directly from the browser’s homepage or toolbar. When you pin a site, it creates a shortcut that remains visible and easily accessible whenever you open a new tab or window in Safari.
By pinning a site, you essentially create a quick and convenient way to jump straight to your preferred websites without the need to type in the URL or search for it in your bookmarks. The pinned site icon will be displayed prominently, making it effortless to recognize and click on.
Pinned sites offer a seamless browsing experience, allowing you to stay connected with your most frequently visited websites. Whether it’s a news site, social media platform, or productivity tool, pinning sites in Safari allows you to access them with just a single click.
Furthermore, pinned sites in Safari offer additional benefits such as real-time notifications and updates. Many websites utilize push notifications to keep users informed about important updates, news, or messages, and by having pinned sites, you can easily stay up to date without needing to have multiple tabs open.
This feature is particularly useful if you have limited screen space or prefer a minimalist browsing setup. The pinned sites take up minimal space on your browser interface, allowing for better organization and decluttering of your browsing experience.
Additionally, pinned sites can be personalized according to your preferences. You have the option to rearrange the order of the pinned sites, making it easier to prioritize and access the most frequently visited ones. You can also customize the appearance of the pinned site icons to give them a unique and visually appealing look.
Overall, pinned sites in Safari and Mac OS provide a convenient and efficient way to access your favorite websites. With their customizable features and easy accessibility, they enhance your browsing experience, improving productivity and saving you time and effort.
Why should you Pin Sites in Safari?
Pinning sites in Safari offers several benefits that enhance your browsing experience and improve overall productivity. Here are some reasons why you should consider pinning sites in Safari:
- Quick Access: Pinning your favorite websites allows for instant and easy access. Instead of typing in URLs or searching through bookmarks, you can simply click on the pinned site icon to open the website.
- Efficiency: By pinning sites, you can eliminate the need to constantly switch between tabs or windows to visit frequently visited websites. This streamlines your workflow and saves valuable time, especially if you rely on specific sites for work or research.
- Organization: Pinned sites help keep your browser interface organized. Instead of having multiple tabs open, you can have a compact row of pinned icons on your toolbar or homepage, reducing clutter and improving navigation.
- Customization: Safari allows you to rearrange the order of your pinned sites, enabling you to prioritize your most frequently visited websites. This customization ensures that the sites you need are easily accessible with a single click.
- Visual Recognition: Pinned sites have distinct icons that make them easily recognizable at a glance. This visual identification helps you locate specific sites quickly, even if you have multiple tabs or windows open.
- Real-Time Notifications: Pinned sites can receive real-time notifications, keeping you updated on important information or new content without constantly checking each website individually. This feature is especially useful for news, social media, or messaging platforms.
- Minimalist Browsing: If you prefer a clean and minimalist browsing setup, pinning sites is an excellent option. Pinned sites take up minimal space, reducing browser clutter and creating a more focused and streamlined browsing experience.
- Consistency: Pinned sites remain visible across different tabs or windows, ensuring that your preferred websites are always within reach. This consistency eliminates the need to search or navigate through bookmarks, providing a seamless and efficient browsing experience.
Overall, pinning sites in Safari offers convenience, efficiency, and customization options that improve your browsing workflow. By pinning your favorite websites, you can save time, stay organized, and have instant access to the sites you rely on the most.
How to Pin Sites in Safari:
Pinning sites in Safari is a simple process that allows you to quickly access your favorite websites with just a single click. Follow these step-by-step instructions to pin sites in Safari:
Step 1: Open Safari
Launch Safari on your Mac device by clicking on the Safari icon in the dock or searching for it in the Applications folder.
Step 2: Navigate to the site you want to pin
Type the URL of the website you want to pin in the address bar or use your bookmarks to navigate to the desired site.
Step 3: Click on the “Share” button
Look for the share icon, usually represented by a square with an upward arrow. It is located in the Safari toolbar, next to the address bar. Click on it to access the sharing options.
Step 4: Select the “Pin” option
In the sharing options menu, you will see various actions you can take for the current webpage. Locate the “Pin” option, usually represented by a push-pin icon. Click on it to pin the site.
Step 5: Rearrange your pinned sites
To rearrange the order of your pinned sites, simply click and drag the site’s icon to the desired position on your toolbar or homepage. This allows you to prioritize and personalize the placement of your favorite sites.
That’s it! You have successfully pinned a site in Safari. Now, whenever you open a new tab or window in Safari, you’ll find your pinned site easily accessible in the toolbar or homepage.
Please note that pinned sites will remain in your Safari browser until you unpin them or clear your browsing data.
Continue to the next section to learn how to unpin sites in Safari and customize your pinned sites as desired.
Step 1: Open Safari
The first step in pinning sites in Safari is to open the Safari browser on your Mac device. Safari is the default web browser for macOS and provides a user-friendly interface for browsing the internet.
To open Safari, you can follow one of these methods:
- Click on the Safari icon: Look for the Safari icon on your dock, which is usually a blue compass. Simply click on the icon to launch the Safari browser.
- Use the Applications folder: If you don’t have the Safari icon on your dock, you can access Safari by opening the Applications folder on your Mac. Go to the Applications folder, locate the Safari app, and double-click on it to launch the browser.
- Spotlight search: If you prefer using the Spotlight feature on your Mac, you can quickly find the Safari browser by pressing Command + Spacebar to open Spotlight, and then type “Safari” in the search bar. Click on the Safari application from the search results to open it.
- Launch from Launchpad: If you have organized your applications using Launchpad, you can locate Safari by swiping left on your trackpad with three fingers or using the Launchpad shortcut. Look for the Safari icon and click on it to open the browser.
Once you have successfully opened Safari, you are ready to proceed to the next step of pinning sites.
Remember, pinning sites in Safari allows you to create quick shortcuts to your favorite websites, making them easily accessible with just a single click. Whether you want to pin news sites, social media platforms, or productivity tools, Safari’s pinning feature can help improve your browsing experience and save you time.
Now that you have opened Safari, let’s move on to the next step to learn how to navigate to the site you want to pin.
Step 2: Navigate to the site you want to pin
After opening Safari, the next step in pinning sites is to navigate to the website that you want to pin. This could be any website that you frequently visit or want to have quick access to.
Here are a few methods to navigate to the site you want to pin:
- Type the URL: If you know the exact URL of the website, simply type it into the address bar at the top of the Safari browser window. Make sure to include the “http://” or “https://” prefix before the URL for secure websites.
- Use bookmarks: If you have previously bookmarked the website, you can access it by clicking on the bookmarks icon in the Safari toolbar. This icon is typically represented by an open book. From the bookmarks menu, locate the desired bookmarked site and click on it to navigate to the website.
- Perform a search: If you can’t remember the exact URL or haven’t bookmarked the site, you can use the search engine integrated into Safari. Simply type in a relevant keyword or topic in the search bar, and Safari will display a list of search results. Click on the search result that corresponds to the website you want to visit.
- Click on a link: If you have received a link to the website via email, message, or any other source, you can simply click on the link to open the website in Safari. This is a convenient way to quickly access a desired site.
Once you have successfully navigated to the site you want to pin, proceed to the next step to learn how to pin the site and create a shortcut for easy access in Safari.
Remember, pinning sites in Safari enhances your browsing experience by allowing you to access your favorite websites with just a single click. Whether it’s news, social media, or any other type of website, pinning sites can save you time and make your browsing more efficient.
Step 3: Click on the “Share” button
Once you have navigated to the website you want to pin in Safari, the next step is to click on the “Share” button. The “Share” button in Safari allows you to access various sharing and action options for the current webpage, including the option to pin the site to your browser.
Here’s how you can click on the “Share” button:
- Locate the “Share” button: The “Share” button is typically located in the Safari toolbar, next to the address bar. It is represented by a square icon with an upward arrow. Look for this icon on the left side of the Safari window.
- Click on the “Share” button: Once you have located the “Share” button, click on it to open the sharing options menu. The menu will display various actions and features that you can perform for the current webpage.
- Explore the sharing options: After clicking on the “Share” button, you will see a list of available actions. These can include options such as bookmarking the page, adding it to your reading list, sending the page via email or message, and more. Take a moment to explore these options if desired.
- Select the “Pin” option: Within the sharing options, you should see the “Pin” option represented by a push-pin icon. Click on this option to pin the site to your Safari browser. Once selected, the site will be added as a pinned site, providing convenient access to it from your browser’s homepage or toolbar.
By clicking on the “Share” button and selecting the “Pin” option, you are creating a shortcut to the current webpage, allowing you to quickly access it with just a single click.
Now that you have successfully clicked on the “Share” button and pinned the site, you can proceed to the next step to learn how to rearrange your pinned sites for better organization and accessibility in Safari.
Remember, pinning sites in Safari enhances your browsing experience by providing quick and easy access to your favorite websites. Whether it’s news, social media, or any other frequently visited site, pinning sites can save you time and make your browsing more efficient.
Step 4: Select the “Pin” option
After clicking on the “Share” button in Safari, you will be presented with various sharing options for the current webpage. Among these options, you will find the “Pin” option, which allows you to pin the site to your Safari browser for quick and easy access.
Here’s how you can select the “Pin” option:
- Locate the “Pin” option: Within the sharing options menu, look for the “Pin” option. It is typically represented by a push-pin icon, indicating its purpose of pinning the current webpage.
- Select the “Pin” option: Once you have located the “Pin” option, click on it to select it. By selecting this option, you are instructing Safari to pin the current webpage as a shortcut for easy access.
- Confirmation of pinning: After selecting the “Pin” option, Safari will confirm that the site has been pinned successfully. You may see a visual indication, such as the pinned site icon appearing in the toolbar or homepage.
- Access the pinned site: To access the pinned site in the future, simply open a new tab or window in Safari. You will find the pinned site icon displayed prominently, allowing you to click on it and directly open the website.
By selecting the “Pin” option, you have created a shortcut to the current webpage, making it easily accessible from your browser’s homepage or toolbar. This eliminates the need to manually type the URL or search for the site in your bookmarks, saving you time and effort.
Now that you have successfully selected the “Pin” option and pinned the site, you can proceed to the next step to learn how to rearrange your pinned sites in Safari for better organization and accessibility.
Remember, pinning sites in Safari offers the convenience of quick and easy access to your favorite websites. Whether it’s news, social media, or any other frequently visited site, pinning sites can enhance your browsing experience and make navigation more efficient.
Step 5: Rearrange your pinned sites
After pinning sites in Safari, you have the option to rearrange the order of your pinned sites. This allows you to prioritize and customize the placement of your favorite websites, making them easily accessible and organized for your browsing convenience.
Here’s how you can rearrange your pinned sites in Safari:
- Click and drag: To rearrange your pinned sites, simply click and hold on the site’s icon that you want to move. While holding the mouse or trackpad button, drag the icon to the desired position on your Safari toolbar or homepage.
- Place the site between two pins: While dragging the pinned site icon, you will see other pinned sites shifting to make room for the move. Position the site between two existing pins to slot it in the desired location.
- Release the mouse or trackpad button: Once you have placed the pinned site in the desired position, release the mouse or trackpad button. The pinned sites will settle into their new arrangement, reflecting the changes you made.
By rearranging your pinned sites, you can tailor the order to your browsing habits and preferences. You may want to have frequently visited sites at the beginning of the toolbar or homepage for quick access, or you may prefer to group similar sites together for better organization.
Take advantage of the customization option and experiment with different arrangements until you find the configuration that works best for you. The flexibility to rearrange your pinned sites ensures that you have a personalized browsing experience that suits your needs.
Remember, the ability to rearrange your pinned sites is a valuable feature that allows for better organization and prioritization. By customizing the order of your pinned sites in Safari, you can optimize your browsing workflow and find your favorite websites with ease.
Now that you know how to rearrange your pinned sites, you can explore further customization options in the next section to make your pinned sites even more personalized.
How to Unpin Sites in Safari:
If you no longer need a site pinned in Safari or want to remove it from your browser’s toolbar or homepage, you can easily unpin the site. Unpinning a site in Safari removes it as a pinned shortcut, decluttering your browsing interface. Here’s how you can unpin sites in Safari:
Step 1: Open Safari
Launch the Safari browser on your Mac device by clicking on the Safari icon in the dock or searching for it in the Applications folder.
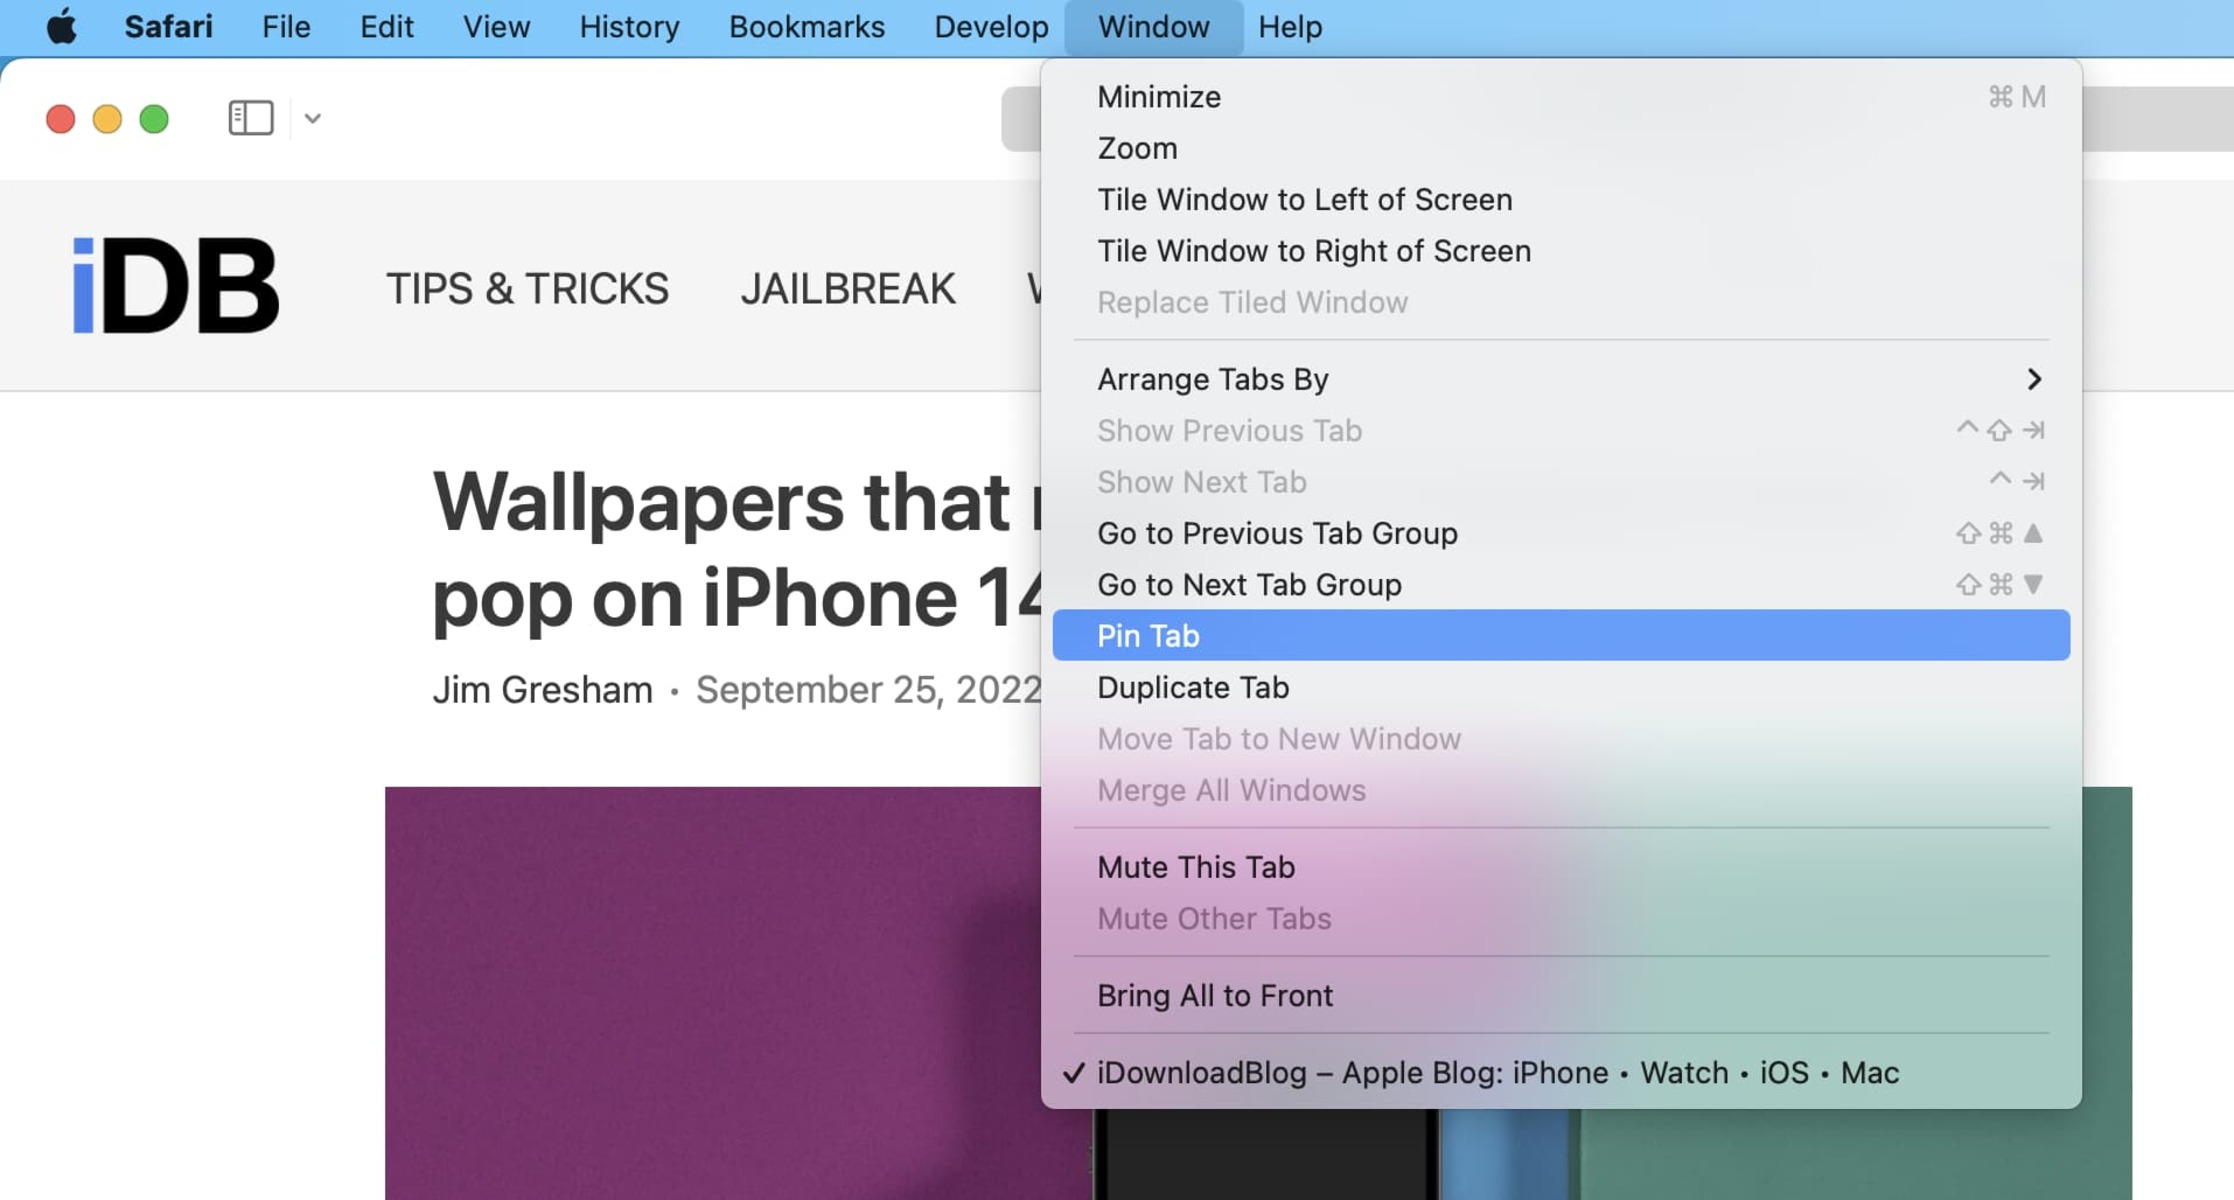
Step 2: Click on the “Window” menu
In the top menu bar of your Mac, click on the “Window” menu. It is located between the “Bookmarks” and “Help” menus.
Step 3: Select “Show Tab Overview”
In the “Window” menu, locate and click on the “Show Tab Overview” option. Alternatively, you can use the keyboard shortcut “Shift + Command + \”. This action will expand the Safari window and display an overview of all your open tabs.
Step 4: Right-click on the pinned site you want to unpin
In the tab overview, locate the pinned site you want to remove. Right-click (or Ctrl-click) on the site’s icon to open a context menu of options.
Step 5: Select “Unpin Tab”
In the context menu, choose the “Unpin Tab” option. Safari will remove the selected site as a pinned shortcut.
After completing these steps, the site will no longer be pinned in Safari, and its icon will disappear from your browser’s toolbar or homepage. However, the website itself will still be accessible through regular bookmarking or typing in the URL.
Remember, unpinning sites in Safari allows you to remove unnecessary clutter from your browser interface, giving you a cleaner and more organized browsing experience.
Now that you know how to unpin sites, you can customize and personalize your pinned sites in the next section to make them even more tailored to your preferences.
Step 1: Open Safari
To begin the process of unpinning sites in Safari, you first need to open the Safari browser on your Mac device. Safari is the default web browser for macOS and provides a user-friendly interface for browsing the internet.
There are a few ways to open Safari:
- Click on the Safari icon: Look for the Safari icon on your dock, which is usually a blue compass. Simply click on the icon to launch the Safari browser.
- Use the Applications folder: If you don’t have the Safari icon on your dock, you can access Safari by opening the Applications folder on your Mac. Go to the Applications folder, locate the Safari app, and double-click on it to launch the browser.
- Spotlight search: If you prefer using the Spotlight feature on your Mac, you can quickly find and open Safari. Press Command + Spacebar to open Spotlight, type “Safari” in the search bar, and click on the Safari application from the search results to open it.
- Launch from Launchpad: If you have organized your applications using Launchpad, you can locate Safari by swiping left on your trackpad with three fingers or using the Launchpad shortcut. Look for the Safari icon and click on it to open the browser.
Once you have successfully opened Safari, you are ready to proceed with the unpinning process.
Unpinning sites in Safari allows you to remove unnecessary clutter from your browser interface, offering a cleaner and more organized browsing experience. It’s particularly useful if you no longer frequently visit a website or want to declutter your toolbar or homepage.
Now that you have opened Safari, let’s move on to the next step to learn how to unpin sites from your browser.
Step 2: Click on the “Window” menu
Once you have opened Safari, the next step in unpinning sites is to click on the “Window” menu. The “Window” menu in Safari provides various options for managing your browser windows and tabs, including the option to access the tab overview feature.
Here’s how you can click on the “Window” menu:
- Locate the “Window” menu: The “Window” menu is located in the top menu bar of your Mac, between the “Bookmarks” and “Help” menus. It is denoted by the word “Window.”
- Click on the “Window” menu: Once you have located the “Window” menu, click on it to open the dropdown list of options. The dropdown menu will display various window-related actions and functionalities.
By clicking on the “Window” menu, you will reveal a range of options to manage your Safari windows and tabs, including the important “Show Tab Overview” feature needed to unpin sites.
Now that you have successfully clicked on the “Window” menu, you are ready to proceed to the next step to learn how to access the tab overview and unpin sites from Safari.
Remember, unpinning sites in Safari allows you to remove unnecessary clutter from your browser interface, providing a cleaner and more organized browsing experience. It offers you the flexibility to customize your toolbar or homepage based on your preferences.
Step 3: Select “Show Tab Overview”
After clicking on the “Window” menu in Safari, the next step is to select the “Show Tab Overview” option. This option allows you to access the tab overview feature in Safari, where you can see all your open tabs and perform actions such as unpinning sites.
Here’s how you can select the “Show Tab Overview” option:
- Locate the “Show Tab Overview” option: Within the dropdown menu of the “Window” menu, look for the “Show Tab Overview” option. It is usually listed towards the top of the menu and is denoted by those words.
- Click on “Show Tab Overview”: Once you have located the “Show Tab Overview” option, click on it. Safari will respond by expanding the browser window and displaying an overview of all your open tabs.
- View the tab overview: After selecting “Show Tab Overview,” you will see a visual representation of all your open tabs. Each tab is displayed as a thumbnail, allowing you to see the content of each page.
By selecting the “Show Tab Overview” option, you will be able to see a bird’s-eye view of all your open tabs in Safari. This view allows you to manage and interact with your tabs more effectively, including the ability to unpin sites.
Now that you have successfully selected the “Show Tab Overview” option, you can proceed to the next step to learn how to unpin sites from Safari.
Remember, unpinning sites in Safari allows you to remove unnecessary clutter from your browser interface, improving your browsing experience by providing a more streamlined and personalized environment.
Step 4: Right-click on the pinned site you want to unpin
After accessing the tab overview in Safari, the next step in unpinning sites is to right-click on the specific site you want to remove as a pinned shortcut. This action will open a context menu with options to manage the tab, including the ability to unpin it.
Here’s how you can right-click on the pinned site you want to unpin:
- Locate the pinned site: In the tab overview, find the site that you want to unpin. Look for its thumbnail or icon, which represents the webpage you pinned as a shortcut.
- Right-click on the pinned site: Once you have located the pinned site, right-click (or Ctrl-click) on its icon. This action will open a context menu with various options for managing the tab.
By right-clicking on the pinned site, you will open a context menu that allows you to perform actions specific to that tab, including the option to unpin the site.
It’s important to note that if you are using a trackpad, you can perform a two-finger click on the pinned site to access the context menu instead of a traditional right-click.
Now that you have successfully right-clicked on the pinned site, proceed to the next step to learn how to select the “Unpin Tab” option to remove the site as a pinned shortcut.
Remember, unpinning sites in Safari gives you the freedom to remove unnecessary clutter from your browser interface, allowing for a more organized and efficient browsing experience.
Step 5: Select “Unpin Tab”
After right-clicking on the pinned site you want to remove in Safari, the next step is to select the “Unpin Tab” option from the context menu. This action will remove the site as a pinned shortcut, decluttering your browser interface.
Here’s how you can select the “Unpin Tab” option:
- Open the context menu: After right-clicking on the pinned site, a context menu will appear. This menu displays various options and actions related to the selected tab.
- Locate the “Unpin Tab” option: Within the context menu, find the “Unpin Tab” option. It is usually displayed as a text option with a descriptive label. Click on this option to initiate the unpinning process.
By selecting the “Unpin Tab” option, Safari will remove the specific site as a pinned shortcut. The site’s icon will no longer be visible on your browser’s toolbar or homepage.
Please note that unpinning a site doesn’t delete or remove the website itself. It simply removes it as a pinned shortcut in Safari. You can still access the website through regular bookmarking or entering the URL in the address bar.
Now that you have successfully selected the “Unpin Tab” option, the site is no longer pinned in Safari. You can repeat this process for any other pinned sites you wish to unpin.
Remember, unpinning sites in Safari allows you to declutter your browser interface, providing a more organized and streamlined browsing experience. With the ability to unpin sites, you can customize and prioritize your browsing environment based on your preferences.
Customizing Pinned Sites:
In addition to pinning and unpinning sites, Safari offers customization options for your pinned sites. These features allow you to personalize the appearance and details of the pinned sites, making them even more tailored to your preferences. Here’s how you can customize your pinned sites in Safari:
Step 1: Right-click on the pinned site
Begin by right-clicking (or Ctrl-click) on the pinned site that you want to customize. This will open a context menu with several options.
Step 2: Select “Edit Address”
In the context menu, locate and click on the “Edit Address” option. This action will enable you to modify the title and URL of the pinned site.
Step 3: Change the title and URL as desired
After selecting “Edit Address,” you can edit both the title and URL of the pinned site. Modify the title to a name that you prefer or find more descriptive and recognizable. Similarly, you can update the URL if needed.
Step 4: Press Enter to save the changes
Once you have made the desired changes, press the Enter key on your keyboard to save the modifications. The title and URL of the pinned site will now reflect your customizations.
By customizing your pinned sites, you can create a more personalized browsing experience. Changing the title and URL allows for easy recognition and quick identification of your favorite websites.
Remember that customization options may vary depending on the version of Safari you are using. The process described here is a general guideline, but some versions of Safari may have slightly different options and interfaces.
With the ability to customize your pinned sites in Safari, you can further enhance your browsing workflow and optimize your access to frequently visited websites.
Step 1: Right-click on the pinned site
To customize a pinned site in Safari, the first step is to right-click (or Ctrl-click) on the site you want to modify. Right-clicking on a pinned site opens a context menu with various options to manage and customize the site according to your preferences.
Here’s how you can right-click on the pinned site:
- Locate the pinned site: Find the pinned site on your Safari toolbar or homepage. The pinned sites are typically represented by icons or site logos.
- Right-click on the pinned site: Once you have located the pinned site, perform a right-click (or Ctrl-click) on its icon. This action will open a context menu specific to that site.
By right-clicking on the pinned site, you will gain access to various customization options and actions that you can take for that particular tab. This context menu provides the necessary tools to personalize and edit the details of the pinned site.
Now that you have successfully right-clicked on the pinned site, you can proceed to the next step to learn how to select the “Edit Address” option and further customize the site according to your preferences.
Remember, customizing pinned sites in Safari allows you to tailor your browsing experience and make your favorite websites more recognizable and personalized.
Step 2: Select “Edit Address”
After right-clicking on the pinned site in Safari, the next step in customizing the site is to select the “Edit Address” option from the context menu. This option allows you to modify and customize the title and URL of the pinned site according to your preferences.
Here’s how you can select the “Edit Address” option:
- Open the context menu: After right-clicking on the pinned site, a context menu will appear. This menu displays various options and actions for managing the site.
- Locate the “Edit Address” option: Within the context menu, find and click on the “Edit Address” option. This option is typically listed with a label indicating the ability to modify the address or URL of the site.
By selecting the “Edit Address” option, you gain the ability to make changes to the title and URL of the pinned site. This customization allows you to create more descriptive or recognizable names for the site, making it easier to identify and access.
Remember, the “Edit Address” option may have different names or labels depending on the version of Safari you are using. Look for options related to editing, modifying, or customizing the pinned site.
Now that you have successfully selected the “Edit Address” option, you can proceed to the next step to learn how to change the title and URL of the pinned site according to your preferences.
Customizing pinned sites in Safari allows you to tailor your browsing experience and personalize your favorite websites to make them more easily recognizable and accessible.
Step 3: Change the title and URL as desired
After selecting the “Edit Address” option for a pinned site in Safari, the next step is to change the title and URL according to your preferences. Modifying these details allows you to customize the appearance and information associated with the pinned site.
Here’s how you can change the title and URL:
- Title: Locate the field where the title of the pinned site is displayed. It is usually editable text next to the site icon. Click on the title to activate the editing mode and modify it as desired. You can change it to something more descriptive or recognizable to your preferences.
- URL: Find the field where the URL of the pinned site is displayed. Similar to the title, the URL is usually editable text near the site icon. Click on the URL to activate the editing mode and update it with the desired web address. You can modify the URL if necessary, but make sure to retain the correct format (e.g., include “http://” or “https://”).
By changing the title and URL of the pinned site, you can create a more personalized and identifiable bookmark for easy recognition and quick access to your preferred website.
Remember to provide clear and descriptive titles that best represent the content or purpose of the site. This customization allows you to organize and personalize your pinned sites in a way that suits your browsing habits.
Once you are satisfied with the changes, proceed to the next step to learn how to save the modifications and apply them to the pinned site.
Customizing the titles and URLs of pinned sites in Safari enables you to tailor your browsing experience and make your favorite websites more easily identifiable and accessible.
Step 4: Press Enter to save the changes
After making changes to the title and URL of a pinned site in Safari, the next step is to save the modifications by pressing the Enter key on your keyboard. This action applies the changes you made and updates the pinned site with the customized title and URL.
Here’s what you need to do:
- Activate the text field: Click on the title or URL field of the pinned site to activate the editing mode. Ensure that the field is ready to accept your changes.
- Make the desired modifications: Type in the new title or modify the URL as desired. Take your time to ensure the changes accurately reflect the desired information.
- Press the Enter key: Once you are satisfied with the modifications, press the Enter key on your keyboard. This action will save the changes and update the pinned site with the customized title and URL.
By pressing Enter, you confirm the modifications and the pinned site will reflect the updated information. The customized title and URL will now be associated with the pinned site, making it more recognizable and personalized to your preferences.
Remember, pressing Enter to save the changes ensures that your customized title and URL are applied to the pinned site. It’s crucial to verify the accuracy of the modifications before finalizing them.
Now that you have successfully saved the changes, you can customize other pinned sites or navigate through your personalized collection with ease.
Customizing the titles and URLs of pinned sites in Safari provides a more personalized browsing experience, allowing you to quickly identify and access your favorite websites with custom names and addresses.