
Why Password Protect a Word Document?
When it comes to sensitive or confidential information, it is essential to take measures to protect it from unauthorized access. One effective way to safeguard your Word documents is by password protecting them. By adding a password to your Word documents, you can ensure that only authorized individuals with the correct password will be able to view, edit, or modify the document. Here are a few reasons why password protecting a Word document is crucial:
- Data Security: Password protecting your Word documents adds an extra layer of security, keeping your sensitive information safe from prying eyes. Whether it’s financial data, personal details, or proprietary business information, password protection helps prevent unauthorized access and potential data breaches.
- Confidentiality: If you are working on confidential projects or sharing sensitive information with colleagues, clients, or partners, password protecting the document ensures that only those authorized individuals can access the content. This helps maintain confidentiality and prevents unauthorized distribution or modifications.
- Control Over Document Access: By setting a password on a Word document, you have full control over who can access and make changes to it. This is particularly useful in collaborative settings where multiple individuals may be working on the same document. Password protection ensures that only authorized collaborators can access and edit the document, ensuring the integrity of the content.
- Compliance with Regulations: Depending on the nature of your work or industry, there may be legal or regulatory requirements regarding the protection of sensitive information. Password protecting your Word documents helps you meet these compliance standards and avoid potential penalties or legal consequences.
- Prevention of Unauthorized Modifications: Password protection also prevents unauthorized modifications to your Word documents. This is particularly important when sharing documents that contain legal contracts, official reports, or important project files. By adding a password, you can ensure that the document remains in its original form and any changes made can be tracked and verified.
Overall, password protecting your Word documents provides peace of mind, knowing that your sensitive information is secure and accessible only to authorized individuals. It is an essential practice in today’s digital age where data breaches and unauthorized access are becoming more prevalent. By taking this simple step, you can protect your privacy, maintain confidentiality, and comply with data protection regulations.
How to Password Protect a Word Document in Word 2016 for Windows
Microsoft Word 2016 for Windows offers a simple and straightforward process to password protect your documents. Follow these steps:
- Open the Word document that you want to password protect.
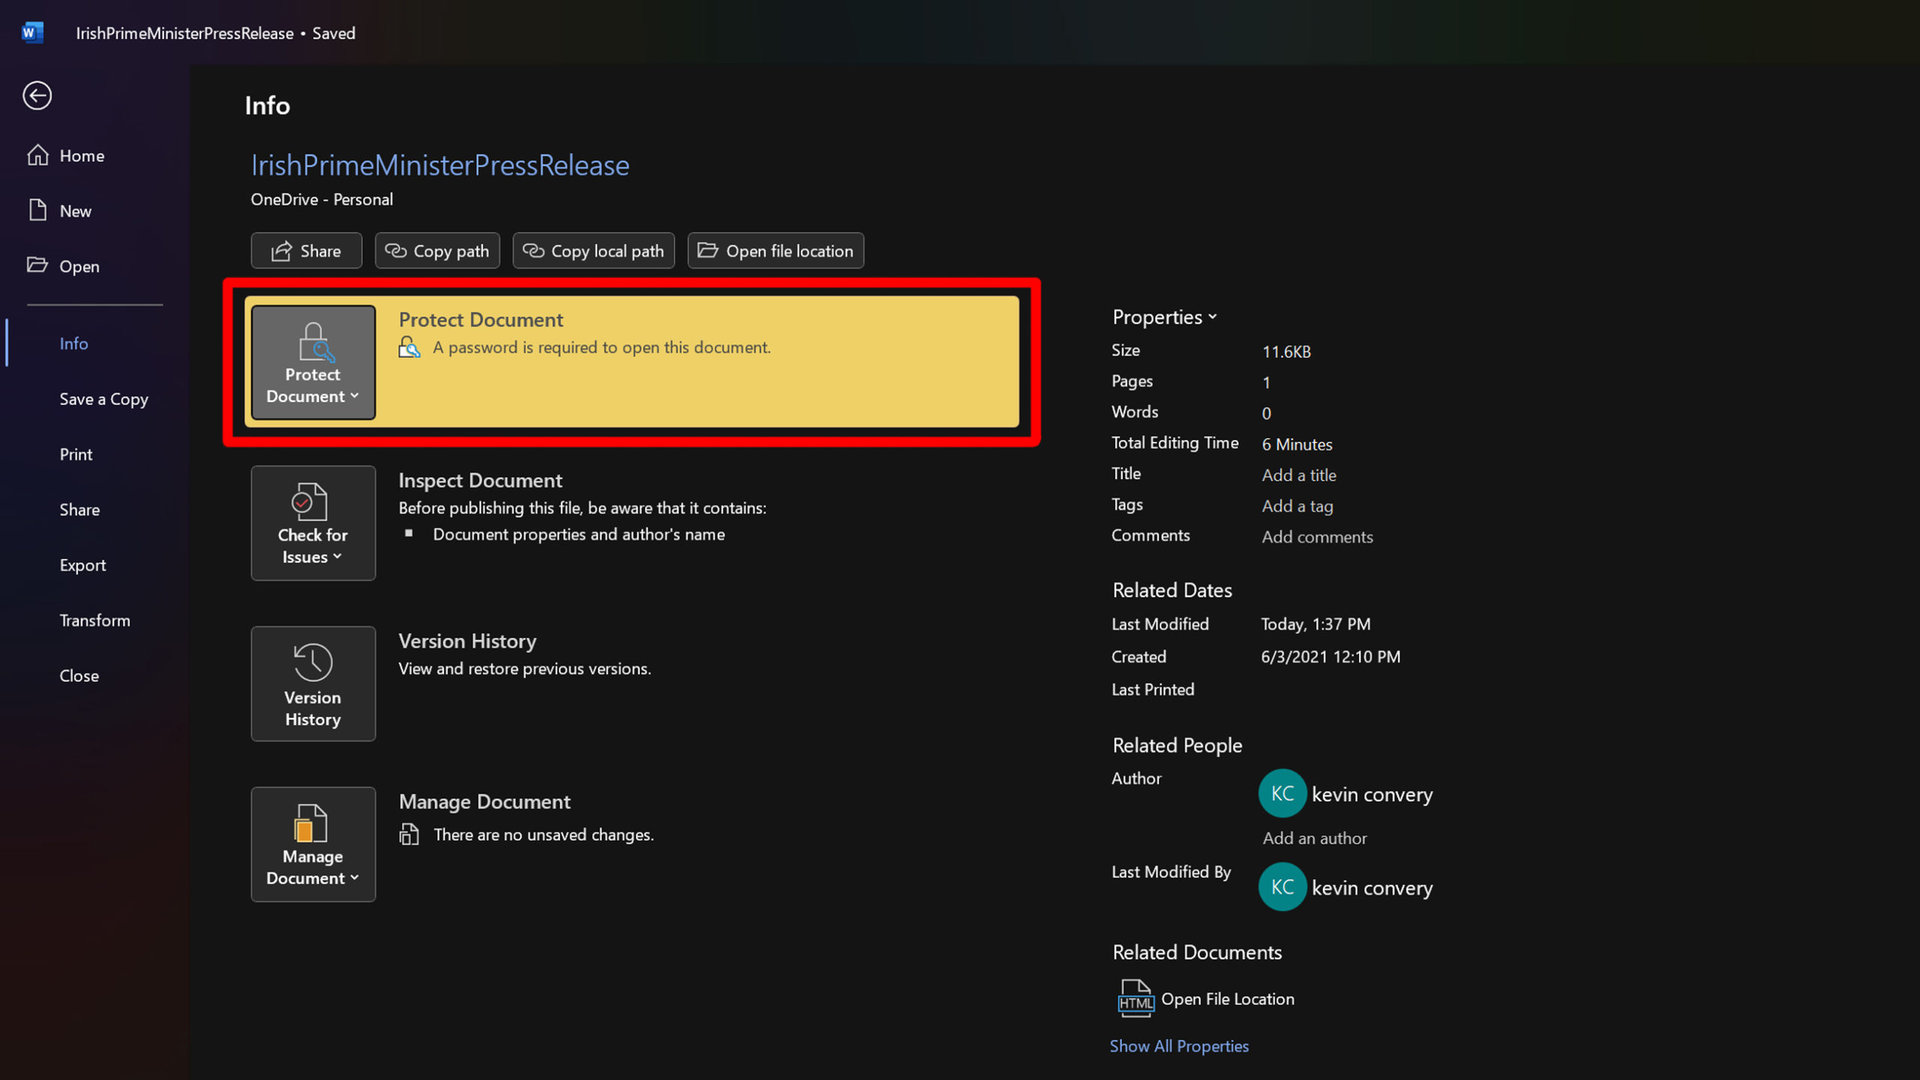
- Click on the “File” tab in the top-left corner of the menu bar.
- Select “Protect Document” from the dropdown menu, then choose “Encrypt with Password.”
- A dialog box will appear, prompting you to enter a password.
- Type in your desired password and click “OK.”
- You will be prompted to re-enter the password to confirm it. Enter the password again and click “OK.”
- Save the document to apply the password protection.
It is important to remember that using a strong and unique password is crucial to ensure the security of your document. Avoid using easily guessable passwords and consider using a combination of uppercase and lowercase letters, numbers, and special characters.
To test the password protection, close the document and re-open it. You will be prompted to enter the password before gaining access to the document.
If you want to remove the password protection, follow these steps:
- Open the password-protected Word document.
- Click on the “File” tab in the top-left corner of the menu bar.
- Select “Protect Document” from the dropdown menu, then choose “Encrypt with Password.”
- The password dialog box will appear with the encrypted dots appearing in the password field.
- Delete the existing password and click “OK.”
- Save the document to remove the password protection.
By following these steps, you can easily password protect your Word documents in Word 2016 for Windows, offering an added layer of security to your confidential or sensitive information.
How to Password Protect a Word Document in Word 2016 for Mac
Microsoft Word 2016 for Mac provides a simple and efficient way to password protect your documents. Follow these steps:
- Open the Word document that you want to password protect.
- Click on the “Review” tab in the top menu bar.
- Click on the “Protect Document” button in the toolbar, then select “Encrypt with Password” from the dropdown menu.
- A dialog box will appear, prompting you to enter a password.
- Type in your desired password and click “OK.”
- You will be prompted to re-enter the password to confirm it. Enter the password again and click “OK.”
- Save the document to apply the password protection.
It is important to choose a strong and unique password to ensure the security of your document. Avoid using easily guessable passwords and consider using a combination of uppercase and lowercase letters, numbers, and special characters.
To test the password protection, close the document and re-open it. You will be prompted to enter the password before gaining access to the document.
If you want to remove the password protection, follow these steps:
- Open the password-protected Word document.
- Click on the “Review” tab in the top menu bar.
- Click on the “Protect Document” button in the toolbar, then select “Encrypt with Password” from the dropdown menu.
- The password dialogue box will appear with the encrypted dots appearing in the password field.
- Delete the existing password and click “OK.”
- Save the document to remove the password protection.
By following these steps, you can easily password protect your Word documents in Word 2016 for Mac, adding an additional layer of security to your sensitive or confidential information.
How to Password Protect a Word Document in Word 2013 for Windows
Microsoft Word 2013 for Windows provides a straightforward process to password protect your documents. Follow these steps:
- Open the Word document that you want to password protect.
- Click on the “File” tab in the top-left corner of the menu bar.
- Select “Info” from the left-hand menu.
- Click on the “Protect Document” button, then choose “Encrypt with Password.”
- A dialog box will appear, prompting you to enter a password.
- Type in your desired password and click “OK.”
- You will be prompted to re-enter the password to confirm it. Enter the password again and click “OK.”
- Save the document to apply the password protection.
Ensure that you choose a strong and unique password to ensure the security of your document. Use a combination of uppercase and lowercase letters, numbers, and special characters.
To test the password protection, close the document and re-open it. You will be prompted to enter the password before gaining access to the document.
If you want to remove the password protection, follow these steps:
- Open the password-protected Word document.
- Click on the “File” tab in the top-left corner of the menu bar.
- Select “Info” from the left-hand menu.
- Click on the “Protect Document” button, then choose “Encrypt with Password.”
- The password dialog box will appear with the encrypted dots displayed in the password field.
- Delete the existing password and click “OK.”
- Save the document to remove the password protection.
By following these steps, you can easily password protect your Word documents in Word 2013 for Windows, providing an added layer of security to your confidential or sensitive information.
How to Password Protect a Word Document in Word 2010 for Windows
Microsoft Word 2010 for Windows allows users to easily password protect their documents. Follow these steps to add a password to your Word document:
- Open the Word document that you want to password protect.
- Click on the “File” tab in the top-left corner of the menu bar.
- Select “Save As” from the options on the left-hand side.
- In the “Save As” dialog box, click on the “Tools” dropdown menu and select “General Options.”
- In the “General Options” dialog box, enter a password in the “Password to open” field.
- Re-enter the password to confirm it.
- Click “OK” to apply the password protection.
- Save the document to save the changes.
Make sure to create a strong and unique password that combines uppercase and lowercase letters, numbers, and special characters. Remember to keep the password secure and avoid sharing it with unauthorized individuals.
To test the password protection, close the document and attempt to reopen it. You will be prompted to enter the password before gaining access to the document.
If you want to remove the password protection, follow these steps:
- Open the password-protected Word document.
- Click on the “File” tab in the top-left corner of the menu bar.
- Select “Save As” from the options on the left-hand side.
- In the “Save As” dialog box, click on the “Tools” dropdown menu and select “General Options.”
- Delete the password from the “Password to open” field.
- Click “OK” to remove the password protection.
- Save the document to save the changes.
By following these steps, you can easily password protect your Word documents in Word 2010 for Windows. This helps to ensure the confidentiality and security of your sensitive information.
How to Password Protect a Word Document in Word 2007 for Windows
Microsoft Word 2007 for Windows provides users with the ability to password protect their documents. Follow these steps to add a password to your Word document:
- Open the Word document that you want to password protect.
- Click on the “Office” button in the top-left corner of the menu bar.
- From the dropdown menu, select “Save As.”
- In the “Save As” dialog box, click on the “Tools” dropdown menu and select “General Options.”
- Enter a password in the “Password to open” field.
- Re-enter the password to confirm it.
- Click “OK” to apply the password protection.
- Save the document to save the changes.
Ensure that you use a strong and unique password, combining uppercase and lowercase letters, numbers, and special characters. Keep the password secure and avoid sharing it with unauthorized individuals.
To test the password protection, close the document and attempt to reopen it. You will be prompted to enter the password before gaining access to the document.
If you want to remove the password protection, follow these steps:
- Open the password-protected Word document.
- Click on the “Office” button in the top-left corner of the menu bar.
- From the dropdown menu, select “Save As.”
- In the “Save As” dialog box, click on the “Tools” dropdown menu and select “General Options.”
- Delete the password from the “Password to open” field.
- Click “OK” to remove the password protection.
- Save the document to save the changes.
By following these steps, you can easily password protect your Word documents in Word 2007 for Windows. This feature provides an extra layer of security, ensuring that only authorized individuals can access and view your sensitive information.
How to Password Protect a Word Document in Word Online
Microsoft Word Online allows users to password protect their documents, providing a secure way to protect sensitive information. Follow these steps to add a password to your Word document:
- Open the Word document that you want to password protect in Word Online.
- Click on the “Review” tab in the top menu bar.
- Click on the “Protect Document” button, then select “Encrypt with Password” from the dropdown menu.
- A dialog box will appear, prompting you to enter a password.
- Type in your desired password and click “OK.”
- You will be prompted to re-enter the password to confirm it. Enter the password again and click “OK.”
- Save the document to apply the password protection.
It is important to create a strong password by using a combination of uppercase and lowercase letters, numbers, and special characters. This helps to enhance the security of your document.
To test the password protection, close the document and re-open it. You will be prompted to enter the password before gaining access to the document.
If you want to remove the password protection, follow these steps:
- Open the password-protected Word document in Word Online.
- Click on the “Review” tab in the top menu bar.
- Click on the “Protect Document” button, then select “Encrypt with Password” from the dropdown menu.
- The password dialog box will appear with the encrypted dots displayed in the password field.
- Delete the existing password and click “OK.”
- Save the document to remove the password protection.
By following these steps, you can easily password protect your Word documents in Word Online. This feature adds an extra layer of security to your documents, ensuring that only authorized individuals can access and view your sensitive information.
How to Remove Password Protection from a Word Document
If you want to remove password protection from a Word document, you can do so by following these simple steps:
- Open the password-protected Word document in Microsoft Word.
- Click on the “File” tab in the top-left corner of the menu bar.
- Select “Protect Document” from the dropdown menu, then choose “Encrypt with Password.”
- The password dialog box will appear with the encrypted dots displayed in the password field.
- Delete the existing password from the password field.
- Click “OK” to remove the password protection.
- Save the document to apply the changes.
Once you have completed these steps, the password protection will be removed from the document, and anyone will be able to open and access it without entering a password.
It is important to note that removing the password protection permanently removes the security measure from the document. Therefore, ensure that you are removing the password protection only if it is no longer necessary or if you want to share the document with others who shouldn’t have to enter a password to access it.
Remember to save the document after removing the password protection to ensure that the changes take effect. By following these steps, you can easily remove password protection from a Word document, allowing for easier access and collaboration.
Tips for Password Protecting a Word Document
When it comes to password protecting a Word document, it is important to ensure the security and integrity of your sensitive information. Here are some valuable tips to keep in mind:
- Use a strong and unique password: Create a password that is difficult for others to guess. Use a combination of uppercase and lowercase letters, numbers, and special characters.
- Avoid using personal information: Do not use easily guessable passwords such as your name, birthdate, or common phrases. Be creative and come up with a password that is unrelated to your personal life.
- Regularly update passwords: Change the password of your documents periodically to maintain their security. Avoid reusing passwords across multiple documents or accounts.
- Store passwords securely: Keep a record of your passwords in a secure location, such as a password manager or encrypted file. Avoid saving passwords in easily accessible locations, such as sticky notes or unprotected documents.
- Use additional security measures: Consider encrypting the entire document or implementing additional security measures, such as two-factor authentication, for an added layer of protection.
- Be cautious when sharing passwords: Only share passwords with trusted individuals who have a legitimate need to access the document. Avoid sending passwords via unsecured channels like email.
- Protect against malware: Keep your computer and Word software updated with the latest security patches to safeguard against potential security vulnerabilities that could compromise your document’s password protection.
- Backup your documents: Regularly create backups of your password-protected documents to ensure that you do not lose access to them in the event of data loss or corruption.
- Consider document-level permissions: In addition to password protection, utilize document-level permissions to control who can access, edit, and modify specific sections of the document.
By following these tips, you can enhance the security of your password-protected Word documents, protecting your sensitive information from unauthorized access or tampering.
Frequently Asked Questions about Password Protecting Word Documents
Here are some commonly asked questions about password protecting Word documents, along with their answers:
- Can I password protect existing Word documents?
- Can I password protect multiple Word documents at once?
- Is there a way to recover a forgotten password?
- Can I access a password-protected Word document on a different computer?
- Can I password protect Word documents on a Mac?
- Can I remove the password protection from a document without knowing the password?
- Can I password protect a Word document on a mobile device?
Yes, you can password protect existing Word documents by following the steps specific to your version of Word. Open the document, go to the relevant tab or menu option, and choose the password protection feature.
Unfortunately, Word does not have a built-in feature to password protect multiple documents simultaneously. You will need to password protect each document individually.
If you forget the password to a Word document, there is no official way to recover it. It is best to keep a record of your passwords in a secure location to avoid losing access to password-protected documents.
Yes, you can access a password-protected Word document on a different computer as long as you have the correct password. The password protection is tied to the document and not the computer.
Yes, you can password protect Word documents on a Mac using Microsoft Word for Mac. The process is similar to the Windows version and involves accessing the relevant menu or toolbar options to set a password.
No, you cannot remove the password protection from a document without knowing the password. The password is required to remove the protection and gain access to the document.
Some mobile versions of Microsoft Word, such as Word for iOS or Android, support password protection. You can follow similar steps to password protect a document on a mobile device as you would on a computer.
If you have any additional questions or encounter specific issues with password protecting your Word documents, it is recommended to consult Microsoft’s official documentation or seek assistance from their support channels.