
Why Measure Distance on Google Maps
Google Maps is a versatile tool that provides us with a wealth of information about our surroundings. While most people use it for navigation purposes, it also offers a handy feature for measuring distances. Whether you are planning a road trip, need to calculate the length of a hiking trail, or simply curious about the distance between two locations, measuring distance on Google Maps can be incredibly useful.
There are several reasons why you might need to measure distance using Google Maps. For travelers, it can help determine the shortest route between destinations, saving time and fuel. It is particularly helpful for hikers who want to plan their trekking routes and calculate the distance they will cover each day. Real estate agents can use this feature to show potential buyers the proximity to important landmarks, like schools or shopping centers. Additionally, students and researchers can utilize it for academic projects that require distance calculations.
Another reason to measure distance on Google Maps is for fitness and outdoor activities. Whether you’re a runner tracking your training progress or a cyclist planning a new route, knowing the exact distance can be invaluable. It allows you to set goals, monitor your performance, and challenge yourself to reach new distances.
Besides these practical applications, measuring distance on Google Maps can also satisfy your curiosity. Ever wondered how far your favorite vacation spot is from your home? Or how close your workplace is to the nearest park? With just a few clicks, you can easily find out.
Overall, the ability to measure distance on Google Maps opens up a world of possibilities for various purposes. It’s a convenient and easy-to-use tool that enhances our planning, navigation, and exploration capabilities. So, whether you’re a traveler, hiker, real estate agent, fitness enthusiast, or simply curious about distances, Google Maps has got you covered.
Method 1: Using the Ruler Tool
Google Maps provides a built-in Ruler Tool that makes it effortless to measure distances between two or more points on the map. Follow these simple steps to use this handy feature:
Step 1: Open Google Maps
Launch your web browser and navigate to Google Maps (maps.google.com) on your computer or the Google Maps app on your mobile device. Ensure that you are signed in to your Google account for access to all features.
Step 2: Enable the Ruler Tool
Once you have the Google Maps interface open, click on the three horizontal lines in the upper-left corner to reveal the main menu. From the menu, select the “Measure Distance” option. This will activate the Ruler Tool.
Step 3: Measure Distance
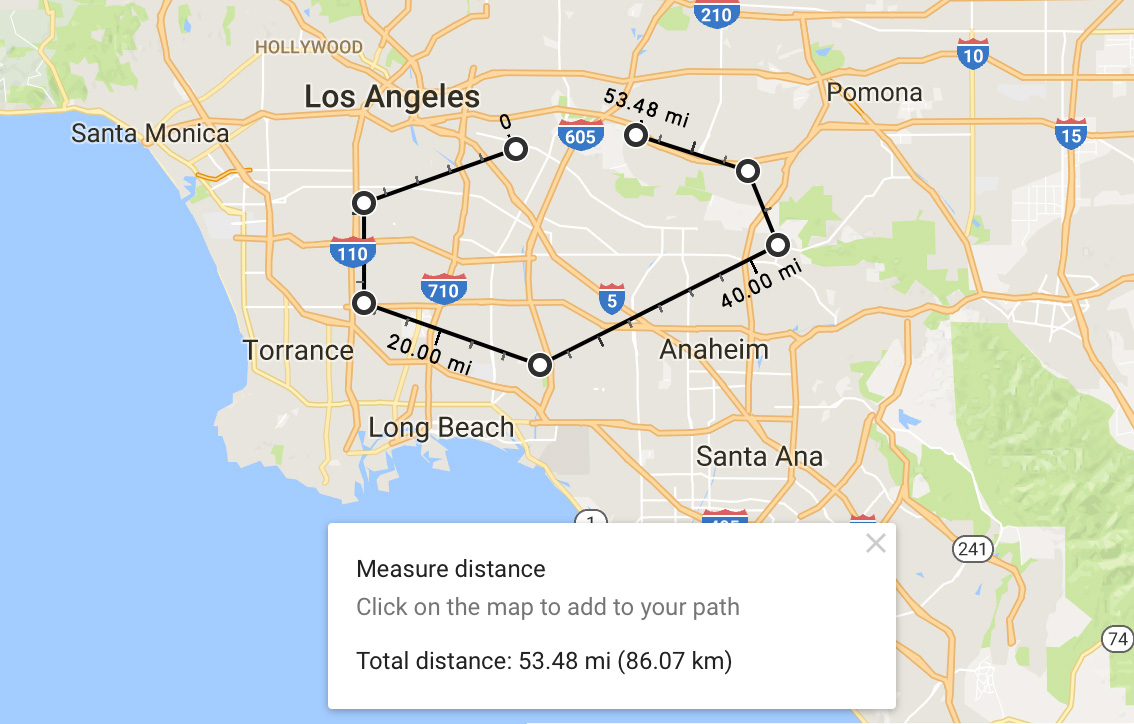
To start measuring the distance, click on the map at the desired starting point. A small black circle will appear. Then, click on the map again to add points along the path you wish to measure. Each time you click, you will see a line connecting the points and the accumulated distance displayed on the map. You can continue adding points until you reach the desired endpoint.
You can also drag the points you’ve added to adjust the route if needed. The Ruler Tool will automatically recalculate and update the distance measurement.
Note: You can switch between different measurement units, such as kilometers, miles, or feet, by clicking on the measurement label on the map.
The Ruler Tool on Google Maps is a convenient and efficient way to measure distances accurately. Whether you’re planning a road trip, assessing the length of a hiking trail, or comparing distances between multiple locations, this tool simplifies the process and provides reliable results.
Step 1: Open Google Maps
To begin measuring distance on Google Maps, you first need to open the application or website. Here’s how you can access Google Maps:
If you’re using a computer:
- Launch your preferred web browser, such as Google Chrome or Mozilla Firefox.
- Type “maps.google.com” in the address bar at the top of the browser window and press Enter.
- The Google Maps homepage will load, displaying a map of the world.
If you’re using a mobile device:
- Unlock your device and navigate to the home screen.
- Locate and tap the Google Maps app icon. It is typically a red map pin on a white background.
- The Google Maps app will open, showing you a map view of your current location or the last location you searched for.
Ensure that you’re connected to the internet, as Google Maps requires an active internet connection to function properly. If you’re using the app on a mobile device and have disabled location services, you may be prompted to grant location access for accurate positioning.
Once you have successfully accessed Google Maps, you can move on to the next steps to start measuring distances using the available tools and features.
Opening Google Maps is the crucial first step in the process of measuring distances. By following the simple instructions outlined above, you will have the application or website up and running, ready to assist you in determining distances accurately and efficiently.
Step 2: Enable the Ruler Tool
Once you have opened Google Maps, the next step in measuring distance is to enable the Ruler Tool. This tool provides a straightforward and intuitive way to measure distances between specific points on the map. Here’s how you can enable it:
On a computer:
- In the top left corner of the Google Maps interface, you will see three horizontal lines, which represent the main menu. Click on these lines to expand the menu options.
- From the menu, select the “Measure Distance” option. This will activate the Ruler Tool and display a small black circle on the map.
On a mobile device:
- At the bottom right corner of the Google Maps interface, look for the blue dot indicating your current location or the last accessed location. Tap and hold the blue dot until a small white circle appears.
- Release your finger after the white circle appears, and a menu will appear on the screen. Tap the “Measure distance” option.
Once the Ruler Tool is enabled, you will notice that your cursor or finger has changed into a small plus sign or crosshair. This indicates that the tool is ready for use, and you can begin measuring distances between different points on the map.
Enabling the Ruler Tool is a crucial step in the process of measuring distance on Google Maps. By following the instructions provided above, you can easily activate the tool and proceed to the next steps to measure distances accurately and effectively.
Step 3: Measure Distance
Once you have enabled the Ruler Tool on Google Maps, you can start measuring distances between specific points on the map. Follow these simple steps to accurately measure the desired distance:
- Click on the map at the desired starting point or tap and hold if you’re using a mobile device. A small black circle will appear at the selected location, indicating the starting point of your measurement.
- Click on the map again or release your finger if using a mobile device, to add additional points along the path you want to measure. Each time you click or add a point, a line will form, connecting the points you have selected, and the accumulated distance will be displayed on the map.
- Continue adding points until you reach your desired endpoint. The Ruler Tool will automatically calculate and update the distance measurement as you add more points or adjust the route.
- To view the exact distance measurement in different units, such as kilometers, miles, or feet, simply click on the measurement label displayed on the map, and a drop-down menu will appear with the available options. Select the preferred unit, and the measurement will be updated accordingly.
It’s important to note that the Ruler Tool allows you to drag and adjust existing points to refine your measurement. Simply click and drag a point to a new location, and the Ruler Tool will recalculate the distance based on the new configuration of points.
By following these steps, you can easily measure distance on Google Maps using the Ruler Tool. Whether you’re planning a trip, determining the length of a hiking trail, or simply curious about distances between locations, this tool provides a user-friendly and accurate way to measure distances with ease.
Method 2: Right-click Measurement
Google Maps offers another convenient method to measure distance using the right-click feature. This method allows you to quickly measure distances between two points on the map without the need for enabling any additional tools. Follow these steps to measure distance using the right-click feature:
Step 1: Open Google Maps
Launch your web browser and navigate to Google Maps (maps.google.com) on your computer or open the Google Maps app on your mobile device. Ensure that you are signed in to your Google account to access all features.
Step 2: Right-click on Starting Point
Identify the starting location on the map and position your cursor or tap and hold if using a mobile device on that specific point. Right-click on your computer or long-press on your mobile device to reveal a context menu.
Step 3: Right-click on Ending Point
Next, find the ending location on the map and right-click on your computer or long-press on your mobile device at that point. A context menu will appear once again.
Step 4: View Distance Measurement
After right-clicking on the ending point, Google Maps will automatically calculate the distance between the starting and ending points. The measured distance will be displayed in a pop-up window or card along with other relevant information about the selected locations.
This method provides a convenient way to measure distance on Google Maps without the need to enable any specific tools. It is particularly helpful if you only need to quickly measure distances between two points and do not require precise route planning or multiple point measurements.
By following these steps, you can easily measure distance using the right-click feature on Google Maps. This method offers a straightforward and efficient way to obtain distance measurements between two points on the map, providing you with valuable information for various purposes.
Step 1: Open Google Maps
Before you can start measuring distances using the right-click feature on Google Maps, you need to first open the application or website. Here’s how you can access Google Maps:
If you’re using a computer:
- Launch your preferred web browser, such as Google Chrome or Mozilla Firefox.
- Type “maps.google.com” in the address bar at the top of the browser window and press Enter.
- Google Maps will load, displaying a map of the world.
If you’re using a mobile device:
- Unlock your device and navigate to the home screen.
- Locate and tap the Google Maps app icon. It is typically a red map pin on a white background.
- The Google Maps app will open, showing you a map view of your current location or the last location you searched for.
Ensure that you have an active internet connection when using Google Maps, whether on a computer or a mobile device, as it requires an internet connection to function properly.
Once you have successfully opened Google Maps, you can proceed to the next steps to measure distances using the right-click feature.
Opening Google Maps is the crucial first step in utilizing the right-click feature to measure distances. By following the simple instructions provided above, you will have the application or website up and running, ready to assist you in measuring distances accurately and efficiently.
Step 2: Right-click on Starting Point
After opening Google Maps, the next step in measuring distances using the right-click feature is to select the starting point on the map. Follow these steps to right-click on the starting point:
Step 1: Open Google Maps
Launch your preferred web browser and navigate to Google Maps (maps.google.com) on your computer or open the Google Maps app on your mobile device. Make sure you are signed in to your Google account for access to all features and personalized information.
Step 2: Identify the Starting Point
Take a moment to identify the location on the map from which you want to start measuring the distance. This can be any specific point, such as an address, landmark, or point of interest.
Step 3: Right-click on the Starting Point
Position your cursor over the starting point on the map, then right-click on your computer or long-press on your mobile device. This action will bring up a context menu with various options.
Note: If you’re using a touchscreen device without a mouse, simply tap and hold on the starting point until the context menu appears.
By right-clicking on the starting point, you are selecting it as the reference point to begin measuring the distance. This action triggers the next step of the process, which involves choosing the ending point to complete the distance measurement.
Once you have successfully right-clicked on the starting point, you can proceed to the following step to finalize the distance measurement using the right-click feature on Google Maps.
Step 3: Right-click on Ending Point
After selecting the starting point, the next step in measuring distances using the right-click feature on Google Maps is to choose the ending point. Follow these steps to right-click on the ending point:
Step 1: Open Google Maps
Ensure that Google Maps is opened on your preferred web browser or the Google Maps app on your mobile device. Make sure you are signed in to your Google account for access to all features and personalized information.
Step 2: Identify the Ending Point
Take a moment to identify the location on the map where you want to conclude the distance measurement. This can be any specific point, such as an address, landmark, or point of interest.
Step 3: Right-click on the Ending Point
Position your cursor over the ending point on the map, and with a right-click on your computer or a long-press on your mobile device, a context menu will appear.
Note: If you’re using a touchscreen device without a mouse, simply tap and hold on the ending point until the context menu appears.
By right-clicking on the ending point, you are selecting it as the final reference point to complete the distance measurement. This action prompts Google Maps to calculate and display the measured distance between the starting and ending points.
Once you have successfully right-clicked on the ending point, Google Maps will provide you with the resulting distance measurement, which you can view in a pop-up window or card along with other relevant information about the selected locations.
With both the starting and ending points selected, you can now proceed to view the distance measurement accurately calculated by Google Maps using the right-click feature.
Step 4: View Distance Measurement
After selecting both the starting and ending points using the right-click feature on Google Maps, the final step is to view the distance measurement. Follow these steps to see the calculated distance:
Step 1: Right-click on the Ending Point
Ensure that you have successfully right-clicked on the ending point to confirm your selection. This action triggers Google Maps to calculate and display the measured distance between the starting and ending points.
Step 2: Displayed Distance Measurement
Once the right-click action is completed, Google Maps will automatically calculate the distance between the selected points. A pop-up window or card will appear, displaying the measured distance as well as other relevant information about the selected locations.
The distance measurement is typically displayed in the unit of measurement based on your location or personal preferences. You may see distances in kilometers, miles, or other commonly used units. If you wish to change the unit of measurement, you can do so in the Google Maps settings.
Note: In addition to the distance measurement, Google Maps may also provide other information related to the selected locations, such as estimated travel time, directions, and nearby attractions.
By following these steps and viewing the distance measurement, you will have accurate information about the distance between the selected starting and ending points. This can be useful for various purposes, including planning routes, estimating travel times, and assessing distances for any specific needs.
Take advantage of the information provided by Google Maps to make informed decisions and effectively utilize the distance measurement feature.
Method 3: Drag and Drop Measurement
Google Maps offers another method to measure distances, which involves using the drag and drop feature. This method allows you to visually measure distances by simply dragging and dropping a starting and ending point on the map. Follow these steps to measure distance using this method:
Step 1: Open Google Maps
Open your preferred web browser and navigate to Google Maps (maps.google.com) on your computer or launch the Google Maps app on your mobile device. Make sure you are signed in to your Google account for access to all features.
Step 2: Locate the Starting Point
Identify the specific location on the map from which you want to start measuring the distance. This can be any address, landmark, or point of interest.
Step 3: Click and Hold on the Starting Point
Using your cursor on a computer or your finger on a mobile device, click and hold on the starting point. As you do this, you will see a pin or marker appear at the selected location.
Step 4: Drag to the Ending Point
While still holding the click or touch, drag the pin or marker to the desired ending point on the map. As you drag, you will notice a line forming, representing the pathway and the distance being measured.
Step 5: Release the Click/Touch
Once you have reached the desired ending point, release the click on your computer or remove your finger from the screen on your mobile device. The distance measurement will be displayed between the starting and ending points.
Step 6: View Distance Measurement
After releasing the click or touch, Google Maps will provide you with the measured distance between the starting and ending points. The distance will be shown in the chosen unit of measurement, such as kilometers or miles.
Using the drag and drop method to measure distances on Google Maps allows for a more interactive and visual experience. It gives you the ability to physically place and adjust the starting and ending points on the map, providing a more intuitive way to measure distances accurately.
By following these steps, you can easily measure distances using the drag and drop feature on Google Maps to aid in planning routes, assessing distances, or satisfying your curiosity about the distance between different locations.
Step 1: Open Google Maps
To begin measuring distances using the drag and drop feature on Google Maps, you first need to open the application or website. Here’s how you can access Google Maps:
If you’re using a computer:
- Open your preferred web browser, such as Google Chrome or Mozilla Firefox.
- Type “maps.google.com” in the address bar at the top of the browser window and press Enter.
- The Google Maps website will load, displaying a map view of the world.
If you’re using a mobile device:
- Unlock your device and navigate to the home screen.
- Locate and tap the Google Maps app icon on your device. It is typically a red map pin on a white background.
- The Google Maps app will open, showing you a map view of your current location or the last location you searched for.
Ensure that you have a stable internet connection to access Google Maps, as it requires an active internet connection to function properly and load the map data.
Once you have successfully opened Google Maps, you can proceed to the next steps to start measuring distances using the drag and drop feature.
Opening Google Maps is the essential first step in utilizing the drag and drop feature to measure distances. By following the instructions provided above, you will have the application or website ready to assist you in measuring distances accurately and efficiently.
Step 2: Locate Starting Point
Once you have opened Google Maps, the next step in measuring distances using the drag and drop feature is to identify and locate the starting point on the map. Follow these steps to pinpoint the starting point:
Step 1: Open Google Maps
Ensure that Google Maps is already opened on your computer or mobile device. Make sure you are signed in to your Google account for access to all features and personalized information.
Step 2: Identify the Starting Point
Take a moment to consider the specific location from which you want to start measuring the distance. It can be any address, landmark, point of interest, or an approximate point on the map.
Step 3: Locate the Starting Point on the Map
Using your cursor on a computer or your finger on a mobile device, visually scan the map to locate and identify the starting point marker or area. The map may already display some markers for well-known places or landmarks.
If you know the exact address or name of the starting point, you can use the search bar at the top of the Google Maps interface or app to find it directly. Enter the address or name and press Enter or tap the search icon.
By searching or visually identifying the location on the map, you can pinpoint the specific starting point.
Locating the starting point accurately is crucial as it serves as the reference for measuring the distance. Once you have successfully located the starting point, you can proceed to the subsequent steps to measure distances using the drag and drop feature on Google Maps.
Step 3: Click and Hold Starting Point
After identifying the starting point, the next step in measuring distances using the drag and drop feature on Google Maps is to click and hold on the starting point. Follow these steps to execute this action:
Step 1: Open Google Maps
Ensure that Google Maps is open on your computer or mobile device. Make sure you are signed in to your Google account for access to all features and personalized information.
Step 2: Locate the Starting Point
Take a moment to visually locate the specific starting point on the map. It could be an address, landmark, point of interest, or a selected area.
Step 3: Click and Hold on the Starting Point
Using your cursor on a computer or your finger on a mobile device, position it directly on the starting point. Click and hold the left mouse button or press and hold on the screen to engage the touch feature. As you do this, you will notice a pin or marker appearing at the location.
By clicking and holding on the starting point, you are initiating the action of selecting it as the starting point for the distance measurement. This action allows you to interact with the map and proceed to the next steps of the process.
It’s important to hold the click or touch until you complete the dragging action in the subsequent steps. This ensures that the starting point is set and ready for measurement.
Once you have successfully clicked and held the starting point, you can proceed to the following steps to continue measuring distances using the drag and drop feature on Google Maps.
Step 4: Drag to Ending Point
After clicking and holding on the starting point, the next step in measuring distances using the drag and drop feature on Google Maps is to drag the marker or pin to the desired ending point. Follow these steps to execute this action:
Step 1: Open Google Maps
Make sure that Google Maps is already open on your computer or mobile device. Sign in to your Google account for access to all features and personalized information.
Step 2: Locate the Starting Point
Visually identify and locate the specific starting point on the map. It can be an address, landmark, point of interest, or another location of significance.
Step 3: Click and Hold on the Starting Point
Position your cursor on a computer or use your finger on a mobile device to click and hold directly on the starting point. Keep the left mouse button held down or maintain the touch pressure on the screen to activate the drag and drop feature.
Step 4: Drag the Marker to the Desired Ending Point
While still holding the click or touch, begin moving the cursor or dragging your finger across the map towards the desired ending point. As you do so, you will notice a line forming, representing the pathway and the distance being measured.
Continue dragging until the marker or pin reaches the ending point you want to measure the distance to. This can be any address, landmark, point of interest, or location you wish to specify.
By dragging the marker or pin from the starting point to the ending point, you are visually defining the route and path for Google Maps to measure the distance accurately.
Drag smoothly and precisely to ensure the desired ending point is reached and the distance measurement is precise. The line connecting the starting and ending points will dynamically adjust as you move, displaying the new pathway and cumulative distance.
Once you have reached the desired ending point, release the click or remove your finger from the screen to lock the distance measurement in place.
By successfully executing this step, you will have established the starting and ending points for the distance measurement using the drag and drop feature on Google Maps, allowing you to proceed to the final step of viewing the distance measurement.
Step 5: Release Click
After dragging the marker or pin to the desired ending point, the next step in measuring distances using the drag and drop feature on Google Maps is to release the click. Follow these steps to execute this action:
Step 1: Open Google Maps
Ensure that Google Maps is open on your computer or mobile device. Sign in to your Google account for access to all features and personalized information.
Step 2: Locate the Starting Point
Visually identify and locate the specific starting point on the map. This can be any address, landmark, point of interest, or another location of significance.
Step 3: Click and Hold on the Starting Point
Position your cursor on a computer or use your finger on a mobile device to click and hold directly on the starting point. Keep the left mouse button held down or maintain the touch pressure on the screen to activate the drag and drop feature.
Step 4: Drag the Marker to the Desired Ending Point
While still holding the click or touch, drag the marker or pin across the map to the desired ending point. Observe the line forming between the starting and ending points, representing the pathway and the distance being measured.
Step 5: Release the Click
Once the marker or pin reaches the desired ending point, release the click on your computer or remove your finger from the screen on your mobile device. This action will lock the distance measurement in place.
By releasing the click, you confirm the selection of the ending point and establish the finalized distance measurement between the starting and ending points on Google Maps.
Make sure to release the click or touch precisely to avoid accidental movements that could alter the distance measurement. The line connecting the starting and ending points will remain fixed, and the distance value will be displayed.
The released click triggers Google Maps to calculate and display the measured distance accurately based on the selected points, providing you with valuable information for various purposes, such as route planning, estimating travel times, or simple curiosity about the distances between locations.
Upon successfully executing this step, you have completed the process of measuring distances using the drag and drop feature on Google Maps.
Step 6: View Distance Measurement
After releasing the click and finalizing the measurement between the starting and ending points using the drag and drop feature on Google Maps, the last step is to view the distance measurement. Follow these steps to execute this action:
Step 1: Open Google Maps
Ensure that Google Maps is already open on your computer or mobile device. Sign in to your Google account for access to all features and personalized information.
Step 2: Locate the Starting Point
Visually identify and locate the specific starting point on the map. This can be any address, landmark, point of interest, or another location you used for the measurement.
Step 3: Click and Hold on the Starting Point
Position your cursor on a computer or use your finger on a mobile device to click and hold directly on the starting point. This action would have already been completed during the previous steps of the measurement process.
Step 4: Drag the Marker to the Desired Ending Point
While holding the click or touch, drag the marker or pin on the map to the desired ending point, effectively measuring the distance between the two selected points.
Step 5: Release the Click
Once the marker or pin reaches the desired ending point, release the click on your computer or remove your finger from the screen on your mobile device. This locks the distance measurement in place.
Step 6: View the Distance Measurement
After releasing the click, Google Maps will display the distance measurement between the starting and ending points. The measured distance will be shown in the chosen unit of measurement, such as kilometers or miles.
A line connecting the starting and ending points will remain visible on the map, representing the path of the measured distance. The precise measured distance may also be displayed in a window or information card alongside additional details about the two locations.
Observe the distance measurement displayed to gain accurate information regarding the distance between the selected points. The value will help you in various situations, including route planning, estimating travel times, or general reference.
By successfully executing this final step, you have accessed and viewed the distance measurement obtained from the drag and drop measurement process on Google Maps. You can now utilize this information according to your specific needs.
Method 4: Measure with the Distance Matrix API
Google Maps provides a powerful Distance Matrix API that allows developers to programmatically measure distances between multiple locations. By utilizing this API, you can obtain accurate distance measurements tailored to your specific requirements. Follow these steps to measure distance using the Distance Matrix API:
Step 1: Get the API Key
Before utilizing the Distance Matrix API, you need to obtain an API key from the Google Cloud Platform Console. This key will authenticate your requests and provide access to the API’s features and services.
Step 2: Activate the Distance Matrix API
In the Google Cloud Platform Console, navigate to the APIs & Services section and activate the Distance Matrix API. This ensures that your API key has the necessary permissions to use the API.
Step 3: Use the API to Measure Distance
To measure distance using the Distance Matrix API, you will need to make API requests with the necessary parameters. These parameters include origins (starting locations), destinations (ending locations), and other optional parameters such as travel mode and restrictions.
By making an appropriate API request, you will receive a response from the Distance Matrix API containing the requested distance measurements. The distances can be obtained in various units such as kilometers, miles, meters, or feet, depending on the options specified in the request.
The Distance Matrix API provides greater flexibility and customization compared to the other methods discussed. It allows you to obtain distance measurements for multiple locations, calculate travel times, and consider factors like traffic conditions, alternative routes, and more.
Utilizing the Distance Matrix API is particularly useful when integrating with other systems or when advanced distance calculations are required for specific applications or projects.
By following these steps and properly utilizing the Distance Matrix API, you can programmatically measure distances between multiple locations with accuracy and flexibility, empowering you with valuable data for a wide range of purposes.
Step 1: Get the API Key
To utilize the Distance Matrix API and measure distances between locations programmatically, you will need to obtain an API key from the Google Cloud Platform Console. This API key serves as a unique identifier for your application and grants the necessary access to use the API. Follow these steps to get your API key:
Step 1: Access the Google Cloud Platform Console
Open a web browser and navigate to the Google Cloud Platform Console (console.cloud.google.com). Sign in to your Google account if prompted.
Step 2: Create a New Project
If you don’t have a project already created, click on the “Select a project” dropdown at the top of the page and choose “New Project”. Give your project a name and click on the “Create” button.
Step 3: Enable the Distance Matrix API
In the Google Cloud Platform Console, select your newly created project from the “Select a project” dropdown. Then, navigate to the “Library” section in the sidebar menu and search for “Distance Matrix API”. Click on the API result and enable it for your project.
Step 4: Create an API Key
From the sidebar menu, go to “APIs & Services” and select “Credentials”. Click on the “Create credentials” button and choose “API key” from the dropdown menu.
Step 5: Restrict the API Key (optional)
For improved security, you can restrict the usage of your API key. This step is optional but recommended. You can set restrictions based on HTTP referrers, IP addresses, or API usage types.
Step 6: Copy the API Key
Once you’ve created the API key, it will be displayed on the screen. Copy the API key and keep it safe, as you will need it in your application to authenticate your requests to the Distance Matrix API.
By successfully following these steps, you have obtained an API key for the Distance Matrix API. This API key is essential for authenticating your requests and gaining access to the features and services provided by the Distance Matrix API.
Remember to keep your API key confidential and use it securely to ensure the privacy and integrity of your application’s interactions with the Distance Matrix API.
Step 2: Activate the Distance Matrix API
After obtaining an API key, the next step in utilizing the Distance Matrix API is to activate it for your project on the Google Cloud Platform. This ensures that your API key has the necessary permissions to access and use the Distance Matrix API. Follow these steps to activate the Distance Matrix API:
Step 1: Access the Google Cloud Platform Console
Open a web browser and navigate to the Google Cloud Platform Console (console.cloud.google.com). Sign in to your Google account if prompted.
Step 2: Select Your Project
In the top bar of the Google Cloud Platform Console, click on the project selection dropdown and choose the project for which you want to activate the Distance Matrix API. If you haven’t created a project yet, follow the instructions to create one.
Step 3: Open the API Library
In the sidebar menu, click on “APIs & Services” and select “Library” from the dropdown. This will open the API Library page where you can find various Google APIs.
Step 4: Search for the Distance Matrix API
In the search bar at the top of the API Library page, type “Distance Matrix API” and press Enter. The Distance Matrix API should appear in the search results below.
Step 5: Enable the Distance Matrix API
Click on the Distance Matrix API in the search results to open its details page. On the details page, click on the “Enable” button to activate the API for your project.
Step 6: Verify the Activation
After enabling the Distance Matrix API, you will be redirected to the API’s dashboard. Here, you can verify that the API is now activated for your project. Check for any additional settings or configurations that may be required, such as usage limits or quotas.
By successfully activating the Distance Matrix API for your project, you have ensured that your API key has the necessary permissions to use the API’s features and services. You are now ready to utilize the Distance Matrix API and integrate it into your application to measure distances programmatically.
Step 3: Use the API to Measure Distance
Once you have obtained an API key and activated the Distance Matrix API for your project, you can now start utilizing the API to measure distances programmatically. Follow these steps to use the Distance Matrix API to measure distance between locations:
Step 1: Set Up API Request
In your application code, construct an HTTP request to the Distance Matrix API, specifying the necessary parameters such as origins (starting locations), destinations (ending locations), and any additional optional parameters like travel mode or traffic model. Ensure that you include your API key as a required parameter in the request.
Step 2: Make API Request
Send the constructed API request to the Distance Matrix API endpoint using the appropriate HTTP method, such as GET or POST. The API will process your request and calculate the distances between the specified origins and destinations.
Step 3: Handle API Response
Once you receive the API response, parse it to extract the desired distance measurement. The response will contain the results of your distance calculation, including the distance values in your chosen unit of measurement.
Step 4: Utilize Distance Measurement
With the extracted distance measurement, you can use it in your application as needed. You may display the distance to the user, store it for future reference, or incorporate it into further calculations or decision-making processes.
Step 5: Implement Error Handling
While using the Distance Matrix API, it’s important to handle any potential errors or issues that may occur during the API request and response process. Implement appropriate error handling mechanisms to handle scenarios such as invalid API key, incorrect request parameters, or API service disruptions.
Utilizing the Distance Matrix API allows you to measure distances dynamically, catering to specific requirements and factors like travel mode, traffic, and alternate routes. By following these steps, you can harness the power of the Distance Matrix API to calculate distances programmatically in your application or project.