
Enable Privacy Settings
Protecting your privacy on Twitter is crucial to ensure that your personal information and tweets are only visible to the people you choose. By enabling privacy settings, you have control over who can see and interact with your account. Here are the steps to get started:
- Access your settings: Log in to your Twitter account and click on your profile picture at the top right corner. From the dropdown menu, select “Settings and Privacy”.
- Navigate to the “Privacy and Safety” section: On the left-hand side menu, click on “Privacy and Safety”. This is where you can customize your privacy settings.
- Set your account to private: Under the “Tweets” section, check the box that says “Protect your Tweets”. This will make your account private, meaning only approved followers can see your tweets.
- Manage your follower settings: Scroll down to the “Followers” section. Here, you have the option to allow or restrict who can follow you. Choose between “Everyone” to allow anyone to follow you, “People you follow” to only allow people you follow to follow you back, or “Only people you approve” to have complete control over who can follow you.
- Customize your notification settings: Twitter allows you to control the type of notifications you receive. Under the “Notifications” section, you can choose to disable notifications from accounts without a profile picture, restrict notifications to people you follow, or even mute specific keywords or conversations.
- Review your data usage: Twitter provides options for data collection and personalized ads. Navigate to the “Data and Permissions” section to manage your data settings and review the permissions you have granted to third-party apps.
By following these steps and enabling privacy settings on Twitter, you can ensure that your account is secure and your tweets are visible only to the audience you want. Remember to regularly review and update your privacy settings to adapt to your changing needs.
Adjust Account Visibility
Controlling the visibility of your Twitter account allows you to manage how easily your profile can be found and accessed by others. Whether you want to increase your visibility for networking or prefer to keep a low profile, here are some tips to adjust your account visibility:
- Username: Choose a unique and easily recognizable username that reflects your personal or brand identity. Avoid using personal information, such as your full name or email address, in your username.
- Bio: Craft a concise and engaging bio that highlights your interests, expertise, or objectives. Consider using relevant keywords that can help others find you when searching for specific topics.
- Profile Picture: Select a clear and professional profile picture that represents you or your brand appropriately. Make sure your picture is easily recognizable, even at a small size, to enhance your visibility across the platform.
- Header Image: Customize your header image to further showcase your personality or brand. Consider using eye-catching visuals or graphics that align with your interests or the message you want to convey.
- Link Sharing: Twitter allows you to share links in your profile. If you prefer to keep your presence on other social media platforms private, ensure that you are not sharing links that redirect to personal accounts or sensitive information.
- Tagging Settings: Under the “Privacy and Safety” settings, you can control who can tag you in photos. Choose between allowing anyone to tag you or limiting tags to only people you follow. This will help you manage your online presence and avoid unwanted tagging.
- Verified Account: If you are a public figure, brand, or organization, you can apply for a verified account. Verification adds a blue checkmark next to your username, signifying authenticity and increasing your credibility.
- Search Settings: Twitter has search settings that allow you to control how your account appears in search results. While some users prefer to be discoverable, others may opt for a more private approach.
- Lists: Utilize Twitter lists to categorize your interests, connections, or topics of focus. This can help others find you based on the specific lists you are included in or create.
By adjusting your account visibility settings on Twitter, you can optimize your online presence and ensure that you are presenting yourself or your brand in the best possible way. Remember to regularly review and update these settings to align with your evolving goals and objectives.
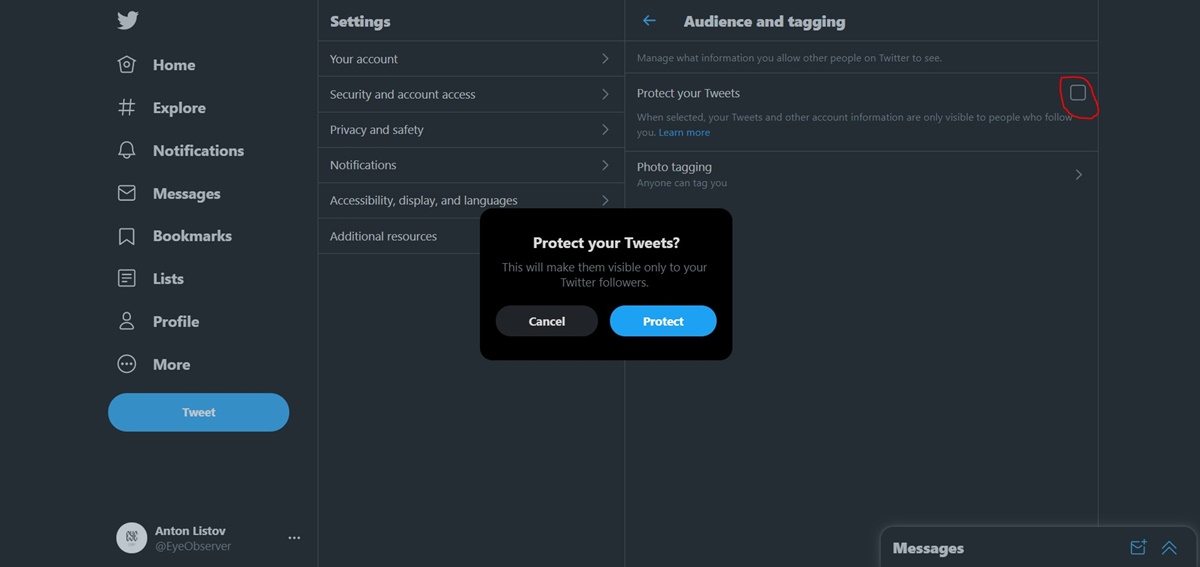
Protect Your Tweets
Protecting your tweets on Twitter provides an extra layer of privacy and control over who can view and interact with your posts. By protecting your tweets, you can ensure that only approved followers can access your updates. Here’s how you can protect your tweets:
- Access your settings: Log in to your Twitter account and click on your profile picture at the top right corner. From the dropdown menu, select “Settings and Privacy”.
- Navigate to the “Privacy and Safety” section: On the left-hand side menu, click on “Privacy and Safety”. This is where you can customize your privacy settings.
- Enable tweet protection: Under the “Tweets” section, check the box that says “Protect your Tweets”. This will change your account’s status to private, ensuring that only approved followers can see your tweets on their timelines.
- Approve and manage followers: Once you protect your tweets, you have control over who can follow you and see your updates. From your profile page, click on the “Followers” tab to review and approve or decline follower requests.
- Send follow requests: By protecting your tweets, you can also restrict who can view your follower list. People who want to follow you will have to send a follow request, giving you the power to accept or reject those requests based on your preferences.
- Stay aware of retweets: Although your tweets are protected, it’s important to note that if one of your approved followers retweets your protected tweet, it may be visible to their followers. Be mindful of this when sharing sensitive or confidential information.
- Regularly review and manage approved followers: As your Twitter network evolves, it’s essential to periodically review and remove followers who no longer align with your interests or values. This helps maintain a secure and trusted follower base.
- Communicate privately: When your tweets are protected, only approved followers can see your updates. This feature can encourage more private and intimate conversations, as well as foster a sense of exclusivity within your online community.
By protecting your tweets on Twitter, you have greater control over your online presence and ensure that your updates are seen only by the audience you choose. Take advantage of this feature to create a more private and personalized Twitter experience.
Control Your Followers
Having control over who can follow you on Twitter is crucial for maintaining a safe and desirable online environment. By managing your followers, you can ensure that your Twitter experience aligns with your preferences and objectives. Here are some tips to help you control your followers:
- Protect your account: Consider enabling tweet protection (as mentioned in the previous section) to ensure that only approved followers can view your tweets. This gives you the power to manage who can access your content.
- Approve follower requests: When your tweets are protected, users who want to follow you will need to send a follow request. Take the time to review these requests and accept or decline them based on your criteria. This way, you can have an engaged and relevant follower base.
- Block unwanted followers: If you encounter unwanted or abusive followers, you can choose to block them. Blocking someone prevents them from following you, viewing your tweets, and engaging with your account.
- Mute accounts: Twitter offers a “mute” feature that allows you to silence accounts without blocking them. By muting an account, you won’t see their tweets or notifications, and they won’t be notified about it. This can be helpful if you want to minimize interactions without completely severing the connection.
- Report abusive accounts: If you come across accounts that engage in harassment, spam, or other abusive behavior, report them to Twitter. This helps maintain a safe and supportive community for yourself and other users.
- Manage who sees your followers: If you prefer to keep your follower list private, you can change your settings to prevent others from viewing the accounts you follow and who follow you. This keeps your connections confidential and protects your privacy.
- Curate your follower base: As your Twitter presence evolves, periodically review your follower list and remove accounts that no longer align with your interests or goals. This helps maintain a relevant and engaged follower base and ensures that your content reaches the right audience.
- Utilize Twitter lists: Create custom lists to categorize your followers based on their interests, location, or any other relevant criteria. Lists facilitate easy navigation through your followers’ tweets and allow you to engage with specific groups of followers more effectively.
By implementing these strategies, you can take control of your Twitter followers and create a more enjoyable and secure online presence. Remember to regularly review and adjust your settings and connections to ensure that your Twitter experience remains positive and aligned with your goals.
Mute and Block Users
On Twitter, you have the ability to mute and block users to manage your online experience and protect yourself from unwanted interactions. Muting and blocking allow you to control the content you see and the people who can interact with you on the platform. Here’s how you can effectively use the mute and block features:
- Muting Users: If you’d like to temporarily hide a user’s tweets and notifications without unfollowing or blocking them, muting is the ideal option. Muting someone means their tweets will no longer appear in your timeline, mentions, or notifications.
- How to Mute: To mute a user, navigate to their Twitter profile, click the three-dot icon, and select “Mute @username”. You will no longer see their tweets, retweets, or replies in your timeline.
- Benefits of Muting: Muting allows you to have more control over your Twitter feed without severing connections or causing any confrontation. It can be useful in situations where you want to tone down the noise from certain users or topics temporarily.
- Blocking Users: When you block a user on Twitter, you completely restrict their ability to view your tweets, follow you, send you direct messages, or interact with your account in any way.
- How to Block: To block a user, go to their Twitter profile, click the three-dot icon, and select “Block @username”. By doing so, you prevent them from engaging with your account and protect yourself from any potential harassment or unwanted interactions.
- Benefits of Blocking: Blocking allows you to maintain a safe and comfortable online environment by preventing specific users from accessing your tweets and interacting with you. It is an effective way to distance yourself from trolls, spammers, or individuals who may pose a threat to your privacy or well-being.
- Review and Adjust Settings: It’s important to periodically review and adjust your mute and block lists as your Twitter experience evolves. This ensures that you are still protected and filtering out content that is not beneficial or enjoyable.
- Seek Support When Needed: If you encounter persistent harassment or threats on Twitter, it is recommended to reach out to the platform’s support team or seek help from trusted resources. Online safety should be a priority, and there are resources available to address any concerns you may have.
Muting and blocking users on Twitter can significantly enhance your online experience by allowing you to curate your feed and protect yourself from unwanted interactions. Take advantage of these features to create a space that aligns with your interests, values, and peace of mind.
Limit Photo Tagging
Photo tagging on Twitter can be a fun way to connect with others and share memorable moments. However, it’s important to have control over who can tag you in photos to maintain your privacy and ensure that you are only associated with content that you approve of. Here are some steps to limit photo tagging on Twitter:
- Access your settings: Log in to your Twitter account and click on your profile picture at the top right corner. From the dropdown menu, select “Settings and Privacy”.
- Navigate to the “Privacy and Safety” section: In the left-hand side menu, click on “Privacy and Safety”. This is where you can customize your privacy settings.
- Manage photo tagging: Scroll down to the “Tags” section. Here, you can choose who can tag you in photos. Twitter provides three options:
- Anyone: This allows anyone on Twitter to tag you in photos.
- People you follow: Only people you follow can tag you in photos.
- No one: This completely disables photo tagging, preventing anyone from tagging you in photos.
- Confirm tag requests: If you choose to allow people you follow to tag you in photos, Twitter gives you the option to review and approve or decline tag requests before they appear on your profile. This extra step provides you with more control over the content associated with your account.
- Monitor and manage tagged photos: Regularly check your tagged photos section on your profile. If you find any inappropriate or unwanted photos, you have the option to remove the tag or report the content to Twitter.
- Communicate your preferences: If there are specific individuals you don’t want to be tagged by, it’s helpful to communicate your tagging preferences to them directly. This can prevent any misunderstandings and ensure that your boundaries are respected.
- Stay aware of tagged photos by others: While you can control who tags you in photos, it’s important to remember that others can still find and tag you in their own photos. Regularly review your notifications and tagged photos to manage your online presence effectively.
By limiting photo tagging on Twitter, you can maintain control over the content associated with your account and protect your privacy. These steps will help ensure that you are only tagged in photos that align with your preferences and standards.
Disable Location Sharing
Sharing your location on Twitter can provide valuable context for your tweets and help you connect with others in specific geographical areas. However, it’s essential to consider the privacy implications of sharing your location data. By disabling location sharing, you have more control over the information you share with others. Here’s how to disable location sharing on Twitter:
- Access your settings: Log in to your Twitter account and click on your profile picture at the top right corner. From the dropdown menu, select “Settings and Privacy”.
- Navigate to the “Privacy and Safety” section: In the left-hand side menu, click on “Privacy and Safety”. This is where you can customize your privacy settings.
- Disable precise location: Scroll down to the “Safety” section and uncheck the box that says “Precise Location”. This ensures that Twitter does not track and share your exact location with others when posting tweets.
- Avoid geotagging in tweets: When composing a tweet, be mindful of whether you want to include your location. By default, Twitter may suggest adding your location to a tweet. Make sure to review and remove any geotags before posting, if you prefer not to disclose your specific whereabouts.
- Review third-party app permissions: If you’ve connected any third-party applications to your Twitter account, navigate to the “Data and Permissions” section to review and revoke any permissions related to location sharing. This helps ensure that your location information is not inadvertently shared through these apps.
- Consider the implications of sharing location: Before sharing your location on Twitter, evaluate the potential risks and benefits. It’s important to balance the desire for engagement and connection with maintaining your privacy and personal safety.
- Report concerns: If you come across any accounts or tweets that violate your privacy or make you uncomfortable regarding location sharing, report them to Twitter. This helps keep the platform safe for all users.
- Regularly review your settings: As your preferences and privacy concerns may evolve, it’s a good practice to periodically review and adjust your privacy settings on Twitter. This ensures that your location sharing choices align with your current needs.
By disabling location sharing on Twitter, you have greater control over the information you share and can protect your privacy. Use these steps to manage your location settings and make informed decisions about when, where, and with whom you share your whereabouts on the platform.
Remove Personal Information
Protecting your personal information on Twitter is essential for safeguarding your privacy and ensuring that only the desired details are shared with others. By removing personal information from your account, you can minimize the risk of identity theft, unwanted contact, and other privacy concerns. Here’s how you can remove personal information from your Twitter profile:
- Edit your profile: Log in to your Twitter account and go to your profile page. Click on the “Edit Profile” button to access your profile settings.
- Update your name: Consider using a pseudonym or username for your display name instead of your real name if you prefer to maintain a higher level of anonymity on Twitter.
- Remove personal details in bio: Review the information in your bio and remove any personal details, such as your address, phone number, or email address. Avoid sharing sensitive or private information that can compromise your security.
- Check your website link: If you have a website link in your profile, ensure that it doesn’t direct visitors to any personal accounts or sensitive information. Consider using a professional or informational website for the link.
- Review your tweets: Go through your past tweets and delete any posts that contain personal information. This includes any tweets that may disclose your location, plans, or sensitive details that you do not wish to share.
- Consider your profile picture: Evaluate if your profile picture reveals personal information or can be easily linked to your identity. Updating it to an image that doesn’t disclose personal details can add an extra layer of privacy.
- Protect your connected accounts: If you have linked your Twitter account to other social media platforms, review the privacy settings on those accounts as well. Remove any personal information that may have been shared and adjust the visibility of your posts accordingly.
- Review and revoke app permissions: Navigate to the “Data and Permissions” section in your Twitter settings and review the permissions granted to third-party apps. Revoke access for any apps that may have access to personal information.
- Stay updated on privacy policies: Regularly check Twitter’s privacy policy to stay informed about how your personal information is handled. Being aware of any changes in policies can help you make informed decisions about sharing personal details in the future.
- Monitor your privacy settings: Periodically review and adjust your privacy settings on Twitter. As your needs and preferences change, ensure that you maintain a level of privacy that aligns with your comfort level.
By removing personal information from your Twitter profile, you can protect your privacy and reduce the risk of unwanted exposure or identity theft. Prioritize your security by following these steps and regularly updating your privacy settings.
Review App Permissions
Granting permissions to third-party applications on Twitter can enhance your user experience and provide additional features. However, it’s important to regularly review and manage these app permissions to maintain control over your data and protect your privacy. Here’s how you can review and adjust app permissions on Twitter:
- Access your settings: Log in to your Twitter account and click on your profile picture at the top right corner. From the dropdown menu, select “Settings and Privacy”.
- Navigate to the “Data and Permissions” section: In the left-hand side menu, click on “Data and Permissions”. This is where you can view and manage the permissions granted to third-party apps.
- Review connected apps: You’ll see a list of all the third-party apps that have access to your Twitter account. Take the time to review each app and the permissions it has been granted.
- Assess app permissions: Evaluate the level of access each app has and consider whether it aligns with your preferences and needs. Some apps may require access to your account information or the ability to post on your behalf, while others may have more limited permissions.
- Revoke access for unnecessary or unused apps: If there are apps that you no longer use or feel uncomfortable with having access to your Twitter account, revoke their permissions. Click on the app’s name and select “Revoke access”.
- Research app privacy policies: If you’re uncertain about the security practices of a particular app, visit their website or read their privacy policy. Understanding how your data is collected, stored, and used can help you make informed decisions about granting permissions.
- Stay cautious with unfamiliar apps: Exercise caution when granting permissions to unfamiliar or newly-created apps. Consider the reputation and credibility of the app developer and ensure that their services are legitimate and secure.
- Regularly review and update permissions: It’s important to periodically review and adjust the permissions granted to third-party apps. As your needs and preferences change, you can modify these settings to align with your evolving requirements.
- Monitor app behavior: Keep an eye on how apps are using your Twitter data. If you notice any suspicious activity or feel that an app is misusing your information, report it to Twitter immediately.
By regularly reviewing and managing app permissions on Twitter, you can maintain control over your data, protect your privacy, and ensure the security of your Twitter account. Take the time to assess and adjust these permissions to align with your comfort level and data protection priorities.
Manage Linked Accounts
Linking your Twitter account to other social media platforms or third-party services can provide seamless integration and expanded functionality. However, it’s important to regularly review and manage your linked accounts to maintain control over your data and protect your privacy. Here are some tips for managing linked accounts on Twitter:
- Access your settings: Log in to your Twitter account and click on your profile picture at the top right corner. From the dropdown menu, select “Settings and Privacy”.
- Navigate to the “Data and Permissions” section: In the left-hand side menu, click on “Data and Permissions”. This is where you can view and manage the permissions granted to linked accounts.
- Review linked accounts: Take the time to review the list of accounts that are currently linked to your Twitter profile. This may include social media platforms, blogging websites, or other third-party services.
- Assess access permissions: Evaluate the level of access each linked account has to your Twitter data. Determine the data that is being shared between platforms and consider whether it aligns with your privacy preferences.
- Remove unnecessary or unused accounts: If there are linked accounts that you no longer use or trust, consider removing them from your Twitter profile. Click on the account’s name and select “Remove access” or a similar option.
- Regularly update permissions: As your usage and needs change, periodically review and update the permissions granted to linked accounts. Adjust the access levels and data sharing preferences based on your evolving requirements.
- Monitor account activity: Keep an eye on the activities and posts that are being shared through your linked accounts. If you notice any suspicious or unauthorized actions, take immediate action to protect your privacy and security.
- Review privacy policies: Familiarize yourself with the privacy policies of the services or platforms you have linked to your Twitter account. Understanding how your data is handled and protected can help you make informed decisions about maintaining or severing these connections.
- Be cautious with new account linkages: Exercise caution when linking new accounts to your Twitter profile. Research the security practices and credibility of the platform or service before granting access to your data.
- Consider the benefits and risks: Assess the benefits and risks associated with linking your Twitter account to other platforms. Determine whether the added functionality is worth the potential privacy implications.
By actively managing linked accounts on Twitter, you can maintain control over your data, protect your privacy, and ensure a safe and secure online experience. Regularly review and adjust these settings to align with your comfort level and data protection priorities.