
How POP Servers Work
POP (Post Office Protocol) servers are commonly used to retrieve and store emails on a remote server. When you set up a POP email account on your phone, it establishes a connection with the email server and downloads the messages to your device. This allows you to read, reply to, and manage your emails even when you are offline.
Unlike IMAP (Internet Message Access Protocol) servers, which synchronize your emails across multiple devices, POP servers usually delete the emails from the server after they are downloaded to your phone. This means that by default, your phone will not delete emails from the POP server automatically.
Understanding how POP servers work is crucial for effectively managing your emails. If you don’t manually delete emails from your phone or change the email account settings, your POP server can quickly become overwhelmed with messages, consuming valuable storage space and complicating your email management.
Fortunately, there are several options available to ensure that your phone deletes emails from POP servers, preventing inbox clutter and optimizing your email workflow.
The Importance of Deleting Emails from POP Servers
Deleting emails from POP servers is essential for maintaining an organized and efficient email system. Here’s why it’s important:
1. Free Up Storage Space: POP servers have limited storage capacity. If you don’t delete emails from the server, it can quickly fill up, leading to bounced emails and the inability to receive new messages. Regularly deleting emails from the server ensures that you have enough space for incoming emails.
2. Avoid Inbox Clutter: Leaving emails on the server can create a cluttered inbox, making it challenging to find important messages or identify new ones. Deleting unnecessary emails prevents inbox overload and allows you to focus on the emails that matter.
3. Enhance Security: Emails contain sensitive information, such as personal details or confidential business data. Leaving them on the server for an extended period increases the risk of unauthorized access or data breaches. Removing emails from the server minimizes these security risks.
4. Streamline Email Management: Deleting emails from both your phone and the POP server keeps your email accounts synchronized. With consistent email management, you can easily track conversations, respond promptly, and avoid confusion caused by multiple copies of the same email.
5. Optimize Performance: If your phone continuously retrieves emails from the server, it can impact battery life and slow down your device’s performance. By deleting emails from the server, you reduce the overhead of syncing large amounts of data, leading to improved performance and longer battery life.
Given the importance of deleting emails from POP servers, let’s explore two options to ensure that your phone removes emails from the server:
Option 1: Deleting Emails Manually from the Phone
If you prefer to have full control over which emails are deleted from the POP server, manually deleting them from your phone is a simple and effective option.
Here’s how you can manually delete emails from the phone:
- Open the email app on your phone.
- Navigate to the inbox or the folder where the emails are located.
- Swipe left or right on an individual email to reveal the delete button or tap on the checkbox beside multiple emails you want to delete.
- Tap on the delete button or the trash icon to remove the selected emails.
- Once deleted from your phone, the emails will also be removed from the POP server the next time your phone synchronizes with it.
Deleting emails manually gives you complete control over which emails are removed from the server. You can carefully review each message before deleting it and ensure that you don’t accidentally delete any important emails.
However, it’s important to note that manually deleting emails can be time-consuming, especially if you receive a high volume of emails. If you prefer a more automated approach, you can consider changing the email account settings to automatically delete emails from the POP server.
Option 2: Changing Email Account Settings
If you want a more automated approach for deleting emails from the POP server, you can change the email account settings on your phone. By configuring your email account to delete messages from the server after they are downloaded, you can save time and ensure that unnecessary emails are removed automatically.
Here’s how you can change the email account settings on both Android and iPhone:
Step-by-Step Guide: Changing Email Account Settings on Android
- Open the email app on your Android device.
- Go to the settings of your email app. This can usually be accessed by tapping on the three-line menu icon or the gear icon.
- Select your email account from the list of added accounts.
- Scroll down and look for the “Sync settings” or “Account settings” option.
- Tap on “Sync settings” or “Account settings” to access the synchronization settings for your email account.
- Locate the option that says “Delete email from server” or something similar.
- Make sure the option is checked or toggled on to enable the automatic deletion of emails from the server.
- Save the changes and exit the settings.
Step-by-Step Guide: Changing Email Account Settings on iPhone
- Open the Settings app on your iPhone.
- Scroll down and tap on “Mail.”
- Select your email account from the list of added accounts.
- Tap on “Account” or “Advanced Settings” (the exact wording may vary depending on your email provider).
- Look for the “Delete from Server” option and ensure that it is enabled or set to a desired timeframe (e.g., immediately, after one week, etc.).
- Save the changes and exit the settings.
By changing the email account settings to delete emails from the server, you can automate the process and ensure that your inbox remains clutter-free without the need for manual intervention.
Step-by-Step Guide: Deleting Emails Manually from the Phone
If you prefer to manually delete emails from your phone to ensure complete control, follow these simple steps:
- Unlock your phone and navigate to the email app or the app where your email account is set up.
- Open the app and log in to your email account using your username and password.
- Once you’re logged in, you will be directed to your email inbox.
- Scroll through your inbox to locate the email that you want to delete.
- Tap and hold on the email to select it. On some devices, you may need to swipe left or right on the email to reveal the delete option.
- Once the email is selected, you will see a menu of options appear at the bottom or top of the screen.
- Look for the “Delete” or trash icon and tap on it to delete the selected email. Alternatively, you may find an option like “Move to Trash.”
- If you want to delete multiple emails, tap on the checkboxes beside each email, and then tap on the delete or trash icon to remove them all at once.
- Repeat the process for any additional emails that you want to delete.
- Once you have deleted the emails from your phone, they will be moved to the trash or deleted items folder.
- To permanently delete the emails, you may need to empty the trash or deleted items folder. Look for an option like “Empty Trash” or “Delete All” and follow the prompts to remove the emails completely.
By following these step-by-step instructions, you can manually delete emails from your phone and keep your inbox neat and organized.
Step-by-Step Guide: Changing Email Account Settings on Android
If you want to automate the process of deleting emails from the POP server on your Android device, you can follow these step-by-step instructions to change the email account settings:
- Unlock your Android device and access the email app. This app may be pre-installed on your device or downloaded from the Google Play Store.
- Open the email app and locate the settings menu. The location of the settings may vary depending on the app you are using, but it is typically represented by a three-line menu icon or a gear icon.
- Once you have found the settings menu, tap on it to access the app’s settings.
- In the settings menu, look for the section that lists your added email accounts. This section may be labeled as “Accounts,” “Manage Accounts,” or something similar.
- Tap on the email account that you want to configure for automatic deletion of emails from the server.
- Within the account settings, scroll down until you find the synchronization settings. This section may be labeled as “Sync settings” or “Account settings.”
- Search for the option that mentions deleting emails from the server. It may be labeled as “Delete email from server,” “Remove messages from server,” or something similar.
- To enable the automatic deletion of emails, make sure the checkbox or toggle switch next to this option is selected or turned on.
- You may also have the option to choose a time frame for deleting emails from the server, such as immediately or after a specific number of days.
- Once you have made the desired changes to the account settings, tap on the “Save” or “Apply” button to save the changes and exit the settings menu.
Following these step-by-step instructions, you can easily change the email account settings on your Android device, allowing for the automatic removal of emails from the POP server.
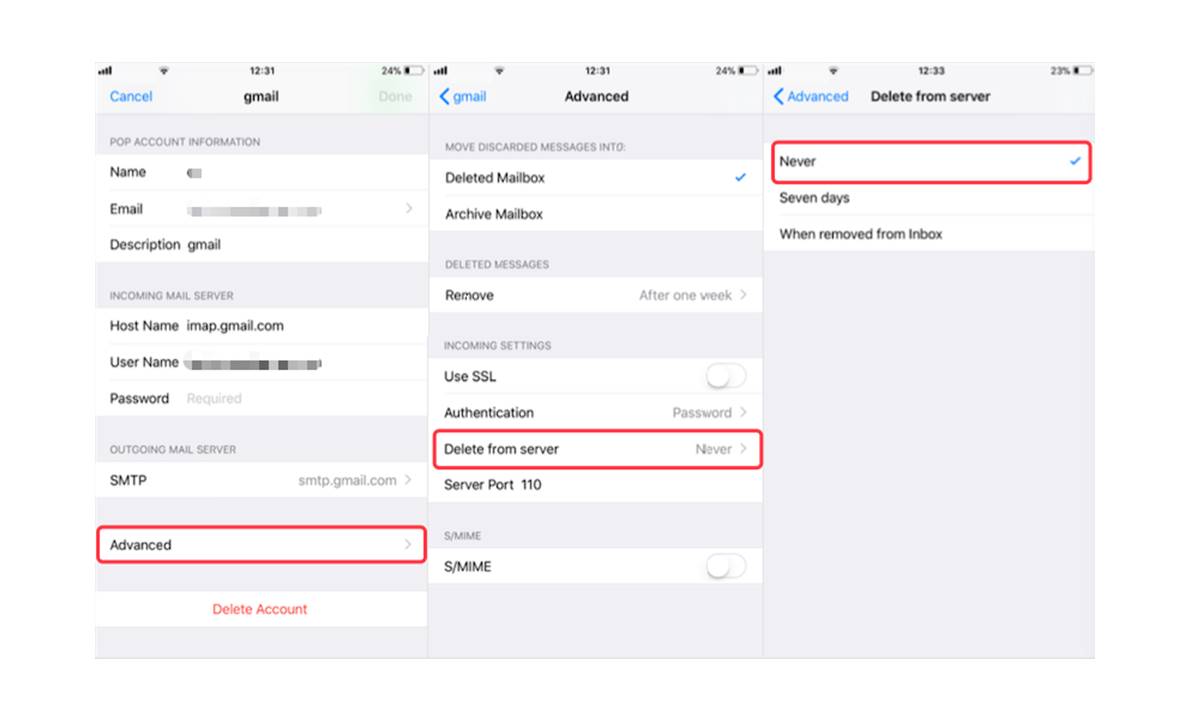
Step-by-Step Guide: Changing Email Account Settings on iPhone
If you’re using an iPhone and want to configure your email account settings to automatically delete emails from the POP server, follow these step-by-step instructions:
- Unlock your iPhone and locate the Settings app on your home screen. It is represented by a gray icon with gears.
- Tap on the Settings app to open it.
- Scroll down and look for the “Mail” option. It is usually represented by an envelope icon.
- Tap on “Mail” to access the email settings.
- Within the Mail settings, you will see a list of your added email accounts. Tap on the account for which you want to change the settings.
- In the account settings, scroll down and tap on “Account” or “Advanced Settings,” depending on the email provider and version of iOS you have.
- Look for the option labeled “Delete from Server” or something similar. Tap on it to open the delete settings.
- In the delete settings, you may have various options to choose from, such as “Immediately,” “After one week,” or “When removed from Inbox.” Select the desired option based on your preferences.
- Once you have selected the appropriate delete settings, tap on the back arrow or “Done” to save the changes and exit the account settings.
By following these step-by-step instructions, you can effortlessly change the email account settings on your iPhone, enabling the automatic deletion of emails from the POP server.
Troubleshooting: Common Issues and Solutions
While configuring your email account settings or manually deleting emails from your phone, you may encounter some common issues. Here are a few troubleshooting tips and solutions to help you overcome these challenges:
1. Emails Not Deleted from the Server: If you notice that emails are not being deleted from the POP server, ensure that you have correctly enabled the delete settings on your device. Double-check the account settings to ensure that the option to delete emails from the server is turned on. If the issue persists, try restarting your device or contacting your email service provider for assistance.
2. Deleted Emails Reappearing on the Phone: Sometimes, deleted emails may reappear in your inbox after a synchronization. This issue can occur if the POP server and your device are not properly synchronized. To resolve this, try manually syncing your email account or adjusting the sync frequency in the email app settings. You can also try removing and re-adding the email account to your device.
3. Unable to Access Account Settings: If you are unable to access the account settings to change the delete settings, ensure that you have the necessary permissions or administrative access for the email account. If you are using a work or corporate email account, reach out to your IT department or system administrator for assistance.
4. Deleted Emails Still Consuming Storage Space: In some cases, deleted emails may still occupy storage space on your device. This can happen if the deleted emails are moved to a trash or deleted items folder that is not automatically emptied. To free up storage space, manually empty the trash or deleted items folder in your email app. You can also adjust the settings to automatically empty the trash after a specified period.
5. Intermittent Synchronization Issues: If you experience intermittent synchronization issues between your device and the POP server, ensure that you have a stable internet connection. Check for any network issues or settings that could interfere with the synchronization process. Restarting your device or updating the email app to the latest version may also help resolve synchronization problems.
If you continue to encounter difficulties or have specific issues that are not addressed here, consider reaching out to customer support for your email service provider or seeking assistance from technical forums or online communities.
By troubleshooting common issues and applying the appropriate solutions, you can ensure a smooth and efficient email management experience on your phone.