
Why create a private story on Snapchat?
Snapchat is a popular social media platform that allows users to share photos and videos with friends and followers. While most of the content on Snapchat is meant to be shared with a wider audience, there are times when you may want to share something more private or exclusive. This is where the option of creating a private story on Snapchat can be beneficial.
Private stories on Snapchat offer a way to share moments and updates with a select group of people. Unlike regular snaps that disappear after a short period of time, private stories allow for a longer viewing time and give you more control over who sees your content. Whether it’s sharing special moments with close friends, organizing an event, or simply maintaining a more intimate circle, private stories can be a valuable tool for maintaining privacy and exclusivity.
One of the main advantages of creating a private story is the ability to share personal moments with a select group of individuals. This can be especially useful for sharing content that you may not want to share with all your followers. By creating a private story, you can ensure that only those who are included in the story can view and engage with your posts.
Furthermore, private stories offer a way to create a more personalized and exclusive experience for your closest friends or family members. You can use private stories to share updates, photos, and videos that are specifically tailored to this select group, creating a sense of intimacy and connection. It’s a great way to strengthen relationships and foster a closer sense of community.
Private stories also provide a space for organizing events or coordinating with a specific group of people. Whether it’s planning a surprise party, organizing a group outing, or sharing important updates with a team or organization, private stories allow for seamless communication and coordination. It eliminates the need for multiple messages or notifications and keeps everything in one central place.
Overall, creating a private story on Snapchat can enhance your social media experience by allowing for more control over your content and who sees it. Whether you want to share personal moments, create an exclusive experience, or organize and communicate with a select group, private stories offer a valuable feature in maintaining privacy, exclusivity, and intimate connections within your social circle.
Step 1: Open Snapchat
To create a private story on Snapchat, the first step is to open the Snapchat app on your mobile device. Ensure that you have the latest version of Snapchat installed to access all the latest features and updates.
If you already have the app installed, simply locate the Snapchat icon on your home screen or app drawer and tap on it to open the app. If you don’t have the app installed, you can download it from the App Store (for iOS users) or Google Play Store (for Android users).
Once you have opened Snapchat, you will be prompted to log in or sign up for an account, depending on whether you already have an existing account or not. If you have an account, enter your login credentials (username and password) and tap on the “Log In” button. If you don’t have an account, tap on the “Sign Up” button and follow the on-screen instructions to create a new Snapchat account.
After logging in or signing up, you will be taken to the Snapchat camera screen. This is the main screen where you can take photos and videos, apply filters and effects, and share them with your friends and followers. From this screen, you can access various features and settings, including the option to create a private story.
It’s important to note that Snapchat requires certain permissions, such as access to your camera and microphone, to function properly. Make sure to grant these permissions when prompted to ensure a seamless experience while using the app.
In addition to opening the Snapchat app, it’s also a good idea to ensure that you have a stable internet connection. Snapchat relies on an active internet connection to upload and share content, so make sure you are connected to Wi-Fi or have a sufficient mobile data plan.
Now that you have successfully opened Snapchat and ensured that you have the necessary permissions and a stable internet connection, you can proceed to the next step in creating your private story.
Step 2: Tap on your profile icon
After opening the Snapchat app, the next step in creating a private story is to tap on your profile icon. Your profile icon is located in the top left or top right corner of the Snapchat camera screen, depending on whether you are using an iPhone or Android device.
When you tap on your profile icon, it will open your Snapchat profile page. This page contains information about your account, including your Snapchat username, profile picture, and various settings and options.
On your profile page, you can view your Snap score, which is a measure of your Snapchat activity, as well as your Trophies, which are achievements you have unlocked on the platform. You can also access various options and features, such as your friends list, Snap Map, and settings.
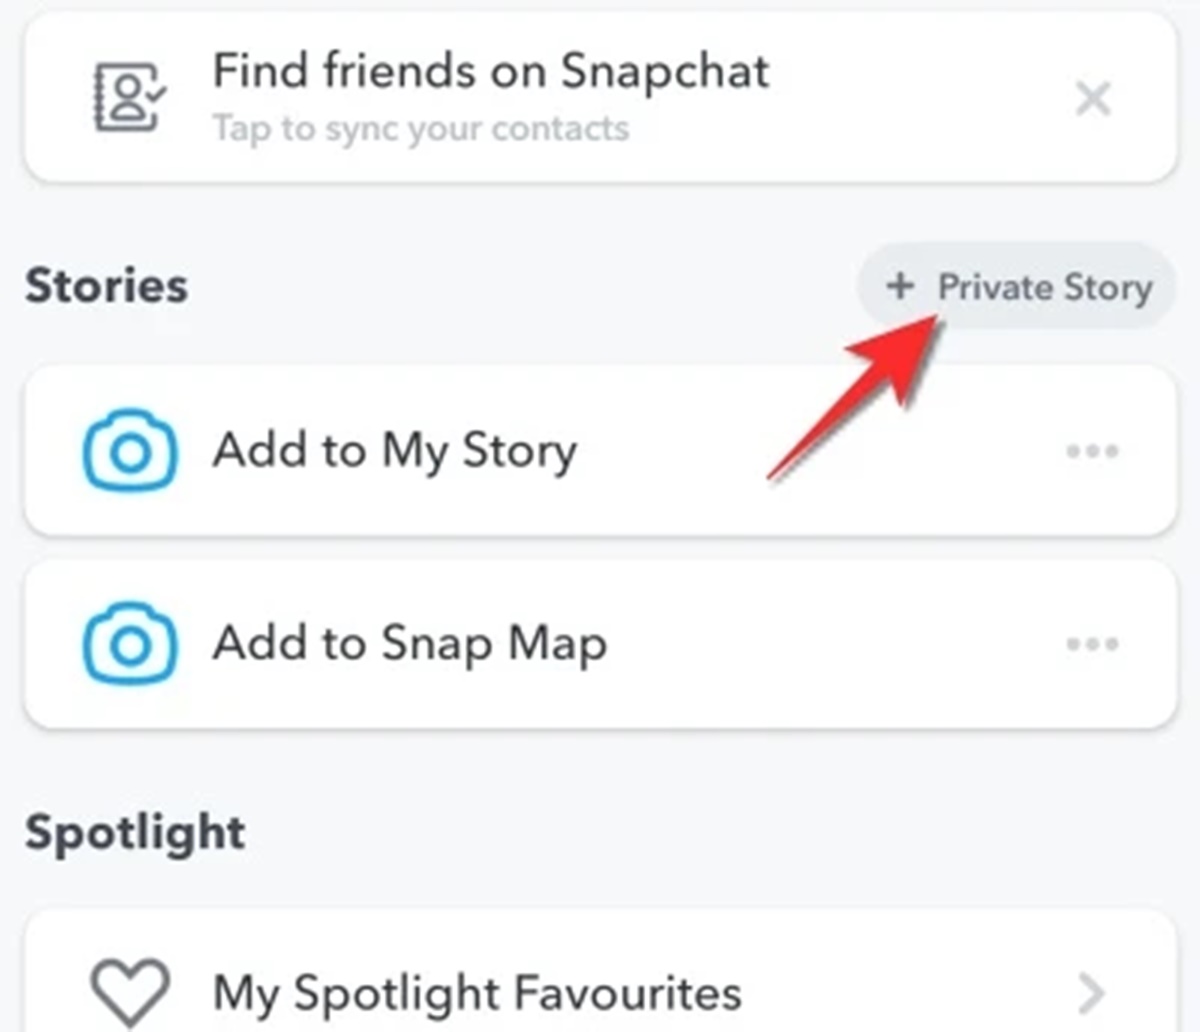
To create a private story, you need to access the private story feature, which is conveniently located on your profile page. Look for the “Private Story” button, which is usually located below your Snapcode or profile picture.
When you find the “Private Story” button, tap on it to enter the private story creation interface. This is where you can set up and customize your private story. The following steps will guide you through the process of creating your private story and customizing its settings.
It’s worth mentioning that if you don’t see the “Private Story” button on your profile page, it could be because you haven’t updated your Snapchat app to the latest version. Make sure to update the app to access all the latest features and options, including the private story feature.
Now that you have tapped on your profile icon and accessed the private story creation interface, you are ready to move on to the next step and give your private story a name.
Step 3: Click on the “Private Story” button
Once you have accessed the private story creation interface by tapping on your profile icon, the next step is to click on the “Private Story” button. This button is prominently displayed on your profile page, usually below your Snapcode or profile picture.
When you click on the “Private Story” button, it will open a new screen specifically designed for creating and managing your private story on Snapchat. This screen allows you to configure various settings and customize your private story according to your preferences.
Upon clicking the “Private Story” button, you will be prompted to give your private story a name. This name can be anything you choose, and it’s recommended to select a name that accurately represents the content or purpose of your private story.
Keep in mind that the name you choose will be visible to the friends you add to your private story, so make sure it is appropriate and clearly conveys the nature of the content they can expect to see. You can always change the name of your private story later if needed.
After providing a name for your private story, click on the “Create” button to confirm its creation. This will finalize the setup of your private story and make it available for you to start adding friends and posting content.
It’s important to note that once you create a private story on Snapchat, it will only be visible to the friends you have added to it. Other Snapchat users, including your followers, will not be able to see or access your private story unless they are specifically added as friends to it.
Additionally, the content you post to your private story will only be visible to those friends who have been granted access to it. This means that any photos or videos you share in your private story will remain private and exclusive to the selected group of friends.
Now that you have clicked on the “Private Story” button and given your private story a name, you can proceed to the next step: choosing who can view your private story.
Step 4: Give your private story a name
After clicking on the “Private Story” button and entering the private story creation interface on Snapchat, the next step is to give your private story a name. The name you choose will help you and your friends identify and remember the purpose or theme of the private story.
When prompted to give your private story a name, you can use your creativity to come up with a unique and descriptive title. Consider the content or subject matter that you plan to share in your private story and select a name that reflects it accurately.
For example, if you’re creating a private story to share memories from a vacation, you might choose a name like “Beach Adventures” or “Summer Getaway.” If your private story will revolve around a specific topic or interest, such as cooking or fitness, you can incorporate relevant keywords into the name.
It’s important to keep in mind that the name you choose for your private story will be visible to the friends you add to it. Therefore, it’s best to select a name that is appropriate and easily understood by your intended audience. Avoid using offensive or misleading names that could confuse or offend your friends.
Furthermore, it’s worth noting that you can always change the name of your private story later if you have a change of heart or if the content or purpose of the story evolves over time. Snapchat allows you to edit the name of your private story at any point, giving you flexibility and the ability to keep it relevant.
Once you have decided on a name for your private story, enter it into the provided text field. Make sure to double-check for any spelling errors or typos before confirming. Once you’re satisfied with the name, proceed by clicking the “Create” button to finalize the creation of your private story.
Now that your private story has been given a name, it’s time to move on to the next step: choosing who can view your private story. This will allow you to control the audience and ensure that only the intended recipients can access and engage with the content you share in your private story.
Step 5: Choose who can view your private story
After giving your private story a name, the next step is to choose who can view your private story on Snapchat. This step is crucial in maintaining the privacy and exclusivity of your content, ensuring that only your selected audience can access and engage with your private story.
When prompted to select the audience for your private story, Snapchat offers various options to customize the visibility settings. These options include:
- My Friends: By selecting this option, only the friends you have added on Snapchat will be able to view your private story.
- Custom: This option allows you to manually select specific friends who can view your private story. You can individually choose which friends to include or exclude from your private story.
- Remove Specific Friends: If you want to restrict certain friends from viewing your private story, you can use this option to remove them from your audience.
Choose the option that suits your preferences and privacy needs. If you want to keep your private story exclusive to a select group of friends, it’s recommended to opt for the “Custom” option. This way, you have full control over who can access your private story.
When selecting the “Custom” option, you will be presented with a list of your Snapchat friends. From this list, you can individually select or deselect friends to include or exclude them from your private story. This allows you to create a tailored and personalized experience for specific individuals.
Additionally, Snapchat offers an added layer of privacy control through the “Remove Specific Friends” option. This feature allows you to remove specific friends from your private story while still maintaining them as friends on Snapchat, ensuring that they do not have access to your private content.
It’s important to regularly review and update your audience settings for your private story. As your friendship dynamics change or your desire for exclusivity fluctuates, you may want to modify the list of friends who can view your private story. Snapchat provides a user-friendly interface that allows you to easily adjust your audience settings as needed.
Once you have chosen who can view your private story, continue to the next step: adding friends to your private story. This will enable you to populate your private story with the desired audience and start sharing exclusive content with them.
Step 6: Add friends to your private story
After setting the visibility settings for your private story on Snapchat, the next step is to add friends to your private story. Adding friends to your private story ensures that they can view the exclusive content you share and be a part of your private story audience.
To add friends to your private story, follow these simple steps:
- Open your private story by tapping on the “Private Story” button on your Snapchat profile page.
- On the private story screen, you will see the option to add friends. Tap on the “Add Friends” button.
- A list of your Snapchat friends will appear. Browse through the list and tap on the names of the friends you want to add to your private story.
- You can also use the search bar at the top of the screen to quickly find specific friends by typing their usernames or display names.
- Once you have selected the friends you want to add, tap on the “Done” button to confirm your selection.
- Voila! Your selected friends will now be added to your private story audience, and they will have access to the exclusive content you post in your private story.
It’s important to note that you can add or remove friends from your private story at any time. If you want to include additional friends or exclude specific individuals, simply follow the above steps and modify your audience as desired.
Furthermore, when you add friends to your private story, they will receive a notification informing them that they have been added. This allows them to stay informed and start viewing your private story content.
Remember, the purpose of a private story is to share exclusive and personal moments with a select group of friends. Be mindful of who you add to your private story and ensure that they are trusted individuals who will respect the privacy and confidentiality of the content you share.
Now that you have successfully added friends to your private story, you can move on to the next step: posting content to your private story. This will allow you to share photos and videos exclusively with your selected audience and engage them in your private story experience.
Step 7: Post content to your private story
Once you have created your private story on Snapchat and added friends to your audience, it’s time to start posting content to your private story. Posting content allows you to share photos and videos exclusively with the selected group of friends who are part of your private story.
To post content to your private story, follow these steps:
- Open the Snapchat app on your mobile device.
- On the Snapchat camera screen, create or capture a photo or video that you want to post to your private story.
- Once you have your desired content ready, tap on the “Send” button at the bottom right corner of the screen.
- A list of your Snapchat friends will appear. Look for the section labeled “Private Story” and tap on it.
- Confirm the selection by tapping on the “Send” button again. Your content will now be posted to your private story, visible only to the friends in your private story audience.
You can continue to create and post content to your private story as often as you like. Each time you post content, it will be visible to the friends who are part of your private story, and they will be able to view and engage with your posts.
It’s important to remember that the content you post to your private story will only be visible for a limited period of time. By default, Snapchat automatically removes content from a private story after 24 hours. This helps to keep your story fresh and encourages your friends to engage with it in a timely manner.
However, if you want to remove a specific post from your private story before the 24-hour expiration period, you can do so by following these steps:
- Open your private story by tapping on the “Private Story” button on your Snapchat profile page.
- Locate the post that you wish to remove.
- Swipe left on the post or tap on the three dots (…) next to it.
- Choose the option to delete or remove the post from your private story.
By regularly posting engaging and relevant content to your private story, you can ensure an active and interactive experience for your friends. It’s a fantastic way to share moments, updates, and exclusive content with a select group of individuals who are close to you.
Now that you know how to post content to your private story, it’s time to move on to the next step: customizing your private story. This will allow you to add personal touches and make your private story uniquely yours.
Step 8: Customize your private story
After you have started posting content to your private story on Snapchat, the next step is to customize your private story to reflect your personal style and preferences. Customization options allow you to add personal touches and make your private story uniquely yours.
Here are some ways you can customize your private story:
- Add captions: When posting a photo or video, you can add captions to provide context or engage your audience. Tap on the “T” icon to access the text input and type in your desired caption. You can also adjust the size, font, and color of the text to make it stand out.
- Apply filters and lenses: Snapchat offers a wide range of fun filters and interactive lenses that you can apply to your photos and videos. From face-altering effects to location-specific filters, these tools allow you to add creativity and personality to your private story content.
- Include stickers and emojis: Stickers and emojis are a fun and expressive way to enhance your private story. Snapchat provides a vast library of stickers and emojis that you can use to add some flair or convey a specific mood or theme.
- Draw or doodle: If you have a creative streak, you can use the drawing tool to add your own artistic touch to photos and videos. Choose different colors and brush sizes to create doodles, sketches, or annotations directly on your content.
- Add links: Snapchat now allows users to add links to their stories. This feature, known as “Paperclip,” enables you to attach a URL that friends can swipe up on to access external content, such as a website, article, or video.
- Change the display duration: By default, Snapchat sets the display duration of your private story snaps to around 3-7 seconds per snap. However, you have the option to extend or shorten the display duration. Tap on the stopwatch icon at the bottom left corner of the screen to adjust the duration as desired.
Customizing your private story adds a personal touch and allows you to express yourself creatively. Experiment with different features and options to find the perfect combination that suits your style and the content you want to share.
Remember, while customizing your private story can be fun and engaging, it’s essential to stay true to yourself and your intended audience. Ensure that any customization choices are appropriate, relevant, and align with the purpose and tone of your private story.
Now that you have customized your private story, it’s time to move on to the next step: viewing and managing your private story. This will allow you to monitor engagement, interact with your friends, and make any necessary adjustments to your private story as needed.
Step 9: View and manage your private story
After creating and customizing your private story on Snapchat, the next step is to view and manage your private story. This step allows you to monitor engagement, interact with your friends, and make any necessary adjustments to your private story as needed.
Here’s how you can view and manage your private story:
- To view your private story, tap on the “Private Story” button on your Snapchat profile page. This will take you to the private story screen where you can see all the content you have posted.
- Swipe left or right to navigate through the different snaps in your private story.
- You can see how many of your friends have viewed each snap by looking at the eye icon at the bottom left corner of the screen. Tap on the eye icon to view the list of friends who have seen your snap.
- To manage your private story, tap on the three dots (…) at the bottom right corner of the screen. This will open a menu with various options.
- From the menu, you can choose to delete specific snaps from your private story or delete the entire private story altogether.
- If you want to edit the audience or visibility settings of your private story, you can do so by tapping on the “Customize Audience” option in the same menu.
- Additionally, you can also save specific snaps from your private story to your Memories or download them to your device.
- Interact with your friends by replying to their messages or comments on your private story. Tap on the chat icon at the bottom left corner of the screen to access the conversation.
Regularly checking the engagement and reactions to your private story can provide valuable insights into the content that resonates with your friends. It allows you to gauge their response and make updates or adjustments to your future posts accordingly.
Furthermore, managing your private story gives you the ability to maintain the integrity and exclusivity of your content. You can ensure that only the intended friends have access to your private story and adjust the audience settings as desired.
Remember, your private story is a unique space for sharing personal moments and connecting with your closest friends. It’s important to respect the privacy and confidentiality of the content shared within this story, and to create a safe and enjoyable experience for yourself and your friends.
Now that you are familiar with how to view and manage your private story, it’s time to move on to the final step: removing friends or deleting your private story. This will allow you to make any necessary changes to your audience or bring your private story journey to a close if needed.
Step 10: Remove friends or delete your private story
As you continue to use and manage your private story on Snapchat, there may come a time when you need to remove friends from your audience or delete your private story altogether. This final step allows you to make any necessary changes to your audience or bring your private story journey to a close if needed.
Here are the options available to remove friends or delete your private story:
- To remove a friend from your private story, open your private story and tap on the three dots (…) at the bottom right corner of the screen to access the menu.
- From the menu options, select “Customize Audience.” This will open the list of friends who are currently part of your private story audience.
- To remove a friend, simply tap on their name to deselect them. This will exclude them from viewing your future private story posts.
- If you want to delete your entire private story, go to your profile page, tap on the “Private Story” button, and then tap on the three dots (…) at the bottom right corner of the screen.
- From the menu options, choose “Delete Private Story.” Confirm your decision, and your private story will be permanently deleted.
Removing friends from your private story allows you to update your audience and maintain the exclusivity of your content. It ensures that only the friends you desire have access to your private story, and allows you to curate the experience according to your preferences.
Deleting your private story should be done deliberately if you no longer wish to continue sharing content with your selected audience. Once deleted, the private story and all its content will be permanently removed, and you will not be able to retrieve them.
It’s important to regularly review your private story audience and make adjustments as needed. Relationships and dynamics can change, and you may want to add new friends or remove certain individuals from your private story to align with your current preferences.
By actively managing your private story and taking control of your audience, you can ensure that the private and exclusive nature of your content is preserved, and that you continue to share moments with those who matter most to you.
Congratulations! You have completed all the steps to create and manage a private story on Snapchat. Now, go ahead and enjoy the experience of sharing private, exclusive, and special content with your chosen group of friends!