
Step 1: Connect the external monitor to your MacBook
Adding an external monitor to your MacBook can greatly enhance your productivity and multitasking capabilities. Whether you’re a designer, developer, or simply someone who needs more screen real estate, setting up an additional monitor is a straightforward process. Follow these steps to connect the external monitor to your MacBook:
- Check the port compatibility: Before purchasing an external monitor, ensure that it is compatible with your MacBook’s available ports. MacBooks are equipped with different types of ports, such as Thunderbolt 3 (USB-C), HDMI, or Mini DisplayPort. Make sure the monitor you choose has the corresponding input port. If needed, you can acquire a compatible adapter for your MacBook.
- Power off your MacBook: Before connecting the external monitor, power off your MacBook. This prevents any potential damage to the monitor or your MacBook’s display ports. It’s always a good practice to turn off devices before making connections.
- Connect the monitor: Take the appropriate cable or adapter and connect one end to your MacBook’s display port and the other end to the monitor’s corresponding input port. Ensure that the connections are secure.
- Power on the monitor: Once the connections are made, power on the monitor. Most monitors have a dedicated power button. Make sure the monitor receives power from an electrical outlet.
- Power on your MacBook: After the monitor is powered on, turn on your MacBook. Wait for it to boot up completely.
- Detect the external monitor: Your MacBook should automatically detect the connected monitor and enable it as an extended display. If the monitor doesn’t activate automatically, navigate to “System Preferences” and select “Displays.” Click on the “Detect Displays” button, and your MacBook should recognize the external monitor.
By following these steps, you will successfully connect the external monitor to your MacBook. Once connected, you can enjoy the benefits of a larger screen and enhanced multitasking capabilities. The next step is to configure the monitor settings on your MacBook to ensure optimal display performance and usability.
Step 2: Adjust the monitor settings on your MacBook
After connecting the external monitor to your MacBook, it’s important to adjust the monitor settings to ensure optimal display performance and usability. Follow these steps to adjust the monitor settings on your MacBook:
- Access the display settings: Click on the Apple menu on the top-left corner of your screen and select “System Preferences.” From the System Preferences window, choose “Displays.”
- Arrangement and position: In the Display settings, you’ll see a tab labeled “Arrangement.” This tab allows you to arrange the external monitor in relation to your MacBook’s built-in display. You can drag and arrange the display icons to represent the physical arrangement of your monitors. This ensures that the cursor moves seamlessly between the displays.
- Resolution and refresh rate: Under the “Display” tab, you can adjust the resolution of the external monitor. Select the desired resolution from the available options. It’s recommended to choose the native resolution of the monitor for the best image quality. Additionally, if your monitor supports different refresh rates, you can select the appropriate refresh rate for smoother motion.
- Color calibration: If you require color accuracy for tasks like photo editing or graphic design, you can calibrate the colors of your external monitor. Under the “Color” tab, click on the “Calibrate” button to start the color calibration process. Follow the on-screen instructions to calibrate the colors accurately.
- Rotation: Some monitors support rotation, allowing you to switch between landscape and portrait orientations. If you prefer using the monitor in a portrait mode, navigate to the Display settings and select the appropriate rotation option.
- Other settings: Depending on the monitor and your specific requirements, you may have additional settings available, such as brightness, contrast, and aspect ratio adjustments. Explore the settings and make any necessary modifications to suit your preferences.
By adjusting these monitor settings, you can optimize the display performance and ensure a comfortable working environment on your MacBook. Take the time to experiment with different settings to find the configuration that works best for you. With the monitor properly adjusted, you’re ready to move on to the next step of configuring the display preferences on your MacBook.
Step 3: Configure the display preferences
Configuring the display preferences on your MacBook is essential for customizing how your external monitor interacts with your MacBook’s built-in display. Follow these steps to configure the display preferences:
- Access the display preferences: Click on the Apple menu on the top-left corner of your screen and select “System Preferences.” From the System Preferences window, choose “Displays.”
- Display mode: In the Display settings, navigate to the “Display” tab. Here, you can select the display mode for your external monitor. You have two options: Mirror Displays and Extend Desktop. Mirror Displays duplicates the same content on both screens, while Extend Desktop provides an extended workspace across multiple monitors.
- Menu bar placement: By default, the menu bar appears on your MacBook’s built-in display. However, if you prefer having the menu bar on your external monitor, you can drag and drop the white menu bar from the built-in display to the external monitor in the Arrangement tab. This can be useful if you predominantly use the external monitor as your main workspace.
- Dock placement: Similarly, you can choose the location of the Dock on your external monitor. In the Displays preferences, go to the “Arrangement” tab and click and drag the small white bar representing the Dock to the desired monitor. This allows you to access the Dock directly from your external monitor.
- Hot corners: Hot corners are a convenient way to access certain functions on your MacBook. In the Displays preferences, go to the “Displays” tab and click on the “Hot Corners” button. Here, you can assign various actions to each corner of your external monitor, such as launching Mission Control, activating the screensaver, or showing the desktop.
- Night Shift: If your MacBook and external monitor support Night Shift, you can enable this feature to reduce blue light emissions during evening hours. In the Displays preferences, switch to the “Night Shift” tab and set the schedule and intensity of the color shift.
By configuring the display preferences, you can personalize the behavior and functionality of your external monitor according to your preferences. Whether you prefer an extended desktop setup with a separate workspace on each monitor or a mirrored display for presentations, adjusting these preferences allows you to streamline your workflow. Take your time to explore the options and make the necessary adjustments for an optimal dual-monitor experience.
Step 4: Set the external monitor as the main display
If you prefer to use the external monitor as your main display on your MacBook, you can easily set it as the primary screen. This means that all your applications, desktop icons, and menus will appear on the external monitor by default. Follow these steps to set the external monitor as the main display:
- Access the display preferences: Click on the Apple menu on the top-left corner of your screen and select “System Preferences.” From the System Preferences window, choose “Displays.”
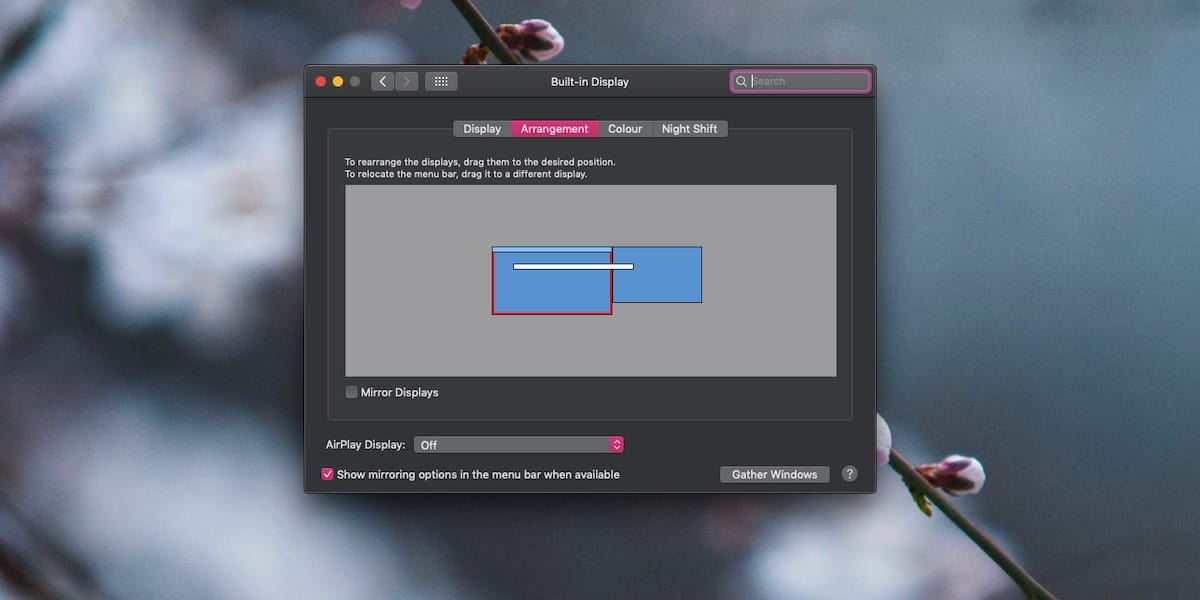
- Arrange the displays: In the Display settings, navigate to the “Arrangement” tab. You should see a graphic representation of your displays, with the external monitor marked as a separate display.
- Drag the menu bar: In the Arrangement tab, click and drag the white menu bar from your MacBook’s display to the external monitor’s graphic representation. This action physically moves the menu bar to the external monitor.
- Set as main display: With the menu bar now on the external monitor, your MacBook recognizes it as the main display. This means that new windows and applications will open on the external monitor, and the dock will be displayed there as well.
- Adjust other settings: You may also want to configure other settings, such as the Dock placement and the position of the screen icons. Depending on your preferences, you can customize the look and feel of the external monitor to suit your needs.
By setting the external monitor as the main display, you can enjoy the benefits of a larger workspace and improved productivity. This configuration is particularly useful when you use your MacBook with a docking station or as a workstation setup. Remember that you can always switch back to the built-in display as your main screen by reversing the steps outlined above.
Step 5: Customize the display layout and arrangement
Customizing the display layout and arrangement allows you to fine-tune the positioning and behavior of your external monitor in relation to your MacBook’s built-in display. By configuring these settings, you can create a seamless and efficient dual-monitor setup. Follow these steps to customize the display layout and arrangement:
- Access the display preferences: Click on the Apple menu on the top-left corner of your screen and select “System Preferences.” From the System Preferences window, choose “Displays.”
- Arrange the displays: In the Display settings, navigate to the “Arrangement” tab. Here you will see a graphical representation of your displays. You can see the main display indicated by a white menu bar and a blue outline. The external monitor(s) will be represented by a separate display icon.
- Drag and position the displays: Click and drag the display icons in the graphical representation to adjust their relative positions. This allows you to physically align the displays according to their physical placement in your workspace.
- Align display edges: If the displays have differing resolutions or sizes, you may want to align their edges for a more seamless transition when moving the cursor between screens. Hold down the Shift key while dragging the display icons to snap them to the same horizontal or vertical alignment.
- Set rotation: If you have rotated your external monitor or prefer a specific orientation, you can set its rotation in the Arrangement tab. Choose either landscape or portrait mode based on your preferences.
- Set preferences for individual displays: To customize the behavior of each individual display, select the display icon in the Arrangement tab. You can adjust the resolution, scaling, and other display-specific settings. This is particularly useful when dealing with displays of different sizes or aspect ratios.
- Enable or disable mirroring: If you prefer to mirror the contents of your MacBook’s built-in display onto the external monitor, check the “Mirror Displays” option in the Display settings. However, if you want to extend your desktop across multiple monitors, ensure that the option is unchecked.
By customizing the display layout and arrangement, you can create a dual-monitor setup that suits your specific needs and preferences. Whether you require a side-by-side configuration, an extended workspace, or a combination of different orientations, take the time to adjust these settings to optimize your productivity and workflow.
Step 6: Optimize the resolution and scaling options
Optimizing the resolution and scaling options for your external monitor is crucial to ensure the best visual experience and readability. By adjusting these settings, you can make sure that the content on your dual-monitor setup appears crisp, clear, and properly proportioned. Follow these steps to optimize the resolution and scaling options:
- Access the display preferences: Click on the Apple menu on the top-left corner of your screen and select “System Preferences.” From the System Preferences window, choose “Displays.”
- Choose the external monitor: In the Display settings, select the external monitor from the list of available displays. This allows you to modify the resolution and scaling options specifically for the external monitor.
- Adjust the resolution: In the “Display” tab, you can modify the resolution of the external monitor. Choose the resolution that provides the best balance between sharpness and readability. Generally, it is recommended to select the native resolution of the monitor for optimal image quality.
- Set the scaling: Scaling determines the size of the content displayed on the external monitor. In the “Display” tab, you will find the scaling options. Choose the scaling option that suits your preference and provides the most comfortable viewing experience. You can also experiment with different scaling settings to find the one that best suits your needs.
- HiDPI mode: Some external monitors support HiDPI mode, also known as Retina mode, which allows for higher pixel density and crisper images. If your monitor supports this feature, enable it in the Display settings to enhance the visual quality of the display.
- Text size: In addition to the resolution and scaling options, you may want to adjust the text size to ensure legibility on your external monitor. Go to the “Displays” tab and click on the “Text” tab to modify the text size settings. Increase or decrease the text size until it is comfortable for your eyes.
By optimizing the resolution and scaling options, you can ensure that the content on your external monitor appears clear, sharp, and properly sized. Take the time to adjust these settings according to your preferences and requirements, ensuring a visually pleasing and comfortable dual-monitor experience on your MacBook.
Step 7: Use additional features and settings to enhance the display
In addition to the basic display settings, there are several additional features and settings that you can utilize to enhance the display experience on your external monitor. By taking advantage of these options, you can further optimize the visual quality and usability of your dual-monitor setup. Follow these steps to utilize additional features and settings:
- Night Shift: Night Shift is a feature that adjusts the color temperature of your display to reduce the amount of blue light emitted. This can help reduce eye strain and improve sleep quality. Enable Night Shift in the Display settings by navigating to the “Night Shift” tab.
- True Tone: If your MacBook and external monitor support True Tone, this feature automatically adjusts the color temperature of your display based on ambient lighting conditions. Enable True Tone in the Display settings by navigating to the “Displays” tab and selecting the option if available.
- Accessibility settings: macOS offers a range of accessibility settings that can enhance the display experience for users with visual impairments. Navigate to the Accessibility settings in System Preferences and explore options such as Zoom, Display accommodations, and Contrast settings to make the display more accessible.
- Night mode in apps: Many apps, including web browsers, support a night mode or dark theme option. Enabling this feature can help reduce eye strain, especially when working in low-light environments. Check the settings within individual apps to see if a night mode or dark theme is available.
- Use color profiles: If color accuracy is crucial for your work, consider using custom color profiles for your external monitor. You can create or download color profiles that ensure more accurate color reproduction. Install the color profile in the Display settings under the “Color” tab.
- Configure energy-saving settings: Adjusting energy-saving settings can help extend the battery life of your MacBook and reduce power consumption. Navigate to the Energy Saver settings in System Preferences and configure options such as display sleep and computer sleep timings to optimize energy usage.
By utilizing these additional features and settings, you can enhance the display experience on your external monitor. Consider your personal preferences and requirements to determine which options are most beneficial to you. Experiment with different settings to find the configuration that provides the best visual quality, usability, and power efficiency for your dual-monitor setup.
Step 8: Troubleshooting common issues and problems
While setting up and using an external monitor with your MacBook is usually straightforward, you may encounter some common issues or problems along the way. It’s important to be aware of these potential challenges and know how to troubleshoot them. Here are some common issues and troubleshooting steps:
- No display on the external monitor: If the external monitor isn’t displaying anything, double-check that all cables and connections are secure. Try disconnecting and reconnecting the cables, ensuring they are firmly plugged in. Also, confirm that the monitor is powered on and set to the correct input source.
- Black bars on the external monitor: If you notice black bars around the edges of the external monitor’s display, it could be due to a mismatch in the aspect ratios between the monitor and your MacBook’s display settings. Adjust the resolution and scaling options in the Display settings to resolve this issue.
- Resolution not available: If the desired resolution for your external monitor is not available in the Display settings, it could indicate an issue with compatibility. Ensure that your monitor supports the desired resolution, and check for any software updates for both your MacBook and the monitor.
- Display flickering or artifacts: If you experience flickering or visual artifacts on the external monitor, it may be due to a faulty cable or a problem with the display drivers. Try using a different cable or adapter to see if the issue is resolved. Additionally, update your MacBook’s display drivers to the latest version.
- Cursor not moving between displays: If the cursor is not moving smoothly between your MacBook’s built-in display and the external monitor, check the arrangement settings in the Display preferences. Ensure that the displays are properly aligned, and try rearranging them if necessary.
- Poor color accuracy: If you notice that the colors on the external monitor seem inaccurate or washed out, it may be due to incorrect color calibration. Use the color calibration options in the Display preferences to calibrate the monitor’s colors accurately. Alternatively, consider using a color profile specific to your monitor for improved color accuracy.
- Audio not working on the monitor: If you’re using the external monitor’s built-in speakers and there is no audio, make sure the monitor is selected as the audio output device in the Sound settings. Additionally, check the connections and ensure that the monitor’s volume is not muted.
By following these troubleshooting steps, you can often resolve common issues and problems encountered when using an external monitor with your MacBook. If you’re still experiencing difficulties, consult the user manual for your monitor or seek support from the manufacturer. With persistence and troubleshooting, you can overcome obstacles and enjoy a smooth and productive dual-monitor setup.
Step 9: Tips for using the main display on your MacBook
While setting up an external monitor as the main display on your MacBook can provide numerous benefits, it’s important to utilize the main display effectively for optimal productivity. Here are some helpful tips for using the main display on your MacBook:
- Organize your desktop: Take advantage of the increased screen real estate by keeping your desktop clean and organized. Use folders, labels, and a logical file structure to easily locate and access your files.
- Utilize Spaces or Mission Control: macOS offers features like Spaces or Mission Control that allow you to create separate virtual desktops. Use these features to group related applications and tasks, keeping the main display clutter-free.
- Maximize screen space: Optimize the use of your main display by maximizing windows or utilizing fullscreen mode for applications that require your full attention. This maximizes the usable screen space, allowing you to focus on the task at hand.
- Use multiple desktops: If you have a large number of open applications, consider using multiple desktops. This allows you to dedicate one desktop to specific tasks or projects, making it easier to switch between different work contexts.
- Take advantage of gestures: macOS offers a variety of trackpad and gesture controls. Familiarize yourself with these gestures to navigate between applications, switch between desktops, and perform other actions more efficiently.
- Customize keyboard shortcuts: Customize keyboard shortcuts to streamline your workflow on the main display. Assign shortcuts for common actions or frequently used applications to save time and increase productivity.
- Use external accessories: Enhance your main display experience by connecting external accessories like a keyboard, mouse, or trackpad. These accessories can improve comfort and productivity, especially during extended work sessions.
- Utilize split-screen mode: macOS allows you to split the screen between two applications side by side. This can be useful for comparing information, referencing multiple documents simultaneously, or multitasking efficiently.
- Take breaks: Remember to take regular breaks to rest your eyes and prevent eye strain. Long periods of staring at a screen can cause fatigue and discomfort. Use apps or timers to remind yourself to take short breaks and look away from the screen.
By implementing these tips, you can make the most of your main display on your MacBook. Utilize the additional screen space, customize settings, and adopt efficient workflows to enhance productivity and create an enjoyable working environment.