
Understanding MacBook Storage
Before diving into how to check your MacBook storage, it’s important to have a basic understanding of what it entails. MacBook storage refers to the amount of space available on your device to store files, applications, and operating system data.
MacBooks typically come with solid-state drives (SSDs), which offer faster performance and better durability compared to traditional hard disk drives (HDDs). SSDs have become increasingly popular due to their speed and efficiency.
MacBook storage is divided into two categories: internal storage and external storage. Internal storage refers to the built-in SSD or HDD that comes with your MacBook, while external storage allows you to expand your storage capacity using options like external hard drives or cloud storage services.
It’s worth noting that macOS system files and pre-installed applications take up a certain amount of space on your MacBook’s internal storage. This means that the actual available storage may be less than the total capacity advertised by Apple.
Understanding your MacBook’s storage capacity is crucial because it affects your device’s performance and limits the number of files and applications you can store. Regularly checking your storage and optimizing it can help you maintain an efficient and clutter-free MacBook.
Now that you have a basic understanding of MacBook storage, let’s explore different methods to check the available storage on macOS.
Checking Available Storage on macOS
Knowing how to check the available storage on your macOS helps you keep track of your MacBook’s storage usage and make informed decisions on managing your files. Fortunately, macOS provides several built-in methods to check your MacBook’s storage.
Here are some ways to check your available storage:
- Using the “About This Mac” feature: Click on the Apple menu in the top-left corner of your screen and select “About This Mac.” In the Overview tab, you’ll see a summary of your MacBook, including the available storage.
- Viewing storage usage with Finder: Open a Finder window and select “Preferences” from the Finder menu. Then, click on the “Sidebar” tab and check the box next to “Hard disks” under “Devices.” Now, you can see your storage devices in the sidebar of the Finder window, along with a continuously updating bar indicating the storage usage.
- Checking storage in the System Information app: To access the System Information app, click on the Apple menu, select “About This Mac,” and then click on the “System Report” button. In the left sidebar, under the “Hardware” section, click on “Storage.” You’ll find detailed information about your internal and external storage devices, including the available space.
- Using Disk Utility to check storage: Open the Disk Utility app, which you can find in the Utilities folder within the Applications folder. In the left sidebar, select your MacBook’s storage device. The bottom section of the app will display information about your device, including the available and used space.
- Analyzing storage with third-party apps: There are numerous third-party applications available that offer more advanced storage analysis features. Some popular choices include DaisyDisk, GrandPerspective, and OmniDiskSweeper. These apps provide visual representations of your storage usage and detailed insights to help you identify and delete unnecessary files.
By utilizing these methods, you can easily keep track of your MacBook’s storage and take necessary actions to optimize it. Regularly reviewing your storage usage will prevent your MacBook from becoming cluttered and ensure that you have enough space for your files and applications.
Using the “About This Mac” Feature
One of the easiest ways to check your available storage on a MacBook is by using the built-in “About This Mac” feature. This feature provides a quick overview of your MacBook’s specifications, including the storage capacity and available space.
Here’s how to use the “About This Mac” feature:
- Click on the Apple menu icon () located at the top-left corner of your screen.
- Select “About This Mac” from the drop-down menu. A new window will open.
- In the Overview tab, you will see the basic details of your MacBook, including the processor, memory, and the macOS version you’re running.
- To check your storage, click on the “Storage” tab.
- A graphical representation of your storage will be displayed, along with a breakdown of the different categories of files taking up space.
- Underneath the graph, you will find information about the total storage capacity and the amount of space currently available on your MacBook.
This feature allows you to quickly assess your available storage without needing to navigate through multiple menus or settings.
Additionally, you can click on the “Manage” button to launch the Storage Management tool, which provides more detailed insights into how your storage is being used. Here, you can review recommendations for optimizing storage and delete unnecessary files to free up space.
It’s worth noting that the “About This Mac” feature provides a high-level overview of your storage usage. For a more detailed analysis and to identify specific files or folders consuming significant space, you may want to explore other methods like using the Finder, Disk Utility, or third-party apps.
Now that you know how to use the “About This Mac” feature, you can easily check your MacBook’s available storage and take appropriate actions to manage your files and optimize your device’s performance.
Viewing Storage Usage with Finder
The Finder app on your MacBook provides a convenient way to not only navigate through files and folders but also view storage usage at a glance. By enabling a specific setting, you can see a continuously updating bar indicating the storage usage of your MacBook.
Here’s how to view storage usage with Finder:
- Open a Finder window by clicking on the blue icon in your Dock or by pressing Command + N.
- Click on the “Finder” menu at the top left of the screen, and then select “Preferences.”
- In the Preferences window, click on the “Sidebar” tab.
- Scroll down and check the box next to “Hard disks” under the “Devices” section.
- Close the Preferences window.
Now, when you open a Finder window, you will see your storage devices, including your MacBook’s internal storage, listed in the sidebar. Adjacent to each device, there is a continuously updating colored bar that represents the space utilization.
The green portion of the bar indicates the available space, while the colored portion represents the used space. You can hover your mouse cursor over the bar to get a tooltip displaying the exact amount of used and available space.
This feature allows you to get a quick visual overview of your MacBook’s storage usage directly within the Finder app. It’s especially handy for keeping track of your storage while browsing through files and folders.
In addition to the colored bar, you can also right-click on a storage device in the sidebar and select “Get Info” to view more detailed information about the storage capacity, available space, and other attributes related to the device.
While viewing storage usage with Finder is helpful, it only provides a general overview. If you need more specific details about your storage or want to analyze the size of individual files and folders, you might consider using other methods like the “About This Mac” feature, Disk Utility, or third-party apps.
By utilizing the storage usage visualizer in Finder, you can easily keep track of your MacBook’s storage usage and make informed decisions about organizing and managing your files.
Checking Storage in the System Information App
The System Information app provides in-depth details about the hardware and software of your MacBook, including the storage devices and their respective capacities. By accessing the Storage section in the System Information app, you can obtain comprehensive information about your internal and external storage devices and their available space.
Here’s how to check your storage in the System Information app:
- Click on the Apple menu () at the top-left corner of your screen.
- Select “About This Mac” from the drop-down menu.
- In the new window, click on the “System Report” button. The System Information app will launch.
- In the left sidebar, under the “Hardware” section, click on “Storage.”
- In the right pane, you will find detailed information about your internal and external storage devices, including the manufacturer, model, capacity, and available space.
- Scroll down to view additional details, such as the number of partitions and file systems on each storage device.
The System Information app offers a comprehensive overview of your MacBook’s storage devices, allowing you to quickly assess their capacities and available space. This is particularly useful if you have multiple storage devices connected to your MacBook or if you want to gather detailed information about specific storage devices.
Additionally, the System Information app provides information about the storage protocol (e.g., SATA, PCIe) and the SMART status of your storage devices. The SMART status indicates the health and reliability of your storage device, which can be essential for monitoring its performance and identifying potential issues.
While the System Information app offers extensive details about your MacBook’s storage, it may not provide a visual representation of storage usage like other methods. For a more graphical representation of your storage and a breakdown of file sizes, you may want to explore using Finder, Disk Utility, or third-party apps.
By utilizing the System Information app, you can gain valuable insights into your MacBook’s storage devices and ensure you have enough space for your files and applications.
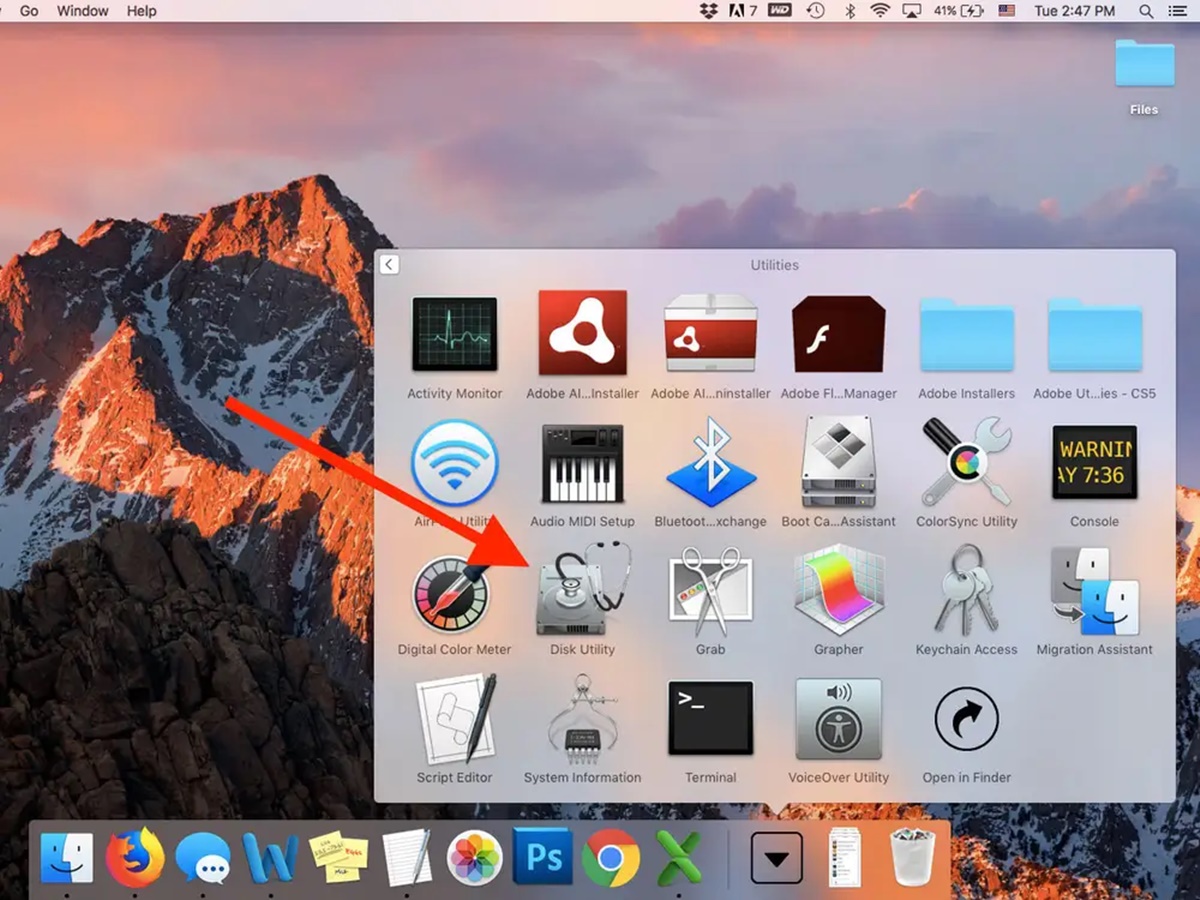
Using Disk Utility to Check Storage
Disk Utility is a built-in macOS tool that allows you to manage and troubleshoot your storage devices. It also provides information about your MacBook’s storage capacity and available space, helping you keep track of your storage usage.
Here’s how to use Disk Utility to check your storage:
- Open the Applications folder by clicking on the Finder icon in the Dock and selecting “Applications” in the sidebar.
- Within the Applications folder, locate and open the Disk Utility app.
- In the Disk Utility app window, you will see a list of available storage devices on the left-hand side.
- Select your MacBook’s internal storage device from the list.
- In the main portion of the window, you will find information about the storage device’s capacity, available space, and used space.
- You can also click on the “Info” button to get additional details, such as the disk type, partition map scheme, and file system used.
Using Disk Utility allows you to get a detailed overview of your MacBook’s storage and identify any potential issues or errors with the storage device.
In addition to checking your MacBook’s internal storage, Disk Utility also allows you to manage external storage devices, create partitions, repair disk permissions, and format disks.
However, it’s important to note that Disk Utility primarily presents technical information and is better suited for advanced users who require more in-depth insights into their storage devices. If you are looking for a more user-friendly and visual representation of storage usage, you may want to explore other methods like using the “About This Mac” feature, Finder, or third-party apps.
By utilizing Disk Utility, you can effectively monitor the capacity and availability of your MacBook’s storage and address any potential issues that may arise.
Analyzing Storage with Third-Party Apps
In addition to the built-in tools provided by macOS, there are various third-party applications available that offer advanced features for analyzing your MacBook’s storage and gaining deeper insights into your storage usage.
Here are a few popular third-party apps for analyzing storage on your MacBook:
- DaisyDisk: DaisyDisk provides a visually pleasing interface that presents a comprehensive overview of your storage usage. It scans your storage and displays a colorful, interactive map showing the distribution of files and folders. You can easily identify large files and delete them to free up space.
- GrandPerspective: GrandPerspective visualizes your storage usage by creating a graphical representation of your files and folders. It allows you to quickly identify space-consuming files and offers different sorting options to facilitate easy cleanup.
- OmniDiskSweeper: OmniDiskSweeper thoroughly scans your storage and presents a detailed list of files and folders, sorted by size. It helps you identify large files that may be taking up unnecessary space and enables you to delete them directly from the app.
These third-party apps offer interactive and visual representations of your storage usage, making it easier to identify and remove large or unnecessary files. They provide a more user-friendly experience compared to the built-in tools.
When using third-party apps, be sure to choose reputable ones from trusted sources to protect your MacBook and ensure the security of your data.
While third-party apps offer additional features and enhanced visualization of storage usage, they may have certain limitations, such as a cost associated with advanced functionality. Therefore, it’s essential to assess your specific needs and choose the app that best suits your requirements.
By using third-party apps to analyze and manage your storage, you can gain more detailed insights into the content of your MacBook’s storage and efficiently optimize its usage.
Tips to Free Up Storage on Your MacBook
If you find that your MacBook’s storage is running low, there are several strategies you can employ to free up space and optimize your storage usage. Here are some tips to help you reclaim storage on your MacBook:
- Delete Unnecessary Files: Begin by identifying and deleting files you no longer need. This includes duplicates, old documents, and files from forgotten installations.
- Clear Temporary Files: Temporary files can accumulate and take up valuable storage space. Use tools like macOS’s built-in “Optimize Storage” feature or third-party apps to remove temporary files and caches.
- Utilize Cloud Storage: Transfer files to cloud storage services like iCloud, Dropbox, or Google Drive, which allow you to access your files remotely while freeing up local storage.
- Remove Unused Applications: Uninstall applications that you no longer use. Use the Launchpad, Finder, or third-party uninstaller apps to safely remove applications along with any associated files.
- Manage Downloads: Clear your downloads folder regularly by deleting files that you no longer need. You can also set your browser to save downloads directly to a specific folder to prevent clutter.
- Optimize Email Storage: Delete unnecessary email attachments or move them to separate folders. Empty the Trash in your email client to permanently delete them.
- Streamline Media Files: Compress or delete large media files like videos or high-resolution photos that you rarely access. Consider transferring them to external storage devices, like external hard drives.
- Empty the Trash: Remember to empty the Trash regularly to permanently delete files and free up storage space. You can do this by right-clicking on the Trash icon in the Dock and selecting “Empty Trash.”
- Use Storage Optimization Tools: Take advantage of built-in storage optimization tools like iCloud Drive, Optimized Storage, and Desktop and Documents folder syncing to offload files and optimize local storage.
- Consider External Storage Options: If you need additional storage capacity, consider using external hard drives or solid-state drives to expand your MacBook’s storage capabilities.
By implementing these storage-saving strategies, you can better manage your MacBook’s storage capacity and keep it running smoothly and efficiently.
Remember to regularly check your storage usage and perform maintenance tasks to prevent your MacBook from becoming cluttered and running out of space.