
Benefits of Using a Monitor with a MacBook
Using a monitor with your MacBook is a great way to enhance your productivity and overall computing experience. Whether you’re a graphic designer, video editor, or simply someone who needs more screen real estate, the benefits of connecting a monitor to your MacBook are plentiful.
One of the main advantages of using a monitor is the increased screen space it provides. Most MacBooks have a limited screen size, which can be restrictive when working on complex tasks or multitasking. By connecting a monitor, you can have a larger workspace to spread out your windows, applications, and files, thereby improving your workflow and efficiency.
Another benefit is the improved visual experience. Monitors often have higher resolutions, better color accuracy, and wider viewing angles compared to MacBook screens. This is particularly advantageous for professionals who work with visual content, such as photographers and graphic designers, as it allows them to see their work in greater detail and with more accurate colors.
In addition to the visual benefits, using a monitor can also have a positive impact on your posture and ergonomics. Most MacBook screens are positioned relatively low, which can result in neck and back strain after extended periods of use. By connecting a monitor and adjusting its height to eye level, you can maintain a more comfortable and ergonomic working position, reducing the risk of strain and discomfort.
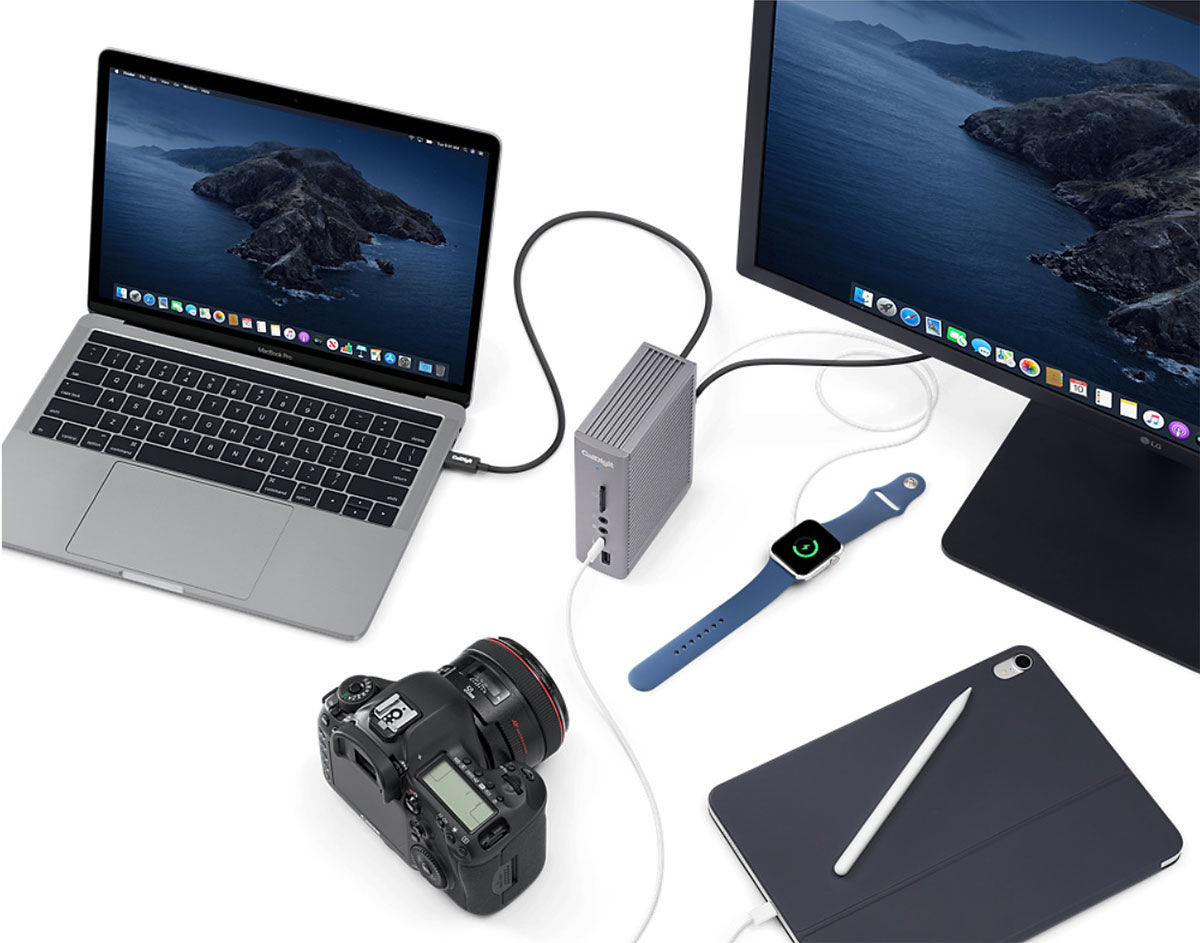
Furthermore, connecting a monitor allows you to take advantage of additional ports and connectivity options. Many monitors come equipped with USB ports, allowing you to connect peripherals such as external hard drives, keyboards, and mice directly to the monitor, minimizing cable clutter on your MacBook.
Lastly, using a monitor can also extend the lifespan of your MacBook by reducing the strain on its components. When using a separate monitor, the MacBook’s built-in display can be turned off, resulting in lower power consumption and less heat generation. This can help prevent overheating issues and lead to improved performance and longevity of your MacBook.
Overall, the benefits of using a monitor with a MacBook are numerous. From increased screen space and improved visual experience to better ergonomics and extended MacBook lifespan, connecting a monitor can greatly enhance your productivity and enjoyment while using your MacBook.
Choosing the Right Monitor
When it comes to choosing a monitor to connect to your MacBook, several factors need to be considered to ensure compatibility and optimal performance. Here are some key aspects to keep in mind while selecting the right monitor:
- Screen Size: The screen size you choose depends on your personal preference and the nature of your work. If you need a larger workspace and more screen real estate, opt for a monitor with a bigger screen. However, bear in mind that a larger screen may also take up more desk space.
- Resolution: The monitor’s resolution determines the level of detail and clarity in the displayed content. For a MacBook, it is recommended to choose a monitor with a resolution that matches or exceeds your MacBook’s native display resolution for seamless integration and the best output quality.
- Connectivity: Ensure that the monitor you select has the necessary ports compatible with your MacBook’s available ports. Common connectivity options include HDMI, DisplayPort, Thunderbolt, and USB-C. Also, consider the number of ports available for connecting other peripherals if needed.
- Color Accuracy: If you work with color-sensitive tasks like graphic design or photo editing, it is crucial to choose a monitor with excellent color accuracy. Look for monitors that support a wide color gamut and have color calibration capabilities to ensure accurate and consistent color representation.
- Refresh Rate: The refresh rate determines how many times per second the monitor refreshes the displayed image. Higher refresh rates, such as 60Hz or 144Hz, provide smoother motion and reduce motion blur, making them ideal for gaming or multimedia purposes.
- Adjustability: Consider the ergonomics of the monitor, such as its ability to tilt, swivel, or adjust its height. Adjustable features allow you to find the most comfortable viewing position, reducing strain and improving productivity.
- Budget: Set a budget range for your monitor purchase. Monitors come in a wide range of prices, so it’s essential to determine your budget and find a balance between your requirements and the price.
Taking these factors into account will help you choose a monitor that perfectly complements your MacBook and meets your specific needs. Remember to do thorough research, read reviews, and compare different models before making your final decision.
Connecting the Monitor to Your MacBook
Connecting a monitor to your MacBook is a straightforward process that requires the right cables and some simple steps. Follow these instructions to ensure a successful connection:
- Gather the Materials: Check the available ports on your MacBook and the required ports on the monitor. Common cables used for connecting monitors to MacBooks include HDMI, DisplayPort, Thunderbolt, and USB-C. Make sure you have the appropriate cable for your setup.
- Plug in the Cable: Connect one end of the cable to the appropriate port on your MacBook and the other end to the corresponding port on the monitor. Ensure that the cable is securely plugged in on both ends.
- Power on the Monitor: Turn on the monitor and ensure it is receiving power. Adjust the monitor’s settings if necessary to select the input source that matches the connected cable.
- Configure Display Settings: Once the monitor is connected, go to the Apple menu on your MacBook and select “System Preferences.” Then, click on “Displays.” You will see the settings for the connected monitor. Adjust the resolution, brightness, and other display preferences as needed.
- Configure Arrangement: If you’re using multiple monitors, you can arrange their position in the “Arrangement” tab of the display settings. Simply drag and arrange the displays according to your desired layout.
- Set Display Preferences: In the display settings, you can also choose the refresh rate, enable or disable the mirrored display, and adjust other display preferences such as color profiles and scaling options.
- Test the Connection: With the monitor connected and settings configured, test the connection by moving windows and applications to the external monitor. Ensure that everything appears as expected, and there are no issues with display quality or alignment.
Once connected, you can enjoy the benefits of having an extended display or using the monitor as your primary workspace. Remember that you can always disconnect the monitor by simply unplugging the cable when you no longer need it.
Adjusting Display Settings on Your MacBook
Once you have connected a monitor to your MacBook, you may need to adjust the display settings to optimize the viewing experience. Here are some key display settings you can adjust on your MacBook:
- Resolution: To adjust the resolution of the external monitor, go to the Apple menu and select “System Preferences.” Then, click on “Displays.” In the “Display” tab, you will see a list of available resolutions. Choose the resolution that best suits your needs. Keep in mind that selecting a lower resolution may result in larger text and icons, while a higher resolution offers more screen space.
- Brightness: Adjusting the brightness can help optimize the visual experience based on the lighting conditions. On your MacBook, press the “F1” and “F2” keys to decrease or increase the brightness, or use the brightness slider in the “Display” tab of the “System Preferences.”
- Color Calibration: For color-sensitive work, it is essential to calibrate the colors on your monitor. macOS provides a built-in tool called “Color Calibrator” that you can access by going to “System Preferences,” clicking on “Displays,” and selecting the “Color” tab. Follow the on-screen instructions to calibrate the color accuracy of your monitor.
- Arrangement: When using multiple monitors, you can arrange their position in the “Arrangement” tab of the “Displays” settings. Drag and arrange the displays to match their physical arrangement on your workspace. You can also set the primary display in this section.
- Night Shift: Night Shift is a feature that adjusts the color temperature of your display to reduce blue light exposure, which can help improve sleep quality. To enable or customize Night Shift, go to the Apple menu, select “System Preferences,” and click on “Displays.” Then, go to the “Night Shift” tab and adjust the schedule or color temperature settings.
- Display Mirroring: By default, macOS extends the desktop to the external monitor. However, if you prefer to mirror the MacBook’s screen on the external monitor, go to the “Arrangement” tab in the “Displays” settings and check the “Mirror Displays” option.
By adjusting these display settings, you can customize the viewing experience on your MacBook and external monitor to suit your preferences and work requirements. Experiment with different settings to find the optimal configuration that enhances readability, color accuracy, and overall visual quality.
Extending or Mirroring Displays
When using a monitor with your MacBook, you have the option to extend or mirror the displays, depending on your workflow and personal preference. Here’s how you can accomplish both:
- Extending Displays: By default, macOS extends the desktop to the external monitor, providing additional screen space. This allows you to drag windows and applications from your MacBook’s screen to the external monitor, effectively expanding your workspace. To extend displays, connect the monitor to your MacBook and navigate to the “Arrangement” tab in the “Displays” settings. Uncheck the “Mirror Displays” option and drag the white menu bar representing your MacBook’s screen to the desired side of the external monitor in the arrangement visual. This will set up an extended display.
- Mirroring Displays: If you prefer to mirror your MacBook’s screen on the external monitor, enabling a duplicate view, follow the same steps to access the “Arrangement” tab. Then, check the “Mirror Displays” option. Both screens will now display the same content simultaneously.
Extending displays is ideal when you need more screen real estate for multitasking, managing multiple applications, or working on complex projects. It allows you to have different content on each screen and enhances productivity. You can easily drag windows between the MacBook and external monitor to organize your work efficiently.
Mirroring displays is helpful in scenarios where you want to share your MacBook’s screen with others, such as during presentations or meetings. It allows everyone to see the same content simultaneously, eliminating the need for multiple devices to view the shared display.
Remember, the option to extend or mirror displays may vary depending on your macOS version and the specific monitor you are using. Consult the documentation provided with your monitor or visit the manufacturer’s website to ensure compatibility and get detailed instructions on setting up extended or mirrored displays.
Experiment with both options to find the configuration that suits your workflow and enhances your productivity. Whether you choose to extend displays for a larger workspace or mirror displays for convenient content sharing, having the flexibility to switch between these modes can greatly enhance your overall computing experience.
Optimizing Display Resolution
The display resolution of your monitor plays a crucial role in the clarity and overall visual experience. Optimizing the display resolution on your MacBook ensures that the content appears crisp, sharp, and well-defined. Here are a few tips for optimizing the display resolution:
- Native Resolution: Set your monitor to its native resolution, which is the optimal resolution recommended by the manufacturer. To do this, go to the Apple menu, select “System Preferences,” click on “Displays,” and choose the “Display” tab. From here, select the native resolution from the available options. Running your monitor at its native resolution ensures that images and text appear at their intended size and clarity.
- Scaling: macOS allows you to adjust the scaling of your display to increase or decrease the size of the user interface elements. A lower scaling value provides more screen real estate, but the content may appear smaller, while a higher scaling value enlarges the text and icons, sacrificing some screen space. To adjust the scaling, go to the “Displays” settings, click on the “Display” tab, and choose the desired scaling option.
- Retina Display: If you have a MacBook with a Retina display, ensure that the “Retina Display” option is enabled in the display settings. This ensures that the macOS interface and content are optimized for the high pixel density of Retina displays, resulting in sharper text and images.
- External Monitors: If you are using an external monitor with your MacBook, it is essential to match the external display’s resolution to the native resolution of the monitor. In the “Display” settings, select the external monitor, then choose the appropriate resolution from the available options. This ensures that the content appears correctly on the external monitor.
- Testing and Adjusting: After adjusting the display resolution, carefully examine different types of content, including text, images, and videos, to ensure they appear clear and sharp. If necessary, refine the settings further until you achieve the desired visual quality.
Remember that optimizing the display resolution is a personal preference, and it may vary based on your eyesight, working distance from the monitor, and individual preference for screen real estate versus readability. Experiment with different resolutions and scaling options to find the perfect balance that suits your needs and enhances your overall viewing experience.
Calibrating Color Accuracy
Calibrating the color accuracy of your monitor is essential, especially if you work with color-sensitive tasks such as graphic design, photography, or video editing. Here are some steps to follow for calibrating color accuracy on your MacBook:
- Use Built-in Display Calibrator: macOS provides a built-in tool called “Display Calibrator Assistant” that guides you through the process of calibrating your monitor’s color accuracy. To access this tool, go to the Apple menu, select “System Preferences,” click on “Displays,” and choose the “Color” tab. From there, click on the “Calibrate” button to launch the Display Calibrator Assistant.
- Follow On-Screen Instructions: The Display Calibrator Assistant will prompt you to make various adjustments while displaying test patterns and colors. Follow the on-screen instructions carefully and make adjustments to the settings such as gamma, white point, and brightness to achieve the desired color accuracy. The assistant will guide you through each step along the way.
- Adjust Advanced Settings: For more precise calibration, the Display Calibrator Assistant also provides options to adjust advanced settings such as contrast, color temperature, and saturation. Make adjustments based on your preferences and requirements for accurate color reproduction.
- Save Custom Color Profile: Once you’ve completed the calibration process, the Display Calibrator Assistant will generate a custom color profile for your monitor. Save this profile with a descriptive name to easily identify it in the future. The custom color profile ensures that your monitor consistently displays colors accurately across different applications, documents, and media.
- Regularly Re-calibrate: Over time, the color accuracy of your monitor can drift, especially with factors such as aging hardware or the effects of ambient lighting. To maintain accurate colors, it is recommended to re-calibrate your monitor regularly, especially if you notice any visual inconsistencies or changes in color perception.
Calibrating the color accuracy of your monitor ensures that the colors you see on your screen are as true and accurate as possible. It enables you to have confidence in your color work and ensures that your creative projects are displayed consistently across different devices and platforms.
Keep in mind that the visual accuracy of color can also be influenced by factors such as ambient lighting conditions and the quality of the monitor itself. Therefore, it’s essential to work in a well-lit environment and invest in a high-quality monitor with good color reproduction capabilities for the best results.
By regularly calibrating your monitor and fine-tuning the color accuracy, you can ensure that your creative work accurately translates from your screen to the final output, leading to more professional and visually stunning results.
Managing Multiple Monitors
Using multiple monitors with your MacBook can greatly enhance your productivity and workflow. Managing multiple monitors effectively involves organizing windows, adjusting settings, and utilizing features that optimize multitasking. Here are some tips for managing multiple monitors:
- Arranging Displays: On your MacBook, go to the Apple menu, select “System Preferences,” click on “Displays,” and navigate to the “Arrangement” tab. Arrange the displays according to their physical position on your workspace. You can drag and rearrange the displays to match their physical layout, allowing for seamless movement between the screens.
- Menu Bar and Dock: The menu bar appears on the primary display by default, but you can choose to have the menu bar appear on each display. In the “Arrangement” tab of the “Displays” settings, check the box that says “Show mirroring options in the menu bar when available” to easily access the menu bar settings for each display. Additionally, you can choose whether the Dock appears on all displays or only on the primary one.
- Window Management: macOS provides several window management options to help you organize windows across multiple monitors. Hold down the green maximize button on a window to enter Split View, which allows you to have two applications side by side in full-screen mode. You can also use window snapping and keyboard shortcuts to send windows to different displays or to resize and position them efficiently.
- Mission Control: Mission Control is a useful feature that allows you to see all open windows across all monitors in one place. To access Mission Control, swipe up with three fingers on your trackpad or press the Mission Control key on your keyboard. Use Mission Control to switch between applications and desktops, or to navigate to specific windows quickly.
- Keyboard Shortcuts: macOS offers various keyboard shortcuts for managing multiple monitors. For example, pressing Control + Up Arrow expands a window to full screen, while Control + Left Arrow or Control + Right Arrow switches between multiple desktops. Familiarize yourself with these shortcuts to navigate efficiently between applications and displays.
- Menu Bar Apps: Install third-party menu bar apps designed for multiple monitors to enhance your management capabilities. These apps provide additional features like display profiles, window snapping, hotkeys, and more, allowing you to customize your workflow and improve productivity even further.
Managing multiple monitors effectively requires a combination of proper arrangement, utilizing built-in features, and leveraging third-party tools if necessary. Find a setup and workflow that suits your needs and preferences, and experiment with different settings and applications to optimize your multitasking experience.
By managing multiple monitors efficiently, you can seamlessly navigate between applications, organize your workspace, and take full advantage of the increased screen real estate, ultimately enhancing your productivity and enabling a more efficient workflow.
Using macOS Split View with a Monitor
macOS offers a helpful feature called Split View, which allows you to work with two applications side by side in full-screen mode. This feature becomes even more convenient when using a monitor, as it provides you with additional screen space to utilize. Here’s how to use Split View with a monitor:
- Enter Split View: Open one of the applications you want to use in Split View mode. Click and hold the green maximize button in the top-left corner of the app’s window until it expands. Then, drag the window to the left or right side of the screen to enter Split View. Alternatively, you can use the keyboard shortcut Control + Up Arrow to maximize the window and then drag it to the side of the screen.
- Add Second Application: Once in Split View mode, thumbnails of your other open applications will appear on the opposite side of the screen. Click on the desired thumbnail to add it to the other side of the screen. This will split the screen between the two applications evenly. If the desired application is not in the thumbnails, you can access Mission Control by swiping up with three fingers on the trackpad or pressing the Mission Control key on the keyboard. From there, drag the desired window to the side of the screen you want it to occupy.
- Adjust Window Size: In Split View mode, you can adjust the size of the windows by hovering your cursor over the separator line between the two applications. The cursor will change to a double-sided arrow, allowing you to click and drag to resize the windows. This flexibility gives you control over how much screen space each application occupies.
- Switch Apps: To switch between the two applications in Split View, simply click on the title bar of the window you want to activate. You can also use the Control + Left Arrow or Control + Right Arrow keyboard shortcut to switch between the apps.
- Exit Split View: To exit Split View mode, move your cursor to the top of the screen to reveal the menu bar. On the top-right corner of the menu bar, click on the green expand button or use the Control + Up Arrow keyboard shortcut. The windows will return to their original positions, and you can continue using them individually.
Split View is a valuable feature for multitasking and comparing information between two applications. With the added screen space provided by a monitor, Split View becomes even more powerful, allowing you to work on multiple tasks efficiently side by side.
Take advantage of macOS’s Split View feature to maximize productivity and make the most of your monitor’s screen space.
Using a Monitor as Primary Display
Using a monitor as the primary display for your MacBook can offer numerous benefits, such as enhanced screen size, improved ergonomics, and increased productivity. Here’s how you can set up a monitor as the primary display:
- Connect the Monitor: Connect the monitor to your MacBook using the appropriate cable and ensure it is powered on.
- Access Display Settings: Go to the Apple menu, select “System Preferences,” and click on “Displays.” The Display settings window will open.
- Identify the Displays: In the Display settings, you will see two screens labeled as ‘Built-in Display’ (your MacBook’s screen) and ‘External Display’ (the connected monitor). Identify which display you want to set as the primary display.
- Set the Primary Display: To set the monitor as the primary display, click and drag the white menu bar from the Built-in Display to the External Display in the Arrangement tab of the Display settings. This will move the menu bar and Dock to the monitor.
- Adjust Display Preferences: Once you’ve set the monitor as the primary display, you may want to adjust some display preferences. In the Display settings, you can adjust the resolution, brightness, Night Shift, and other settings specific to the primary display.
- Ergonomic Considerations: Position the monitor at a comfortable height and distance to promote good posture and reduce strain. Adjust it so that the top of the screen is at or slightly below eye level.
- Using the MacBook: After setting up the monitor as the primary display, you can still use your MacBook alongside it. The MacBook’s screen will become a secondary display, offering additional screen space for organizing windows or displaying supplementary information.
Setting a monitor as the primary display improves workflow efficiency, especially when working on tasks that require a larger screen, such as graphic design, video editing, or data analysis. It allows you to have a dedicated workspace on the larger monitor, while still having the versatility of a secondary screen with your MacBook’s built-in display.
Remember to adjust the settings and preferences of the external monitor to your liking, ensuring that the visuals are accurately displayed and comfortable for your work environment. Experiment with the arrangement and placement of windows and applications to find the most productive setup for your needs.
Using a monitor as the primary display can transform your MacBook into a powerful workstation, providing you with a comfortable and productive work environment.
Utilizing Keyboard Shortcuts for Monitor Management
macOS provides a range of useful keyboard shortcuts that can help you manage and control your connected monitor(s) efficiently. These shortcuts allow you to perform tasks such as adjusting display settings, navigating between windows and desktops, and controlling the arrangement of your monitors. Here are some essential keyboard shortcuts for monitor management:
- Brightness Control: To adjust the brightness of your monitor, press Option + Shift + the brightness key (usually F1 or F2) on your MacBook’s keyboard. This shortcut allows you to quickly increase or decrease the brightness without accessing the display settings.
- Toggle Display Mirroring: To toggle display mirroring (mirroring your MacBook’s screen on an external monitor), press Command + F1. This shortcut enables or disables display mirroring, depending on your current setup preferences.
- Switch Displays: If you have multiple monitors connected to your MacBook, you can use the Control + Left Arrow or Control + Right Arrow keyboard shortcut to move the active window or focus to the next or previous display. This is particularly useful for navigating between applications that are open on different monitors.
- Switch Desktops: To switch between virtual desktops or spaces while using multiple monitors, press Control + Left Arrow or Control + Right Arrow along with the Control + Up Arrow or Control + Down Arrow keys. This combination allows you to seamlessly move between different desktops across your monitors.
- Enter Full-Screen Mode: To enter or exit full-screen mode for the active application on your primary monitor, press Control + Command + F. This shortcut maximizes the application window to fill the display, providing you with a distraction-free viewing experience.
- Access Mission Control: Mission Control gives you an overview of all open windows and virtual desktops. To access Mission Control, swipe up with three fingers on your trackpad or press the Mission Control key on your keyboard. This shortcut is beneficial when managing and arranging windows or moving applications across multiple monitors.
- Screen Capture: To take screenshots or screen recordings of a specific monitor, use the Shift + Command + number key (4, 5, or 6) followed by the Spacebar. This lets you capture the contents of a particular monitor while excluding others, allowing for more focused and precise screen captures.
These keyboard shortcuts offer quick and efficient ways to manage your connected monitors, saving you time and effort. Remember to practice and familiarize yourself with these shortcuts to make the most of your multi-monitor setup and enhance your overall productivity.
Additionally, you can customize keyboard shortcuts through the “Keyboard” settings in “System Preferences” to create your own shortcuts for specific monitor-related actions, providing further flexibility and customization options.
Displaying MacBook Screen on Multiple Monitors
With macOS, you have the ability to connect multiple monitors to your MacBook and extend or mirror your screen across them. This allows you to expand your workspace, view content simultaneously on different monitors, or even create a presentation setup. Here’s how you can display your MacBook screen on multiple monitors:
- Connect the Monitors: Connect your additional monitors to your MacBook using the appropriate cables or adapters. Ensure that the monitors are powered on.
- Access Display Settings: Go to the Apple menu, select “System Preferences,” and click on “Displays.” The Display settings window will open, showing the arrangement and settings for the connected monitors.
- Arrange the Displays: In the “Arrangement” tab of the Display settings, you will see graphical representations of your MacBook’s built-in display and the connected external monitors. To arrange the displays, click and drag the monitors’ thumbnails to match their physical placement on your desk. This ensures that the cursor movements between monitors are smooth and natural.
- Choose Display Mode: Decide whether you want to extend your desktop across multiple monitors or mirror your MacBook’s screen on the additional monitors.
- Extend Displays: By default, macOS extends the desktop across all connected monitors, providing you with an expanded workspace. You can drag windows and applications between the screens for better multitasking. To enable extended displays, uncheck the “Mirror Displays” option in the “Arrangement” tab of the Display settings. The menu bar and Dock will appear on the primary display, while the secondary monitor(s) will function as additional workspace.
- Mirror Displays: If you prefer to have the same content displayed on all monitors simultaneously, check the “Mirror Displays” option. This creates a duplicate view, useful for presentations or situations where you want all screens to show the same content. You can adjust the resolution and other settings for the mirrored display(s) using the respective monitor’s settings.
- Adjust Display Settings: In the Display settings, you can adjust individual settings for each monitor, including resolution, brightness, and color calibration. Customize the settings based on the capabilities and preferences of each display to optimize the visual experience across all monitors.
- Organize Windows and Applications: With multiple monitors, you can move windows and applications across screens for better organization and workflow. Simply click and drag a window to the desired monitor, or use the keyboard shortcuts mentioned earlier to switch between monitors quickly.
- Use Spaces and Mission Control: To further organize your workflow across multiple monitors, utilize Spaces and Mission Control. Spaces allow you to have separate virtual desktops for different tasks, while Mission Control provides an overview of all open windows and virtual desktops. Swipe up with three fingers on your trackpad or use the Mission Control key on your keyboard to access these features.
Displaying your MacBook screen on multiple monitors offers flexibility and expands your possibilities for productivity, creativity, and collaboration. Customize the arrangement, settings, and workspace organization to suit your preferences and optimize your workflow.
Remember to consider the capabilities of your MacBook’s graphics and the individual specifications of each monitor for smooth performance and compatibility.
Using Power Saving Features
Using power saving features on your MacBook when connected to a monitor can help conserve energy, extend battery life, and reduce system heat generation. Here are some power saving features and tips you can utilize:
- Dim the Display: Lowering the brightness of your monitor can have a significant impact on power consumption. Adjust the display brightness to a comfortable level using the brightness controls on your MacBook or in the Display settings. Consider reducing the brightness when working in a well-lit environment or during periods of extended use.
- Enable Energy Saver Preferences: Access the Energy Saver preferences in the System Preferences menu and enable the “Put hard disks to sleep when possible” and “Slightly dim the display while on battery power” options. These settings help conserve power by reducing the activity of the hard disks and dimming the display when your MacBook is running on battery power.
- Turn off Screen Savers: Screen savers were originally designed to prevent screen burn-in on older CRT monitors, but they consume unnecessary power on modern displays. Disable screen savers in the Desktop & Screen Saver preferences to conserve energy when your monitor is not in use.
- Enable Power Nap: Power Nap is a feature that allows your MacBook to perform various tasks, such as checking for new email, updating calendars, and downloading software updates, even while it is in sleep mode. Enable Power Nap in the Energy Saver preferences to stay productive while saving energy.
- Optimize Battery Performance: If you’re using a MacBook with a built-in battery, adjusting the battery settings can help you maximize battery performance. Go to the Battery preferences and choose the “Battery” tab. From there, you can enable options such as “Turn display off after” and “Put hard disks to sleep when possible” to prolong battery life when using the monitor on battery power.
- Reduce System Load: When using a monitor, you may be performing tasks that require heavy system resources, such as video editing or gaming. To mitigate excessive power consumption and heat generation, consider closing unnecessary applications, limiting background processes, and quitting resource-intensive tasks that are not in use.
- Disconnect Unused Devices: Some peripherals, such as external hard drives, USB devices, or audio equipment, draw power even when not in use. Disconnect or power off devices that are not actively being utilized to minimize power consumption and extend battery life.
By incorporating these power-saving features and practices into your workflow, you can optimize energy usage and promote a more environmentally-friendly computing experience. Additionally, the reduced strain on your MacBook’s components can contribute to improved performance and longevity.
Remember that power saving features and settings may vary depending on your macOS version and hardware configuration. Adjust the settings according to your preferences and requirements, finding the right balance between energy conservation and optimal performance.
Troubleshooting Common Issues
While using a monitor with your MacBook can greatly enhance your computing experience, you may encounter some common issues along the way. Here are some troubleshooting tips for addressing these issues:
- No Signal or Black Screen: If your monitor is not receiving a signal or displaying a black screen, check the cable connections between your MacBook and the monitor. Ensure that the cables are securely plugged in and that you have selected the correct input source on the monitor. You may also try restarting your MacBook and power cycling the monitor.
- Incorrect or Distorted Display: If you notice incorrect colors, distorted images, or weird artifacts on your monitor, double-check the display settings on your MacBook. Verify that you have selected the appropriate display resolution and color profile for your monitor. Additionally, calibrate the color accuracy of your monitor using the Display Calibrator tool in the System Preferences.
- Monitor Flickering or Refresh Issues: If your monitor is flickering or experiencing refresh rate issues, first ensure that the cables are not loose or damaged. If the issue persists, try adjusting the refresh rate in the Display settings. Reduce the refresh rate if it is set to a higher value, as it can strain the graphics card. Alternatively, update your macOS and monitor drivers to ensure compatibility.
- Mismatched Display Resolutions: If your monitors have different resolutions, macOS may attempt to scale the content across multiple screens, causing a mismatched display. To address this, go to the Display settings and arrange the displays by clicking and dragging them in the correct order. Adjust the scaling settings to ensure that the content appears consistent across all screens.
- External Display Not Detected: If your MacBook is not detecting the external display, ensure that the cables are securely connected on both ends. If you are using an adapter, ensure that it is compatible and functioning correctly. Try switching to a different cable or adapter to troubleshoot any potential hardware issues. Additionally, check for macOS updates and install them to ensure compatibility with external displays.
- Overheating or Performance Issues: Using a monitor can increase the strain on your MacBook’s graphics card, potentially leading to overheating or performance issues. To mitigate this, ensure proper ventilation and airflow around your MacBook. Consider using cooling pads or adjusting the graphics settings of resource-intensive applications to reduce strain on the system.
- Unresponsive Graphics or Tearing: If you experience graphics tearing or unresponsiveness, go to the Energy Saver settings in System Preferences and ensure that the “Automatic graphics switching” option is enabled. This allows macOS to automatically switch between the integrated and discrete graphics cards to optimize performance and power efficiency.
If you encounter persistent issues that cannot be resolved through troubleshooting, consult the manufacturer’s documentation or reach out to their support for further assistance. Additionally, consider seeking guidance from Apple Support or consulting with a professional technician to diagnose and resolve complex issues.
By addressing common issues promptly and effectively, you can ensure a smooth and optimal experience when using a monitor with your MacBook.