
Adjusting the Display Zoom Settings on your iPhone or iPad
Have you ever found it difficult to read small text or view images on your iPhone or iPad? With the display zoom feature, you can easily magnify everything on your screen for improved readability and clarity. Whether you have visual impairments or simply want to enhance your viewing experience, adjusting the display zoom settings can make a world of difference.
To begin, go to the Settings app on your device and tap on Display & Brightness. From there, you’ll see an option for Display Zoom. Tap on it to access the zoom settings. You will be presented with two options: Standard and Zoomed.
The Standard option displays the typical size of icons and text on your device, while the Zoomed option offers a larger and more magnified view. Choose the Zoomed option to enable the display zoom feature. Keep in mind that changing the display zoom settings will require your device to restart.
Once your device has restarted, you will notice that everything appears larger and more pronounced. Icons, typography, and even your home screen layout will be magnified. You can now enjoy a more visually pleasing experience without straining your eyes.
If you find that the magnification is not suitable for your preferences, don’t worry. You can further customize the zoom level by going back to the Display Zoom settings. There, you will find a slider that allows you to adjust the level of magnification. Slide it to the left for less magnification or to the right for more magnification.
Keep in mind that increasing the zoom level may impact the overall visual aesthetics of certain apps and interface elements. Some content may appear slightly cropped or obscured. However, the trade-off is worth it if it means being able to comfortably read text or discern details more easily.
As you explore the display zoom settings on your iPhone or iPad, remember that it’s a feature designed to cater to your individual needs. Experiment with different zoom levels to find the one that suits you best, and enjoy an improved viewing experience on your device.
Enabling and Customizing the Magnifier Feature
Did you know that your iPhone or iPad comes with a built-in magnifier feature? This handy tool acts as a digital magnifying glass, allowing you to zoom in on objects and text for better visibility. Whether you need help reading fine print or examining small details, enabling and customizing the magnifier feature can greatly enhance your device’s functionality.
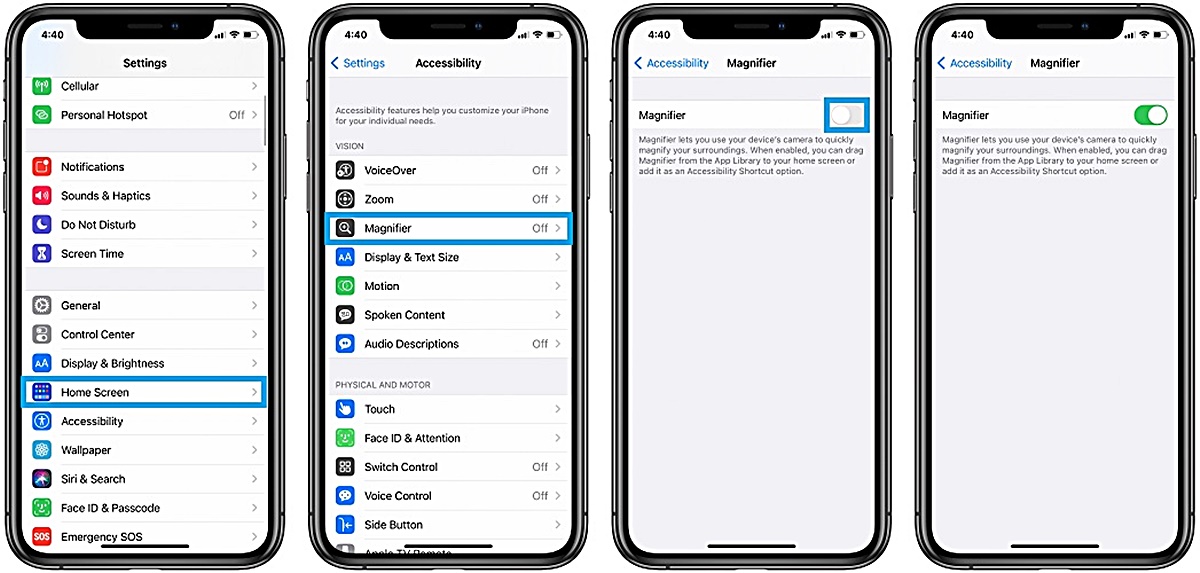
To enable the magnifier feature, go to the Settings app on your device and tap on Accessibility. From there, select Magnifier and toggle the switch to turn it on. You also have the option to enable Magnifier as a shortcut, accessible by triple-clicking the Home or Side button, depending on your device model.
Once enabled, you can access the magnifier feature by triple-clicking the designated button or by adding it to your Control Center for quick and easy access. To add it to your Control Center, go to Settings, tap on Control Center, and select Customize Controls. Look for the Magnifier option and tap the green plus icon next to it.
Now, when you need to use the magnifier, simply open the Control Center by swiping down from the top-right corner of your screen (or swipe up from the bottom on older iPhone models with a Home button) and tap on the magnifier icon.
But wait, there’s more! You can also customize the magnifier settings to suit your specific needs. To do this, open the magnifier and tap on the settings icon (represented by a gear). Here, you’ll find various options to enhance your magnifying experience.
First, you can adjust the magnification level by sliding the magnification bar left or right. This allows you to zoom in or out to the desired level of magnification. You can also freeze the image by tapping the capture button, making it easier to examine details without holding your device steady.
Furthermore, you can apply different visual filters to improve contrast and enhance visibility. Experiment with the available filters and choose the one that provides the best display for your specific needs.
Additionally, you have the option to enable auto-brightness, which adjusts the brightness level of your screen to optimize visibility in different lighting conditions. This ensures that the magnified image is clear and easy to see, regardless of the environment you’re in.
The magnifier feature on your iPhone or iPad is a powerful tool that can greatly assist those with visual impairments or anyone in need of a little extra assistance when examining small details. Take advantage of the customization options available and make the most of this useful feature.
Using the Zoom In and Zoom Out gestures on your iPhone or iPad
If you prefer a more intuitive way of adjusting the display size on your iPhone or iPad, you’re in luck! Apple devices offer convenient zoom in and zoom out gestures that allow you to quickly magnify or shrink the content on your screen. This feature comes in handy when viewing images, reading text, or simply navigating through your device with ease.
To zoom in on your screen, gently double-tap the area you want to enlarge. You’ll notice that the content expands, bringing it into closer view. This gesture is particularly useful when focusing on specific details or fine text that may otherwise be difficult to read.
Conversely, if you want to zoom out and view more content on your screen, perform a double-tap with three fingers. The display will shrink, allowing you to see a broader view of the page or app. This gesture is beneficial when you want to get an overview of a document, webpage, or image without scrolling.
In addition to the double-tap gestures, you can also use a two-finger pinch gesture to zoom in or out. Simply place two fingers on the screen and pinch them together to zoom in, or spread them apart to zoom out. This method is especially useful for quickly adjusting the display size to your preference.
If you’re using an iPad with multitasking capabilities, you can also utilize the zoom-in and zoom-out gestures while in Split View or Slide Over mode. This allows you to magnify or shrink the content of one app while keeping the other app at a standard display size.
It’s important to note that the zoom-in and zoom-out gestures are customizable, allowing you to adjust the sensitivity to your liking. To do this, go to Settings, tap on Accessibility, and select Zoom. From there, you can adjust the Zoom Region to Full Screen or Window, depending on how you prefer the zoomed display to appear.
With the zoom in and zoom out gestures on your iPhone or iPad, you have the freedom to easily adjust the display size to suit your needs. Whether you’re reading small text, examining photos, or navigating through apps, this feature provides a seamless and intuitive way to magnify or shrink the content on your device.
Enlarging the Text Size on your iPhone or iPad
If you find yourself squinting or struggling to read text on your iPhone or iPad, don’t worry – Apple devices offer a simple solution to enlarge the text size and make it more readable. By adjusting the text size settings, you can ensure that all the text displayed on your device appears larger and easier to read.
To begin, go to the Settings app on your device and tap on Display & Brightness. From there, select Text Size. You’ll see a slider that allows you to smoothly increase or decrease the size of the text displayed on your screen. Slide it to the right to enlarge the text, or to the left to make it smaller. As you adjust the slider, the text size will immediately change, giving you a real-time preview of how it will appear.
But what if you need more customization options? You can further tailor the text size to your preference by enabling the “Larger Text” feature. When you toggle this option on, you’ll have even more control over the text size, as it opens up additional text size options and a slider specifically for dynamic type.
Dynamic type allows the text in apps that support it to automatically adjust to your preferred size. To adjust the dynamic type settings, go to Settings, tap on Accessibility, and select Display & Text Size. From there, you can adjust the slider to control the overall text size for apps that utilize dynamic type.
In addition to adjusting the text size, you can also enable Bold Text to enhance readability further. Enabling this feature makes all the system font (such as the text in apps, menus, and labels) appear thicker and more prominent.
Experiment with different text sizes and the Bold Text option until you find the optimal settings for your needs. It’s worth noting that increasing the text size can affect the layout of some apps, as more space may be required to accommodate the larger text. Nevertheless, this trade-off is worthwhile if it means improving your reading experience and reducing eyestrain.
By adjusting the text size settings on your iPhone or iPad, you can make reading a more comfortable and enjoyable experience. Whether it’s browsing the web, reading emails, or using your favorite apps, having larger and more legible text will make navigating and consuming content on your device much easier.
Changing the Display Resolution Settings on your iPhone or iPad
Did you know that you can adjust the display resolution settings on your iPhone or iPad? While Apple devices are designed to provide optimal display quality, there may be instances where you want to change the resolution for various reasons, including conserving battery life or improving performance. With the ability to modify the display resolution, you have greater control over your device’s visual output.
To change the display resolution settings, open the Settings app on your device and tap on Display & Brightness. From there, select Display Resolution. You will be presented with a list of available resolution options, each with a description of how it affects your device’s performance and battery life.
Keep in mind that changing the display resolution may impact the clarity and sharpness of the visuals on your screen. Higher resolutions generally result in crisper images and text, but they may also consume more power. Conversely, lower resolutions may lead to slightly less vivid visuals but can help conserve battery life.
Once you have selected your desired display resolution, tap on Set to confirm the change. Your device will adjust the resolution accordingly, and you will notice a difference in the overall display quality. Take a moment to explore your device and observe how the visuals appear at the new resolution.
If you find that the changed resolution does not meet your expectations or preferences, you can always revert to the default resolution by following the same steps and selecting the original resolution option.
It’s important to note that changing the display resolution settings on your iPhone or iPad is not a commonly used feature for most users. Apple has carefully optimized the default resolution to provide the best balance of performance, battery life, and visual quality. However, if you have specific requirements or prefer to experiment with different resolution settings, this feature gives you the flexibility to tailor the display to your liking.
Always keep in mind that choosing a higher resolution may lead to increased power consumption and potentially affect other aspects of your device’s performance. If you notice any adverse effects, such as decreased battery life or laggy performance, consider reverting to the default resolution.
By understanding and utilizing the display resolution settings on your iPhone or iPad, you can fine-tune the visual output to suit your preferences and optimize the overall experience on your device.
Utilizing Accessibility Options to Enhance Display Size on your iPhone or iPad
If you’re looking to enhance the display size on your iPhone or iPad beyond the standard settings, Apple provides an array of accessibility options specifically designed to accommodate various visual needs. These features not only magnify the content on your screen but also offer additional customization options to ensure a comfortable viewing experience.
To access the accessibility options on your device, go to the Settings app and tap on Accessibility. From there, you’ll find a variety of features that can help you enlarge the display size.
One such feature is the Zoom function, which not only magnifies the entire screen but also provides handy controls to pan around and navigate within the zoomed view. To enable Zoom, toggle the switch next to it and customize the zoom settings to your liking.
Zoom also offers a helpful Zoom Controller that appears on the screen when you enable the feature. This controller allows you to adjust the magnification level, quickly access additional zoom options, and even temporarily disable the zoomed view when needed.
Another useful accessibility option is the Larger Text feature. Enabling this option allows you to adjust the system font size, making it larger and easier to read throughout your device. Simply navigate to Settings, tap on Accessibility, and select Display & Text Size to access this feature.
If you prefer bolder text for improved visibility, you can enable the Bold Text option. This feature enhances the contrast and makes the system font appear more prominent, reducing visual strain. You can find this option in the Display & Text Size section under Accessibility.
Additionally, Apple offers the ability to increase the contrast of your device’s display. By going to the Accessibility settings and selecting Display & Text Size, you can enable the Increase Contrast option. This option enhances the visibility of interface elements, icons, and text, making them stand out more against the background.
You can also take advantage of the Reduce Transparency feature, found in the Accessibility > Display & Text Size settings. This option reduces the transparency effects throughout the interface, making it easier to distinguish between different elements on the screen.
Apple understands that everyone’s visual needs are unique, which is why these accessibility options provide customized solutions to enhance the display size and improve readability on your iPhone or iPad. Take the time to explore these features and find the settings that work best for you.
Remember, the accessibility features are designed to assist individuals with visual impairments. However, they can be beneficial for anyone looking for a more comfortable and personalized viewing experience on their device.
By utilizing the accessibility options, you can enhance the display size on your iPhone or iPad, making it easier to read text, navigate apps, and enjoy content with greater comfort and clarity.
Maximizing Display Space by Hiding the Status Bar on your iPhone or iPad
Do you wish to maximize the available display space on your iPhone or iPad? Apple offers a simple yet effective way to do just that by allowing you to hide the status bar. By hiding the status bar, you can gain more screen real estate and utilize the space for immersive content, such as apps, games, and videos.
To hide the status bar on your device, you don’t need to delve into complicated settings or install third-party apps. Instead, Apple provides an intuitive and built-in feature that allows you to toggle the visibility of the status bar.
Start by accessing the Control Center on your device. On iPhone models with a notch (such as the iPhone X and newer), simply swipe down from the top-right corner of the screen. On older iPhone models with a Home button, swipe up from the bottom of the screen.
Once in the Control Center, look for the status bar icon. This icon resembles two parallel lines, similar to the Wi-Fi and battery icons. Tap on it to toggle the visibility of the status bar. When the status bar is hidden, you will notice a full-screen display, allowing you to make the most of your device’s screen real estate.
It’s worth noting that hiding the status bar does not permanently remove it from your device. It simply hides it while you are in an app or using your device, providing a more immersive experience. When you need to access the status bar again, you can swipe down from the top of the screen to reveal it.
While hidden, the status bar may still appear momentarily when interacting with certain apps or performing specific actions, such as scrolling to the top of a webpage or tapping on the top of the screen. This temporary appearance of the status bar ensures easy access to important information, such as the time, battery level, and signal strength.
By hiding the status bar on your iPhone or iPad, you can enjoy a more immersive and focused experience, particularly when using content-heavy apps or engaging in media consumption. Whether you’re watching a movie, playing games, or exploring apps, the hidden status bar allows for a truly full-screen experience.
Remember, the ability to hide the status bar is a convenient feature provided by Apple to enhance your device’s display space. It’s up to you to decide when and where to hide the status bar, depending on your preference and the specific task or activity at hand.
Take advantage of this feature to fully immerse yourself in your device’s content, and enjoy a more expansive and captivating viewing experience on your iPhone or iPad.
Installing and Using Third-Party Apps to Magnify your iPhone or iPad Display
In addition to the built-in features provided by Apple, there are also a variety of third-party apps available in the App Store that can further enhance the magnification capabilities of your iPhone or iPad. These apps offer additional customization options and advanced features to provide a tailored and optimal display experience based on your specific needs.
To get started, open the App Store on your device and search for “magnifier” or “display magnifier.” You’ll find a wide selection of apps designed to assist with magnifying text and images on your device’s screen.
When choosing a third-party app, consider factors such as user ratings, reviews, and the specific features offered. Look for apps that provide adjustable magnification levels, different visual filters, and additional tools for capturing and saving magnified images.
After selecting an app, tap on the “Get” or “Install” button to download and install it on your device. Once the installation is complete, open the app, and familiarize yourself with its functionality and interface.
Many magnifier apps provide intuitive controls for adjusting the magnification level. This allows you to zoom in or out to the desired level, ensuring that text and images are clear and easily readable. Some apps may also offer the ability to freeze the image or capture screenshots for later reference.
It’s important to note that third-party magnifier apps may have their own unique settings and customization options. Explore the app’s settings to access features such as contrast adjustment, text enhancement, and color inversion, which can further enhance the visibility and readability of the magnified content.
When using third-party magnifier apps, keep in mind that they may not have integration with the built-in accessibility features of your device. This means that they may not work in all apps or have the ability to magnify certain elements or text within other apps. However, they can still be useful for specific tasks or situations where you require more advanced magnification options.
Lastly, be aware that some third-party magnifier apps may require in-app purchases or offer premium features at an additional cost. If you find a particular app that meets your needs but offers such features, evaluate whether the benefits outweigh the cost before making a purchase.
Installing and using third-party magnifier apps on your iPhone or iPad can provide additional flexibility and customization options for enhancing the display size. Consider exploring different apps to find the one that best complements your preferences and visual needs, and continually check the App Store for new options that may become available.
Overcoming Common Challenges while Magnifying your iPhone or iPad Display
While magnifying your iPhone or iPad display can greatly improve readability and enhance your viewing experience, there may be some challenges that you encounter along the way. However, with a few tips and tricks, you can overcome these common challenges and make the most out of your magnified display.
One challenge you may face is the possibility of content appearing cropped or obscured when using the zoom or magnifier feature. This can happen particularly in apps that are not optimized for the magnified view. In such cases, try adjusting the magnification level or exploring alternative apps that offer better compatibility with the zoomed display.
Another challenge is the potential increase in power consumption when using magnification features for an extended period. Higher magnification levels often require more processing power and can drain your device’s battery more quickly. To mitigate this, consider reducing the magnification level when not necessary or keep your device connected to a power source while using the zoom or magnifier feature for an extended period.
When using third-party magnifier apps, you may encounter compatibility issues with certain apps or find that the magnification is not as seamless as with the built-in features. Always check user reviews and ratings to ensure the app you choose is reliable, compatible, and provides the functionality you need.
It’s important to note that increased magnification can also lead to potential visual distortions or reduced image quality due to pixelation or blurriness. This is especially noticeable when zooming in on low-resolution images or text. To mitigate this, try to use higher-resolution images or documents whenever possible.
Furthermore, it’s essential to be aware of the potential strain that may occur on your eyes when using magnification features for an extended period. Take regular breaks, adjust the magnification level as needed, and consider using features like invert colors or change color filters to improve readability and reduce eye strain.
Lastly, keep in mind that device performance can be impacted by the increased processing demands of the magnification features. In some cases, you may experience slight delays or lag when using zoom or magnifier tools. If this becomes a significant issue, try adjusting the magnification level accordingly or consult with Apple Support for further assistance.
By being aware of these common challenges and employing some simple strategies, you can navigate through the potential obstacles while magnifying your iPhone or iPad display. With a bit of experimentation, you’ll find a comfortable balance between magnification and usability, allowing you to enjoy an enhanced visual experience on your device.