
System Requirements
The first step to install Bullguard Internet Security is to ensure that your computer meets the necessary system requirements. By checking these requirements beforehand, you can ensure a smooth installation process and optimal performance of the software. Here are the minimum system requirements for installing Bullguard Internet Security:
- Operating System: Windows 7 SP1 or later, macOS 10.12 Sierra or later
- Processor: Intel Core 2 Duo 1.0 GHz or equivalent
- RAM: 2 GB for Windows, 1 GB for macOS
- Hard Disk Space: 850 MB available for installation
- Internet Connection: High-speed internet connection for updates and online backup
- Screen Resolution: 1024 x 768 pixels or higher
Please note that these are the minimum requirements, and for optimal performance, it is recommended to have a higher specification. Additionally, Bullguard Internet Security may require additional system resources depending on the number of applications running simultaneously.
Before proceeding with the installation, make sure that your computer meets these requirements. If your system does not meet the minimum specifications, there is a possibility that Bullguard Internet Security may not function properly.
By ensuring that your computer meets these system requirements, you can proceed with confidence to download and install Bullguard Internet Security. Let’s move on to the next step!
Downloading the Bullguard Internet Security Installer
Now that you have confirmed that your computer meets the system requirements, it’s time to download the Bullguard Internet Security installer. Follow the steps below to get started:
- Visit the official Bullguard website: Open your preferred web browser and go to the Bullguard website.
- Go to the Downloads section: Look for the Downloads section on the website. It is usually located in the main navigation bar or can be found on the homepage.
- Select Bullguard Internet Security: Once you are in the Downloads section, find and select Bullguard Internet Security. Make sure you choose the version that is compatible with your operating system.
- Click on the Download button: After selecting the correct version, click on the Download button to begin the download process. The installer file will be saved to your computer’s default download location.
- Wait for the download to complete: Depending on your internet speed, the download may take a few minutes. Be patient and do not interrupt the download process.
- Verify the downloaded file: Once the download is complete, navigate to the folder where the installer file was saved. Check the file name and make sure it matches the expected name for Bullguard Internet Security.
Now that you have successfully downloaded the Bullguard Internet Security installer, you are ready to proceed with the installation process. In the next section, we will guide you through the steps of running the installer on your computer.
Running the Bullguard Internet Security Installer
With the Bullguard Internet Security installer downloaded to your computer, it’s time to run the installer and begin the installation process. Follow the steps below to get started:
- Locate the installer file: Navigate to the folder where the Bullguard Internet Security installer file was saved. It is usually in the Downloads folder or the location you specified during the download process.
- Double-click on the installer file: Find the Bullguard Internet Security installer file and double-click on it to start the installation process. If prompted, grant administrative privileges to the installer.
- Allow the installer to make changes: Depending on your operating system, you may be prompted by a User Account Control (UAC) window asking if you want to allow the installer to make changes to your computer. Click “Yes” or enter your administrator password, if required.
- Wait for the installer to initialize: After granting the necessary permissions, the installer will start initializing. This process may take a few moments, so be patient.
- Follow the on-screen instructions: Once the installer is ready, you will be guided through the installation process with a series of on-screen instructions. Read each prompt carefully and click “Next” or “Continue” to proceed.
- Choose the installation location: During the installation process, you will be asked to choose the location where Bullguard Internet Security will be installed. By default, a suitable location will be suggested, but you can choose a different directory if desired.
- Select additional components (if applicable): Depending on the Bullguard Internet Security version you downloaded, you may have the option to select additional components or features. If presented with these options, choose the ones you want and click “Next” to continue.
- Review the installation settings: Before proceeding with the installation, you will be presented with a summary of the installation settings. Take a moment to review the choices you made and make any necessary adjustments.
- Initiate the installation: Once you are satisfied with the settings, click “Install” or “Start” to begin the installation process. The installer will now copy the necessary files and configure Bullguard Internet Security on your computer.
- Wait for the installation to complete: The installation process may take a few minutes to complete. Do not interrupt or close the installer until it finishes installing all the necessary components.
Congratulations! You have successfully run the Bullguard Internet Security installer. In the next section, we will guide you through the process of selecting the installation language.
Selecting the Installation Language
When installing Bullguard Internet Security, you have the option to select the installation language that best suits your preference. Follow the steps below to choose your desired language:
- Launch the Bullguard Internet Security installer: Locate and run the Bullguard Internet Security installer on your computer by double-clicking on the installer file.
- Choose the installation language: Once the installer is launched, you will be presented with a welcome screen. Look for the option to select the installation language and click on it to open the language selection menu.
- Select your preferred language: In the language selection menu, you will find a list of available languages. Scroll through the options and click on the language that you want to use for the installation process.
- Confirm your selection: After choosing your preferred language, click on the “OK” or “Continue” button to confirm your selection. The installer will apply the chosen language settings for the rest of the installation process.
It’s important to note that selecting the installation language does not affect the language settings of Bullguard Internet Security itself. Once the installation is complete, you can further customize the language settings within the Bullguard Internet Security application.
By selecting the installation language that you are most comfortable with, you can ensure that the installation process proceeds smoothly and that you understand any prompts or instructions that may appear.
In the next section, we will cover the license agreement and how to review and accept it before continuing with the installation.
Reviewing and Accepting the License Agreement
Before proceeding with the installation of Bullguard Internet Security, it is important to review and accept the license agreement. The license agreement outlines the terms and conditions of using the software. Follow the steps below to review and accept the license agreement:
- Open the Bullguard Internet Security installer: Launch the Bullguard Internet Security installer by double-clicking on the installer file you downloaded.
- Locate the license agreement: Once the installer is open, you will be presented with a welcome screen. Look for a link or button that says “License Agreement” or “Read Me.” Click on this link to access the license agreement.
- Read the license agreement: The license agreement will open in a new window or tab. Take the time to carefully read through the agreement to understand the terms and conditions of using Bullguard Internet Security. Pay attention to any provisions regarding usage, limitations, and privacy policies.
- Accept the license agreement: After reviewing the license agreement, you will usually find an “Accept” or “Agree” button at the bottom of the page. Click on this button to indicate your acceptance of the terms and conditions.
- Proceed with the installation: Once you have accepted the license agreement, you can return to the installer window or tab. You are now ready to proceed with the installation process.
It is important to carefully review the license agreement to ensure that you understand the rights and obligations associated with using Bullguard Internet Security. If you have any concerns or questions regarding the license agreement, you may seek legal advice or contact Bullguard support for clarification.
In the next section, we will discuss the different installation types available and guide you on how to choose the appropriate one for your needs.
Choosing Installation Type
When installing Bullguard Internet Security, you have the option to choose from different installation types based on your preferences and needs. Each installation type offers a different level of control and customization during the installation process. Follow the steps below to choose the appropriate installation type:
- Start the Bullguard Internet Security installer: Open the Bullguard Internet Security installer by double-clicking on the installer file you downloaded.
- Choose the installation type: Once the installer is open, you will be presented with a welcome screen. Look for an option that allows you to choose the installation type. Typically, you will be presented with two options: “Express” and “Custom”.
- Select the installation type: Consider your requirements and preferences before making a selection. Here’s a breakdown of the installation types:
- Express: This is the recommended installation type for most users. It installs Bullguard Internet Security with default settings and configurations, minimizing the need for user input. It is suitable if you prefer a quick and hassle-free installation.
- Custom: This installation type offers more control and customization options. It allows you to choose specific components and features you want to install, as well as configure advanced settings. It is suitable if you want to personalize your installation according to your specific needs.
- Make your selection: Click on the installation type that aligns with your preferences. If you are unsure, the Express installation type is a safe choice.
- Proceed with the installation: After selecting the installation type, click on the “Next” or “Continue” button to proceed with the installation process.
By choosing the appropriate installation type, you can ensure that Bullguard Internet Security is installed in a way that best matches your requirements and preferences. Next, we will explore the customization options available during the installation process.
Customizing the Installation
During the installation of Bullguard Internet Security, you have the option to customize various settings according to your preferences. This allows you to tailor the installation to meet your specific needs. Follow the steps below to customize the installation:
- Launch the Bullguard Internet Security installer: Open the Bullguard Internet Security installer by double-clicking on the installer file you downloaded.
- Select the “Custom” installation type: When prompted to choose the installation type, select the “Custom” option. This will provide more control and customization options during the installation process.
- Choose components and features: In the customization window, you will see a list of components and features that can be installed. Review the options carefully and select or deselect the ones you want or don’t want to include.
- Configure advanced settings (if available): Depending on the version of Bullguard Internet Security you are installing, you may have the option to configure advanced settings during the installation process. If these options are available, carefully review and adjust them according to your preferences.
- Review the customization selection: After making your selections and configurations, review the summary of your customization choices. Double-check to ensure that everything is aligned with your preferences.
- Initiate the customized installation: Click on the “Install” or “Start” button to begin the customized installation process. The installer will now proceed with installing Bullguard Internet Security according to your selected components and configurations.
- Wait for the installation to complete: The customized installation process may take a few minutes. Allow the installer to finish installing all the selected components and features.
By customizing the installation, you can have more control over what features and components are installed, ensuring that Bullguard Internet Security is tailored to your specific requirements. Take advantage of this customization opportunity to optimize the software according to your preferences.
In the next section, we will guide you through the installation process and explain what to expect as the installation progresses.
Starting the Installation Process
After customizing the installation settings, you are now ready to start the installation process of Bullguard Internet Security. Follow the steps below to initiate the installation:
- Launch the Bullguard Internet Security installer: Double-click on the installer file you downloaded to open the Bullguard Internet Security installer.
- Select the installation type: If prompted, choose the appropriate installation type based on your preferences. You can select either the “Express” or “Custom” installation type.
- Review the installation settings: If applicable, review the summary of your installation settings to ensure that everything is configured correctly.
- Start the installation: Once you have confirmed the installation settings, click on the “Install” or “Start” button to begin the installation process.
- Wait for the installation to progress: The installer will now start copying the necessary files and configurations onto your computer. The progress bar or indicator will show you the installation progress.
- Be patient: Depending on your computer’s speed and the selected installation components, the installation process may take a few minutes. It is important to be patient and allow the installer to complete the installation.
- Monitor the installation process: As the installation progresses, you may see additional prompts or screens for certain configurations or actions. Follow these prompts and provide any necessary inputs to ensure a successful installation.
- Installation complete: Once the installation is complete, you will see a message indicating that Bullguard Internet Security has been successfully installed on your computer.
Now that you have started the installation process, it is important to follow any additional instructions or prompts that may appear on your screen. These instructions may include steps to activate Bullguard Internet Security or configure certain settings. Completing these steps will ensure that the software is fully functional and ready to protect your computer.
In the next section, we will guide you through the process of activating Bullguard Internet Security.
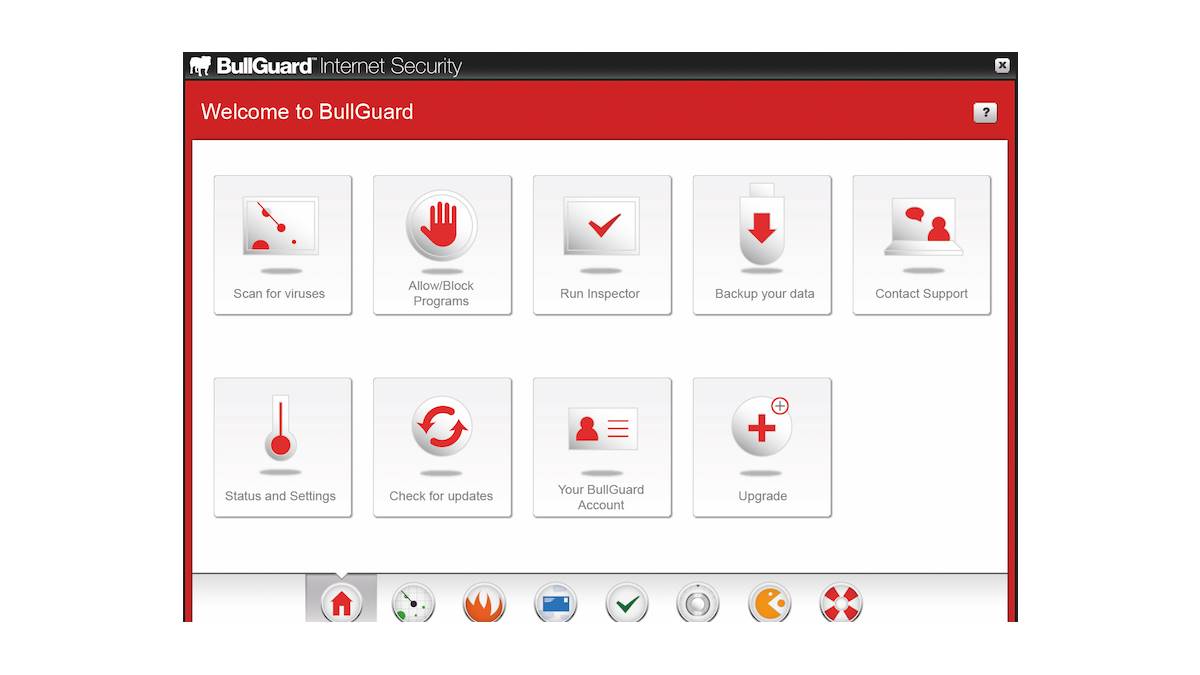
Activating Bullguard Internet Security
After the successful installation of Bullguard Internet Security, the next step is to activate the software. Activation is necessary to validate your license and enable all the features and protection that Bullguard Internet Security offers. Follow the steps below to activate Bullguard Internet Security:
- Launch Bullguard Internet Security: Locate the Bullguard Internet Security icon on your desktop or in the Start menu and double-click to launch the application.
- Access the activation screen: Once Bullguard Internet Security is open, look for the activation section or menu. The location may vary depending on the version you installed, but it is usually found in the main dashboard or settings menu.
- Enter your license key: In the activation screen, you will be prompted to enter your license key. The license key is typically provided to you when you purchase Bullguard Internet Security. Enter the key in the designated field accurately.
- Click on “Activate” or a similar button: After entering the license key, click on the “Activate” or similar button. Bullguard Internet Security will connect to the licensing servers and verify the validity of your license.
- Wait for the activation process: The activation process may take a few moments as the software verifies your license information. Stay connected to the internet throughout this process.
- Confirmation of activation: Once the activation is successful, you will receive a confirmation message indicating that Bullguard Internet Security has been activated on your computer.
After activation, your Bullguard Internet Security is fully operational and ready to protect your computer from online threats. You can now explore the various features and settings available within the application to enhance your security and customize the software to your needs.
In the next section, we will cover the final steps to complete the installation process.
Completing the Installation Process
Once Bullguard Internet Security is activated, there are a few final steps to complete the installation process. These steps will ensure that the software is fully functional and ready to protect your computer effectively. Follow the instructions below to complete the installation process:
- Update Bullguard Internet Security: After activation, it is important to update Bullguard Internet Security to the latest version. This will ensure that you have the most up-to-date protection against the latest threats. Look for the update option within the application and follow the prompts to install any available updates.
- Configure scan settings: Bullguard Internet Security offers various scan options to scan your computer for viruses and malware. Take some time to explore the scan settings and configure them according to your preferences. This will help you customize the scanning process to suit your needs.
- Set up automatic updates: Enable automatic updates within Bullguard Internet Security so that the software can regularly check for new updates and install them automatically. This ensures that your computer is continuously protected with the latest security patches and enhancements.
- Enable real-time protection: Bullguard Internet Security provides real-time protection to detect and block threats as they occur. Confirm that real-time protection is enabled within the application settings to ensure that your computer is protected in real-time against malware, phishing attacks, and other malicious activities.
- Ensure firewall protection: Bullguard Internet Security includes a firewall feature to monitor incoming and outgoing network connections. Verify that the firewall is enabled and properly configured to provide an additional layer of protection for your computer.
- Go through the documentation: Take the time to read the documentation provided by Bullguard Internet Security. The documentation will provide you with further guidance on using the software effectively, including additional features, troubleshooting, and best practices for online security.
By completing the above steps, you will ensure that the installation process is fully finalized, and Bullguard Internet Security is configured for optimal protection. Remember to keep the software up-to-date and regularly perform scans to maintain a secure and protected computer environment.
Congratulations! You have successfully installed and completed the initial setup of Bullguard Internet Security. You can now browse the internet, download files, and use your computer with confidence, knowing that your digital security is in good hands.
Restarting Your Computer
After completing the installation of Bullguard Internet Security, it is recommended to restart your computer. Restarting ensures that any system changes made during the installation process are fully applied and that Bullguard Internet Security functions optimally. Follow the steps below to restart your computer:
- Save your work: Before initiating a restart, make sure to save any unsaved work or close any open applications to prevent data loss.
- Close all programs: Close all open programs and windows on your computer.
- Click on the Start menu: In the bottom left corner of your screen, click on the Start menu icon.
- Click on the Power button: In the Start menu, you will see a Power button. Click on it to reveal a set of options.
- Select Restart: From the power options, choose the “Restart” option. You may be prompted to confirm the restart process.
- Wait for the computer to restart: After confirming the restart, your computer will shut down and then start up again. Allow the computer time to complete the restart process.
- Login to your computer: Once the computer has restarted, you will be prompted to log in to your user account. Enter your credentials to access your computer.
Restarting your computer after installing Bullguard Internet Security allows the software to load and integrate properly into your system. It also ensures that any necessary updates or configurations take effect, providing you with the best possible protection against online threats.
After restarting your computer, Bullguard Internet Security will start automatically, and you can continue using your computer with confidence, knowing that your system is protected.
In the next section, we will discuss the importance of keeping Bullguard Internet Security up to date through regular software updates.
Updating Bullguard Internet Security
Keeping Bullguard Internet Security up to date is crucial for maintaining its effectiveness in protecting your computer from evolving threats. Regular updates ensure that the software has the latest security patches, bug fixes, and feature enhancements. Follow the steps below to update Bullguard Internet Security:
- Launch Bullguard Internet Security: Double-click on the Bullguard Internet Security icon to open the application.
- Access the update settings: Look for the update or settings section within the Bullguard Internet Security interface. It is usually found in the main dashboard or settings menu.
- Start the update process: Within the update settings, click on the “Check for updates” or a similar button to initiate the update process. Bullguard Internet Security will connect to the update servers to check for available updates.
- Download and install available updates: If there are updates available, Bullguard Internet Security will prompt you to download and install them. Follow the on-screen instructions to proceed with the update process. It is essential to stay connected to the internet during this process.
- Wait for the update to complete: The update process may take some time, depending on the size of the update and your internet connection speed. Be patient and allow Bullguard Internet Security to complete the update process.
- Restart the software (if necessary): After the update is installed, Bullguard Internet Security may require a restart to apply the changes. If prompted, follow the instructions to restart the software.
Regularly updating Bullguard Internet Security is vital for ensuring that the software can effectively detect and respond to the latest threats. It also helps to keep your computer and personal information safe from new vulnerabilities that may be discovered.
It is recommended to enable automatic updates within Bullguard Internet Security so that the software can automatically check for and install updates on a regular basis. This way, you can ensure that your computer is continuously protected without having to manually initiate the update process.
By keeping Bullguard Internet Security up to date, you are taking an active step in safeguarding your computer and maintaining a secure digital environment.
In the next section, we will cover the process of configuring Bullguard Internet Security to suit your specific needs and preferences.
Configuring Bullguard Internet Security
Bullguard Internet Security provides various configuration options that allow you to customize the software according to your specific needs and preferences. By configuring Bullguard Internet Security, you can enhance your protection and optimize its performance. Follow the steps below to configure Bullguard Internet Security:
- Launch Bullguard Internet Security: Double-click on the Bullguard Internet Security icon to open the application.
- Access the settings menu: Look for the settings or configuration section within the Bullguard Internet Security interface. It is usually represented by a gear or settings icon.
- Explore the settings options: Click on the settings or configuration icon to access the various options available for customization. These options may include general settings, scan settings, firewall settings, and more.
- Configure general settings: In the general settings section, you can customize options such as automatic scanning, notifications, and updates. Review the available options and adjust them according to your preferences.
- Tweak scan settings: Bullguard Internet Security offers different types of scans, including quick scans, full system scans, and custom scans. Customize the scan settings according to your desired frequency and thoroughness. You can also specify folders or files to be excluded from scans if needed.
- Manage firewall settings: The firewall in Bullguard Internet Security helps protect your computer from unauthorized access. Explore the firewall settings and configure them to suit your needs. You can customize network rules, set up trusted applications, and manage network zones.
- Personalize application settings: Bullguard Internet Security provides additional settings to personalize your experience. Customize options such as user interface preferences, language settings, and profiles to tailor the software to your liking.
- Save and apply settings: After configuring Bullguard Internet Security to your satisfaction, save and apply the settings. Some changes may require a restart of the software to take effect.
By configuring Bullguard Internet Security according to your preferences, you can optimize its performance, enhance your protection, and personalize your experience. Take the time to explore the settings and make adjustments that align with your specific needs.
Remember to regularly review and update the configurations as necessary, especially when there are changes in your computing habits or security requirements. By actively managing the settings, you can ensure that Bullguard Internet Security is always aligned with your evolving needs.
In the next section, we will summarize the installation and configuration process and provide some final words of advice.