
Understanding the Outlook Attachment Size Limit
When using Microsoft Outlook, you may have encountered limitations on the size of attachments you can send or receive. These size restrictions are in place to ensure efficient email transmission and to prevent issues with server storage. Understanding these limitations is crucial for effectively managing your email communication.
By default, the attachment size limit in Outlook is set to a maximum of 20 megabytes (MB) for sending and receiving messages. However, it’s important to note that this limit may vary depending on your organization’s email server settings. It’s always a good idea to check with your IT administrator to confirm the specific attachment size limit in your Outlook setup.
When an attachment exceeds the size limit, Outlook typically displays an error message indicating that the message with the attachment cannot be sent. Likewise, if you receive an email with an oversized attachment, Outlook may not download it or may display a warning about the attachment’s size.
The attachment size limit applies to individual attachments as well as to the total size of all attachments combined. For example, if the attachment size limit is 10 MB, you can send a single attachment of up to 10 MB or multiple attachments that, when combined, do not exceed the limit.
It’s important to understand that the attachment size limit set in Outlook is not necessarily the same as the maximum file size supported by other email clients or services. It may be lower or higher depending on the email server and client configurations. Therefore, even if you can send larger attachments through other means, recipients using Outlook might still face limitations.
Managing the attachment size limit is vital to ensure smooth email communication and avoid unnecessary complications. In the following sections, we will explore various methods to increase the Outlook attachment size limit and provide you with practical solutions to overcome this restriction.
Methods to Increase the Attachment Size Limit
If you frequently encounter attachment size limitations in Outlook, don’t worry! There are several methods you can employ to increase the attachment size limit and overcome this restriction. Let’s explore these methods below:
1. Using Registry Settings:
One way to increase the attachment size limit is by modifying the registry settings in Outlook. This method requires some technical knowledge and should be performed with caution. By adjusting the MaxFileSize and MaxLargeFileSize values in the registry, you can increase the attachment size limit. However, it’s essential to note that modifying the registry can have unintended consequences, so it’s crucial to create a backup and follow instructions carefully.
2. Modifying Outlook Profile:
Another method is to modify your Outlook profile settings. By changing the Exchange Server or Office 365 mailbox settings, you can adjust the attachment size limit specifically for your account. This method allows you to customize the limit based on your needs, but it might require administrative access or assistance from your IT department.
3. Using Third-Party Software:
If you’re not comfortable modifying settings or don’t have administrative access, you can utilize third-party software to increase the attachment size limit. There are various tools available that offer extended attachment capabilities for Outlook. These software solutions often integrate seamlessly with Outlook and provide a user-friendly interface for managing large attachments.
4. Compressing Attachments:
An effective way to work within attachment size limitations is by compressing attachments before sending them. You can use file compression software or built-in compression features within Outlook to reduce the file size without compromising the content. Compressing attachments allows you to fit larger files within the existing size limit, making it easier to send them via email.
5. Using Cloud Storage Services:
If the attachment size limitations in Outlook are still hindering your communication, consider utilizing cloud storage services. By uploading large files to cloud storage platforms like Google Drive, Dropbox, or OneDrive, you can share the files with recipients through shared links instead of attaching them directly to emails. This method allows you to bypass attachment size restrictions and ensure smooth file sharing.
6. Splitting Large Attachments:
If the attachment size exceeds the limit, another option is to split the large file into multiple smaller files that fall within the size restriction. You can use file archiving software to split the attachment into manageable sizes and send them individually or as a compressed archive. The recipient can then reassemble the files on their end.
7. Requesting IT Admin to Increase Limit:
If none of the above methods work for you, consider reaching out to your IT department or system administrator and request an increase in the attachment size limit. They may be able to make adjustments on the server side to accommodate your needs. However, keep in mind that this is dependent on organizational policies and server capabilities.
By employing these methods, you can effectively overcome the attachment size restrictions in Outlook and enhance your email communication, ensuring that important files and documents can be shared seamlessly.
Method 1: Using Registry Settings
One way to increase the attachment size limit in Outlook is by modifying the registry settings. However, it’s important to note that modifying the registry can have unintended consequences and should be done with caution. Follow these steps to change the registry settings:
- Open the Registry Editor by pressing the Windows key + R, typing “regedit” into the Run dialog box, and clicking OK.
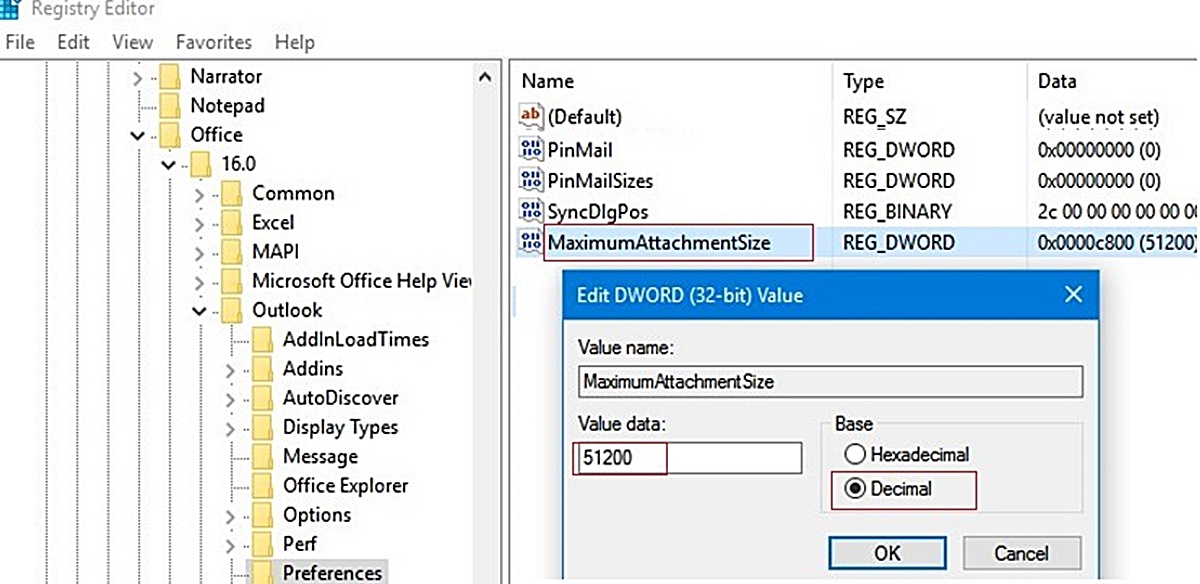
- Navigate to the following registry key: HKEY_CURRENT_USER\Software\Microsoft\Office\16.0\Outlook\Preferences (Note: The number “16.0” may vary depending on your version of Outlook).
- Right-click on the Preferences folder, select New, and then click DWORD (32-bit) Value.
- Name the new value “MaxFileSize” (without the quotes) and press Enter.
- Double-click on the MaxFileSize value and select Decimal. Enter the desired size limit (in kilobytes) within the Value data field. For example, to set a limit of 50 megabytes, enter “51200” (50 * 1024).
- Click OK to save the changes.
Additionally, you may also need to create a “MaxLargeFileSize” value following the same steps as above. This value allows you to set the size limit for files that are saved as an attachment by default.
After making these changes, restart Outlook for the new settings to take effect. However, bear in mind that modifying the registry is not recommended unless you have a good understanding of the process. It’s advisable to back up your registry before proceeding and exercise caution to avoid any potential issues.
Remember to consult with your IT administrator or seek professional assistance if you are unsure about modifying the registry or if you encounter any difficulties during the process.
Using registry settings to adjust the attachment size limit in Outlook can be an effective way to increase the allowable file sizes. However, it’s crucial to proceed with caution and ensure that you make the necessary backups and take appropriate measures to avoid any adverse effects on your system.
Method 2: Modifying Outlook Profile
Another method to increase the attachment size limit in Outlook is by modifying your Outlook profile settings. This method allows you to customize the attachment size limit specifically for your account. Please note that you may need administrative access or assistance from your IT department to perform these changes. Here’s how you can modify your Outlook profile:
- Open Outlook and go to the File tab.
- Click on Account Settings and select Account Settings again from the drop-down menu.
- In the Account Settings window, select your email account and click on Change.
- In the Change Account window, click on More Settings.
- Navigate to the Advanced tab.
- Under the section titled “Mailbox Size and Limit Information,” you will find options to modify the attachment size limit.
- Adjust the values for “Maximum allowed” attachment size limit for both sending and receiving based on your requirements.
- Click OK to save the changes.
- Exit and restart Outlook for the new settings to take effect.
By modifying your Outlook profile settings, you can increase the attachment size limit specifically for your account, allowing you to send and receive larger files. However, please keep in mind that changing these settings may impact the overall performance of Outlook and your email server.
It’s essential to consult with your IT administrator or seek professional assistance if you are unsure about modifying your Outlook profile or if you encounter any issues during the process. Your IT department can guide you and provide any necessary permissions or support required for modifying Outlook profile settings effectively.
Modifying your Outlook profile can provide a customized solution to increase the attachment size limit and allow for better management of large files in your email communication.
Method 3: Using Third-Party Software
If modifying settings or profiles is not an option or you prefer a more user-friendly approach, using third-party software is an effective method to increase the attachment size limit in Outlook. There are various tools available that offer extended attachment capabilities and integrate seamlessly with Outlook. Here’s how you can utilize third-party software to overcome attachment size restrictions:
1. Research and Choose a Trusted Software:
Start by researching and selecting a reputable third-party software that specializes in extending attachment size limits in Outlook. Look for software that has positive reviews, good customer support, and compatibility with your Outlook version.
2. Download and Install the Software:
Once you’ve identified the suitable software, download it from the official website or a trusted software marketplace. Make sure to follow the installation instructions provided by the software developer to ensure a seamless integration with Outlook.
3. Configure the Software:
After installation, open the software and navigate through the configuration settings. Typically, you’ll find options to adjust attachment size limits, customize storage locations, and even compress attachments to optimize space. Configure the settings according to your preferences and requirements.
4. Attach and Send Larger Files:
Once the software is configured, you can easily attach larger files to your emails within the newly extended attachment size limit. Navigate to Outlook, compose a new email, and attach the desired file. You’ll notice that the software seamlessly handles the attachment and ensures smooth email transmission.
5. Share Files with Recipients:
When recipients receive your email with larger attachments, they may need to either install the same third-party software or utilize a companion application to access the files seamlessly. Make sure to communicate the requirements and provide instructions to recipients for an uninterrupted file sharing experience.
Using third-party software can provide a convenient solution to overcome attachment size limitations in Outlook. These tools often offer additional features such as file compression, secure transfer, and integration with popular cloud storage services, enhancing your overall email experience.
Remember to choose reputable software, install it from trusted sources, and keep it up to date to ensure compatibility with the latest Outlook versions and secure file transmission.
Always exercise caution and conduct thorough research before installing and using third-party software, ensuring that it aligns with your specific needs and meets your organization’s security protocols.
Method 4: Compressing Attachments
When facing attachment size limitations in Outlook, one effective method to work within those restrictions is by compressing attachments. Compression reduces the file size without compromising the content, allowing you to fit larger files within the existing attachment size limit. Here’s how you can compress attachments:
1. Use Built-in Compression Features:
Outlook provides built-in compression features that allow you to shrink the size of your attachments. To compress an attachment, simply compose a new email, attach the file, and click on the “File” tab or the attachment icon. From there, choose the option to compress the attachment. Outlook will automatically reduce the file size while maintaining its integrity.
2. Utilize File Compression Software:
If the built-in compression features in Outlook are not sufficient for your needs, you can use third-party file compression software. Choose reputable compression tools that offer various compression algorithms and formats. These software programs allow you to compress files individually or compress multiple files into a compressed archive to be attached to your email.
3. Consider Different Compression Formats:
When compressing attachments, consider using different compression formats that provide higher compression ratios. For example, using the ZIP format often results in a smaller file size compared to other formats like RAR or 7z. Experiment with different compression formats to find the one that offers the best balance between file size reduction and compatibility with the intended recipient’s software.
4. Balancing Compression and Compatibility:
While compressing attachments can help overcome attachment size limitations, it’s essential to balance compression with compatibility. Some recipients may not have the necessary software to extract files from certain compression formats. Ensure that the recipient is familiar with the compression format you’re using or provide instructions on how to extract the compressed files.
5. Be Mindful of File Types:
Keep in mind that not all file types benefit from compression. Certain file types, such as already compressed formats like JPEG or MP3, may not compress significantly further. Compressing these files may only result in minimal size reduction and may not be worth the effort. Focus on compressing files that are not already compressed or have the potential for substantial size reduction.
By utilizing compression techniques, you can effectively reduce the file size of attachments and fit larger files within the attachment size limit in Outlook. Always consider the compatibility of the compressed files and communicate instructions to recipients for a seamless file sharing experience.
Method 5: Using Cloud Storage Services
If attachment size limitations in Outlook are still hindering your ability to send large files, you can utilize cloud storage services as an alternative solution. By uploading your attachments to cloud storage platforms like Google Drive, Dropbox, or OneDrive, you can share the files with recipients through shared links instead of attaching them directly to emails. Here’s how you can use cloud storage services to overcome attachment size restrictions:
1. Choose a Cloud Storage Service:
First, select a cloud storage service that best fits your needs and preferences. Popular options include Google Drive, Dropbox, OneDrive, and Box. Consider factors such as storage capacity, file size limits, ease of use, and security features while making your choice.
2. Upload Files to Cloud Storage:
After signing up for an account with the chosen cloud storage service, upload the large file or files you wish to share. Simply drag and drop the file(s) from your computer or use the upload functionality provided by the cloud storage platform. Ensure that the file(s) uploaded are within the size limits set by the cloud storage service.
3. Generate a Shared Link:
Once the files are uploaded, generate a shared link or shareable URL to provide access to the files. In most cloud storage services, you can right-click on the uploaded file, select “Share” or “Get Link,” and choose the option to generate a shareable link.
4. Insert the Shared Link in Emails:
In your email composition within Outlook, instead of attaching the large file directly, type a descriptive message and insert the shared link generated from the cloud storage service. Recipients can click on the link to access and download the file directly from the cloud storage platform.
5. Set Access Permissions:
Depending on the nature of the file(s) you’re sharing, you may want to adjust the access permissions on the cloud storage service. For sensitive files, restrict access to specific individuals or groups by configuring the file’s sharing settings. This way, you can ensure that only intended recipients can view and download the shared file.
Using cloud storage services allows you to bypass attachment size restrictions in Outlook and deliver large files seamlessly. It also offers the advantage of centralized file management, version control, and easy collaboration options.
Remember to inform recipients about the use of a cloud storage service, provide instructions on how to access the shared file(s), and ensure that the file(s) remain accessible for a reasonable duration.
Keep in mind any privacy and security implications associated with using third-party cloud storage services, and choose a reputable and secure platform that aligns with your organization’s policies.
Method 6: Splitting Large Attachments
If you encounter a situation where the attachment size exceeds the limit set in Outlook, you can consider splitting the large attachment into smaller parts. This method allows you to send multiple smaller files that individually fall within the attachment size limit. Here’s how you can split large attachments:
1. Identify the Attachment Size Limit:
First, determine the maximum attachment size limit allowed in Outlook. This information is crucial for effectively splitting the large file into smaller parts that comply with the limit.
2. Choose a File Splitting Tool:
There are various file splitting tools available that can help automate the process of splitting large attachments. Research and select a reliable file splitting tool that offers the necessary features such as selecting file size limits, maintaining file integrity, and compatibility with your operating system.
3. Split the Attachment:
Using the chosen file splitting tool, select the large attachment you want to split and specify the desired file size for each part. The tool will automatically divide the attachment into smaller parts, ensuring that each part does not exceed the attachment size limit. In some cases, you may need to specify the desired file size manually, while some tools may offer predefined options.
4. Send the Split Attachments:
Once the large attachment is split into smaller parts, the file splitting tool will generate separate files. Compose a new email in Outlook and attach each individual part as separate attachments. Remember to clearly label the attachments, indicating their sequence (e.g., “Part 1 of 3,” “Part 2 of 3,” and so on) to help the recipient correctly reconstruct the file.
5. Communicate Instructions to the Recipient:
It’s essential to inform the recipient about the split attachments and provide detailed instructions on how to reconstruct the file. Clearly explain the sequence of the attached parts and any additional steps they may need to follow to combine the parts back into a single file.
6. Be Mindful of File Types and Compatibility:
When splitting large attachments, consider the compatibility of the file parts with the recipient’s software or operating system. Ensure that both you and the recipient have the necessary software or tools to reassemble the parts into the original file.
By splitting large attachments, you can overcome attachment size limitations in Outlook and successfully share larger files. However, it’s important to consider the complexity this method may introduce for both you and the recipient, so use it only when necessary and provide clear instructions for a smooth file sharing experience.
Method 7: Requesting IT Admin to Increase Limit
If all other methods to increase the attachment size limit in Outlook are not feasible or do not provide the desired results, you can consider reaching out to your IT department or system administrator and requesting an increase in the attachment size limit. Here’s how you can request an increase:
1. Determine the Current Limit:
Before contacting your IT administrator, find out the existing attachment size limit in Outlook. This information will help you communicate the necessary changes and provide a starting point for the discussion.
2. Prepare a Clear Request:
Create a formal request outlining the reasons for needing an increased attachment size limit. Be specific about the challenges you face with the current limit and how it affects your ability to send or receive important files. Include any business justifications or examples that highlight the need for an increase.
3. Reach Out to IT Administrator:
Contact your IT department or system administrator through the appropriate channels, such as email or a helpdesk ticketing system. Include your request along with any supporting documents or evidence that can strengthen your case for an increased attachment size limit.
4. Explain the Impact and Benefits:
When communicating with the IT administrator, clearly explain the impact of the current attachment size limit on your productivity and the potential benefits of increasing it. Emphasize any cost or time savings that can be achieved by allowing larger attachments.
5. Address Security Concerns:
Understand that attachment size limits are often implemented to ensure efficient email transmission and prevent potential security risks. Acknowledge the importance of security concerns and assure the IT administrator that you are aware of the implications. If necessary, propose alternate security measures or provide assurance that the files you send or receive adhere to organizational security protocols.
6. Follow the Organizational Protocols:
Ensure that you follow any established protocols or procedures within your organization when requesting an increased attachment size limit. This may involve obtaining approvals from the appropriate levels of management or filling out specific request forms.
7. Provide Feedback and Collaboration:
During the process of requesting an increased attachment size limit, be open to feedback from the IT administrator. Collaborate to find a solution that meets both your needs and the organization’s requirements. Remember that the IT administrator may have insights or constraints that need to be considered.
By reaching out to your IT department or system administrator, you can initiate a conversation regarding the attachment size limit in Outlook. Their expertise and understanding of the organization’s infrastructure can help determine if it’s possible to increase the attachment size limit and the process needed to implement the change.
Keep in mind that increasing the attachment size limit may not always be feasible due to technical limitations, resource constraints, or security considerations. Be prepared to explore alternative solutions or workarounds if an increase is not possible in your specific organizational setting.
Tips to Manage Large Attachments Efficiently
Dealing with large attachments in Outlook can be challenging at times. To ensure smooth email communication and efficient management of large attachments, consider the following tips:
1. Evaluate Necessity:
Before attaching a large file, evaluate if sending the attachment is necessary. Consider alternative methods of file sharing, such as utilizing cloud storage services or shared network drives. This approach can prevent overwhelming the recipient’s mailbox and optimize email storage.
2. Compress Attachments:
Take advantage of file compression techniques to reduce the size of attachments without compromising their content. Compressing files using built-in features or third-party software can significantly reduce file size, making it easier to send them via email and reducing the risk of size limitations.
3. Use File Transfer Services:
If the file size exceeds the attachment limit even after compression, consider using dedicated file transfer services. These services allow you to upload the file to a secure server and share a download link with the recipient. This method ensures that large files can be easily accessed without the constraints of attachment size limits.
4. Educate Recipients:
Inform your recipients about the attachment size limits and provide instructions on alternative methods for accessing large files. This can help avoid confusion and ensure smooth file sharing. Consider providing clear explanations, step-by-step instructions, and relevant support contacts if recipients have any difficulties accessing or downloading the files.
5. Utilize Cloud Storage Integration:
Take advantage of the integration between Outlook and cloud storage services like OneDrive or Google Drive. Instead of attaching large files, upload them to the cloud storage platform and send a link to the file. This allows recipients to access and download the file directly from the cloud storage service.
6. Regularly Clean up Attachments:
To free up storage space and maintain a well-organized mailbox, regularly clean up attachments from your emails. Delete unnecessary attachments or move them to appropriate folders or cloud storage. By keeping your mailbox uncluttered, you can avoid reaching attachment size limits and improve overall performance.
7. Collaborate with Team Members:
If you often work with the same team members, consider setting up shared network drives or shared folders in cloud storage platforms. This allows multiple team members to access and collaborate on files without the need for attachments, minimizing the impact of attachment size limits.
8. Prioritize Security:
When dealing with large attachments, ensure that sensitive information or confidential files are shared securely. Use encryption methods or consider password-protecting files to enhance data protection. Additionally, follow your organization’s security policies and guidelines when handling and sharing large attachments.
By implementing these tips, you can effectively manage large attachments in Outlook and ensure efficient and secure file sharing. Assess the necessity of file attachments, leverage compression techniques, use alternative file transfer methods, educate recipients, and maintain an organized and secure approach to handling large attachments within your email communication.