
Checking the File Format of the Downloaded Music
Before importing downloaded music into iTunes, it is essential to ensure that the files are in a compatible format. iTunes supports various audio file formats such as MP3, AAC, WAV, and AIFF. To check the format of your downloaded music files, follow the steps below:
- Open the folder where you have downloaded your music files. You can locate this folder by checking the default download location in your web browser’s settings or by navigating to the folder you manually selected during the downloading process.
- Identify the file extensions of the music files. The file extension is the series of characters that appear after the period in the file name. For example, if a file is named “song.mp3,” the file extension is “.mp3.”
- Verify if the file extensions of the downloaded music files match the supported formats by iTunes. If they don’t, you may need to convert the files to a compatible format before importing them into iTunes. There are various third-party software and online tools available that can help you convert the file formats easily.
It’s crucial to note that file extensions alone do not guarantee the compatibility of the music files. Some files with the correct extensions may still be encoded in an unsupported format. In such cases, you will need to use a specialized audio conversion tool to ensure compatibility with iTunes.
By checking the file format and converting the files if necessary, you can ensure a smooth and hassle-free process when importing downloaded music to iTunes. Now that you have confirmed the file formats, you are ready to organize your music files before adding them to iTunes.
Organizing Your Music Files
When it comes to importing downloaded music into iTunes, organizing your music files can help you maintain a well-structured library and easily find your favorite tracks. Follow these steps to organize your music files:
- Create a dedicated folder for your music files. This will make it easier to locate and manage your files.
- Give meaningful names to your music files. Use descriptive titles that include the artist name, song name, and any other relevant information. This will help you quickly identify the songs in your iTunes library.
- Organize your music files into subfolders based on genres, artists, albums, or playlists. This will make it easier to navigate and browse your music collection within iTunes.
- Ensure that all the necessary metadata, such as artist, album, genre, and track number, are correctly tagged for each music file. This will enhance your browsing experience and make it easier to create customized playlists in iTunes.
- Delete any duplicate or unnecessary music files to avoid cluttering your iTunes library. This will free up storage space and make your library more streamlined.
By organizing your music files before importing them into iTunes, you can create a well-structured library that reflects your musical preferences and makes it easier to find and enjoy your favorite songs. Once you have organized your music files, you are ready to move on to the next step of connecting your device to your computer.
Connecting Your Device to Your Computer
Before you can start importing downloaded music to iTunes, you’ll need to connect your device to your computer. Whether you’re using an iPhone, iPad, iPod, or any other compatible device, follow these steps to establish the connection:
- Using a USB cable, connect your device to an available USB port on your computer. Make sure the cable is securely plugged in on both ends.
- Depending on your device and computer, you may see a prompt on your device’s screen asking for permission to connect to the computer. Tap “Allow” to grant permission.
- Your computer may also prompt you to trust the connected device. If so, follow the on-screen instructions to trust the device and establish the connection.
Once your device is connected to your computer, you can proceed to the next step of opening iTunes.
Keep in mind that it’s important to have the latest version of iTunes installed on your computer. If you don’t have iTunes installed, you can download it for free from the official Apple website.
Now that your device is connected and iTunes is ready, you can continue with the process of adding music files to your iTunes library.
Opening iTunes
To import downloaded music into iTunes, you need to have the iTunes application open on your computer. Follow these steps to open iTunes:
- Locate the iTunes application on your computer and double-click on its icon. The iTunes icon is typically a musical note inside a white circle.
- If you’re using a Windows computer, you may need to click on the Start menu and search for “iTunes” to find and open the application.
- Mac users can usually find the iTunes application in their Dock or by using Spotlight Search.
Once you have successfully opened iTunes, you’ll see the familiar interface with various options, including library, playlists, and devices.
If you’re new to iTunes, take a moment to familiarize yourself with the different sections and menus. The library section is where your imported music files will be stored, and the playlists section allows you to create and manage personalized playlists. The devices section displays your connected device and enables you to sync your music with it.
With iTunes open and ready to use, you can now proceed to the next step of adding music files to your iTunes library.
Adding Music Files to Your iTunes Library
Now that you have iTunes open on your computer, it’s time to add the downloaded music files to your iTunes library. Follow these steps to import music files into iTunes:
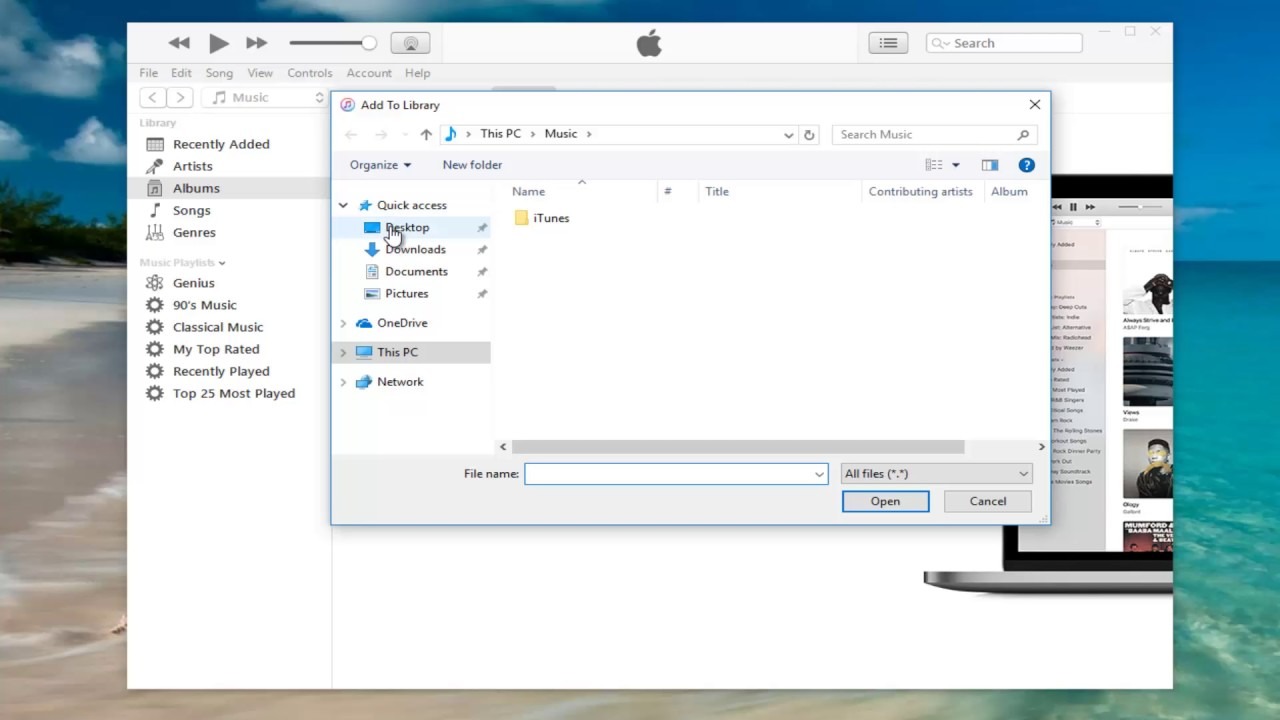
- Click on the “File” tab in the top left corner of the iTunes window and select “Add File to Library” (for adding individual files) or “Add Folder to Library” (for adding a folder containing multiple files).
- A file explorer window will open. Navigate to the folder where your downloaded music files are stored.
- Select the music file(s) or folder you want to import and click “Open.” iTunes will begin importing the selected music files into your library.
- You can monitor the progress of the import by checking the status bar at the top of the iTunes window. Depending on the number of files and their sizes, the import process may take a few moments.
After the import process is complete, you will find your newly added music files in the “Songs” section under the “Library” tab in iTunes. From there, you can sort and organize your music files further, create playlists, and edit the metadata if needed.
It’s important to note that iTunes does not move or duplicate the original music files when you add them to the library. Instead, it creates a reference to the files and stores them in the iTunes library folder.
With your music files successfully imported into the iTunes library, you can now move on to the next steps of syncing your device with iTunes and transferring the music files to your device.
Syncing Your Device with iTunes
To enjoy your downloaded music on your device, you need to sync it with iTunes. Syncing allows you to transfer the music files from your iTunes library to your device. Follow these steps to sync your device with iTunes:
- Ensure that your device is still connected to your computer via USB.
- In iTunes, click on the device icon that appears in the upper-left corner of the iTunes window. This will open the device management page.
- From the sidebar on the left, select “Music” to access the music syncing settings.
- Choose whether you want to sync your entire music library or specific playlists, artists, albums, or genres. You can also customize the options according to your preferences.
- Once you have selected your desired syncing options, click on the “Apply” or “Sync” button to start the synchronization process.
- Wait for the sync to complete. The time it takes will depend on the number of music files and the speed of your computer and device.
During the sync, iTunes will transfer the selected music files to your device. You can monitor the progress in the top bar of the iTunes window.
After the sync is complete, you can disconnect your device from the computer. You should now be able to enjoy the downloaded music on your device using the built-in music player or any compatible music app.
Remember, you can always repeat the syncing process whenever you add new music to your iTunes library or want to update the music on your device.
With your device synced and the music files transferred, you are now ready to enjoy your favorite tunes on the go. In the next section, we will address any common issues you might encounter during the process.
Transferring Music to Your Device
After syncing your device with iTunes, the music files from your iTunes library will be transferred to your device. Follow these steps to ensure a successful transfer:
- Disconnect your device from your computer if you haven’t done so already.
- On your device, locate the music app or any other compatible app where you want to access your transferred music.
- Open the music app and navigate to the library or music section.
- You should now see the transferred music files available in your library. You can browse and play them as desired.
- If you want to listen to the music offline, you may need to enable the option to download the files for offline playback, depending on the app you are using. Refer to the app’s settings for more information.
Once the music transfer is complete, you can enjoy your downloaded music directly on your device without needing to be connected to your computer or the internet.
Remember, the steps for accessing your transferred music may vary slightly depending on the device and music app you are using. However, the general process remains the same – sync your device with iTunes and open the music app on your device to find and play the transferred music.
Now that you have successfully transferred your downloaded music to your device, you can enjoy your favorite tracks anytime and anywhere you go!
Troubleshooting Common Issues
While importing downloaded music to iTunes, you may encounter some common issues. Here are a few troubleshooting tips to help resolve these issues:
- Incompatibility: If iTunes is unable to import certain music files due to incompatibility, you may need to convert them to a supported format using third-party software or online tools.
- Missing Metadata: If your music files are missing metadata like artist, album, or track number, you can manually edit the information in iTunes. Right-click on the song, select “Get Info,” and enter the missing details in the appropriate fields.
- Duplicates: Duplicate music files can clutter your iTunes library. To remove duplicates, select “File” in iTunes, choose “Display Duplicates,” and delete the duplicate files. Alternatively, you can use third-party software to clean up your library.
- Syncing Issues: If you encounter problems while syncing your device with iTunes, try disconnecting and reconnecting your device, restarting both your device and computer, and updating your iTunes to the latest version.
- Device Not Recognized: If your device is not recognized by iTunes, ensure that you have the latest device drivers installed on your computer. You may also try using a different USB port or cable to establish a connection.
- Slow Transfer: Large music libraries or slow computers can result in slow music transfers. To speed up the process, close any unnecessary applications, ensure your computer has enough storage space, and consider transferring music in smaller batches.
If you continue to experience issues while importing downloaded music to iTunes, you may find Apple’s support articles or online forums helpful for troubleshooting specific problems or seeking further assistance.
By addressing these common issues, you can ensure a smooth and hassle-free experience when importing and managing your downloaded music in iTunes.