
Method 1: Using Android’s Built-in Settings
One of the simplest ways to hide notifications on your Android lock screen is by utilizing the built-in settings provided by the Android operating system. Follow the steps below to customize your lock screen notifications:
- Access the “Settings” app on your Android device.
- Scroll down and tap on the “Apps & Notifications” option.
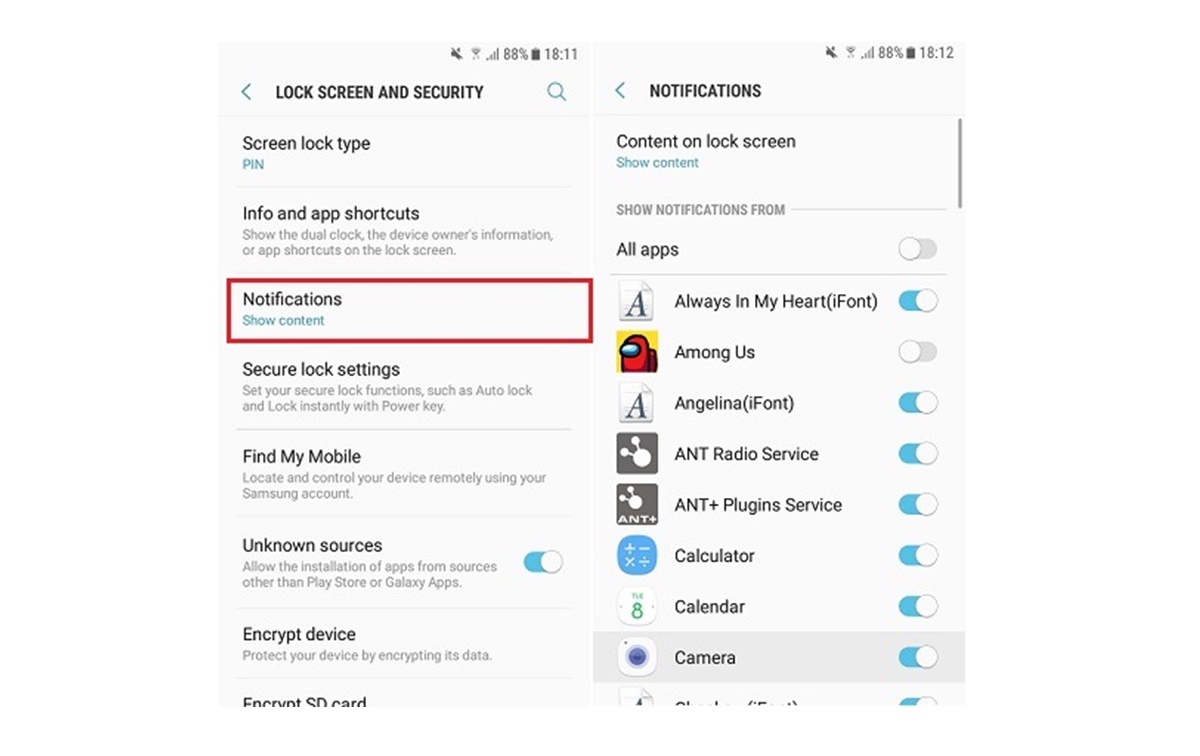
- Next, select “Notifications.”
- Here, you will see a list of apps that have the ability to display notifications on your lock screen.
- Select a specific app from the list to customize its notification settings.
- To completely hide notifications from a specific app on the lock screen, simply toggle off the “Lock screen” option.
- If you want to customize the display of notifications for a particular app, you can tap on it and select various options like “Show silently” or “Don’t show notifications at all.”
- Repeat these steps for each app that you want to hide or customize notifications for.
By using Android’s built-in settings, you have full control over which apps can display notifications on your lock screen. This method allows for a personalized approach, ensuring that only the notifications that are important to you are visible when your device is locked.
Method 2: Customizing App Notifications
If you prefer a more granular approach to managing your lock screen notifications, you can customize the notification settings for individual apps. This gives you the flexibility to choose which types of notifications can appear on your lock screen. Here’s how you can do it:
- Go to the “Settings” app on your Android device.
- Scroll down and select “Apps & Notifications.”
- Choose the “Notifications” option.
- Look for the specific app that you want to customize and tap on it.
- Inside the app’s notification settings, you’ll find various options to control how notifications are displayed on your lock screen.
- You can toggle off the “Allow notification dots” feature if you don’t want any visual indicators on your lock screen.
- Depending on the app, you might have additional options to choose from, such as hiding sensitive content or showing notifications silently.
- Make the desired changes to the notification settings for that particular app.
- Continue customizing the notification settings for other apps as needed.
By customizing app notifications, you can fine-tune what is displayed on your Android lock screen. This way, you have better control over the information that is visible at a glance, allowing for a more personalized lock screen experience.
Method 3: Using a Third-Party App
If you’re looking for even more advanced options and customization features, you can turn to third-party apps specifically designed for managing lock screen notifications. These apps offer additional functionality beyond what the built-in Android settings provide. Follow these steps to utilize a third-party app:
- Open the Google Play Store on your Android device.
- Search for “lock screen notification apps” and browse through the available options.
- Choose a reputable app that suits your needs and has positive reviews.
- Install the selected app on your device.
- Launch the app and navigate to its settings or preferences.
- Explore the various options and features available for customizing lock screen notifications.
- Depending on the app, you might have the ability to hide specific apps from the lock screen, customize the layout and appearance of notifications, or even set up custom filters.
- Adjust the settings according to your preferences and requirements.
- Enjoy the enhanced control and customization that the third-party app provides for your lock screen notifications.
Using a third-party app can offer a more tailored and intuitive experience when it comes to managing lock screen notifications. These apps often come with a wide range of options and features, allowing you to customize your lock screen to your liking.
Method 4: Setting Privileged Apps
If you want to have more granular control over which apps can display notifications on your lock screen, you can take advantage of the privileged apps feature on your Android device. This feature allows you to specify certain apps that have priority access to display notifications, while others may be hidden. Follow these steps to set privileged apps:
- Open the “Settings” app on your Android device.
- Navigate to the “Apps & Notifications” section.
- Select “Notifications.”
- Tap on “Advanced” or “Advanced settings,” depending on your device.
- Look for an option called “Special app access” or something similar.
- Choose “Notification access” or “Notification access settings.”
- A list of apps that are allowed to access notifications will be displayed.
- To set privileged apps, toggle on or off the apps that you want to have priority access on your lock screen.
- If you want an app to have full access to display notifications on your lock screen, make sure the toggle is switched on for that specific app.
- For apps that you want to hide notifications from, make sure the toggle is switched off.
- Exit the settings after making your desired changes.
Setting privileged apps gives you greater control over the apps that can display notifications on your Android lock screen. By managing privileged apps, you can ensure that only the most important and relevant notifications are shown, providing a clutter-free lock screen experience.
Method 5: Setting Quiet Hours
If you want to avoid being disturbed by notifications during specific times, you can take advantage of the “Quiet Hours” feature on your Android device. This allows you to set a specific time period during which notifications will be automatically silenced or hidden from your lock screen. Here’s how to set up quiet hours:
- Open the “Settings” app on your Android device.
- Scroll down and select “Sound & vibration” or a similar option.
- Look for “Do Not Disturb” or “Quiet Hours.”
- Tap on the option to enter the quiet hours settings.
- Enable the “Scheduled” or “Set time” option.
- Select the start and end times for the quiet hours period.
- You can also configure additional settings such as allowing certain callers or notifications to break through during quiet hours.
- Exit the settings after setting up your desired quiet hours.
During the set quiet hours, your Android device will automatically suppress notifications, ensuring a disturbance-free experience. Notifications will either be silenced or hidden from your lock screen, depending on your specific settings. This feature is particularly useful when you need uninterrupted time for sleep or focused work.
Method 6: Disabling Lock Screen Notifications for Specific Apps
If you want to disable lock screen notifications for specific apps on your Android device, follow these steps:
- Open the “Settings” app on your Android device.
- Select “Apps & Notifications” or a similar option.
- Choose “Notifications.”
- Scroll through the list of apps and select the app for which you want to disable lock screen notifications.
- Inside the app’s notification settings, locate the “Lock screen” option.
- Toggle off the “Lock screen” option to disable lock screen notifications for that specific app.
- Repeat the process for any other apps that you want to disable lock screen notifications for.
By disabling lock screen notifications for specific apps, you can have a cleaner lock screen without unnecessary distractions. This can be particularly helpful if you have certain apps that frequently send non-essential notifications.
Method 7: Using a Third-Party Lock Screen App
If you’re looking to completely revamp your lock screen experience and have more control over notifications, you can consider using a third-party lock screen app. These apps offer enhanced customization options and unique features that can transform the way notifications are displayed on your Android device. Follow these steps to use a third-party lock screen app:
- Go to the Google Play Store on your Android device.
- Search for “lock screen apps” and browse through the available options.
- Look for a lock screen app that suits your preferences and has positive reviews.
- Install the chosen app on your device.
- Launch the app and follow the on-screen instructions for setup.
- Grant the necessary permissions to the app to access your device’s notifications.
- Explore the customization options available within the lock screen app.
- Depending on the app, you may be able to customize the layout, appearance, and behavior of notifications on your lock screen.
- Configure the settings according to your preferences and desired level of customization.
- Enjoy the enhanced lock screen experience provided by the third-party app.
Using a third-party lock screen app can give you greater control over the appearance and functionality of notifications on your Android device. These apps often offer unique features and customization options that can significantly enhance your lock screen experience.
Method 8: Changing Lock Screen Settings for Individual Apps
If you want to have more control over the lock screen notifications for individual apps on your Android device, you can customize the settings specifically for each app. This allows you to choose how notifications from each app are displayed on your lock screen. Follow these steps to change lock screen settings for individual apps:
- Open the “Settings” app on your Android device.
- Select “Apps & Notifications” or a similar option.
- Choose “Notifications.”
- Scroll through the list of apps and select the app you want to customize the lock screen settings for.
- Inside the app’s notification settings, you’ll find various options to control how the app’s notifications appear on your lock screen.
- Toggle on or off the “Lock screen” option to enable or disable lock screen notifications for that specific app.
- Depending on the app, you may have additional settings to customize how notifications are displayed, such as showing notifications silently or hiding sensitive content.
- Make the desired changes to the lock screen settings for that particular app.
- Repeat the process for other apps that you want to customize the lock screen settings for.
By changing the lock screen settings for individual apps, you can have more fine-grained control over which apps can display notifications on your Android lock screen. This allows you to tailor your lock screen experience to your preferences and prioritize the most important notifications.
Method 9: Completely Disabling Lock Screen Notifications
If you prefer a completely distraction-free lock screen without any notifications, you have the option to disable lock screen notifications altogether on your Android device. This will prevent any app from displaying notifications on the lock screen. Here’s how to completely disable lock screen notifications:
- Open the “Settings” app on your Android device.
- Select “Apps & Notifications” or a similar option.
- Choose “Notifications.”
- Look for an option called “On the lock screen” or “Lock screen preferences.”
- Tap on it to access the lock screen notification settings.
- Select the option to “Show all notification content” or a similar option.
- This will either show all notifications, hide sensitive content, or disable notifications on the lock screen, depending on the available options.
- Choose the option that completely disables lock screen notifications.
- Exit the settings, and the changes will take effect.
By completely disabling lock screen notifications, you can ensure a clean and distraction-free lock screen experience. However, keep in mind that you may need to regularly check your notifications manually to stay updated.