
Understanding Grouping in Google Slides
Grouping objects in Google Slides allows you to efficiently manage multiple elements within your presentation. Whether you want to move, resize, or apply formatting to a set of objects simultaneously, grouping provides a convenient way to accomplish this. Grouping is particularly useful when working with complex slide layouts or when you want to align and arrange objects as a cohesive unit.
By grouping objects, you create a single entity that can be manipulated as a whole, rather than moving or formatting each element individually. This not only saves time but also ensures consistency and precision in your slideshow design. Whether you are creating a professional presentation, designing an infographic, or making interactive learning materials, understanding how to group objects in Google Slides is a valuable skill.
When you group objects, they are considered a single item, and you can perform various actions on the group as a whole. This includes moving, resizing, rotating, applying animations, and formatting all objects within the group simultaneously. You can also work with the group as a single object when applying transitions or duplicating slides. Grouping objects provides a level of organization and control that enhances the overall visual impact of your presentation.
It is important to note that grouping objects in Google Slides does not merge them into a single shape or text box. The individual objects within the group retain their original properties and can be edited separately. However, when you manipulate the group, changes are applied to all objects within it. Understanding this concept is crucial for effectively utilizing grouping in Google Slides.
In the next sections, we will explore different methods of selecting and grouping objects in Google Slides, as well as how to ungroup them. With these techniques in your toolkit, you’ll be able to efficiently manage and manipulate objects within your presentations, saving you time and effort.
Selecting Objects to Group
Before you can group objects in Google Slides, you need to select the specific items you want to include in the group. Here are a few methods you can use to select objects:
-
Click and drag: To select a single object, simply click on it. To select multiple objects, hold down the Shift key and click on each object you want to include in the group. You can also click and drag your mouse to create a box around the objects you want to select. This method is ideal when the objects are close together or located in the same vicinity.
-
Using the selection pane: In the toolbar, go to the “Arrange” menu and select “Selection pane.” This will open a sidebar that displays all the objects on your slide. You can then click on the objects in the selection pane to select them. This method is particularly helpful when working with complex slide layouts or when you have objects that are hidden or overlapping.
-
Using keyboard shortcuts: Pressing the Shift key followed by the arrow keys allows you to select objects one at a time in a specific direction. Holding down the Shift key while pressing the Tab key allows you to cycle through objects in reverse order. This method is useful for quickly navigating through objects and selecting them individually.
Once you have selected the objects you want to include in the group, you can proceed to group them using one of the methods described in the following sections.
Remember, the key to successfully grouping objects is to ensure that you have selected all the desired items. Double-check your selection to verify that you have included everything you need before moving on to the grouping process.
Grouping Objects Using the Toolbar
In Google Slides, you can easily group selected objects using the toolbar. The toolbar provides a quick and convenient method for grouping objects together. Here’s how you can do it:
-
Select the objects you want to group by clicking and dragging over them or using any of the selection methods mentioned in the previous section.
-
Once the objects are selected, go to the toolbar and click on the “Arrange” menu.
-
In the “Arrange” menu, you will find the “Group” option. Click on it, and the selected objects will be grouped together as a single entity.
You can also use the keyboard shortcut Ctrl+Shift+G (Windows) or Command+Shift+G (Mac) to quickly group selected objects without accessing the toolbar.
After grouping the objects, you will notice that they are treated as a single item. You can move, resize, or apply formatting to the entire group without affecting the individual objects within it. This allows you to maintain the desired layout and alignment, ensuring a professional and cohesive design for your presentation.
Grouping objects using the toolbar is a straightforward and efficient method, especially when working with a small number of objects. However, for more complex slide layouts or when dealing with a large number of objects, alternative methods such as the right-click menu or keyboard shortcuts might be more convenient.
Now that you know how to group objects using the toolbar, let’s explore other methods available in Google Slides to further enhance your productivity in managing and manipulating objects within your presentations.
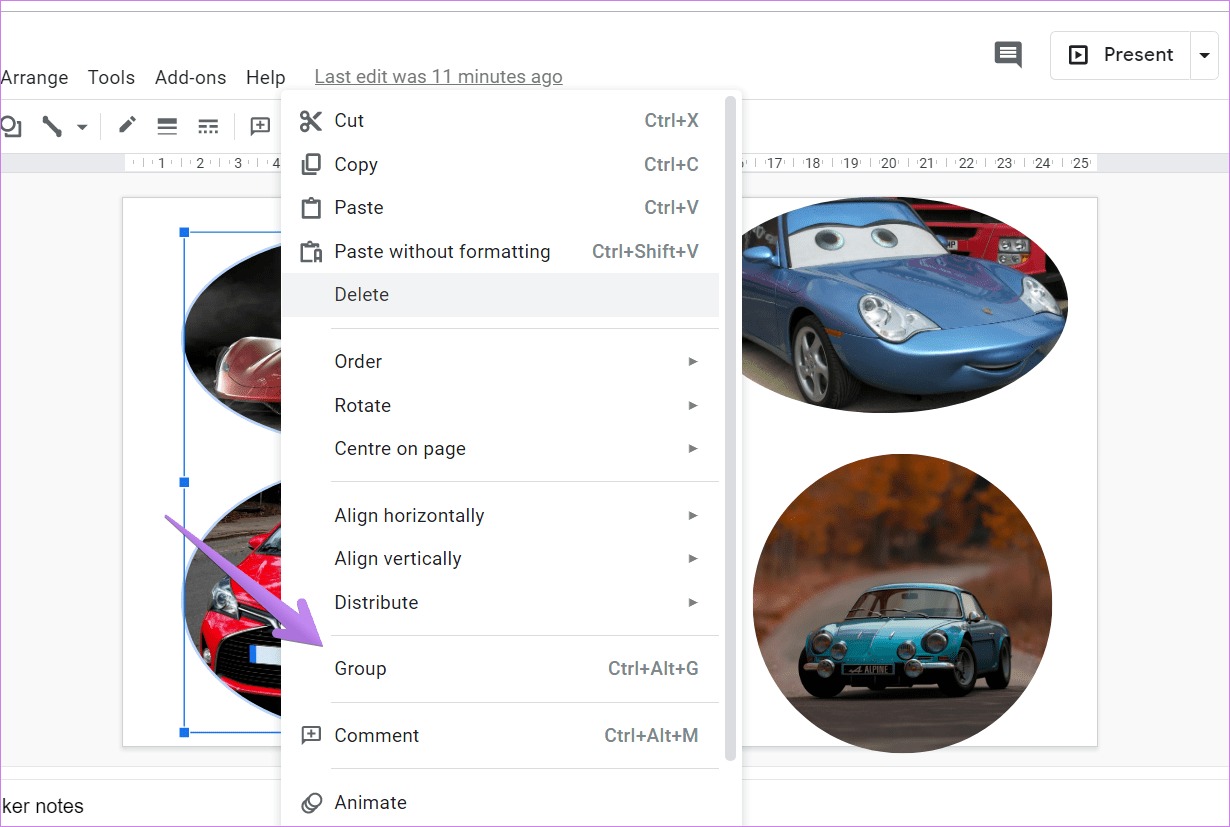
Grouping Objects Using the Right-Click Menu
In Google Slides, grouping objects can also be accomplished through the right-click menu. This method offers a quick and accessible way to group selected objects. Follow these steps to use the right-click menu for grouping:
-
Select the objects you want to group by clicking and dragging over them or using any of the selection methods mentioned earlier.
-
Once the objects are selected, right-click on one of the selected objects. This will open a context menu with various options.
-
In the context menu, hover over the “Group” option, and another menu will appear with two choices: “Group” and “Ungroup”. Click on “Group”, and the selected objects will be grouped together as a single entity.
Using the right-click menu for grouping objects is especially useful when you prefer using the mouse for actions. It provides a convenient and intuitive way to manage objects in your presentation without having to navigate through the toolbar or use keyboard shortcuts.
Remember, you can also ungroup objects using the right-click menu by selecting the grouped object, right-clicking, and choosing the “Ungroup” option. This will restore the objects back to their individual states.
Now that you know how to group objects using the right-click menu, you have another effective method under your belt for efficiently organizing and controlling objects within your Google Slides presentations.
Grouping Objects Using the Keyboard Shortcut
If you prefer using keyboard shortcuts, Google Slides provides a convenient way to group objects without relying on the toolbar or right-click menu. Here’s how you can group objects using the keyboard shortcut:
-
Select the objects you want to group by clicking and dragging over them or using any of the selection methods mentioned earlier.
-
Once the objects are selected, press the Ctrl+Shift+G combination on Windows or Command+Shift+G on Mac. This will instantly group the selected objects together as a single entity.
Using the keyboard shortcut for grouping objects offers a speedy and efficient method, especially if you prefer navigating through your presentation using the keyboard. It eliminates the need to reach for the mouse or navigate through menus, allowing for faster and more streamlined workflow.
Remember, you can also ungroup objects using the keyboard shortcut. Simply select the grouped object and press Ctrl+Shift+G (Windows) or Command+Shift+G (Mac) again, and the objects will be restored to their individual states.
By mastering the keyboard shortcut for grouping objects, you can maintain a smooth and uninterrupted workflow, ensuring efficient organization and manipulation of objects within your Google Slides presentations.
Ungrouping Objects
Just as you can group objects together in Google Slides, you can also ungroup them when needed. Ungrouping objects allows you to restore individual elements within a group, giving you the flexibility to modify or format them separately. Here’s how you can ungroup objects:
-
Select the grouped object by clicking on it. You will notice that the grouped object is surrounded by a bounding box, indicating that it is grouped as a single entity.
-
With the grouped object selected, go to the toolbar and click on the “Arrange” menu.
-
In the “Arrange” menu, you will find the “Ungroup” option. Click on it, and the grouped object will be ungrouped, restoring the individual elements within it.
You can also use the right-click menu to ungroup objects. Simply right-click on the grouped object, hover over the “Group” option, and choose “Ungroup” in the submenu that appears.
Alternatively, you can use the keyboard shortcut Ctrl+Shift+G (Windows) or Command+Shift+G (Mac) to quickly ungroup a selected grouped object.
Ungrouping objects gives you the freedom to edit and format individual elements within a group independently. You can rearrange their positions, apply specific formatting, or modify their properties based on your needs. This level of control allows for further customization and refinement of your presentation design.
Be cautious when ungrouping objects, as it can result in accidental changes if you unintentionally modify the grouped elements. It is a good practice to make a copy of the grouped object or save a version of the slide before ungrouping, so you can easily revert back if needed.
Now that you know how to ungroup objects, you have the ability to modify and format individual elements within a group, giving you more flexibility and control over your Google Slides presentations.
Nesting Groups Within Groups
In Google Slides, you have the ability to create hierarchical structures by nesting groups within groups. This advanced grouping technique allows you to organize and manage complex slide layouts more effectively. Here’s how you can nest groups within groups:
-
Select the objects you want to include in the first group using any of the selection methods mentioned earlier.
-
Once the objects are selected, group them together using one of the grouping methods described earlier, such as the toolbar, right-click menu, or keyboard shortcut.
-
Next, select the newly formed group by clicking on it.
-
Select additional objects that you want to include in the nested group. These objects can be individually selected or already grouped.
-
Group the selected objects together using the same grouping method you used initially.
By following these steps, you have created a nested group, where the initially grouped objects serve as the parent group, and the objects grouped afterwards become the child group inside the parent group. This hierarchical structure allows for even greater organization and control of your slide elements.
With nested groups, you can manipulate the entire parent group, which in turn affects all the child groups and objects within them. This hierarchical relationship provides a higher level of organization and flexibility when working with intricate slide designs or when you need to move, resize, or apply formatting to multiple groups simultaneously.
It’s important to note that nested groups can become complex, and it’s easy to lose track of the different levels of grouping. Make sure to keep a clear mental or visual representation of the hierarchy to avoid confusion or unintended changes to your slide layout.
Nesting groups within groups is an advanced technique that empowers you to create intricate and well-structured slide designs in Google Slides. Explore and experiment with this feature for enhanced control and organization of your presentation elements.
Editing Grouped Objects
Editing grouped objects in Google Slides allows you to make changes to multiple elements at once, saving you time and effort. When objects are grouped together, you can edit their properties, such as text, color, size, and position, as a cohesive unit. Here’s how you can edit grouped objects:
-
Select the grouped objects by clicking on the group. The group will be highlighted, indicating that it is selected.
-
Double-click on any object within the group to enter editing mode. Alternatively, you can right-click on the group and choose “Edit Group” from the context menu.
-
Make the desired changes to the objects within the group. You can modify text, apply formatting, resize objects, and adjust their positions.
-
Once you have finished editing the grouped objects, click outside the group or press Enter to exit editing mode. The changes you made will be applied to all objects within the group.
Editing grouped objects allows you to maintain consistency and uniformity in your presentation design. You can quickly update multiple elements with just a few edits, ensuring a professional and polished look for your slides.
It’s important to note that editing grouped objects affects all the objects within the group. If you want to make individual changes to specific objects within the group, you will need to ungroup them first. Remember to use caution when editing grouped objects, as unintended modifications can occur if you’re not careful.
By efficiently editing grouped objects, you can streamline the design process and make consistent updates to your Google Slides presentations. Experiment with different editing techniques to optimize your workflow and create visually engaging slides.
Formatting Grouped Objects
In Google Slides, formatting grouped objects allows you to apply consistent styles, colors, and effects to multiple elements at once. By grouping objects together, you can easily format them as a cohesive unit, ensuring visual harmony and efficiency in your presentation design. Here’s how you can format grouped objects:
-
Select the grouped objects by clicking on the group. The group will be highlighted, indicating that it is selected.
-
Access the formatting options by using the toolbar at the top of the Google Slides window. The toolbar provides various formatting tools, including font styles, fill colors, borders, shadows, and more.
-
Use the formatting options to make changes to the appearance of the grouped objects. You can experiment with different font styles, adjust fill colors, modify outlines, and apply effects to enhance the visual impact of the elements.
-
As you make formatting changes, they will be applied to all objects within the group. This ensures consistent styling across the selected elements.
Formatting grouped objects allows you to create a cohesive look and feel in your Google Slides presentation. It ensures that the design elements align with your visual theme, brand guidelines, or overall aesthetic goals. Applying formatting to grouped objects also saves time and effort, as you only need to make changes once instead of modifying each object individually.
Remember, you can always ungroup the objects if you want to make individual formatting adjustments to specific elements within the group. However, be mindful of the visual coherence and consistency of your presentation design when ungrouping objects.
By effectively formatting grouped objects, you can create visually appealing and polished slides that captivate your audience. Utilize the formatting options available in Google Slides to enhance the visual impact of your grouped elements and create dynamic and engaging presentations.
Tips for Efficient Grouping in Google Slides
Grouping objects in Google Slides offers a range of benefits, including easier management, streamlined edits, and consistent formatting. To make the most of this feature and enhance your productivity, consider the following tips for efficient grouping:
-
Plan your grouping strategy: Before starting, think about how you want to organize your objects into groups. Analyze the elements and their relationships to determine the most logical and efficient way to group them together.
-
Use group labels: If you have multiple groups within your presentation, consider labeling them using text boxes or shapes. This can help you quickly identify and access specific groups when making edits or formatting changes.
-
Stay organized with the selection pane: Utilize the selection pane to manage and select objects more efficiently, especially when working with complex slide layouts. This pane allows you to easily identify and select objects, even if they are hidden or overlapped.
-
Consider grouping common elements: Grouping objects that share common attributes, such as a specific color scheme or formatting style, can help you maintain consistency throughout your presentation. This approach simplifies edits and ensures a cohesive design.
-
Explore nested groups: Experiment with nesting groups within groups to create hierarchical structures. This technique is useful for managing complex slide layouts and maintaining flexibility in making changes to grouped objects.
-
Save a copy before ungrouping: If you plan to ungroup objects, make a copy of the slide or save a version of it beforehand. This precaution ensures that you can easily revert back or make adjustments without losing the original grouped objects.
-
Utilize keyboard shortcuts: Familiarize yourself with keyboard shortcuts for grouping, ungrouping, and other common actions. This helps you save time and increases your efficiency when working with objects in Google Slides.
-
Regularly review and update groups: As you make changes to your presentation, periodically review your grouped objects to ensure they still serve their purpose. Make any necessary adjustments to maintain organization and avoid unnecessary complexity.
By following these tips, you can maximize the efficiency and effectiveness of grouping objects in Google Slides. Grouping provides an effective way to manage and manipulate multiple elements within your presentations, helping you create visually appealing and professional slides with ease.