
Adding Animations to Slides
Adding animations to slides in Google Slides can bring your presentations to life, making them more engaging and dynamic. Animations allow you to control how objects enter, exit, and emphasize on your slides. Let’s explore how to add animations to slides in Google Slides.
1. Open your Google Slides presentation and navigate to the slide where you want to add an animation.
2. Select the object or text you want to animate. This can be a shape, image, text box, or even a chart or graph.
3. With the object selected, go to the toolbar and click on the “Insert” tab. From the drop-down menu, select “Animation”.
4. A sidebar will appear on the right side of the screen with various animation options. Choose the animation you want to apply to the selected object.
5. Once you select an animation, you can customize its options. For example, you can choose the direction, speed, and delay of the animation by clicking on the “Effect Options” button.
6. To preview the animation, click on the “Play” button in the sidebar. This will show you how the object will animate on the slide.
7. If you’re satisfied with the animation, click on the “Apply” button to add it to the selected object.
8. Repeat these steps for any other objects or text you want to animate on the slide.
Adding animations can make your presentations more visually appealing and help you convey your message effectively. It is important, however, to use animations wisely and in moderation. Overusing animations can be distracting and take away from the content of your presentation. Therefore, it’s essential to strike a balance between adding animations and keeping the focus on the information you want to deliver.
Note: Animations can also be applied to individual elements within a slide, such as bullets in a text box or data points in a chart. This allows you to create more sophisticated and dynamic presentations.
Choosing the Right Animation
Choosing the right animation is crucial to make your slides more impactful and engaging. Each animation style conveys a different mood and message, so it’s important to select the one that best suits your presentation. Here are some factors to consider when choosing the right animation for your slides.
1. Purpose: Consider the purpose of your presentation and the message you want to convey. If you want to grab attention or add excitement, choosing a more dynamic animation like “Bounce” or “Fade In” can be effective. On the other hand, if you want to explain a process or sequence, using animations like “Appear,” “Wipe,” or “Slide” can help illustrate the steps clearly.
2. Relevance: Think about the content of your slide and how the animation can complement it. For example, if you’re presenting data, using animations like “Bar” or “Pie Chart” can bring the numbers to life. If you have a slide with bullet points, using animations like “Fly In” or “Appear” can make each point appear one by one, focusing the audience’s attention on each point.
3. Consistency: Maintain a consistent animation style throughout your presentation to create a cohesive and professional look. Using a variety of different animations on each slide may be distracting for your audience. Stick to a few animation styles and apply them consistently across your slides.
4. Timing: Consider the timing and duration of your animations. Short and quick animations can create a sense of energy and movement, while longer animations can help convey a slower and more deliberate pace. Experiment with different timings to find the right balance for your presentation.
5. Audience: Lastly, consider your audience and their preferences. If you’re presenting to a more formal audience, you may want to use subtle and understated animations. However, if your audience is more casual or younger, you can be more creative and use more playful animations.
By considering these factors, you can choose the right animation that enhances your message and engages your audience. Remember, the goal of animations is to support your content and not to overshadow it. Be mindful of using animations strategically and sparingly to maintain the focus on your presentation content.
Applying Entrance Animations
Entrance animations are a great way to grab your audience’s attention and introduce elements onto your slide. They allow objects to enter the slide with style and emphasis. Here’s how you can apply entrance animations in Google Slides:
1. Select the object or text you want to animate.
2. Go to the toolbar and click on the “Insert” tab. From the drop-down menu, select “Animation.”
3. In the Animation sidebar that appears on the right side of the screen, click on “Entrance.”
4. You will see a variety of entrance animation options, such as “Fade In,” “Bounce,” “Slide In,” and more. Hover your mouse over each option to preview the animation.
5. Click on the entrance animation that best suits your object or text.
6. After selecting the entrance animation, you can further customize its options by clicking on the “Effect Options” button in the Animation sidebar. This will allow you to adjust the direction, speed, and delay of the animation.
7. To preview the animation, click on the “Play” button in the Animation sidebar. This will show you how the object or text will enter the slide.
8. If you’re satisfied with the animation, click on the “Apply” button to add it to the selected object or text.
Applying entrance animations can add a dynamic and engaging touch to your slides. They can help bring attention to key points, highlight important information, and make your presentation more visually appealing. However, it’s essential to use entrance animations sparingly and purposefully. Overusing them can be distracting and detract from the content of your presentation.
As you apply entrance animations, consider the nature of your presentation and the message you want to convey. Choose an entrance animation that aligns with the mood and purpose of your content. Remember, the goal is to enhance your presentation, not overwhelm it with excessive animations.
Experiment with different entrance animation styles and find the ones that best suit your slide content and engage your audience effectively. By applying entrance animations thoughtfully, you can create a visually captivating presentation that leaves a lasting impression.
Applying Exit Animations
Exit animations in Google Slides allow objects or text to exit the slide in a visually appealing manner. These animations can help you transition between ideas or create a sense of closure. Here’s how you can apply exit animations to your slides:
1. Select the object or text you want to animate.
2. Open the “Insert” tab in the toolbar and choose “Animation” from the drop-down menu.
3. In the Animation sidebar that appears on the right side of the screen, click on “Exit.”
4. You’ll see a variety of exit animation options, such as “Fade Out,” “Bounce,” “Slide Out,” and more. Hover your mouse over each option to preview the animation.
5. Select the exit animation that best suits your object or text.
6. Customize the animation options by clicking on the “Effect Options” button in the Animation sidebar. This allows you to adjust the direction, speed, and delay of the animation.
7. Preview the animation by clicking the “Play” button in the Animation sidebar. This will show you how the object or text will exit the slide.
8. If you’re satisfied with the animation, click on the “Apply” button to add it to the selected object or text.
Applying exit animations can be an effective way to add emphasis and bring closure to a slide. These animations can help signal the end of a topic or highlight the completion of a point. However, it’s important to use exit animations sparingly and purposefully.
Consider the flow and narrative of your presentation when choosing which objects or text to animate with exit animations. Use them to support the content and enhance the overall visual impact of your slides. Avoid overusing exit animations, as this can distract and deflect attention from your message.
Experiment with different exit animation styles to find the ones that best suit the tone and purpose of your presentation. By using exit animations strategically, you can create a more dynamic and engaging slide show.
Remember, the goal is to enhance your presentation and facilitate the understanding of your message. Use exit animations wisely to leave a lasting impression and maintain a professional and polished presentation.
Applying Emphasis Animations
Emphasis animations in Google Slides allow you to bring attention to specific objects or text on your slides. These animations can help highlight key points, draw focus, and add visual interest to your presentation. Here’s how you can apply emphasis animations to your slides:
1. Select the object or text you want to emphasize.
2. Go to the “Insert” tab in the toolbar and choose “Animation” from the drop-down menu.
3. In the Animation sidebar on the right side of the screen, click on “Emphasis.”
4. You’ll be presented with a variety of emphasis animation options, such as “Pulse,” “Grow,” “Spin,” and more. Hover your mouse over each option to preview the animation.
5. Select the emphasis animation that best suits your object or text.
6. Customize the animation options by clicking on the “Effect Options” button in the Animation sidebar. This allows you to adjust the intensity, speed, and timing of the animation.
7. Preview the animation by clicking the “Play” button in the Animation sidebar. This will show you how the object or text will be emphasized on the slide.
8. If you’re satisfied with the animation, click on the “Apply” button to add it to the selected object or text.
Applying emphasis animations can add a dynamic and engaging touch to your slide show. They can help highlight important information, guide your audience’s attention, and create visual interest. However, it’s important to use emphasis animations judiciously.
Consider the content and context of your presentation when choosing which objects or text to animate with emphasis. Use emphasis animations to support your message and enhance the overall visual impact of your slides. Overusing emphasis animations can be distracting and dilute the effectiveness of your presentation.
Experiment with different emphasis animation styles to find the ones that best suit your content and presentation style. By using emphasis animations strategically, you can create a more engaging and memorable slide show.
Remember to consider the overall flow and narrative of your presentation. Use emphasis animations to reinforce your main points and guide your audience’s attention in a purposeful manner.
By applying emphasis animations thoughtfully, you can elevate the impact of your message and create a visually compelling presentation.
Customizing Animation Options
Customizing animation options in Google Slides allows you to fine-tune and personalize your animations to suit your presentation style and content. By adjusting settings such as direction, speed, and delay, you can create animations that align perfectly with your message. Here’s how you can customize animation options in Google Slides:
1. Select the object or text with the applied animation.
2. Go to the toolbar and click on the “Insert” tab. Choose “Animation” from the drop-down menu.
3. In the Animation sidebar on the right side of the screen, look for the selected animation and click on the “Effect Options” button next to it.
4. A pop-up window will appear, allowing you to customize the animation options.
5. Direction: Choose the direction in which you want the animation to occur. You can select options like “From Left,” “From Right,” “From Top,” “From Bottom,” or “None.”
6. Speed: Adjust the speed at which the animation occurs. You can choose options like “Fast,” “Medium,” or “Slow,” depending on the desired effect.
7. Delay: Set a delay before the animation starts. This can be useful for creating a sequential animation effect or controlling the timing of elements on your slide.
8. After customizing the animation options, click on the “Apply” button to save the changes.
By customizing animation options, you can tailor the animations to suit your specific needs and enhance the visual impact of your presentation. Here are some tips for using animation options effectively:
– Direction: Choose a direction that complements the movement of your content. For example, if you are animating a bullet list, you may want the bullets to enter from the left side, following the natural reading flow.
– Speed: Adjust the speed of the animation to create the desired impact. A faster speed can add energy and excitement, while a slower speed can enhance emphasis and allow for better comprehension.
– Delay: Use delays to control the timing of animations. This can be helpful when you want to synchronize animations with your spoken words or create a buildup of anticipation.
Experiment with different combinations of direction, speed, and delay to find the customizations that best enhance your presentation. However, remember to use customization sparingly and purposefully. Too many variations may lead to visual clutter and distract from your message.
By taking advantage of the customization options available in Google Slides, you can create animations that are refined, polished, and aligned with your presentation goals.
Animating Text
Animating text in Google Slides can add flair and make your presentation more engaging. With carefully timed text animations, you can bring attention to key points and guide your audience’s focus. Here’s how you can animate text in Google Slides:
1. Select the text box or specific text you want to animate.
2. Go to the toolbar and click on the “Insert” tab. Choose “Animation” from the drop-down menu.
3. In the Animation sidebar on the right side of the screen, click on “Text.”
4. Choose the desired animation effect for the text. This can include options like “Appear,” “Fade,” “Fly In,” or “Typewriter.”
5. Customize the animation options by clicking on the “Effect Options” button in the Animation sidebar. This allows you to adjust the speed, direction, and other parameters.
6. Preview the animation by clicking the “Play” button in the Animation sidebar. This will show you how the text will animate on the slide.
7. If you’re satisfied with the animation, click on the “Apply” button to add it to the selected text.
Text animations should be used strategically to highlight important information and avoid overwhelming the audience. Here are a few tips for animating text effectively:
– Simplify: Determine the key points or phrases you want to highlight in your presentation. Use text animation sparingly to draw attention to these specific elements, avoiding excessive animations that can distract the audience.
– Timing: Consider the timing of your text animations. Ensure that the animations are in sync with your speech or presentation flow, allowing the audience to follow along smoothly. Coordination between spoken words and animated text can have a significant impact on the overall effectiveness of your presentation.
– Consistency: Maintain consistency in the style and timing of your text animations. Using a consistent animation effect throughout your presentation can create a cohesive and professional appearance.
– Readability: While animating text can add visual interest, it’s important to ensure that the text remains readable. Avoid using complex animation effects that may make it difficult for the audience to follow along or read the text.
By employing thoughtful text animations, you can engage your audience and emphasize key information effectively. Remember to strike a balance and use animations strategically to enhance the clarity and impact of your presentation.
Animating Images
Animating images in Google Slides can bring visual interest and enhance the storytelling in your presentations. By carefully applying animation effects to images, you can captivate your audience and make your message more impactful. Here’s how you can animate images in Google Slides:
1. Insert the desired image onto the slide by clicking on the “Insert” tab in the toolbar. Choose “Image” and select the image you want to animate from your local files or Google Drive.
2. With the image selected, go to the toolbar and click on the “Insert” tab again. Choose “Animation” from the drop-down menu.
3. In the Animation sidebar on the right side of the screen, click on “Image.” You will see a variety of animation options available for images, such as “Fade,” “Zoom,” “Flip,” and more.
4. Select the animation effect that best suits your image and desired visual impact.
5. Customize the animation options by clicking on the “Effect Options” button in the Animation sidebar. This allows you to adjust the speed, direction, and other parameters of the animation.
6. Preview the animation by clicking the “Play” button in the Animation sidebar. This will show you how the image will animate on the slide.
7. If you’re satisfied with the animation, click on the “Apply” button to add it to the selected image.
When animating images, it’s essential to use these effects purposefully and with consideration for your presentation. Here are some tips to help you animate images effectively:
– Relevance: Choose animation effects that are relevant to the content and mood of your presentation. For example, a zoom-in animation can be used to focus on specific details, while a fade animation can create a smooth transition between images.
– Timing: Consider the timing of your image animations. Coordinate the animation with your speech or presentation flow, ensuring that the image animates at the appropriate moment to enhance the impact of your message.
– Subtlety: Keep image animations subtle and avoid excessive or distracting effects. The purpose of animating images is to enhance visual interest and storytelling, not to overshadow or distract from the content of your presentation.
– Consistency: Maintain consistency in the style and timing of your image animations. Using a consistent animation style throughout your presentation can create a cohesive and professional look.
By animating images in Google Slides, you can engage your audience visually and create a dynamic and captivating presentation. Remember to use animation effects thoughtfully, aligning them with your content and presentation goals.
Animating Shapes and Objects
Animating shapes and objects in Google Slides can add a touch of interactivity and visual appeal to your presentation. By applying animation effects to shapes and objects, you can capture your audience’s attention and convey information in a dynamic and engaging way. Here’s how you can animate shapes and objects in Google Slides:
1. Select the shape or object you want to animate.
2. Go to the toolbar and click on the “Insert” tab. Choose “Animation” from the drop-down menu.
3. In the Animation sidebar on the right side of the screen, click on “Shape” or “Object.” You will see a variety of animation options available for shapes and objects, such as “Grow,” “Shrink,” “Rotate,” and more.
4. Select the animation effect that best suits your shape or object and desired visual impact.
5. Customize the animation options by clicking on the “Effect Options” button in the Animation sidebar. This allows you to adjust the speed, direction, and other parameters of the animation.
6. Preview the animation by clicking the “Play” button in the Animation sidebar. This will show you how the shape or object will animate on the slide.
7. If you’re satisfied with the animation, click on the “Apply” button to add it to the selected shape or object.
When animating shapes and objects, it’s important to do so thoughtfully and with purpose. Here are some tips to help you animate shapes and objects effectively:
– Relevance: Choose animation effects that are relevant to the content and message of your presentation. For example, a rotating animation can be used to showcase a 3D object, while a growing/shrinking animation can highlight changes or comparisons.
– Simplicity: Keep the animation effects clean, simple, and consistent. Avoid excessive, complex animations that may overshadow the content or distract your audience.
– Timing: Consider the timing of your shape and object animations. Coordinate the animation with your speech or presentation flow, ensuring that the animation occurs at the right moment to reinforce your message and maintain the audience’s engagement.
– Contrast: Use shape and object animations to create contrast and draw attention to specific elements of your presentation. Animate objects to reveal important details or to guide the audience’s focus to key information.
By animating shapes and objects in Google Slides, you can enhance the visual impact of your presentation and convey information in a more engaging and interactive way. Remember to use animation effects purposefully, aligning them with your content and presentation goals.
Animating Charts and Graphs
Animating charts and graphs in Google Slides can make numerical data more dynamic and visually engaging. By applying animation effects to your charts and graphs, you can capture your audience’s attention and effectively communicate key insights. Here’s how to animate charts and graphs in Google Slides:
1. Select the chart or graph you want to animate.
2. Go to the toolbar and click on the “Insert” tab. Choose “Animation” from the drop-down menu.
3. In the Animation sidebar on the right side of the screen, click on “Chart” or “Graph.” You will see a variety of animation options available for charts and graphs, such as “Build,” “Appear,” “Grow,” and more.
4. Select the animation effect that best suits your chart or graph and the story you want to tell with the data.
5. Customize the animation options by clicking on the “Effect Options” button in the Animation sidebar. This allows you to adjust the speed, direction, and other parameters of the animation.
6. Preview the animation by clicking the “Play” button in the Animation sidebar. This will show you how the chart or graph will animate on the slide.
7. If you’re satisfied with the animation, click on the “Apply” button to add it to the selected chart or graph.
When animating charts and graphs, it’s important to use the animations strategically to enhance the message and clarity of your data. Here are some tips to help you animate charts and graphs effectively:
– Reveal insights: Use animation effects to gradually reveal different parts of your chart or graph. This can help guide your audience’s focus and highlight specific data points or trends.
– Storytelling: Align the animation with your narrative to create a more compelling and coherent story. Introduce each component of the chart or graph at the right moment to support your explanation and ensure that the audience understands the information being presented.
– Simplicity: Keep the animations clean and simple, avoiding excessive or distracting effects. The purpose of animating charts and graphs is to make the data more accessible and visually interesting, not to overwhelm the audience.
– Timing: Coordinate the timing of the animations with your speech or presentation flow. Ensure that the animations are in sync with your verbal presentation, allowing the audience to absorb and understand the information effectively.
By animating charts and graphs in Google Slides, you can transform complex data into a visually engaging narrative. Use animation effects purposefully to guide your audience’s focus and enhance the overall impact of your data-driven presentations.
Animating SmartArt Graphics
Animating SmartArt graphics in Google Slides can transform static diagrams into dynamic visual representations. By applying animation effects to your SmartArt graphics, you can bring them to life and effectively illustrate complex ideas or processes. Here’s how you can animate SmartArt graphics in Google Slides:
1. Insert the desired SmartArt graphic onto the slide by clicking on the “Insert” tab in the toolbar. Choose “SmartArt” and select the desired graphic from the options available.
2. With the SmartArt graphic selected, go to the toolbar and click on the “Insert” tab again. Choose “Animation” from the drop-down menu.
3. In the Animation sidebar on the right side of the screen, click on “Shape” or “Object.” You will see a variety of animation options available for SmartArt graphics, such as “Fade,” “Fly In,” “Unfold,” and more.
4. Select the animation effect that best suits your SmartArt graphic and desired visual impact.
5. Customize the animation options by clicking on the “Effect Options” button in the Animation sidebar. This allows you to adjust the speed, direction, and other parameters of the animation.
6. Preview the animation by clicking the “Play” button in the Animation sidebar. This will show you how the SmartArt graphic will animate on the slide.
7. If you’re satisfied with the animation, click on the “Apply” button to add it to the selected SmartArt graphic.
Animating SmartArt graphics can help simplify complex concepts and make them more understandable and engaging for your audience. Here are some tips for effectively animating SmartArt graphics:
– Storytelling: Align the animation with your narrative to create a coherent and compelling story. Sequence the animation to present information in a logical order that supports the flow of your presentation.
– Highlighting: Use animation effects to draw attention to specific elements or sections of the SmartArt graphic. This can help your audience focus on key points or visualize the progression of a process.
– Simplicity: Keep the animation effects clean and simple to avoid overwhelming your audience. The purpose of animating SmartArt graphics is to enhance comprehension, not to distract from the content.
– Timing: Coordinate the timing of the animations with your speech or presentation flow. Ensure that the animations are synchronized with your verbal presentation, allowing your audience to follow along seamlessly.
By animating SmartArt graphics in Google Slides, you can transform complex information into visually compelling visuals. Use animation effects purposefully to enhance understanding and engagement, making your presentations more dynamic and impactful.
Using the Animation Pane
The Animation Pane in Google Slides is a powerful tool that allows you to have full control over the animation sequence and timing of objects on your slides. With the Animation Pane, you can manage and customize animations with ease. Here’s how you can use the Animation Pane in Google Slides:
1. Open your Google Slides presentation and navigate to the slide where you want to work with animations.
2. Go to the toolbar and click on the “Insert” tab. Select “Animation” from the drop-down menu.
3. In the Animation sidebar on the right side of the screen, click on the “Animation Pane” button at the bottom right corner of the sidebar.
4. The Animation Pane will appear on the right side of the screen, displaying a list of all the objects with animations on the selected slide.
5. In the Animation Pane, you can see the order of animations and adjust their sequence. Simply click and drag the animations up or down to reposition them in the desired order.
6. To customize the timings of animations, click on an animation in the Animation Pane. You can then adjust the delay, duration, and start options using the options provided in the Animation Pane.
7. If you want to remove an animation, select it in the Animation Pane and click on the “X” icon that appears next to it.
8. You can also use the Animation Pane to add additional animations to objects. Simply click on the “Add animation” button at the top of the Animation Pane and choose the desired animation effect from the options available.
The Animation Pane provides a clear overview of all the animations applied to objects on your slide and allows you to fine-tune their sequence and timing. Here are some tips for effectively using the Animation Pane:
– Organize and streamline: Use the Animation Pane to keep your animations organized and in a logical order. This makes it easier for you to manage and control the flow of your animations.
– Fine-tune timings: Take advantage of the timing options in the Animation Pane to ensure that your animations are perfectly synchronized with your presentation. Adjust the delay and duration settings to create the desired impact.
– Preview: Use the “Play” button in the Animation Pane to preview the animations and ensure they are functioning as intended. This allows you to make any necessary adjustments before presenting.
– Grouping and layering: If you have multiple objects with animations, consider grouping or layering them to create more complex and visually appealing effects. The Animation Pane can help you manage and coordinate these animations seamlessly.
The Animation Pane in Google Slides is a valuable tool that gives you complete control over the animations in your presentation. By utilizing its features, you can customize and perfect the delivery of your animated content, making your slides more engaging and impactful.
Setting Animation Timing
Setting animation timing in Google Slides allows you to control when and how animations occur on your slides. By adjusting the timing options, you can create a more dynamic and synchronized presentation. Here’s how you can set animation timing in Google Slides:
1. Select the object or text with the applied animation.
2. Go to the toolbar and click on the “Insert” tab. Choose “Animation” from the drop-down menu.
3. In the Animation sidebar on the right side of the screen, select the animation you want to adjust the timing for.
4. Click on the “Effect Options” button in the Animation sidebar to open the customization options.
5. Within the customization options, you will find settings for timing, duration, delay, and start options.
6. Timing: Adjust the timing of the animation to control when it starts. You can choose options like “On Click,” “With Previous,” or “After Previous” to synchronize the animation with other elements.
7. Duration: Specify the duration or speed of the animation. Longer durations create slower animations, while shorter durations result in faster animations.
8. Delay: Set a delay before the animation starts. This allows you to create a pause or gap between different animations, enabling you to control the flow and timing of the presentation.
9. Start options: Determine how the animation starts, whether it’s automatic or triggered manually by a click or another event.
10. Preview the animation by clicking the “Play” button in the Animation sidebar. This allows you to see how the animation timing affects the overall flow of your presentation.
Customizing the animation timing is essential to ensure the smooth delivery of your presentation. Here are a few tips for setting animation timing effectively:
– Storytelling: Think about the narrative and flow of your presentation. Use animation timing to enhance the storytelling, building up suspense or guiding your audience’s focus and understanding.
– Clarity: Ensure that timing choices align with the content being presented. Avoid rapid or complex animations that may confuse or overwhelm your audience. Choose a speed and duration that allow information to be absorbed and comprehended comfortably.
– Rehearsal: Practice your presentation with the animations and timing to ensure smooth transitions and a cohesive delivery. This allows you to refine and adjust the timing as needed, creating a more polished and professional presentation.
By setting animation timing in Google Slides, you can enhance the visual impact of your presentation and create a more engaging and synchronized experience for your audience. Take the time to experiment with different timing options to find the perfect balance for your content and delivery.
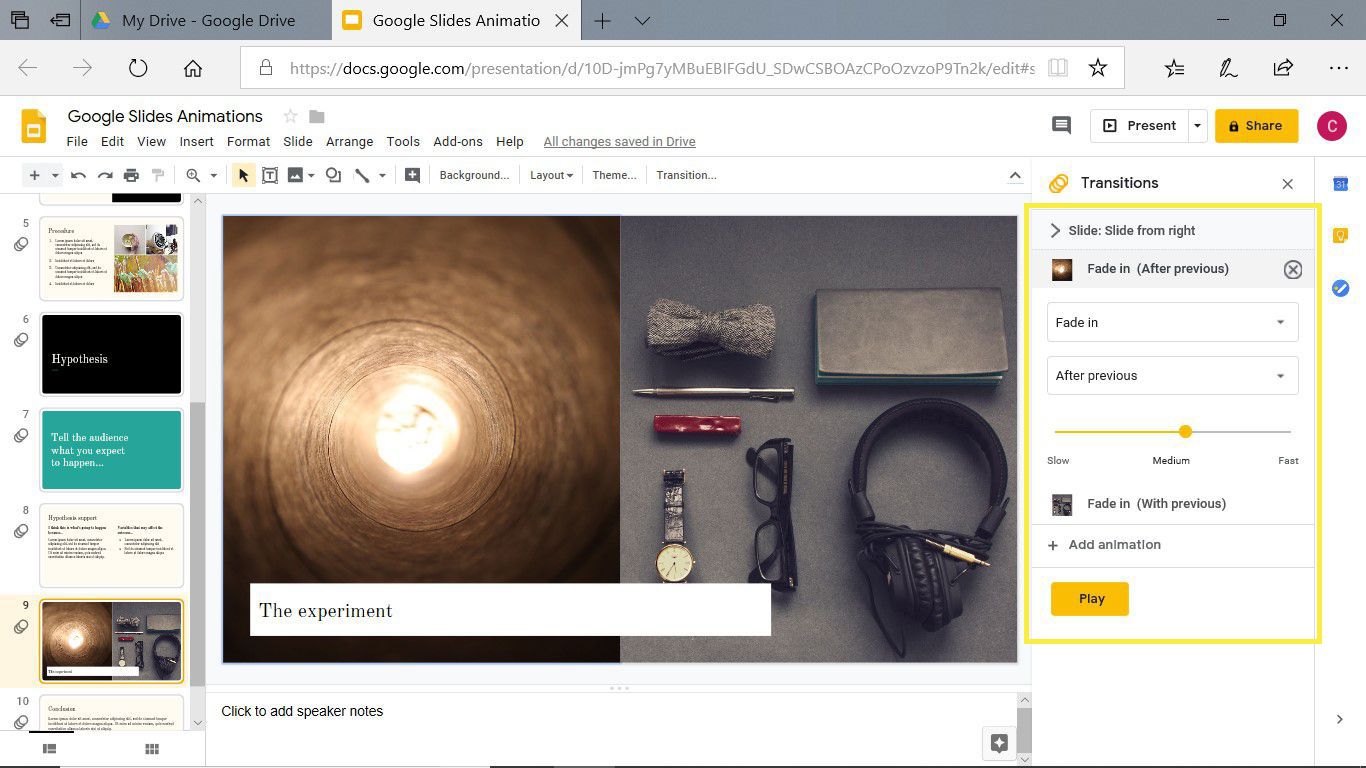
Applying Transitions between Slides
Applying transitions between slides in Google Slides can add a professional and visually appealing touch to your presentation. Transitions help create smooth and seamless connections between slides, enhancing the flow and engagement of your audience. Here’s how you can apply transitions between slides in Google Slides:
1. Open your Google Slides presentation and navigate to the slide where you want to apply a transition.
2. Go to the toolbar and click on the “Slide” tab. Select “Change Transition” from the drop-down menu.
3. A sidebar will appear on the right side of the screen, displaying various transition options.
4. Browse through the available transitions and click on the one you want to apply to the slide.
5. Customize the transition options by clicking on the “Effect Options” button in the Transition sidebar. This allows you to adjust the speed, direction, and other parameters of the transition.
6. Preview the transition by clicking the “Play” button in the Transition sidebar. This will show you how the slide will transition to the next one.
7. If you’re satisfied with the transition effect, click on the “Apply” button to add it to the selected slide.
Applying transitions between slides can help you create a more engaging and polished presentation. Here are some tips for effectively applying transitions:
– Consistency: Maintain consistency in your choice of transitions throughout your presentation. Using a consistent transition style creates a cohesive and professional look.
– Relevance: Choose transition effects that are relevant to the content and mood of your presentation. For example, a fade transition might be suitable for a subtle transition between slides, while a slide or zoom transition could be used for a more dynamic effect.
– Timing: Consider the timing and duration of your transitions. Adjust the speed and duration to fit the pace of your presentation and ensure a smooth transition between slides.
– Moderation: Use transitions sparingly and purposefully. Overusing transitions can distract from the content of your presentation and create a visually noisy experience for your audience. Select transitions that enhance your presentation rather than overwhelm it.
By applying transitions between slides in Google Slides, you can improve the overall flow and visual appeal of your presentation. Experiment with different transition effects and durations to find the ones that best complement your content and engage your audience.
Choosing the Right Transition
Choosing the right transition between slides in Google Slides is crucial for creating a smooth and visually appealing presentation. Transitions help signal a shift in content, guide the audience’s attention, and add a professional touch to your slides. Here’s how you can choose the right transition for your presentation:
1. Consider the tone and message of your presentation. Think about the overall mood you want to convey and the impression you want to leave with your audience. For a formal or business presentation, subtle transitions like “Fade” or “Crossfade” may be appropriate. On the other hand, for a more creative or dynamic presentation, transitions like “Slide” or “Zoom” might be more suitable.
2. Align the transition with the content. Each slide transition should support and enhance the information being presented. For example, a “Wipe” transition might be suitable when revealing new bullet points in a list, while a “Flip” transition could be used when showcasing before-and-after images or demonstrating a transformation.
3. Consider the timing and pace of your presentation. Some transitions, like “Fade” or “Dissolve,” create a seamless flow between slides and are ideal for a slower-paced presentation. On the other hand, transitions like “Slide” or “Zoom” can add energy and keep the audience engaged in a faster-paced presentation.
4. Be consistent. Choose one or a few transitions to use consistently throughout your presentation. This creates a cohesive and professional look. Too many different transitions can be distracting and may take away from the content of your slides.
5. Consider your audience. Think about the preferences and expectations of your audience. A more conservative audience may appreciate simpler transitions, while a younger or more tech-savvy audience may enjoy more dynamic and playful transitions. Consider the demographics, cultural background, and expectations of your specific audience to make an informed decision.
6. Preview and test your chosen transition. Before finalizing your transition choice, preview it by playing through your slides to see how it flows and if it complements your content. Make any necessary adjustments to the timing or specific transitions in order to achieve the desired effect.
By selecting the right transition in Google Slides, you can enhance the visual impact of your presentation and ensure a seamless flow between slides. Remember to choose transitions that align with your content, pace, and audience to create a polished and engaging experience.
Customizing Transition Options
Customizing transition options in Google Slides allows you to personalize and fine-tune the transition effects between slides. By adjusting these options, you can create a more engaging and seamless transition that aligns with the content and tone of your presentation. Here’s how you can customize transition options in Google Slides:
1. Open your Google Slides presentation and go to the slide where you want to adjust the transition.
2. Click on the “Slide” tab in the toolbar and select “Change Transition” from the drop-down menu.
3. A sidebar will appear on the right side of the screen, displaying various transition options.
4. Choose the desired transition effect from the available options by clicking on it. You can preview the transition by clicking the “Play” button next to the effect.
5. Customize the transition options by clicking on the “Effect Options” button in the Transition sidebar. This will open up additional settings for the selected transition effect.
6. Within the customization options, you can adjust settings such as duration, direction, sound, and advance slide options.
7. Duration: Set the duration of the transition, determining how long it takes for one slide to transition to the next. Experiment with different durations to find the timing that best suits the flow of your presentation.
8. Direction: Choose the direction in which the transition occurs. Some transitions offer options like “From Left,” “From Right,” “From Top,” “From Bottom,” or “Random.” Select the direction that best complements the content and visual elements on your slides.
9. Sound: Decide whether you want to include a sound effect during the transition. You can select from a range of available sound options or choose “No Sound” if you prefer a silent transition.
10. Advance slide options: Customize how slides advance during the presentation. You can choose to advance slides manually with a click or automatically after a set duration.
Experiment with the customization options to create a transition effect that aligns with your presentation goals and enhances the visual impact of your slides. Keep these tips in mind:
– Consistency: Maintain consistency in your chosen transition options throughout your presentation. Using consistent durations, directions, and sound choices can create a cohesive and professional look.
– Relevance: Customize the transition options to match the content and mood of your slides. Consider how the transition will complement the narrative or highlight key points in your presentation.
– Timing: Adjust the duration and advance slide options to ensure a smooth and appropriate flow between slides. Consider the amount of information on each slide and the pace at which you want to deliver it.
Remember that the purpose of customizing transition options is to enhance the audience’s experience and make your presentation more engaging. Use these customization features wisely to ensure that the transitions support and enhance your content effectively.
Applying Transition Effects to All Slides
Applying transition effects to all slides in your Google Slides presentation can create a consistent and cohesive visual experience. Instead of manually applying transitions to each slide one by one, you can apply a single transition effect to all slides at once. Here’s how you can apply transition effects to all slides in Google Slides:
1. Open your Google Slides presentation and go to any slide.
2. Click on the “Slide” tab in the toolbar and select “Change Transition” from the drop-down menu.
3. A sidebar will appear on the right side of the screen, displaying various transition options.
4. Choose the desired transition effect by clicking on it. This will set the chosen transition as the default for all slides in your presentation.
5. Customize the transition options by clicking on the “Effect Options” button in the Transition sidebar. This allows you to adjust the duration, direction, sound, and advance slide options for the selected transition effect.
6. If you are satisfied with the transition effect and customization options, simply close the Transition sidebar.
By applying a transition to all slides, you ensure a consistent visual experience throughout your presentation. However, it’s important to keep these considerations in mind:
– Relevance: Choose a transition that complements the content and mood of your presentation. Consider how the transition effect reflects the narrative or enhances the overall message.
– Timing: Adjust the duration and advance slide options to fit the pace and delivery of your presentation. Ensure that the timing of the transition aligns with the flow of your speech and the desired impact of each slide.
– Moderation: Use transitions judiciously and avoid overusing them. While transitions can enhance the visual appeal of your slides, excessive or flashy transitions can distract from the content and detract from the professionalism of your presentation.
– Preview and adjust: Test your transition effect by running through your slides and make any necessary adjustments to the customization options. Ensure that the transitions are smooth and seamless, enhancing the overall flow of your presentation.
By applying transition effects to all slides in Google Slides, you can create a harmonious and visually compelling presentation experience for your audience. Remember, consistency and relevance are key when selecting and customizing the transition effect to ensure it supports and enhances your content effectively.
Adding Animations to Master Slides
Adding animations to master slides in Google Slides can save you time and effort by applying animations consistently across all slides in your presentation. By adding animations to the master slides, you ensure that every slide inherits the same animation effects, creating a cohesive and professional visual experience. Here’s how you can add animations to master slides in Google Slides:
1. Open your Google Slides presentation and click on the “View” tab in the toolbar.
2. Select “Master” from the drop-down menu, and then select “Slide Master.”
3. The Slide Master view will open, displaying the master slide layout.
4. Click on the master slide where you want to add the animations. Typically, this would be the first (topmost) slide in the Slide Master view.
5. Go to the toolbar and click on the “Insert” tab. Select “Animation” from the drop-down menu.
6. In the Animation sidebar on the right side of the screen, choose the animation effect you want to apply to the master slide.
7. Customize the animation options by clicking on the “Effect Options” button in the Animation sidebar. This allows you to adjust settings such as speed, direction, and delay.
8. Preview the animation by clicking the “Play” button in the Animation sidebar. This allows you to see how the animation will appear on all slides that inherit the master slide layout.
9. If you’re satisfied with the animation effect and customization options, close the Animation sidebar to exit the Slide Master view.
By adding animations to master slides, all slides that inherit from the master slide layout will automatically include the same animation effects. This ensures consistency and saves you time when designing your presentation. However, remember these considerations:
– Moderation: Use animations sparingly in master slides to avoid overwhelming the audience with excessive or distracting effects. Select animation effects that enhance the content and support the narrative of your presentation.
– Content accommodation: Keep in mind that not all slides may be suitable for the same animation effect. Consider how the animation will interact with different types of content, such as text-heavy slides, charts, or images.
– Preview and fine-tuning: After applying animations to the master slides, review and test the animations on regular slides to ensure they are visually appealing and enhance the overall flow of your presentation.
By adding animations to master slides in Google Slides, you can create a cohesive and visually engaging presentation with consistent animation effects across all slides. Customizing animations at the master slide level saves effort and maintains a professional look, while still allowing room for specific slide animations as needed.
Working with Slide Transitions and Animations in Collaboration
When collaborating on a presentation in Google Slides, it’s important to ensure that slide transitions and animations are coherent and consistent across team members. Here are some tips for effectively working with slide transitions and animations in collaboration:
1. Communication: Establish clear communication with your team members about the desired style and approach for slide transitions and animations. Discuss any specific guidelines or preferences to ensure a unified visual experience for the entire presentation.
2. Consistency: Maintain consistency in slide transitions and animations throughout the presentation. Decide on a common set of transition effects and stick with them to create a cohesive and professional look. Standardize the timing, duration, and overall feel of the animations to ensure they align with the content and narrative.
3. Collaboration Tools: Leverage collaboration features in Google Slides to work together seamlessly. Utilize real-time editing and commenting to discuss and make joint decisions about slide transitions and animations. Encourage team members to share their ideas and provide feedback to establish a shared vision for the presentation.
4. Designated Animator: Consider appointing a single team member as the designated animator responsible for implementing slide transitions and animations. This person can take ownership of ensuring that animations are consistent, coherent, and meet the expectations discussed with the rest of the team.
5. Document and Share Guidelines: Create a document or style guide that outlines the agreed-upon guidelines for slide transitions and animations. Include information about the chosen transition effects, timing, and any specific considerations for different types of content. Share this document with the team to ensure everyone is on the same page when working on their respective slides.
6. Test and Review: Regularly test the slide transitions and animations as you collaborate on the presentation. Review the transitions and animations in different viewing modes, such as presentation mode or preview mode, to ensure they work as intended. Fix any inconsistencies or issues that arise during the collaboration process.
7. Iterate and Refine: As you work together on the presentation, be open to feedback and suggestions from team members. Iterate and refine the slide transitions and animations based on the collective input to create the best possible visual experience for your audience.
By actively collaborating on slide transitions and animations in Google Slides, you can create a cohesive and visually captivating presentation. Effective communication, consistency, and shared decision-making will result in a final product that reflects the collective effort and expertise of the entire team.
Tips and Best Practices for Slide Animations and Transitions
Implementing slide animations and transitions effectively can enhance the impact and engagement of your presentation. Here are some tips and best practices to consider when working with animations and transitions in Google Slides:
1. Purposeful Use: Use animations and transitions purposefully to enhance understanding and emphasize key points. Avoid using them gratuitously or excessively, as this can distract and dilute the message of your presentation.
2. Consistency: Maintain consistency in the use of animations and transitions throughout your presentation. Use a consistent set of effects and timings to create a cohesive and professional look.
3. Subtlety: Keep slide animations and transitions subtle and smooth to avoid overwhelming your audience. The goal is to enhance the content, not overpower it.
4. Timing: Time your animations and transitions appropriately to maintain a smooth flow. Ensure that animations occur at the right moment to support your narrative and engage your audience effectively.
5. Readability: Ensure that text and content remain readable during animations and transitions. Avoid using small or illegible fonts, and test readability on different screen sizes and devices.
6. Preview and Test: Before presenting, preview your animations and transitions to ensure they work as intended. Check for any issues or inconsistencies, and make necessary adjustments to improve the visual experience.
7. Practice: Practice your presentation with the animations and transitions to ensure smooth delivery. Familiarize yourself with the timing and coordination between spoken words and slide transitions for a polished performance.
8. Audience Considerations: Consider the preferences and expectations of your audience when selecting animations and transitions. Adapt the style and intensity of effects to match the demographics and context of your listeners.
9. Content Suitability: Ensure that the selected animations and transitions align with the content being presented. For example, formal presentations may require more subtle transitions, while product demonstrations could benefit from more dynamic effects.
10. Regular Updates: Revisit your slide animations and transitions periodically. As your presentation evolves, make necessary updates to enhance the visual impact and adapt to audience feedback.
By following these tips and best practices, you can make effective use of slide animations and transitions to enhance the delivery and impact of your presentation in Google Slides. Keep the focus on your content and the needs of your audience to create a visually engaging and memorable experience.