
Check the Volume Settings
One of the first things to do when experiencing sound issues on your Mac is to check the volume settings. It may seem like a simple step, but sometimes the volume might accidentally be turned down or muted.
Begin by locating the volume icon in the menu bar, which is represented by a speaker symbol. Click on the icon and drag the volume slider up to increase the volume. Make sure it is not set to the lowest level or muted.
If you don’t see the volume icon in the menu bar, go to “System Preferences” and click on “Sound.” In the “Output” tab, check if the volume is turned up and not muted. You can also try adjusting the balance slider to ensure that sound is not being directed to only one side.
Additionally, check the volume settings within specific applications you are using. Some apps have their own volume control, so even if the system volume is turned up, the app volume might be low or muted.
If the volume settings are correct, but you still can’t hear any sound, try plugging in headphones or external speakers to check if the issue is with the built-in speakers of your Mac. If you hear sound through the external device, it could indicate a problem with the internal speakers or audio driver.
It’s also worth mentioning that certain applications or websites may have their own volume controls that are separate from your system settings. Make sure to check the volume controls within those specific apps or websites.
By checking the volume settings and ensuring they are properly configured, you can rule out any simple issues that may be causing the sound problem on your Mac. If the issue persists, it’s time to move on to the next troubleshooting step.
Plug in Your Headphones Properly
If you’re experiencing sound issues on your Mac, one of the potential causes could be improper headphone connection. Even a slight misalignment when plugging in your headphones can result in no sound or distorted audio. Follow these steps to ensure a proper headphone connection:
- Inspect the headphone jack: Start by examining the headphone jack on your Mac. Look for any debris, dust, or foreign objects that might be obstructing the connection. If you notice anything, gently clean the jack using a soft, dry cloth or a can of compressed air. This will help ensure a clean and secure connection.
- Use the correct port: Some Mac devices have multiple audio ports, such as separate ports for headphones and microphone. Make sure you’re plugging your headphones into the correct port. Refer to your Mac’s user manual or the manufacturer’s website to identify the correct audio port for headphones.
- Insert the headphones properly: When inserting the headphone plug into the audio port, make sure it is fully seated and securely connected. Give it a gentle twist if necessary to ensure a snug fit. Avoid inserting the plug at an angle, as this can cause poor contact and result in no sound or intermittent audio.
- Check the headphone cables: Inspect the headphone cables for any signs of damage or fraying. If you notice any issues, such as exposed wires or a loose connection, consider replacing the headphones or repairing them if possible. Faulty cables can lead to sound problems or even complete audio loss.
- Test with different headphones: If you still experience sound issues after properly connecting your headphones, try using a different pair of headphones. Sometimes, the problem may lie with the headphones themselves, such as a damaged driver or faulty wiring. Testing with a different pair will help determine if the issue is with the headphones or the Mac.
By ensuring a proper headphone connection, you eliminate one potential cause of sound problems on your Mac. If the issue persists, continue with the next troubleshooting steps to identify and resolve the underlying problem.
Restart Your Mac
If you’re facing sound issues on your Mac, a simple yet effective troubleshooting step is to restart your computer. Restarting can help resolve software glitches or conflicts that may be causing the sound problem. Follow these steps to restart your Mac:
- Save your work: Before restarting your Mac, save any open documents or projects to prevent losing unsaved changes.
- Close all applications: Close any open applications to ensure a clean restart. It’s important to fully exit all programs to allow the system to shut down properly.
- Click on the Apple menu: In the top-left corner of your screen, click on the Apple logo to open the menu.
- Select Restart: From the drop-down menu, select the “Restart” option. Your Mac will begin the shutdown process.
- Wait for the restart: Allow your Mac to fully shut down and restart. This process may take a few moments.
- Test the sound: Once your Mac has restarted, test the sound by playing a video or audio file. Check if the sound issue has been resolved.
Restarting your Mac can help refresh system processes and clear temporary issues that might be affecting sound output. It allows the operating system to start fresh and re-establish proper audio functionality. In many cases, a simple restart can resolve sound problems without the need for further troubleshooting.
If the sound issue persists after restarting, continue with the next troubleshooting steps to identify and resolve the root cause of the problem.
Disconnect and Reconnect External Speakers
If you have external speakers connected to your Mac and you’re experiencing sound issues, it’s worth disconnecting and reconnecting them to ensure a proper audio connection. Sometimes, a loose or faulty connection can lead to sound problems. Follow these steps to disconnect and reconnect your external speakers:
- Locate the speakers: Identify the external speakers connected to your Mac. They may be connected through the headphone jack, USB ports, or Bluetooth.
- Turn off the speakers: If your speakers have a power button, switch them off before disconnecting to avoid any potential electrical issues.
- Unplug the speakers: Carefully unplug the connectors from your Mac. This may involve unplugging the headphone jack, USB cable, or Bluetooth pairing, depending on the type of speakers you’re using.
- Inspect the connectors: While the speakers are disconnected, examine the connectors for any visible damage or debris. Clean the connectors and ports if necessary using compressed air or a soft, dry cloth.
- Reconnect the speakers: Plug the connectors back into the appropriate ports on your Mac. Ensure a secure connection by pushing the connectors in fully, but avoid using excessive force.
- Turn on the speakers: If your speakers have a power button, switch them back on after reconnecting. Follow any additional setup instructions specified by the speaker manufacturer.
- Test the sound: After reconnecting the speakers, play an audio or video file to test the sound output. Check if the issue has been resolved.
By disconnecting and reconnecting your external speakers, you can eliminate any potential issues caused by a weak or faulty audio connection. If the sound problem persists, move on to the next troubleshooting steps to identify and resolve the underlying cause.
Update Your Mac’s Software
Keeping your Mac’s software up to date is crucial not only for security and performance but also for resolving potential sound issues. Outdated software can sometimes cause compatibility issues with audio drivers or result in glitches that affect sound output. Follow these steps to update your Mac’s software:
- Check for updates: Click on the Apple menu in the top-left corner of your screen and select “System Preferences.” Then, click on “Software Update.” Your Mac will check for any available updates.
- Install updates: If any updates are found, click on the “Update Now” button to install them. Depending on the size of the updates, this process may take some time. Ensure that your Mac is connected to a stable internet connection during the update process.
- Restart your Mac: After installing the updates, your Mac may prompt you to restart the computer. It is important to restart to allow the system to fully apply the updates.
- Test the sound: Once your Mac has restarted, play an audio or video file to test the sound. Check if the sound issue has been resolved.
Software updates often include bug fixes, performance enhancements, and improvements to audio functionality. By ensuring that your Mac’s software is up to date, you can eliminate any potential software-related issues that may be affecting the sound on your Mac.
If the sound issue persists after updating your Mac’s software, continue with the next troubleshooting steps to identify and resolve the underlying problem.
Reset the NVRAM or PRAM
The NVRAM (Non-Volatile Random Access Memory) or PRAM (Parameter Random Access Memory) on your Mac stores various settings related to sound, display, and other system configurations. Resetting the NVRAM or PRAM can help resolve sound issues caused by corrupted settings. Follow these steps to reset the NVRAM or PRAM on your Mac:
- Shut down your Mac: Click on the Apple menu in the top-left corner of your screen and select “Shut Down.”
- Turn on your Mac: Press the power button to turn on your Mac.
- Immediately press and hold the following keys: Option, Command (⌘), P, and R.
- Keep holding the keys: Hold down the keys until you hear the startup sound for the second time or see the Apple logo appear and disappear for the second time.
- Release the keys: After the second startup sound or when the Apple logo appears and disappears for the second time, release the keys.
- Wait for your Mac to restart: Your Mac will restart and the NVRAM or PRAM will be reset to the default settings.
- Test the sound: Once your Mac has restarted, play an audio or video file to test the sound output. Check if the issue has been resolved.
Resetting the NVRAM or PRAM can help clear any corrupted settings that might be causing sound issues on your Mac. It’s important to note that after resetting the NVRAM or PRAM, you may need to reconfigure certain settings like the display resolution or startup disk selection. Refer to Apple’s support documentation or the manufacturer’s website for specific instructions relevant to your Mac model.
If the sound issue persists after resetting the NVRAM or PRAM, proceed with the next troubleshooting steps to identify and resolve the root cause of the problem.
Reset the Core Audio
If you’re still experiencing sound issues on your Mac, resetting the Core Audio can help resolve any underlying problems with the audio system. The Core Audio is responsible for managing sound output and input on your Mac. Follow these steps to reset the Core Audio:
- Quit all open applications: Close any applications that are currently running on your Mac.
- Open “Terminal”: Go to the Applications folder, then Utilities, and launch the Terminal app.
- Type the command: In the Terminal window, type the following command and press Enter:
sudo killall coreaudiod - Enter your password: You will be prompted to enter your administrator password. Note that when entering the password, no characters will be displayed on the screen. Press Enter after entering the password.
- Wait for the Core Audio to reset: The Terminal will execute the command to reset the Core Audio. Wait for the process to complete. This may take a few seconds.
- Test the sound: Once the Core Audio has been reset, play an audio or video file to test the sound output. Check if the issue has been resolved.
Resetting the Core Audio refreshes the audio system, which can help resolve any software conflicts or glitches causing sound problems on your Mac. If the sound issue persists, continue with the next troubleshooting steps to identify and resolve the underlying cause.
Check for Sound Output in Sound Settings
If you’re still encountering sound issues on your Mac, it’s important to check the sound output settings to ensure that the correct audio device is selected. Follow these steps to verify the sound output in the Sound settings:
- Click on the Apple menu: In the top-left corner of your screen, click on the Apple logo to open the menu.
- Select “System Preferences”: From the drop-down menu, select “System Preferences.”
- Open the “Sound” settings: In the System Preferences window, click on the “Sound” icon to open the Sound settings.
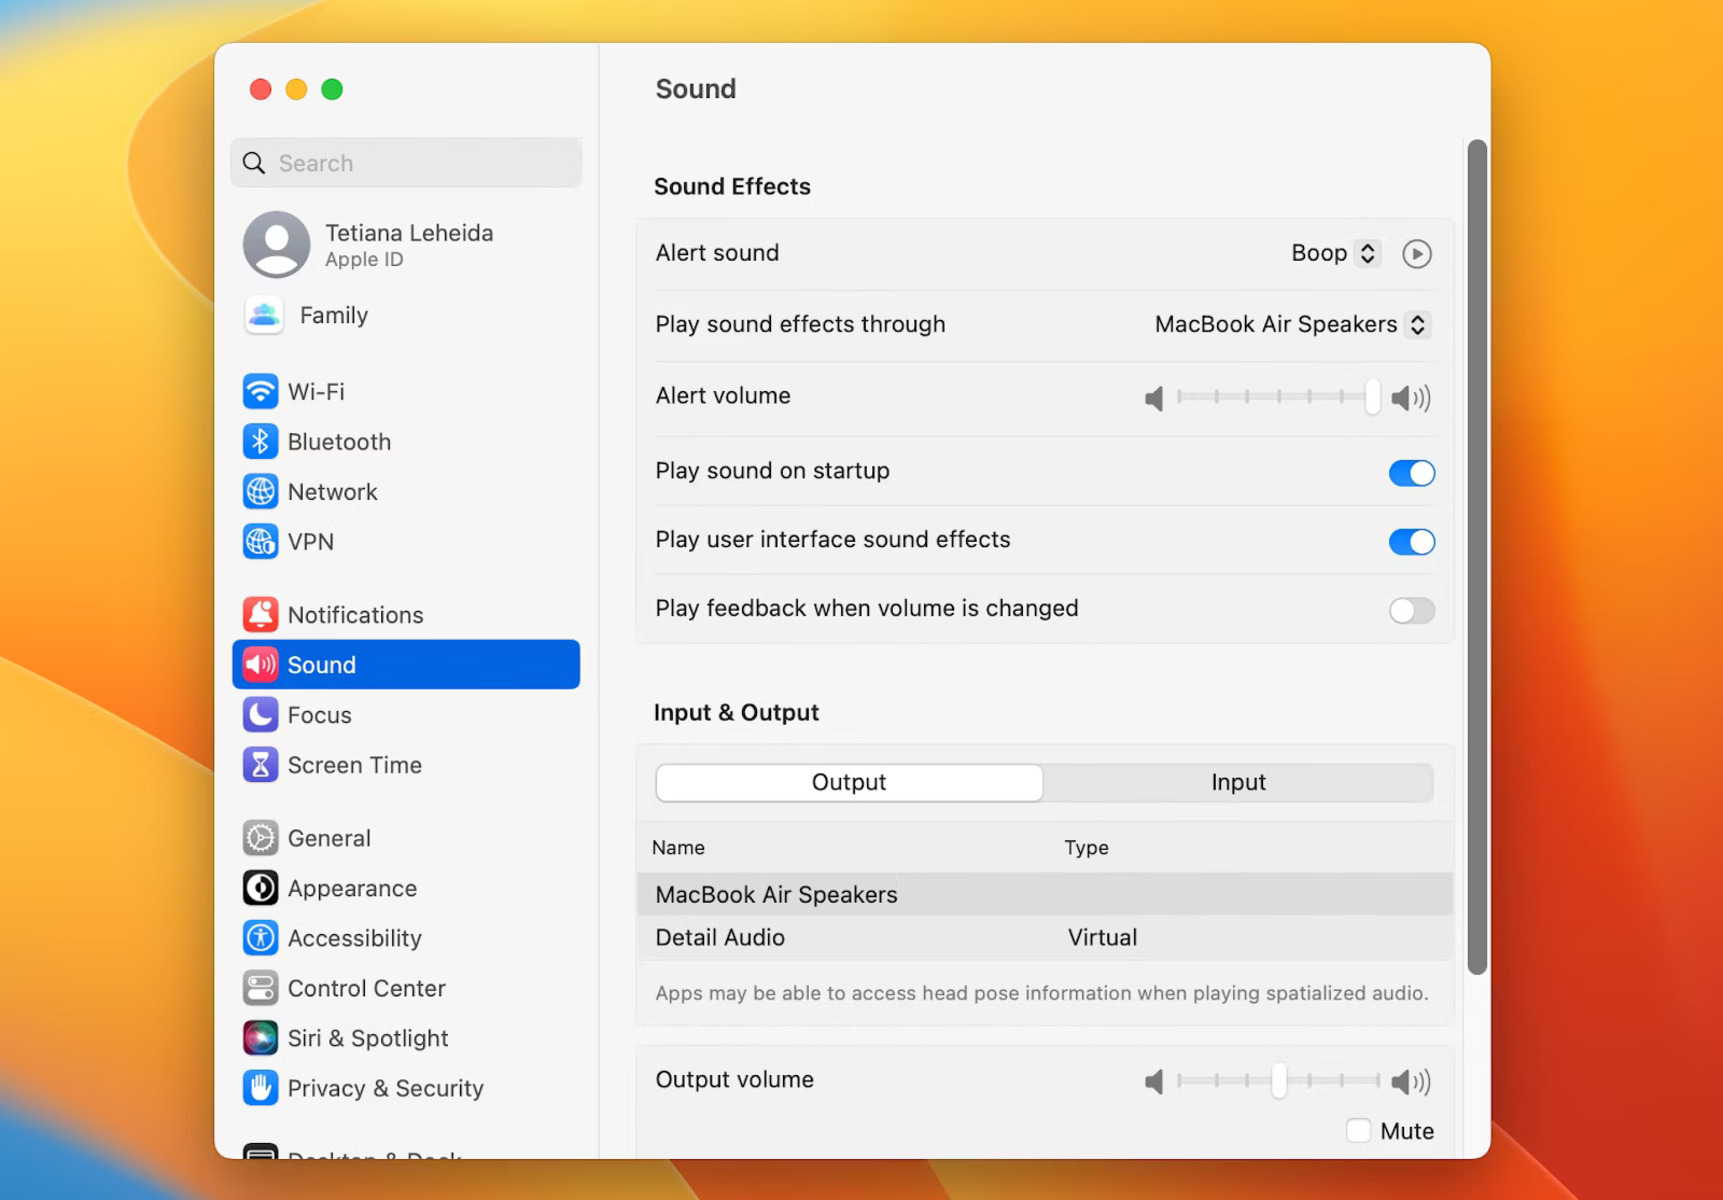
- Go to the “Output” tab: In the Sound settings, navigate to the “Output” tab. Here, you will see a list of available sound output devices.
- Select the correct output device: Ensure that the desired audio output device is selected. If you’re using external speakers or headphones, choose the appropriate device from the list. If you’re unsure, try selecting different output devices to see if sound is produced.
- Adjust output volume: In the Output tab, you can also adjust the output volume using the slider. Make sure the volume is not set too low or muted.
- Test the sound: Once you’ve selected the correct output device and adjusted the volume, play an audio or video file to test the sound output. Verify if the issue has been resolved.
Checking the sound output settings ensures that the correct audio device is being used for playback. Sometimes, the sound may be directed to the wrong output device, leading to a lack of sound or distorted audio on your Mac. By verifying the sound output settings, you can eliminate any improper configurations that might be causing the sound issue.
If the sound problem persists, continue with the following troubleshooting steps to further diagnose and resolve the underlying cause.
Verify the Sound Control of Individual Apps
If you’re experiencing sound issues with specific applications on your Mac, it’s essential to check the sound control settings within those apps. Sometimes, individual apps may have their own volume controls that are separate from the system settings. Follow these steps to verify the sound control of individual apps:
- Open the desired app: Launch the specific application in which you’re experiencing sound problems.
- Locate the sound controls: Look for any sound control settings within the application. This may be represented by a speaker icon, volume slider, or audio settings menu.
- Adjust the volume: Check if the app’s volume is set to a suitable level. Increase the volume if it’s too low or ensure that it’s not muted.
- Test the sound: Play an audio or video file within the app to test the sound output. Verify if the sound issue has been resolved.
By verifying the sound control settings within individual apps, you can address any app-specific sound settings that might be causing the issue. Certain apps may have their own volume controls that can override the system settings, resulting in sound problems on your Mac.
If you’re still encountering sound issues with specific apps even after adjusting the sound controls, it’s recommended to check for any updates for the particular app. Developers often release updates to address bugs and improve audio compatibility. Additionally, you can try reinstalling the app or reaching out to the app’s support team for further assistance.
If the sound problem continues across multiple apps or persists even after verifying the sound control settings, proceed with the next troubleshooting steps to identify and resolve the underlying cause.
Remove Any Conflicting Audio Plugins
If you’re experiencing sound issues on your Mac, conflicting audio plugins could potentially be the cause. Some plugins may conflict with the system’s audio settings, leading to sound problems or even complete audio loss. Follow these steps to remove any conflicting audio plugins:
- Quit all applications: Close any running applications to ensure that there are no active processes using the audio plugins.
- Navigate to the Plugin folder: Open Finder and go to the “Library” folder on your Mac’s main hard drive. Inside the Library folder, locate the “Audio” or “Audio Plug-Ins” folder.
- Identify the plugins: In the Audio Plug-Ins folder, look for any third-party audio plugins that you suspect may be causing conflicts. These plugins are typically in the form of .component or .vst files.
- Move the plugins to a temporary location: Once you’ve identified the problematic plugins, move them to a temporary folder on your desktop or another location outside of the Plug-Ins folder.
- Restart your Mac: After removing the conflicting plugins, restart your Mac to ensure that the changes take effect.
- Test the sound: Once your Mac has restarted, play an audio or video file to test the sound output. Check if the sound issue has been resolved.
By removing conflicting audio plugins, you eliminate potential sources of conflict within the system that might be causing the sound problems. It’s important to note that some plugins may be necessary for specific audio software or production tools, so exercise caution when removing them. If you’re unsure about a plugin’s function, it’s recommended to consult the documentation or support resources of the associated software.
If the sound issue persists even after removing conflicting audio plugins, continue with the next troubleshooting steps to identify and resolve the underlying cause.
Repair Disk Permissions
If you’re encountering sound issues on your Mac, repairing disk permissions can be a helpful troubleshooting step. Disk permissions control access to certain files and system resources on your Mac, and corrupted or incorrect permissions may interfere with the proper functioning of audio-related components. Follow these steps to repair disk permissions:
- Launch Disk Utility: Open Finder and go to “Applications”, then “Utilities”. Locate and open the Disk Utility application.
- Select your Mac’s startup disk: In the left sidebar of Disk Utility, select your Mac’s startup disk. It is typically labeled “Macintosh HD” or the name you have assigned to it.
- Click on “First Aid”: At the top of the Disk Utility window, click on the “First Aid” tab.
- Click on “Repair Disk Permissions”: Within the First Aid tab, click on the “Repair Disk Permissions” button. Disk Utility will begin scanning and repairing the permissions on your Mac’s disk.
- Wait for the repair process to complete: Allow Disk Utility to complete the repair process. The duration may vary depending on the size of your disk and the number of permissions to be repaired.
- Test the sound: After Disk Utility has finished repairing disk permissions, play an audio or video file to test the sound output. Check if the issue has been resolved.
Repairing disk permissions helps ensure that the necessary permissions are correctly set for audio-related files and resources. It can potentially fix any corrupted or incorrect permissions that might be causing sound problems on your Mac. However, it’s important to note that in newer versions of macOS, repairing disk permissions may no longer be necessary or available as an option in Disk Utility. If that is the case, proceed with the next troubleshooting steps to identify and resolve the underlying cause of the sound issue.
Delete Audio Preferences
If you’re still experiencing sound issues on your Mac, deleting the audio preferences can help resolve any corrupted or misconfigured settings related to audio. Follow these steps to delete the audio preferences:
- Quit all applications: Close any open applications to ensure that there are no active processes accessing the audio preferences.
- Go to the Preferences folder: Open Finder and click on the “Go” menu in the menu bar. While holding the “Option” key, click on “Library.”
- Locate the Preferences folder: In the Library folder, navigate to the “Preferences” subfolder.
- Find the audio preferences: Look for any files or folders related to audio settings or preferences. These may have names like “com.apple.audio” or something similar. It’s recommended to search for files with .plist extension.
- Move the audio preference files: Once you’ve identified the audio preference files, move them to a temporary folder on your desktop or another location outside of the Preferences folder.
- Restart your Mac: After removing the audio preferences, restart your Mac to allow the system to reset and recreate the preference files.
- Test the sound: Once your Mac has restarted, play an audio or video file to test the sound output. Check if the issue has been resolved.
By deleting the audio preferences, you’re essentially clearing out any corrupted or misconfigured settings that may be causing sound problems on your Mac. This forces the system to create fresh preferences upon restart, potentially resolving any issues related to audio settings.
If the sound issue persists after deleting the audio preferences, proceed with the next troubleshooting steps to identify and resolve the underlying cause of the problem.
Reset the SMC
If you’re experiencing persistent sound issues on your Mac, resetting the System Management Controller (SMC) can help resolve hardware-related problems that might be affecting the audio functionality. The SMC controls many important functions on your Mac, including power management and hardware settings. Follow these steps to reset the SMC:
- Shut down your Mac: Click on the Apple menu in the top-left corner of your screen and select “Shut Down.”
- Disconnect the power cord: Unplug the power cord from your Mac and also remove any external devices connected to it.
- Wait for 15 seconds: Let the Mac sit for about 15 seconds to ensure that all power is drained from the system.
- Reconnect the power cord: Plug the power cord back into your Mac.
- Press the power button: Press the power button to turn on your Mac. As you press the button, immediately hold down the following keys: Left Shift, Control, Option (Alt), and the power button (on MacBooks with a physical power button).
- Release the keys: Release all the keys and the power button at the same time.
- Start your Mac normally: Press the power button to turn on your Mac and let it start up as usual.
- Test the sound: Once your Mac has started up, play an audio or video file to test the sound output. Verify if the issue has been resolved.
Resetting the SMC can help resolve issues related to power management, hardware settings, and other system-level functions that may be affecting the sound on your Mac. It’s important to note that the key combination required to reset the SMC may vary depending on your Mac model, so refer to Apple’s support documentation or the manufacturer’s website for specific instructions.
If the sound issue continues after resetting the SMC, proceed with the next troubleshooting steps to identify and resolve the underlying cause.
Reset the Sound Output Device
If you’re still encountering sound issues on your Mac, resetting the sound output device can help resolve any misconfigurations or conflicts that may be affecting the audio output. Follow these steps to reset the sound output device:
- Click on the Apple menu: In the top-left corner of your screen, click on the Apple logo to open the menu.
- Select “System Preferences”: From the drop-down menu, select “System Preferences.”
- Open the “Sound” settings: In the System Preferences window, click on the “Sound” icon to open the Sound settings.
- Go to the “Output” tab: In the Sound settings, navigate to the “Output” tab. Here, you will see a list of available sound output devices.
- Select “Internal Speakers”: Choose “Internal Speakers” or the built-in audio device as the sound output device. If it’s already selected, choose “External Speakers” and then switch back to “Internal Speakers.”
- Close the Sound settings: After selecting or switching the sound output device, close the Sound settings.
- Test the sound: Play an audio or video file to test the sound output. Verify if the issue has been resolved.
By resetting the sound output device, you’re essentially refreshing the audio configurations and resetting any potential conflicts or incorrect settings. This can help resolve sound issues on your Mac. If the issue persists, continue with the next troubleshooting steps to identify and resolve the underlying cause of the problem.
Reset Bluetooth Connections
If you’re experiencing sound issues with Bluetooth devices on your Mac, resetting the Bluetooth connections can help resolve any connectivity or pairing problems that may be impacting the audio output. Follow these steps to reset Bluetooth connections:
- Open System Preferences: Click on the Apple menu in the top-left corner of your screen and select “System Preferences.”
- Choose the Bluetooth settings: In the System Preferences window, click on the “Bluetooth” icon to open the Bluetooth settings.
- Turn off Bluetooth: In the Bluetooth settings, click on the “Turn Bluetooth Off” button to disable Bluetooth on your Mac.
- Restart your Mac: After turning off Bluetooth, restart your Mac. Click on the Apple menu and select “Restart.” This will reboot your Mac.
- Enable Bluetooth again: Once your Mac has restarted, return to the Bluetooth settings and click on the “Turn Bluetooth On” button to re-enable Bluetooth.
- Re-pair Bluetooth devices: Put your Bluetooth device (such as headphones or speakers) into pairing mode and follow the instructions to pair it with your Mac as you did originally.
- Test the sound: Once the Bluetooth device is successfully paired, play an audio or video file to test the sound output. Verify if the issue has been resolved.
Resetting Bluetooth connections can help refresh the Bluetooth pairing process and resolve any connectivity issues that may be causing sound problems on your Mac. It allows your Mac to establish a clean and stable connection with your Bluetooth devices, ensuring proper audio output.
If the sound issue persists after resetting Bluetooth connections, continue with the next troubleshooting steps to identify and resolve the underlying cause of the problem.
Contact Apple Support for Further Assistance
If you have followed all the troubleshooting steps and are still unable to resolve the sound issues on your Mac, it may be necessary to seek further assistance from Apple Support. Apple’s dedicated support team can provide specialized help and guidance to diagnose and fix complex or hardware-related problems. Here’s how you can reach out to Apple Support:
- Visit the Apple Support website: Go to https://support.apple.com in your web browser to access Apple’s official support page.
- Select your Mac model: On the Apple Support website, choose your specific Mac model to bring up relevant support articles and resources.
- Explore support articles: Browse through the support articles related to audio or sound issues on your Mac. These articles often provide step-by-step instructions and solutions to common problems.
- Contact Apple Support directly: If you’re unable to find a solution or need personalized assistance, you can contact Apple Support directly. Choose the contact option that best suits your needs, such as phone support, live chat, or scheduling an appointment at an Apple Store.
- Provide detailed information: When contacting Apple Support, be prepared to provide specific details about your Mac model, the version of macOS you’re using, and a detailed description of the sound issue you’re experiencing. This information will help the support team better understand and troubleshoot the problem.
- Follow the guidance: Apple Support will guide you through further troubleshooting steps or provide instructions for arranging a repair if necessary. Follow their instructions carefully and provide any requested information or diagnostics.
Contacting Apple Support ensures that you receive expert help tailored to your specific issue. Their knowledgeable support staff can help identify any underlying hardware or software problems and provide the appropriate solution to get your sound working effectively on your Mac.
Remember to provide all relevant information and be patient as Apple Support works with you to resolve the sound issues. They are there to assist you and ensure that you have the best user experience on your Mac.