
What is Hal.dll?
Hal.dll, short for Hardware Abstraction Layer, is a crucial component of the Windows operating system. It acts as a bridge between the hardware and the software, providing a layer of abstraction that enables the operating system to communicate with the computer’s hardware devices. Hal.dll is responsible for handling tasks such as memory management, interrupt handling, and device drivers.
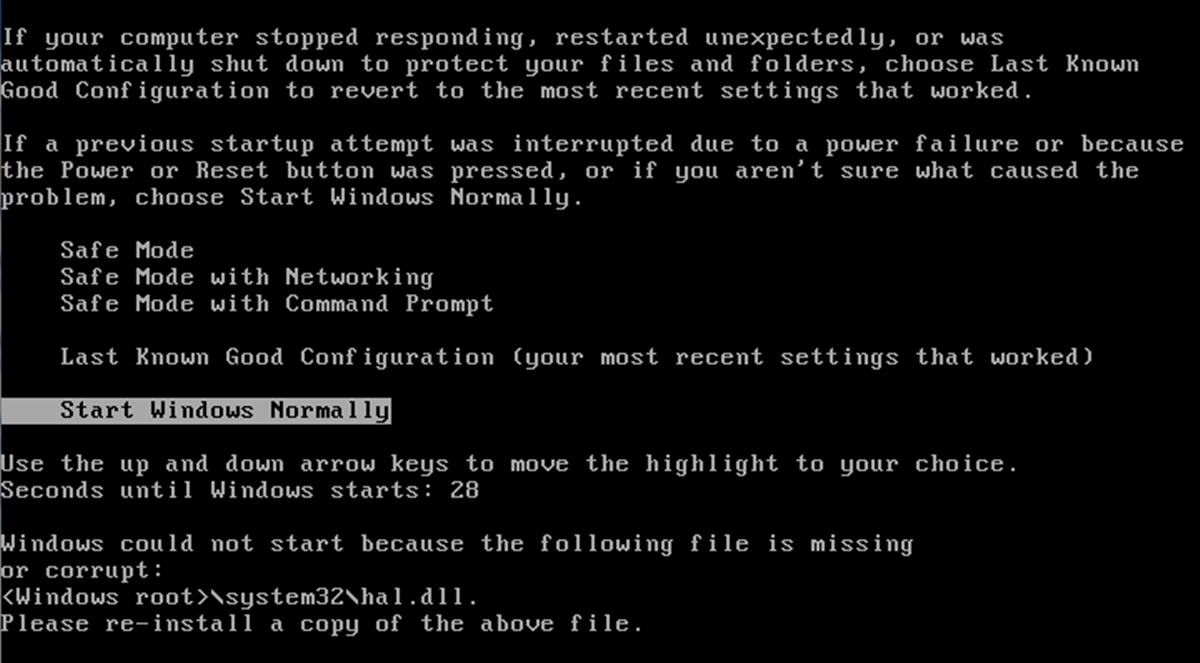
Hal.dll is located in the system32 folder of the Windows installation directory and is loaded into memory during the boot process. It plays a vital role in the functioning of the computer, making it essential for the proper operation of the operating system.
In simple terms, Hal.dll serves as a translator, allowing the operating system to understand and interact with the different hardware components in the computer. Without Hal.dll, the computer would not be able to communicate with devices such as the processor, memory, and disk drives.
Hal.dll is specific to each hardware architecture, meaning there are different versions of Hal.dll for different processor types, such as x86 or x64. This ensures that the operating system is compatible with the specific hardware configuration of the computer.
Hal.dll also plays a crucial role in the system’s stability and reliability. Any issues or errors with Hal.dll can lead to system crashes, Blue Screen of Death (BSOD) errors, and other problems that can render the computer unusable.
It is worth noting that Hal.dll errors are more commonly encountered in older versions of Windows, such as Windows XP, compared to newer versions like Windows 10. However, they can still occur in any Windows version if there is a problem with the Hal.dll file.
In the next sections, we will explore some common causes of Hal.dll errors and discuss methods to fix them so that you can get your Windows XP system up and running smoothly again.
Common Causes of Hal.dll Errors
Hal.dll errors can occur due to a variety of reasons. Identifying the underlying cause of the error can help in finding the most appropriate solution. Here are some common causes of Hal.dll errors:
- Corrupted or Missing Hal.dll File: The most common cause of Hal.dll errors is a corrupted or missing Hal.dll file. This can happen due to software conflicts, hardware failures, or issues during the installation or uninstallation of software.
- Hardware Issues: Problems with the hardware components of your computer can also result in Hal.dll errors. This includes faulty or incompatible hardware, such as a malfunctioning hard drive or problematic RAM modules.
- Driver Incompatibility: Outdated or incompatible device drivers can cause conflicts with the Hal.dll file and lead to errors. This can occur when you install new hardware devices without updating the necessary drivers.
- Software or System Updates: In some cases, software updates or system updates can cause conflicts with the Hal.dll file. This can happen if the update modifies or replaces critical system files, leading to compatibility issues.
- Virus or Malware Infections: Malicious software can corrupt or overwrite system files, including Hal.dll. Virus or malware infections can cause serious damage to your computer’s operating system, leading to Hal.dll errors.
- Hardware Malfunction: Physical hardware malfunctions, such as a failing hard drive or faulty RAM, can also trigger Hal.dll errors. These types of errors often require replacing or repairing the affected hardware component.
When encountering a Hal.dll error, it is important to consider these common causes and assess the situation to determine the appropriate troubleshooting steps. In the following sections, we will explore various methods to fix Hal.dll errors on Windows XP, both with and without the Windows XP Installation CD.
How to Fix Hal.dll Errors using the Windows XP Installation CD
If you have a Windows XP installation CD, you can use it to repair Hal.dll errors. Here’s how:
- Insert the Windows XP installation CD into your computer’s CD/DVD drive and restart the computer.
- When prompted, press any key to boot from the CD.
- Once the installation process starts, press the “R” key to enter the Recovery Console.
- Enter the administrator password, if prompted.
- In the Recovery Console, select the installation of Windows XP for which you want to repair Hal.dll errors.
- Enter the administrator password again, if prompted.
- At the command prompt, type “expand d:\i386\hal.dl_ c:\windows\system32\hal.dll” (without the quotes), replacing “d:” with the appropriate drive letter of your CD/DVD drive.
- Press Enter to execute the command and extract a fresh copy of Hal.dll from the Windows XP installation CD to the system32 folder.
- Once the file is copied, type “exit” and press Enter to exit the Recovery Console.
- Remove the Windows XP installation CD and restart your computer.
After following these steps, the Hal.dll error should be resolved, and your Windows XP system should boot up without any issues. If the problem persists, you may need to try alternative methods or seek further assistance.
Note: It’s important to ensure that you have a valid and genuine Windows XP installation CD to perform the above steps. Using an illegitimate or pirated copy is against the law and may result in further complications.
How to Fix Hal.dll Errors without the Windows XP Installation CD
If you don’t have a Windows XP installation CD, there are still methods you can try to fix Hal.dll errors. Here’s what you can do:
- Use System Restore: If you have previously enabled System Restore on your Windows XP computer, you can try using it to restore your system to a previous working state where the Hal.dll error didn’t exist. To do this, restart your computer and press the “F8” key repeatedly until the Advanced Boot Options menu appears. From there, select “Safe Mode with Command Prompt” and then log in. Once in Safe Mode with Command Prompt, type “rstrui.exe” and press Enter to access System Restore. Follow the on-screen instructions to choose a restore point and restore your system.
- Replace Hal.dll from Another Computer: If you have access to another computer running the same version of Windows XP, you can try replacing the Hal.dll file. To do this, remove the hard drive from the affected computer and connect it to the working computer. Navigate to the system32 folder on the affected hard drive and locate the Hal.dll file. Make a backup of the existing Hal.dll file, then copy the Hal.dll file from the working computer to the same location on the affected hard drive.
- Run a System File Checker (SFC) Scan: Windows XP includes a built-in tool called System File Checker that can scan for and restore missing or corrupted system files, including Hal.dll. To run an SFC scan, restart your computer and press the “F8” key repeatedly until the Advanced Boot Options menu appears. From there, select “Safe Mode with Command Prompt” and then log in. Once in Safe Mode with Command Prompt, type “sfc /scannow” and press Enter to initiate the scan. Follow the on-screen instructions and wait for the scan to complete.
- Perform a Repair Installation: If none of the above methods work, you can consider performing a Repair Installation of Windows XP. This process reinstalls Windows XP while preserving your files, applications, and settings. Keep in mind that you may need a valid Windows XP installation CD for this method. Instructions for performing a Repair Installation can be found on Microsoft’s official website or various online resources.
Remember to create a backup of your important files before attempting any of these methods to avoid any data loss. If the Hal.dll error persists or you encounter difficulties, it is advisable to seek professional assistance or consult with a knowledgeable technician.
How to Manually Restore Hal.dll File from Another Computer
If you have access to another computer running the same version of Windows XP, you can manually restore the Hal.dll file on the affected computer. Here’s a step-by-step guide:
- Remove the hard drive from the affected computer.
- Connect the hard drive to the other computer using a USB adapter or by installing it as a secondary drive.
- Navigate to the system32 folder on the affected hard drive. This folder is typically located at
C:\Windows\system32. - Locate the Hal.dll file in the system32 folder.
- Make a backup of the existing Hal.dll file. You can simply copy it to another location, such as your desktop or a USB drive, for safekeeping.
- Copy the Hal.dll file from the other computer to the same location in the system32 folder on the affected hard drive.
- Safely disconnect the affected hard drive from the other computer and reinsert it into the original computer.
- Boot up the computer and check if the Hal.dll error has been resolved.
By manually replacing the Hal.dll file from another computer, you can ensure that you have a clean and working version of the file without any corruption or errors. Remember to use a computer with the same version of Windows XP and make sure that the Hal.dll file you replace it with is compatible.
If you encounter any difficulties during this process or if the Hal.dll error persists, it is recommended to seek professional assistance or consult with a knowledgeable technician for further guidance.
How to Run System File Checker to Repair Hal.dll Errors
To repair Hal.dll errors, you can use the System File Checker (SFC) tool, which is built into Windows XP. SFC scans the system files for any corruption or damage and replaces them with a fresh copy from the Windows installation source. Here’s how to run System File Checker:
- Click on the “Start” button and open the “Run” dialog box by typing “Run” in the search field and pressing Enter. Alternatively, you can press the Windows key + R on your keyboard.
- In the Run dialog box, type “cmd” and press Enter to open the Command Prompt.
- In the Command Prompt window, type “sfc /scannow” (without the quotes) and press Enter to initiate the System File Checker scan.
- Wait for the scan to complete. This may take some time as the tool checks all the system files for errors or corruption.
- If any corrupted files are found, SFC will attempt to repair them. You may be prompted to insert the Windows XP installation CD if the necessary files are not available on your system.
- After the repair process is complete, restart your computer.
Running System File Checker can help repair any corrupted or missing Hal.dll files, ensuring the smooth operation of your Windows XP system. However, it’s important to note that if the Hal.dll file was not the cause of the error, the SFC scan may not resolve the issue.
If the Hal.dll error persists even after running System File Checker, you may need to explore other troubleshooting methods or seek further assistance from a professional to diagnose and resolve the issue.
How to Perform a Repair Installation of Windows XP to Fix Hal.dll Errors
If other methods have failed to fix the Hal.dll errors on your Windows XP system, you can consider performing a Repair Installation. This process reinstalls the operating system while preserving your files, applications, and settings. Here’s how to perform a Repair Installation:
- Insert the Windows XP installation CD into your computer’s CD/DVD drive and restart the computer.
- When prompted, press any key to boot from the CD.
- Wait for the Windows Setup to load. Select your language preferences and press Enter to continue.
- Press F8 to accept the Windows XP Licensing Agreement.
- In the next screen, you’ll see a list of existing Windows XP installations. Select the installation you want to repair and press R to start the Repair Installation process.
- Follow the on-screen instructions provided by the Windows Setup Wizard. It may ask you for certain preferences, such as entering the product key or setting up network connections. Fill in the required information and proceed.
- Wait for the Repair Installation to complete. The process could take anywhere from 30 minutes to a few hours, depending on your system’s speed.
- After the installation is finished, your computer will restart. Remove the Windows XP installation CD from the drive.
- Log in using your existing user account, and verify if the Hal.dll error has been resolved.
A Repair Installation of Windows XP reinstalls critical system files, including the Hal.dll file, which can help resolve errors and restore the functioning of your operating system. However, it’s important to note that this process may require you to reinstall certain software programs and Windows updates.
Before proceeding with a Repair Installation, it is recommended to back up your important files to an external storage device to prevent any potential data loss.
If the Hal.dll error persists even after performing a Repair Installation, it is advisable to seek professional assistance or consult with a knowledgeable technician for further diagnosis and troubleshooting.
Additional Steps to Resolve Hal.dll Errors
If you are still experiencing Hal.dll errors on your Windows XP system, here are some additional steps you can take to try and resolve the issue:
- Check for Windows Updates: Make sure your Windows XP system is up to date with the latest updates and patches. Microsoft regularly releases updates that address security vulnerabilities and fix system issues. To check for updates, go to the Start Menu, open the Control Panel, and click on “Windows Update.”
- Scan for Malware: Run a thorough scan of your system using a reputable antivirus or anti-malware software. Malicious software can cause file corruption or overwrite critical system files, including Hal.dll. Remove any detected malware or viruses from your system.
- Check Hardware Connections: Ensure that all hardware components in your computer are properly connected. Reseat the memory modules, check the cables, and ensure that there are no loose connections. Faulty hardware or loose connections can cause Hal.dll errors.
- Test Hardware Components: Use diagnostic tools to test the hardware components of your computer, such as the hard drive and RAM. Faulty hardware can lead to errors, including Hal.dll errors. Replace any malfunctioning hardware as necessary.
- Perform a Clean Installation of Windows XP: If all else fails, you can consider performing a clean installation of Windows XP. This involves formatting the hard drive and reinstalling the operating system from scratch. It is a more time-consuming process that requires backing up your files and reinstalling your applications, so it should be considered as a last resort.
Remember to create backups of your important files before attempting any major changes to your system to avoid data loss.
If the Hal.dll errors persist despite trying these additional steps, it is recommended to seek professional assistance or consult with a knowledgeable technician. They can provide further guidance and help diagnose any underlying hardware or software issues that may be causing the errors.