
Check your internet connection
One of the most common reasons why the History Channel on Roku may not be working is a problematic internet connection. Before troubleshooting any other issues, it’s crucial to ensure that your internet connection is stable and strong. Here are a few steps you can take to check your internet connection:
1. Test other streaming services: Verify if other streaming services, such as Netflix or Hulu, are working on your Roku device. If they are also experiencing issues, it’s a clear indicator that the problem lies with your internet connection rather than the History Channel app.
2. Check your Wi-Fi signal: Move closer to your Wi-Fi router and check if the signal strength improves. Weak signal strength can lead to streaming issues. If your signal strength is consistently weak, you may want to consider repositioning your Wi-Fi router or investing in a Wi-Fi extender for better coverage.
3. Restart your modem and router: Turn off both your modem and Wi-Fi router, wait for a few seconds, and then turn them back on. This simple restart can often resolve minor connectivity issues.
4. Connect via Ethernet: If possible, try connecting your Roku device directly to your modem or router using an Ethernet cable. This eliminates any potential issues with the Wi-Fi connection and provides a more stable network connection.
5. Check for network congestion: If multiple devices are connected to your Wi-Fi network and are causing congestion, it can affect the streaming quality. Consider disconnecting unused devices or limiting bandwidth-heavy activities, such as file downloads or video conferencing.
If your internet connection seems to be working fine, but the History Channel on Roku is still not functioning correctly, it’s time to explore other troubleshooting steps. Remember, a stable and strong internet connection is crucial for smooth streaming, so it’s always worth starting with this basic step before diving into more technical solutions.
Restart your Roku device
If you’re experiencing issues with the History Channel on Roku, a simple yet effective solution is to restart your Roku device. Restarting can help resolve minor glitches and refresh the system, allowing for smoother functioning. Follow these steps to restart your Roku device:
1. Using the Roku remote: Press the Roku Home button on your remote to navigate to the Roku home screen.
2. Select the Settings option: Use the arrow keys on your remote to highlight the Settings option. Press the OK button to enter the Settings menu.
3. Choose the System option: Scroll down and select the System option from the Settings menu.
4. Select System restart: In the System menu, scroll down and choose the System restart option. A confirmation screen will appear.
5. Confirm the Restart: Select Restart to confirm that you want to restart your Roku device. Wait for your Roku to turn off and then turn back on. This process usually takes a minute or so.
6. Test the History Channel: Once your Roku device has restarted, navigate back to the Roku home screen and launch the History Channel app. Check if the issue has been resolved and if you can now stream content.
If you have a Roku streaming stick or a Roku TV, you can also restart your device physically by following these steps:
1. Locate the power cable: Unplug the power cable from the back of your Roku device or directly from the power outlet.
2. Wait for 10 seconds: Allow your Roku device to sit unplugged for at least 10 seconds to ensure a complete power cycle.
3. Reconnect the power cable: Plug the power cable back into your Roku device or the power outlet.
4. Power on the device: Wait for your Roku device to power on. This process may take a minute or so.
5. Launch the History Channel: Once your Roku device has fully started, navigate to the Roku home screen and launch the History Channel app to check if the issue has been resolved.
Restarting your Roku device can often resolve minor software glitches that may be causing the History Channel to malfunction. It’s a quick and straightforward step that can make a significant difference in the performance and functionality of your Roku device.
Update your Roku software
Keeping your Roku software up to date is essential for the smooth functioning of your device and its applications, including the History Channel. Roku regularly releases software updates that address bugs, improve performance, and add new features. If you’re experiencing issues with the History Channel on Roku, it’s a good idea to check if there are any updates available for your device. Here’s how you can update your Roku software:
1. Access the Roku home screen: Use the Roku remote to navigate to the Roku home screen by pressing the Roku Home button.
2. Select the Settings option: Scroll up or down and highlight the Settings option on the home screen. Press the OK button to enter the Settings menu.
3. Choose the System option: In the Settings menu, scroll down and select the System option.
4. Select System update: Within the System menu, choose the System update option. Roku will check for any available software updates.
5. Update your software: If an update is available, your Roku device will start downloading and installing it automatically. This process can take several minutes, so be patient and avoid interrupting it.
6. Restart your Roku device: Once the software update is complete, it’s a good idea to restart your Roku device. Refer to the previous section on how to restart your Roku device for step-by-step instructions.
After updating the Roku software and restarting your device, launch the History Channel app to see if the issues have been resolved. If the History Channel is still not working correctly, try the next troubleshooting steps.
Updating your Roku software ensures that you have the latest enhancements and fixes, which can significantly improve the performance and compatibility of your device. It’s a vital maintenance step that should be done regularly to ensure optimal performance and a seamless streaming experience.
Check for app updates
Just like your Roku device’s software, the applications installed on your device, including the History Channel app, also need regular updates to ensure optimal performance and functionality. If you’re encountering problems with the History Channel on Roku, it’s worth checking if there are any updates available for the app. Here’s how you can check for and install app updates on your Roku device:
1. Access the Roku home screen: Use the Roku remote to navigate to the Roku home screen by pressing the Roku Home button.
2. Go to the Roku Channel Store: Scroll up or down and select the Streaming Channels option on the home screen. Press the OK button to enter the Roku Channel Store.
3. Find the History Channel app: In the Roku Channel Store, use the search function or browse through the categories to find the History Channel app.
4. Select the app: Once you’ve found the History Channel app, highlight it and press the OK button to open the app page.
5. Check for updates: On the History Channel app page, look for an option or button that says “Update” or “Check for updates.” Select it to check if there are any available updates for the app.
6. Install updates: If an update is available, follow the on-screen prompts to install it. This process may take a few minutes, so be patient and avoid interrupting it.
7. Restart your Roku device: After installing the app updates, it’s recommended to restart your Roku device. Refer to the earlier section on how to restart your Roku device for step-by-step instructions.
Once your Roku device has restarted, launch the History Channel app to see if the issues have been resolved. If the app is still not functioning correctly, proceed to the next troubleshooting steps.
Regularly checking for app updates and keeping the History Channel app up to date ensures that you have access to the latest features and bug fixes. It can go a long way in resolving performance issues and improving your overall streaming experience.
Clear the cache and data of the History Channel app
If you’re experiencing persistent issues with the History Channel on Roku, clearing the cache and data of the app can often resolve these problems. Clearing the cache removes temporary files that might be corrupted or causing conflicts, while clearing the data resets the app to its default settings. Here’s how you can clear the cache and data of the History Channel app:
1. Access the Roku home screen: Press the Roku Home button on your remote to navigate to the Roku home screen.
2. Go to the Roku Channel Store: Scroll up or down and select the Streaming Channels option on the home screen. Press the OK button to enter the Roku Channel Store.
3. Find the History Channel app: Use the search function or browse through the categories to locate the History Channel app in the Roku Channel Store.
4. Open the app options: Highlight the History Channel app and press the Star (*) button on your remote to open the app options menu.
5. Select Manage installed apps: In the app options menu, choose the Manage installed apps option. A list of your installed apps will appear.
6. Find the History Channel app: Scroll through the list of installed apps and select the History Channel app.
7. Clear cache: On the History Channel app page, select the Clear cache option. Confirm your selection if prompted. This will remove any temporary files stored in the app’s cache.
8. Clear data: After clearing the cache, select the Clear data option. Confirm your selection if prompted. This will reset the app to its default settings, removing any personalized preferences or login information.
9. Restart your Roku device: Once you have cleared the cache and data of the History Channel app, it’s recommended to restart your Roku device. Refer to the previous section on how to restart your Roku device.
After your Roku device has restarted, launch the History Channel app to see if the issues have been resolved. If clearing the cache and data does not solve the problem, proceed to the next troubleshooting steps.
Clearing the cache and data of the History Channel app can help resolve common app-related issues and improve its overall performance. It’s a simple yet effective step in troubleshooting problems with the app on your Roku device.
Delete and reinstall the History Channel app
If all the previous troubleshooting steps didn’t resolve the issues with the History Channel on Roku, deleting and reinstalling the app may be the solution. This process ensures that you have a fresh installation of the app, eliminating any potential software conflicts or errors. Here’s how you can delete and reinstall the History Channel app:
1. Access the Roku home screen: Press the Roku Home button on your remote to navigate to the Roku home screen.
2. Go to the Roku Channel Store: Scroll up or down and select the Streaming Channels option on the home screen. Press the OK button to enter the Roku Channel Store.
3. Find the History Channel app: Use the search function or browse through the categories to locate the History Channel app in the Roku Channel Store.
4. Open the app options: Highlight the History Channel app and press the Star (*) button on your remote to open the app options menu.
5. Select Remove channel: In the app options menu, choose the Remove channel option. Confirm your selection if prompted. This will uninstall the History Channel app from your Roku device.
6. Restart your Roku device: After uninstalling the app, it’s recommended to restart your Roku device. Refer to the earlier section on how to restart your Roku device for step-by-step instructions.
7. Reinstall the History Channel app: Once your Roku device has restarted, go back to the Roku Channel Store and search for the History Channel app again. Select it, and then choose the Add channel option to reinstall the app.
8. Wait for the installation to complete: The History Channel app will begin downloading and installing on your Roku device. The installation process may take a few minutes, so be patient and avoid interrupting it.
9. Launch the app: Once the installation is complete, navigate back to the Roku home screen, locate the History Channel app, and launch it. Check if the issues have been resolved and if you can now stream content without any problems.
Deleting and reinstalling the History Channel app provides a fresh start and can effectively resolve any app-related issues. It ensures that you have the latest version of the app and eliminates any potential conflicts that may have been causing the problems.
Ensure your Roku is in a good Wi-Fi range
Having a strong and stable Wi-Fi signal is crucial for smooth streaming on your Roku device, including the History Channel. If you’re experiencing buffering or connectivity issues, it’s important to ensure that your Roku is in a good Wi-Fi range. Here are some steps to optimize your Wi-Fi range:
1. Placement of the Roku device: Position your Roku device as close as possible to your Wi-Fi router. It’s recommended to have them in the same room or within reasonable proximity to ensure a strong signal.
2. Remove obstacles: Ensure that there are no physical obstructions, such as walls or large objects, between your Roku device and the Wi-Fi router. These obstacles can interfere with the Wi-Fi signal and weaken the connection.
3. Avoid interference: Keep your Roku device away from other electronic devices that may interfere with Wi-Fi signals, such as cordless phones, microwave ovens, or baby monitors. These devices operate on similar frequencies and can cause signal interference.
4. Adjust the router’s antennas: If your Wi-Fi router has adjustable antennas, make sure they are positioned vertically and oriented at different angles. This helps in broadcasting the signal in multiple directions for better coverage.
5. Reduce Wi-Fi congestion: If you are living in an apartment building or a neighborhood with several Wi-Fi networks, the coexistence of multiple networks can cause interference. Try changing the wireless channel of your Wi-Fi router to a less congested frequency to improve the performance of your Roku device.
6. Upgrade your Wi-Fi router: If you have an older or outdated Wi-Fi router, consider upgrading to a newer model that supports the latest Wi-Fi standards. Newer routers often provide better coverage, range, and stronger signals.
Ensuring that your Roku device is in a good Wi-Fi range can help eliminate connectivity issues while streaming the History Channel. By following these steps, you can optimize your Wi-Fi setup for a smoother streaming experience.
Remove any obstacles between your Roku and the Wi-Fi router
When setting up your Roku device, it’s essential to ensure that there are no physical obstacles between it and the Wi-Fi router. Obstructions such as walls, furniture, or other objects can interfere with the Wi-Fi signal strength and cause connectivity issues. To improve the signal and minimize interference, follow these steps:
1. Check the line of sight: Position your Roku device and the Wi-Fi router in a way that they have a clear line of sight to each other. Direct visibility between the two helps to maximize the signal strength.
2. Minimize distance and obstructions: Place your Roku device and the Wi-Fi router in the same room, if possible. If they are in different rooms, aim for minimizing the number of walls or obstacles that the Wi-Fi signal has to pass through.
3. Reposition your Roku device: If there are obstacles, such as furniture or other electronic devices, between your Roku device and the Wi-Fi router, try repositioning your Roku to a different location. It may help to improve the signal strength and reduce interference.
4. Keep devices away from wireless interference: Avoid placing your Roku device near other electronic devices that generate wireless signals. Devices such as cordless phones, baby monitors, or microwave ovens can interfere with the Wi-Fi signal, causing instability or weakened connectivity.
5. Consider using Wi-Fi extenders: If repositioning your Roku device doesn’t provide optimal signal strength, you can consider using Wi-Fi extenders or mesh network systems. These devices help extend the Wi-Fi coverage and improve the signal strength in areas with poor connectivity.
By removing obstacles and ensuring a clear path for the Wi-Fi signal between your Roku device and the router, you can significantly enhance the quality and stability of your connection. This will result in a smoother streaming experience when using the History Channel on your Roku device.
Restart your Wi-Fi router
If you’re encountering Wi-Fi-related issues with your Roku device, restarting your Wi-Fi router can often help resolve connectivity problems. Over time, routers can encounter temporary glitches or become overloaded, causing intermittent or poor signal strength. Here’s how to restart your Wi-Fi router:
1. Locate the power source: Find the power cable connected to your Wi-Fi router and locate the power source. It is usually a wall outlet or a power strip.
2. Unplug the power cable: Carefully unplug the power cable from the power source. Ensure to disconnect it completely from both ends.
3. Wait for 10-15 seconds: Give your Wi-Fi router a brief rest by waiting for about 10-15 seconds. This pause will allow any temporary errors or conflicts to be cleared.
4. Plug the power cable back in: Firmly plug the power cable back into the power source. Ensure that it is secured tightly to avoid any loose connections.
5. Wait for the router to restart: After plugging in the power cable, wait for a few minutes for the Wi-Fi router to fully restart. The router’s lights will indicate that it has completed the restart process.
6. Connect your Roku device: Once the Wi-Fi router has restarted, reconnect your Roku device to the Wi-Fi network. Go to the Roku home screen, select Settings, then Network, and choose your Wi-Fi network from the available options.
7. Test the connection: Launch the History Channel app or any other streaming service on your Roku device to check if the Wi-Fi connection is stable and functioning as expected.
Restarting your Wi-Fi router can help resolve temporary glitches and improve the overall performance of your network. It gives your router a fresh start and allows it to establish a stable connection with your Roku device, ensuring a seamless streaming experience while using the History Channel.
Disconnect and reconnect to your Wi-Fi network on Roku
If you’re experiencing connectivity issues with your Roku device, disconnecting and reconnecting to your Wi-Fi network can help establish a stronger and more stable connection. Sometimes, the connection between your Roku device and the Wi-Fi network can become unstable, leading to intermittent issues with streaming apps like the History Channel. Follow these steps to disconnect and reconnect to your Wi-Fi network on Roku:
1. Access the Settings menu: Using your Roku remote, navigate to the Roku home screen by pressing the Roku Home button.
2. Select the Settings option: Scroll up or down and highlight the Settings option on the home screen. Press the OK button to enter the Settings menu.
3. Choose the Network option: In the Settings menu, scroll down and select the Network option.
4. Select the Wi-Fi network: Under the Network menu, select the option that displays your Wi-Fi network name. This will show the current connection status of your Roku device.
5. Choose the Forget button: On the Wi-Fi network page, select the Forget button to disconnect your Roku device from the Wi-Fi network.
6. Confirm the disconnection: A confirmation message will appear to confirm the disconnection. Select Yes to proceed with disconnecting your Roku device from the Wi-Fi network.
7. Reconnect to the Wi-Fi network: After disconnecting, select your Wi-Fi network from the list of available networks. Enter the Wi-Fi password if prompted. Once connected, your Roku device will display a confirmation message.
8. Test the connection: Launch the History Channel app or any other streaming service on your Roku device to check if the Wi-Fi connection is stable and functioning properly.
By disconnecting and reconnecting to your Wi-Fi network, you can refresh the connection and establish a more stable connection between your Roku device and the network. This can help resolve any intermittent connectivity issues that may be impacting the streaming experience on the History Channel and other apps.
Contact the History Channel support team
If you’ve tried all the previous troubleshooting steps and are still facing persistent issues with the History Channel on Roku, it may be helpful to reach out to the support team of the History Channel for further assistance. The support team has specialized knowledge and resources to address specific issues related to the app. Here’s how you can contact the History Channel support team:
1. Visit the History Channel website: Go to the official website of the History Channel and navigate to the support or contact page. Look for any available contact options or a dedicated support form.
2. Fill out the support form: If a support form is provided, fill it out with detailed information about the issues you’re experiencing. Be sure to include your Roku device model, software version, and a clear description of the problem.
3. Email or live chat support: If there are contact email addresses or live chat options available, choose the method that works best for you and explain the issues you’re encountering with the History Channel on Roku.
4. Phone support: Check if there is a phone number provided for support. If so, contact the support team directly and explain the problems you’re facing. Be prepared to provide necessary information like your Roku device details and a clear description of the issue.
5. Social media support: Some companies, including the History Channel, offer support through their social media platforms as well. Look for their official social media accounts and reach out to them about your issue.
When contacting the History Channel support team, be sure to provide as much information as possible about the problem. Include any error messages you may have encountered, specific episodes or content that are not playing correctly, and any troubleshooting steps you’ve already attempted. The more details you provide, the better equipped the support team will be to assist you in resolving the issue.
Remember, the support team is there to help, so don’t hesitate to reach out and seek their assistance. They can provide specific guidance and solutions tailored to the issues you’re experiencing with the History Channel on Roku.
Try streaming the History Channel on another device
If you’re still encountering issues with the History Channel on your Roku device, it’s worth trying to stream the channel on another device to determine if the problem is specific to your Roku or more widespread. This step helps to isolate whether the issue is related to your Roku device or the History Channel service itself. Here’s how you can stream the History Channel on another device:
1. Use a different streaming device: If you have access to another streaming device such as a Smart TV, gaming console, or mobile device, try downloading and installing the History Channel app on that device.
2. Launch the History Channel app: Once you have the app installed on the alternate device, launch it and sign in using your account details if required.
3. Test the streaming: Navigate through the app and try streaming different content on the History Channel. Pay attention to any buffering issues, video playback problems, or other similar issues that you’ve experienced on your Roku device.
4. Compare the performance: While streaming the History Channel on the alternate device, compare the performance to your experience on Roku. Take note of any differences in terms of streaming quality, playback stability, and any other issues you’ve encountered.
5. Reach out for support: If you are experiencing similar issues on the alternate device, it indicates that the problem may be related to the History Channel service itself. In this case, contact the History Channel support team, as mentioned in the previous section, and provide them with details about your experience on both the Roku device and the alternate device.
If the History Channel streams smoothly on the alternate device, it suggests that the issue may be specific to your Roku device. You can then revisit the previous troubleshooting steps or consider contacting Roku support for further assistance, as they may be better equipped to address hardware or software-related issues specific to Roku devices.
By testing the History Channel on another device, you can gain valuable insights into the origins of the problem and take the appropriate steps to resolve the issue.
Reset your Roku device to factory settings
If you’ve tried all the previous troubleshooting steps and are still facing persistent issues with the History Channel on Roku, resetting your Roku device to its factory settings can often help resolve complex and stubborn problems. This process will remove all your personalized settings and return the device to its original state. Here’s how you can reset your Roku device to factory settings:
1. Access the Settings menu: Using your Roku remote, navigate to the Roku home screen by pressing the Roku Home button.
2. Select the Settings option: Scroll up or down and highlight the Settings option on the home screen. Press the OK button to enter the Settings menu.
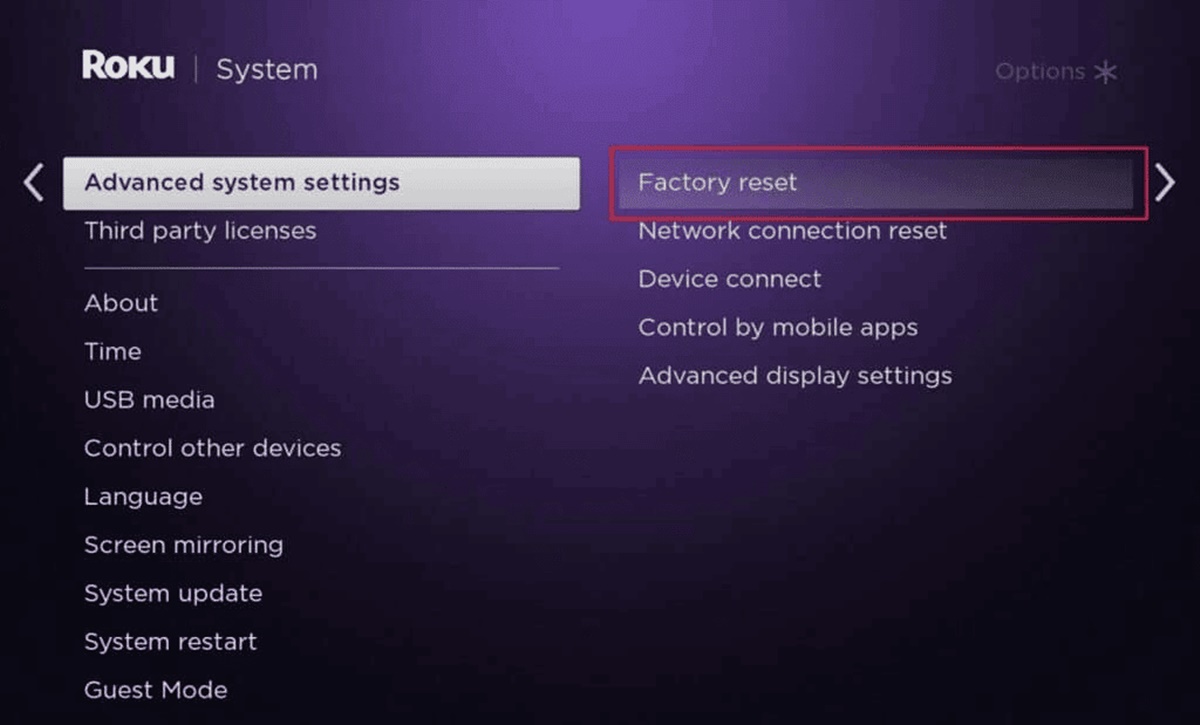
3. Choose the System option: In the Settings menu, scroll down and select the System option.
4. Select Advanced system settings: Within the System menu, choose the Advanced system settings option. You may need to enter your Roku device’s PIN if you have set one up.
5. Select Factory reset: In the Advanced system settings menu, choose the Factory reset option. A warning message will appear, informing you about the consequences of the reset.
6. Confirm the reset: Read the warning message carefully, as resetting your Roku device will erase all your data and settings. If you’re sure you want to proceed, select Factory reset again.
7. Follow the on-screen prompts: Your Roku device will begin the reset process and guide you through a series of on-screen prompts. Follow these prompts to complete the factory reset. The process may take a few minutes to complete.
8. Set up your Roku device again: Once the factory reset is complete, your Roku device will restart. Follow the on-screen instructions to set up your device as you would when initially configuring it.
After resetting your Roku device to factory settings, reinstall the History Channel app and set up any other preferences or settings to your liking. This fresh start can often resolve complex issues that may have been hindering the performance of the History Channel app on your Roku device.
Resetting your Roku device should be considered a last resort, as it erases all your data and settings. However, if all other troubleshooting methods have failed to resolve the issues you’re experiencing, a factory reset can provide a clean slate and resolve underlying software-related problems.