
What is an IP Address?
An IP address, short for Internet Protocol address, is a unique numerical label assigned to each device connected to a computer network. It serves two primary purposes: identifying the host or network interface and providing the location of the device in the network.
Think of an IP address as the digital equivalent of a physical address. Just as a physical address enables mail to be delivered to a specific location, an IP address allows data packets to be transmitted to the intended recipient on the internet.
There are two versions of IP addresses currently in use: IPv4 (Internet Protocol version 4) and IPv6 (Internet Protocol version 6). IPv4 addresses consist of four sets of numbers separated by periods, while IPv6 addresses use a more complex hexadecimal format, separating blocks with colons.
IP addresses are vital for networking and communication on the internet. They allow devices to send and receive data, connect to servers, and identify and communicate with other devices on the network. Without IP addresses, the internet as we know it would not be possible.
It’s worth mentioning that IP addresses can be categorized into two types: public and private. Public IP addresses are unique and globally routable, meaning they are accessible from anywhere on the internet. Private IP addresses, on the other hand, are used for internal network communication and are not directly accessible from the internet.
Understanding your IP address is essential for troubleshooting network issues, setting up network devices, and maintaining online security. In the following sections, we will explore various methods to help you find your IP address on a Windows operating system.
Method 1: Using the Command Prompt
The Command Prompt is a powerful tool in Windows that allows you to execute various commands and perform system tasks. It can also be used to quickly find your IP address. Here’s how to do it:
- Open the Command Prompt by pressing the Windows key + R, typing “cmd” in the Run dialog, and clicking OK.
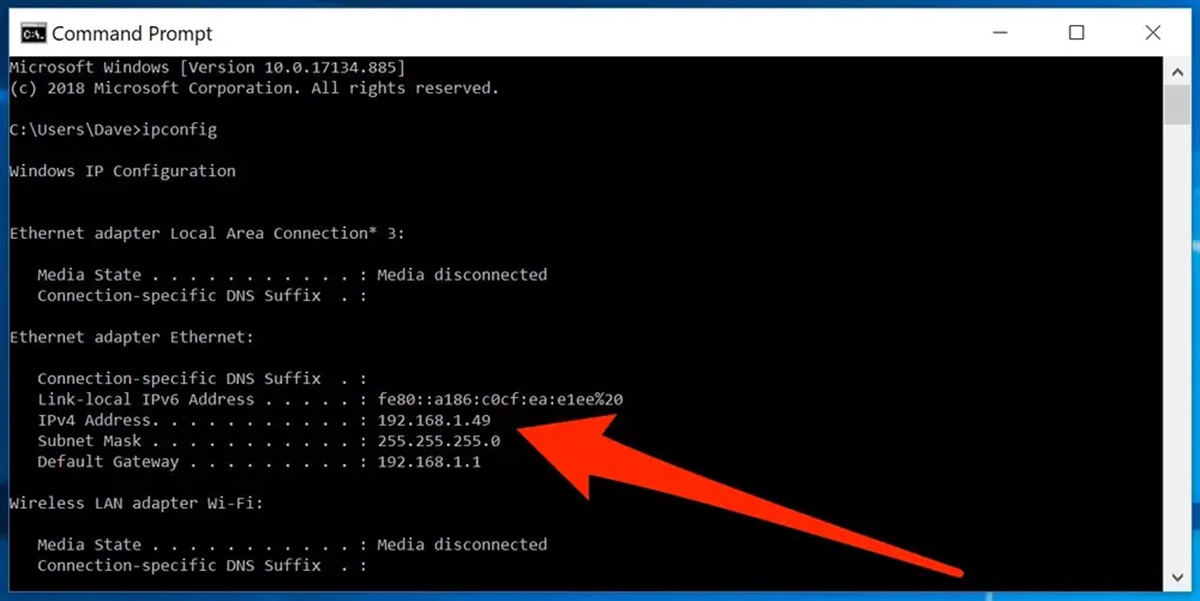
- In the Command Prompt window, type “ipconfig” and press Enter.
- A list of network configurations will appear. Look for the line that says “IPv4 Address” or “IPv6 Address” followed by a series of numbers separated by dots or colons. This is your IP address.
- Make a note of the IP address or copy it by right-clicking in the Command Prompt window and selecting “Mark”. Highlight the IP address, then right-click to copy it.
This method provides a quick and straightforward way to find your IP address using the Command Prompt. It is especially useful when troubleshooting network connectivity or configuring network settings.
It’s important to note that running the ipconfig command will display information about all network interfaces on your system, including Ethernet, Wi-Fi, and VPN connections. Therefore, make sure to identify the IP address associated with the network you are currently using.
Now that you know how to find your IP address using the Command Prompt, let’s explore other methods that can help you locate it in different ways.
Method 2: Using the Network and Sharing Center
The Network and Sharing Center in Windows provides a centralized location to manage and troubleshoot network-related settings. It also offers an easy way to find your IP address. Follow the steps below:
- To open the Network and Sharing Center, right-click on the network icon in the system tray (located in the bottom-right corner of the taskbar) and select “Open Network & Internet settings.”
- In the Network & Internet settings window, click on “Change adapter options” under the “Change your network settings” section.
- A window will open displaying all available network connections on your computer. Right-click on the network connection you are currently using (i.e., Ethernet or Wi-Fi) and select “Status.”
- In the Status window, click on the “Details” button.
- A pop-up window will appear, showing various network details. Look for the line that says “IPv4 Address” or “IPv6 Address.” The numbers next to it represent your IP address.
- Take note of the IP address or copy it by selecting it and pressing Ctrl+C.
The Network and Sharing Center provides a user-friendly method to find your IP address, especially for those who prefer navigating through Windows settings rather than using the command line. It also offers additional network-related information that can be useful in troubleshooting network issues.
Remember that the IP address displayed in the Network and Sharing Center corresponds to the network connection you selected. If you have multiple active connections (e.g., both Ethernet and Wi-Fi), make sure to identify the IP address of the connection you are interested in.
Now that you know how to find your IP address using the Network and Sharing Center, let’s explore other methods that can help you locate it in different ways.
Method 3: Using the Settings App
The Settings app in Windows provides a straightforward way to access and customize various system settings. It also offers a convenient method to find your IP address. Follow the steps below:
- Open the Settings app by clicking on the Start menu and selecting the gear icon, or by pressing the Windows key + I.
- In the Settings window, click on “Network & Internet.”
- On the left-hand side, select “Wi-Fi” or “Ethernet,” depending on the type of network connection you are using.
- In the Wi-Fi or Ethernet settings, scroll down and click on “Advanced network settings.”
- Scroll down again and click on “Change adapter options.”
- A window will open displaying all available network connections on your computer. Right-click on the network connection you are currently using and select “Status.”
- In the Status window, click on the “Details” button.
- A new window will appear, showing various network details. Look for the line that says “IPv4 Address” or “IPv6 Address.” The numbers next to it represent your IP address.
- Take note of the IP address or copy it by selecting it and pressing Ctrl+C.
Using the Settings app provides a user-friendly way to find your IP address without the need to use the command prompt. It is particularly useful for those who prefer navigating through the Windows interface to access system settings.
Keep in mind that the IP address displayed in the Settings app corresponds to the network connection you selected. If you have multiple active connections (e.g., both Wi-Fi and Ethernet), make sure to identify the IP address of the connection you are interested in.
Now that you know how to find your IP address using the Settings app, let’s explore other methods that can help you locate it using different techniques.
Method 4: Using the System Tray
The system tray, located in the bottom-right corner of the Windows taskbar, provides quick access to various system and application settings. It also offers a simple way to find your IP address. Follow the steps below:
- Locate the network icon in the system tray. It may appear as a Wi-Fi signal icon or a computer with Ethernet cables, depending on your network connection type.
- Right-click on the network icon to open the context menu.
- In the context menu, select “Open Network & Internet settings.”
- The Network & Internet settings window will open. Click on “Change adapter options” under the “Change your network settings” section.
- A window will appear displaying your network connections. Right-click on the network connection you are currently using and select “Status.”
- In the Status window, click on the “Details” button.
- A popup window will appear, showing various network details. Look for the line that says “IPv4 Address” or “IPv6 Address.” The numbers displayed next to it represent your IP address.
- Take note of the IP address or copy it by selecting it and pressing Ctrl+C.
Using the system tray to find your IP address provides a quick and convenient method, as it allows you to access network settings directly from the taskbar. Whether you are connected via Wi-Fi or Ethernet, this method works for both types of network connections.
Remember that the IP address displayed corresponds to the network connection you selected in the system tray. If you have multiple active connections, ensure you identify the IP address of the connection you are interested in.
Now that you know how to find your IP address using the system tray, let’s explore other methods that can help you locate it using different techniques.
Method 5: Using the Control Panel
The Control Panel is a centralized location in Windows that allows you to access various system settings and configurations. It also provides a method to find your IP address. Follow the steps below:
- Open the Control Panel by clicking on the Start menu, searching for “Control Panel,” and selecting it from the search results.
- In the Control Panel window, select “Network and Internet.”
- Click on “Network and Sharing Center.”
- In the Network and Sharing Center, click on the active network connection listed under the “View your active networks” section.
- A status window will appear for the selected connection. Click on the “Details” button.
- A popup window will appear, showing various network details, including your IP address. Look for the line that says “IPv4 Address” or “IPv6 Address.”
- Take note of the IP address or copy it by selecting it and pressing Ctrl+C.
Using the Control Panel to find your IP address provides an alternative method, especially for those who are more familiar with navigating through the traditional Windows interface. It allows you to access network-related settings and view your IP address in just a few clicks.
Keep in mind that the IP address displayed in the Control Panel corresponds to the network connection you selected. If you have multiple active connections, ensure you identify the IP address of the connection you are interested in.
Now that you know how to find your IP address using the Control Panel, let’s explore other methods that can help you locate it using different techniques.
Method 6: Using the Windows PowerShell
Windows PowerShell is a command-line interface and scripting language that provides advanced system administration capabilities in Windows. It also offers a method to find your IP address. Follow the steps below:
- Open the Windows PowerShell by pressing the Windows key + X and selecting “Windows PowerShell” or “Windows PowerShell (Admin)” from the menu.
- In the PowerShell window, type the command “ipconfig” and press Enter.
- A list of network configurations will appear. Look for the line that says “IPv4 Address” or “IPv6 Address” followed by a series of numbers separated by dots or colons. This represents your IP address.
- Take note of the IP address or copy it by right-clicking in the PowerShell window and selecting “Mark”. Highlight the IP address, then right-click to copy it.
Using the Windows PowerShell provides a more advanced command-line approach to find your IP address. It is especially useful for system administrators and power users who prefer using PowerShell for various tasks.
When running the ipconfig command in PowerShell, it will display information about all network interfaces on your system, including Ethernet, Wi-Fi, and VPN connections. Therefore, make sure to identify the IP address associated with the network you are currently using.
Now that you know how to find your IP address using the Windows PowerShell, let’s explore other methods that can help you locate it using different techniques.
Method 7: Using the Windows Subsystem for Linux (WSL)
The Windows Subsystem for Linux (WSL) allows you to run a Linux environment directly on Windows. If you have WSL installed and configured, you can use it to find your IP address. Follow the steps below:
- Launch the WSL by opening the Start menu, searching for your preferred Linux distribution (e.g., Ubuntu), and selecting it from the search results.
- Once the Linux terminal window opens, enter the command “ifconfig” and press Enter.
- A list of network interfaces and configurations will appear. Look for the line that says “inet” followed by a series of numbers separated by dots. This represents your IP address.
- Take note of the IP address or copy it by selecting it and pressing Ctrl+Shift+C.
Using the Windows Subsystem for Linux (WSL) with a Linux distribution installed provides a flexible and powerful method to find your IP address. It leverages the Linux networking utilities to obtain your IP address information.
If you haven’t already done so, you can install the WSL and a Linux distribution by following the official Microsoft documentation or respective distribution’s guide.
Now that you know how to find your IP address using the Windows Subsystem for Linux (WSL), let’s explore other methods that can help you locate it using different techniques.
Method 8: Using a Third-Party Application
If you prefer a more user-friendly approach or want additional features, you can use a third-party application to find your IP address. Various network utility tools and applications are available that provide an easy way to obtain this information. Here’s how you can use a third-party application to find your IP address:
- Search for a reliable IP address finder application online and download it from a trusted source.
- Install the application on your Windows computer following the provided instructions.
- Open the application once it’s installed.
- Within the application, you should find a section or button labeled “IP address” or similar.
- Click on the “IP address” button or navigate to the relevant section.
- The application will display your IP address on the screen.
- Take note of the IP address if necessary or copy it using the provided option in the application.
Using a third-party application to find your IP address offers a user-friendly and often feature-rich experience. Some applications provide additional network information, such as network speed, latency, and more.
It’s important to download and install applications from reputable sources to ensure the security of your computer. Read user reviews and do some research before installing any third-party software.
Now that you know how to find your IP address using a third-party application, you have more flexibility in choosing the method that suits your preferences and needs.