
What is Monitor Resolution?
Monitor resolution refers to the number of pixels displayed on a screen, usually measured in terms of width by height. It defines the level of detail and clarity that can be seen on the monitor. The higher the resolution, the more pixels there are, resulting in sharper and more detailed images.
The resolution of a monitor determines the amount of information that can be displayed on the screen at any given time. It affects how text, images, and videos appear on the monitor. A higher resolution allows for more content to be visible without scrolling or zooming, making it ideal for tasks that require precise details, such as photo editing or graphic design.
Common resolutions for monitors include 1920×1080 (Full HD), 2560×1440 (2K), and 3840×2160 (4K Ultra HD). The first number denotes the horizontal pixels, while the second number represents the vertical pixels. As technology advances, higher resolution monitors are becoming more affordable and widely available.
When choosing a monitor or adjusting settings, it is crucial to understand the native resolution. Native resolution refers to the optimal resolution at which a monitor is designed to display content. When the content matches the native resolution, it appears the sharpest and most accurate.
It’s important to note that changing the resolution of a monitor from its native resolution may distort the images and text, causing them to appear blurry or stretched. Therefore, it is generally recommended to stick to the native resolution for the best visual experience.
The monitor resolution can significantly impact the overall user experience and productivity. Whether you are watching movies, playing games, or working on a document, the resolution plays a crucial role in delivering clear and vibrant visuals.
Now that we understand the basics of monitor resolution, let’s explore how to find the native resolution of your monitor.
Native Resolution
The native resolution of a monitor refers to the optimal resolution at which it was designed to display content. It is the resolution that provides the best visual quality and clarity for the monitor’s specific screen size. Using the native resolution ensures that the images and text appear sharp and true to their original form.
Manufacturers determine the native resolution based on the physical characteristics of the monitor, such as the number and arrangement of pixels on the screen. Deviating from the native resolution may result in distorted or blurry images, as the monitor attempts to scale or interpolate the content to fit its native resolution.
To find the native resolution of your monitor, you can refer to the user manual that came with the device. It usually contains detailed information about the monitor’s specifications and recommended settings. If you don’t have access to the manual, you can follow these steps to find the native resolution:
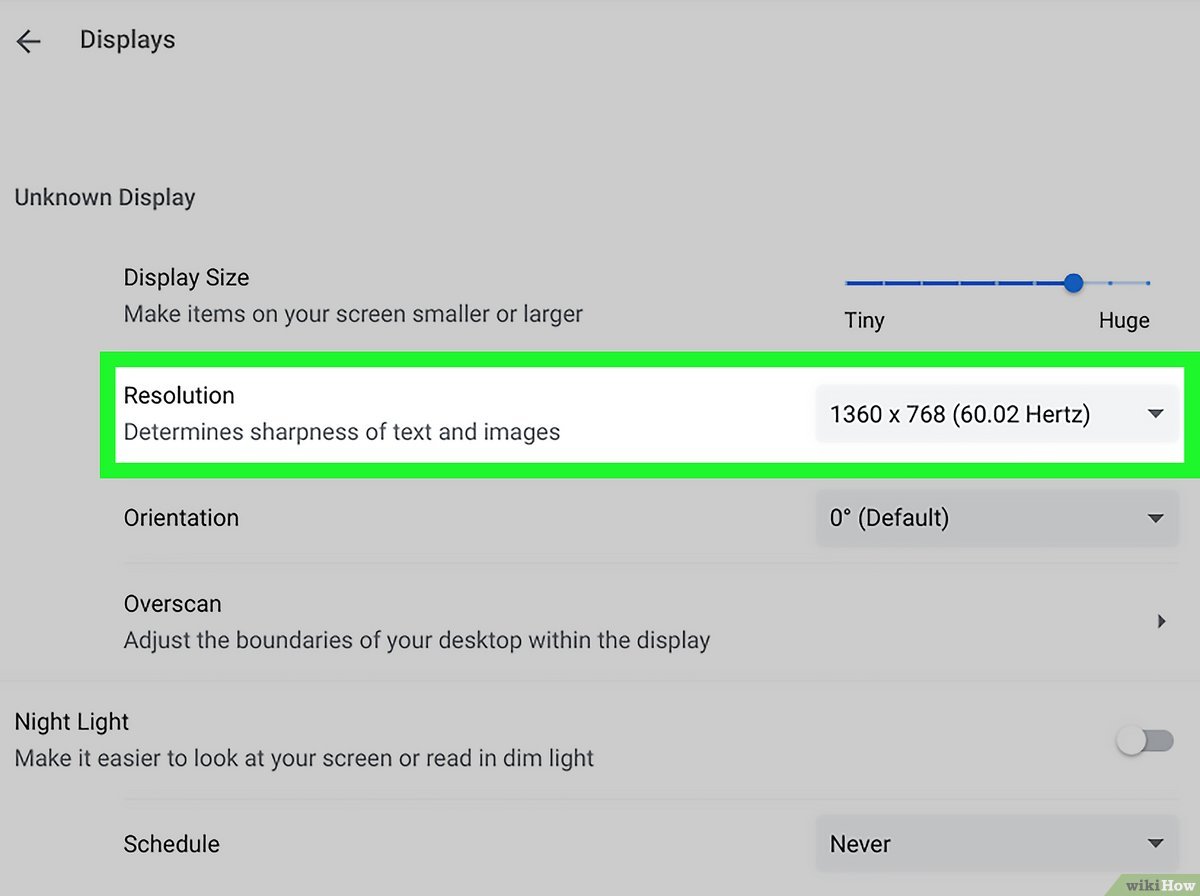
- Right-click on your desktop and select “Display Settings” or “Screen Resolution.”
- In the display settings window, look for the “Resolution” dropdown menu.
- The native resolution will be marked with the phrase “Recommended” or “Native” next to it.
- Select the native resolution, and click “Apply” to confirm the changes.
It’s important to note that the available resolutions may vary depending on your operating system and the capabilities of your graphics card. Some monitors also have built-in buttons or on-screen menus that allow you to directly access the native resolution settings.
Using the native resolution provides the best visual experience, as it ensures that the monitor displays the content as intended by the designers. However, if you find that the native resolution is too small and makes text and images appear too tiny, you can consider adjusting the display scale or using accessibility options to enlarge the content while still maintaining the native resolution.
Now that you know how to find the native resolution of your monitor, let’s explore how to adjust display settings on various operating systems.
How to Find the Native Resolution of Your Monitor
Knowing the native resolution of your monitor is essential for optimal visual quality and clarity. Here are a few methods to help you determine the native resolution:
Display Settings on Windows:
On Windows operating systems, you can find the native resolution in the following way:
- Right-click on your desktop and select “Display settings” from the context menu.
- In the display settings window, scroll down to the “Resolution” section.
- Look for the dropdown menu labeled “Resolution” or “Display resolution.”
- The native resolution is usually marked as “Recommended” or may display the word “Native.”
- Select this resolution from the dropdown menu to set it as the display resolution.
- Click “Apply” to save the changes.
Display Settings on macOS:
For macOS users, follow these steps to find the native resolution:
- Click on the Apple icon in the top-left corner and select “System Preferences” from the dropdown menu.
- In the System Preferences window, click on “Displays.”
- Select the “Display” tab.
- The native resolution is listed as “Default for display” or may have a label like “Best (Retina)” next to it.
- Click on this resolution to set it as the native resolution.
- Close the settings window to save the changes.
Display Settings on Linux:
If you are using a Linux distribution, the process to find the native resolution may vary depending on the desktop environment. However, the steps generally follow this pattern:
- Open the system settings or control center. It is usually accessible through the main menu or a specific key combination.
- Look for the “Display” or “Screen” settings.
- The native resolution is typically indicated as “Recommended” or “Native.”
- Select this resolution to set it as the native resolution.
- Save the changes and close the settings window.
Using Online Tools to Find Monitor Resolution:
If you want a quick and convenient way to find the native resolution, you can use online tools specifically designed for this purpose. These tools typically detect your screen size and provide you with the recommended or native resolution information.
Remember that the native resolution is the optimal setting for your monitor. It ensures that you experience the highest level of detail and clarity while working, gaming, or watching videos.
Now that you know how to find the native resolution of your monitor, let’s explore some useful tips for managing monitor resolution effectively.
Display Settings on Windows
Configuring the display settings on Windows allows you to adjust various parameters, including the resolution, orientation, and scaling. Here’s how you can access and modify the display settings on Windows:
- Right-click on an empty area of your desktop and select “Display settings” from the dropdown menu. Alternatively, you can navigate to the Windows Start menu, click on the gear icon to open the Settings app, and then select “System” followed by “Display.”
- In the display settings window, you’ll find the “Resolution” dropdown menu. Click on it to reveal the available resolution options.
- The native resolution is usually marked as “Recommended” or may have a label like “Native.” Select this resolution to set it as the display resolution.
- Additionally, you can adjust other display settings such as orientation (landscape, portrait) and scaling. Scaling allows you to make text and other elements larger or smaller on your screen.
- To change the scaling settings, scroll down to the “Scale and layout” section. Here, you can choose between various scaling options or set a custom scaling value to meet your preferences.
- Click “Apply” to save the changes. Windows will apply the new settings, and you’ll have the option to revert back or keep the changes within 15 seconds.
It’s worth mentioning that some older graphics cards or drivers might not support all resolutions. In such cases, the available resolution options might be limited. Updating the graphics card driver to the latest version can often resolve this issue.
If you make changes to the resolution and find that the display looks distorted or fuzzy, it is likely that you have selected a non-native resolution. In such cases, revert back to the native resolution to restore optimal visual quality.
Windows also offers advanced display settings that allow you to fine-tune various aspects of your monitor’s appearance, such as color calibration and screen refresh rate. These settings can be accessed through the “Display adapter properties” or “Advanced display settings” links in the display settings window.
Understanding and adjusting the display settings on Windows empowers you to optimize the visual experience on your monitor. By selecting the native resolution and adjusting other relevant settings, you can ensure that you view content in the best possible way.
Now that you know how to configure display settings on Windows, let’s explore the display settings on macOS.
Display Settings on macOS
macOS provides a simple and intuitive way to adjust display settings, allowing you to customize various aspects of your monitor’s appearance. Here’s how you can access and modify display settings on macOS:
- Click on the Apple icon located in the top-left corner of your screen.
- Select “System Preferences” from the dropdown menu.
- In the System Preferences window, click on the “Displays” icon.
- The display settings window will open, showing an overview of your monitor and available settings.
- By default, you’ll be in the “Display” tab, where you can adjust the resolution and other display options.
- The native resolution is usually displayed as “Default for display” or labeled as “Best (Retina)”. Select this resolution to set it as the native resolution.
- In addition to the resolution, the display settings window allows you to adjust brightness, arrange multiple displays, set the refresh rate, and enable features like Night Shift to reduce blue light emissions during nighttime.
- Make the desired changes to the display settings based on your preferences.
- Close the display settings window to save the changes.
macOS offers a variety of screen resolutions, including scaling options, to accommodate different monitor sizes and user preferences. It automatically detects the native resolution of your monitor and recommends it as the default setting.
If you change the resolution to a non-native value, the display may appear blurry or distorted. To maintain optimal visual quality, it is advisable to stick to the native resolution whenever possible.
In the display settings window, you will also find additional tabs like “Color,” “Arrangement,” and “Night Shift.” These tabs allow you to fine-tune color calibration, arrange the position of multiple displays, and adjust the screen’s color temperature to reduce eye strain during evening hours.
Understanding the display settings on macOS empowers you to personalize your viewing experience and make the most of your screen. By selecting the native resolution and adjusting other relevant settings, you can ensure that your monitor provides the best possible visual quality.
Now that you know how to configure display settings on macOS, let’s explore the display settings on Linux.
Display Settings on Linux
Configuring display settings on Linux provides a flexible and customizable experience, allowing you to adjust various aspects of your monitor’s appearance. Although the specific steps may vary depending on the Linux distribution and desktop environment you are using, here’s a general overview of how to access and modify display settings:
- Open the system settings or control center. It can usually be accessed through the main menu or a specific key combination, such as Super/Windows key + A or Super/Windows key + S.
- Look for the “Display” or “Screen” settings. Depending on your Linux distribution, the name and location of these settings may differ.
- In the display settings window, you will find various options to configure your monitor, including resolution, refresh rate, orientation, and positioning.
- The native resolution is typically indicated as “Recommended” or “Native.” Select this resolution to set it as the native resolution for your monitor.
- Additionally, you can customize other display settings, such as adjusting the screen’s orientation (landscape, portrait) or configuring multiple monitors, if applicable.
- Make the desired changes to the display settings based on your preferences.
- Click “Apply” or “OK” to save the changes.
Linux offers a wide range of screen resolutions that can be tailored to your specific needs and monitor capabilities. Selecting the native resolution ensures that you are using the optimal setting for your monitor, resulting in the best visual quality.
Some Linux distributions and desktop environments provide advanced options to fine-tune display settings, such as color calibration, screen scaling, or screen rotation. These settings can be helpful if you need to adjust the appearance to suit your personal preferences or accommodate specific usage scenarios.
It’s important to note that the location and terminology of display settings may vary in different Linux distributions or desktop environments. If you encounter difficulties locating or modifying display settings, consulting the documentation or online forums specific to your Linux distribution can provide valuable assistance.
Having control over display settings in Linux empowers you to personalize your visual experience and optimize your monitor’s performance. By selecting the native resolution and adjusting other relevant settings, you can ensure that your monitor displays content with the best possible quality.
Now that you know how to configure display settings on Linux, let’s explore how you can use online tools to find monitor resolution.
Using Online Tools to Find Monitor Resolution
If you’re unable to find the native resolution of your monitor through the manual or system settings, there are online tools available that can help you determine the correct resolution. These tools are designed to detect your screen size and provide you with the recommended or native resolution information.
Here’s how you can use online tools to find your monitor resolution:
- Open a web browser and search for “online monitor resolution tool” or similar keywords.
- Choose a reliable website that offers a resolution detection tool. Some popular options include DisplayResolution.me and WhatIsMyScreenResolution.com.
- Once you’ve accessed the website, it will automatically detect your screen resolution and display it on the screen.
- The tool may not only show the resolution but also provide additional information about your monitor, such as the aspect ratio and pixel density.
- You can typically find the recommended or native resolution listed prominently on the page.
Online resolution detection tools are convenient when you need quick and accurate information about your monitor’s native resolution. Depending on the tool, they may also offer other features like detecting the current screen size, comparing multiple resolutions, or identifying the best resolution for specific applications or purposes.
While using online tools can be helpful in finding your monitor resolution, ensure that you use reputable websites to guarantee accurate results and protect your privacy. Always be cautious when providing personal information or granting permissions to online tools.
By utilizing online tools, you can easily determine the native resolution of your monitor, even if you do not have access to the user manual or system settings. This knowledge will enable you to optimize your display settings and ensure that you’re viewing content in the best possible quality.
Now that you know how to find your monitor resolution using online tools, let’s explore some additional tips for managing monitor resolution effectively.
Useful Tips for Managing Monitor Resolution
Managing monitor resolution effectively helps ensure optimal visual quality and a comfortable viewing experience. Here are some useful tips to help you make the most of your monitor’s resolution:
1. Stick to the Native Resolution:
Using the native resolution guarantees the best image quality and avoids distortion or blurriness. Deviating from the native resolution can result in reduced clarity and accuracy of displayed content. Always select the recommended or native resolution in your display settings.
2. Adjust Scaling Options:
If text or other elements appear too small on your high-resolution monitor, you can increase the scaling option available in your operating system. Scaling enlarges the content while maintaining the native resolution, resulting in a more comfortable viewing experience.
3. Consider Multiple Monitors:
If you work with multiple monitors, ensure that all monitors have the same resolution for a consistent visual experience. Mismatched resolutions can lead to inconsistencies in content appearance and difficulty in aligning windows and elements.
4. Optimize Font and Interface Size:
Some applications allow you to adjust font and interface size independently of the monitor resolution. Take advantage of these options to customize the size of text, icons, and other elements to your preference, ensuring better readability and easier navigation.
5. Calibrate Your Monitor:
Monitor calibration helps optimize color accuracy and ensure consistency across different applications. Consider using calibration tools or built-in calibration settings provided by your operating system to achieve accurate and vivid color reproduction.
6. Adjust Refresh Rate:
Depending on your monitor and graphics card capabilities, you may have the option to adjust the refresh rate. A higher refresh rate, such as 75Hz or 120Hz, can result in smoother motion and reduce eye strain, especially when viewing fast-paced content like videos or games.
7. Test Different Viewing Distances:
Experiment with different viewing distances to find what works best for your monitor resolution and personal preference. The ideal distance ensures optimal clarity and minimizes eyestrain. Consult ergonomic guidelines to determine the recommended distance for your screen size and resolution.
By implementing these tips, you can effectively manage your monitor resolution to enhance visual quality, readability, and overall user experience. Remember to periodically check and adjust your display settings as needed to adapt to changing preferences or requirements.
Now that you are equipped with these tips, you can make the most out of your monitor’s resolution and enjoy a crisp and visually stunning display.