
What is DBAN?
DBAN, short for Darik’s Boot and Nuke, is a powerful software tool that allows users to securely and completely erase the data on a hard drive. It is commonly used when selling or donating a computer, as it helps to ensure that personal and sensitive information cannot be recovered by any means.
DBAN operates by overwriting data on the hard drive with random characters multiple times, effectively obliterating any trace of the previous data. This process is known as data wiping or data sanitization and is essential in preventing unauthorized access to confidential information.
One of the main advantages of DBAN is its ease of use. It is a bootable software, meaning that it is independent of the computer’s operating system. This allows DBAN to work on a wide range of systems, including Windows, macOS, and Linux.
Additionally, DBAN supports different erasure methods, including DoD 5220.22-M, Gutmann, and PRNG Stream. These methods vary in the number of times the data is overwritten, providing users with flexibility based on their specific security needs.
DBAN also has the ability to sanitize multiple hard drives simultaneously, saving time when dealing with larger systems or storage devices.
It is important to note that DBAN is intended for complete data erasure and is not recommended for simple file deletion or recovery. If you only need to remove specific files or folders, it is best to use dedicated file shredding or deleting software.
Overall, DBAN is a reliable and efficient tool for ensuring the complete removal of data from a hard drive before disposing of or repurposing your device. By using this software, you can have peace of mind knowing that your personal information remains secure and cannot be retrieved by any means.
Why Erase a Hard Drive?
Erasing a hard drive may seem like an unnecessary step, especially if you are planning to sell or dispose of your computer. However, the importance of securely wiping your data cannot be overstated. Here are several reasons why you should erase a hard drive before getting rid of your device:
- Protecting personal information: Your computer stores a vast amount of personal and sensitive information, such as financial records, passwords, and personal documents. By securely wiping your hard drive, you eliminate the risk of this data falling into the wrong hands.
- Preventing identity theft: Identity theft is a serious concern in today’s digital age. Even if you delete files or format the hard drive, the data can still be recovered using specialized software. By using a tool like DBAN to erase the hard drive, you ensure that your personal information is irretrievable.
- Complying with privacy regulations: Depending on your industry or location, there may be privacy regulations in place that require you to properly sanitize data before disposing of electronic devices. Failure to comply with these regulations may result in legal consequences or reputational damage.
- Protecting sensitive business data: If you are selling or retiring a work computer, it is crucial to erase the hard drive to protect proprietary company information, customer data, or trade secrets from falling into the wrong hands. Data breaches can have severe financial and legal ramifications for businesses.
- Ensuring peace of mind: By thoroughly wiping your hard drive, you can have peace of mind knowing that all traces of your personal and confidential information have been permanently removed, reducing the risk of unauthorized access or data loss.
Remember, simply deleting files or formatting the hard drive is not enough. Sophisticated data recovery techniques can still retrieve information from seemingly erased drives. Using tools like DBAN ensures that your data is effectively and securely erased beyond recovery.
Getting Started with DBAN
DBAN, or Darik’s Boot and Nuke, is a user-friendly software tool that allows you to securely erase the data on your hard drive. Here’s a step-by-step guide to help you get started with DBAN:
- Download DBAN: Begin by downloading the DBAN software from the official website. Make sure to select the appropriate version for your operating system.
- Create a bootable USB or CD: Once you have downloaded the DBAN software, you will need to create a bootable USB or CD. This process varies depending on your operating system. Follow the instructions provided on the DBAN website or use a third-party tool to create the bootable media.
- Backup your data: Before proceeding with the DBAN process, make sure to backup any important data that you want to keep. Once you start the erasure process, all data on the selected hard drive will be irretrievably deleted.
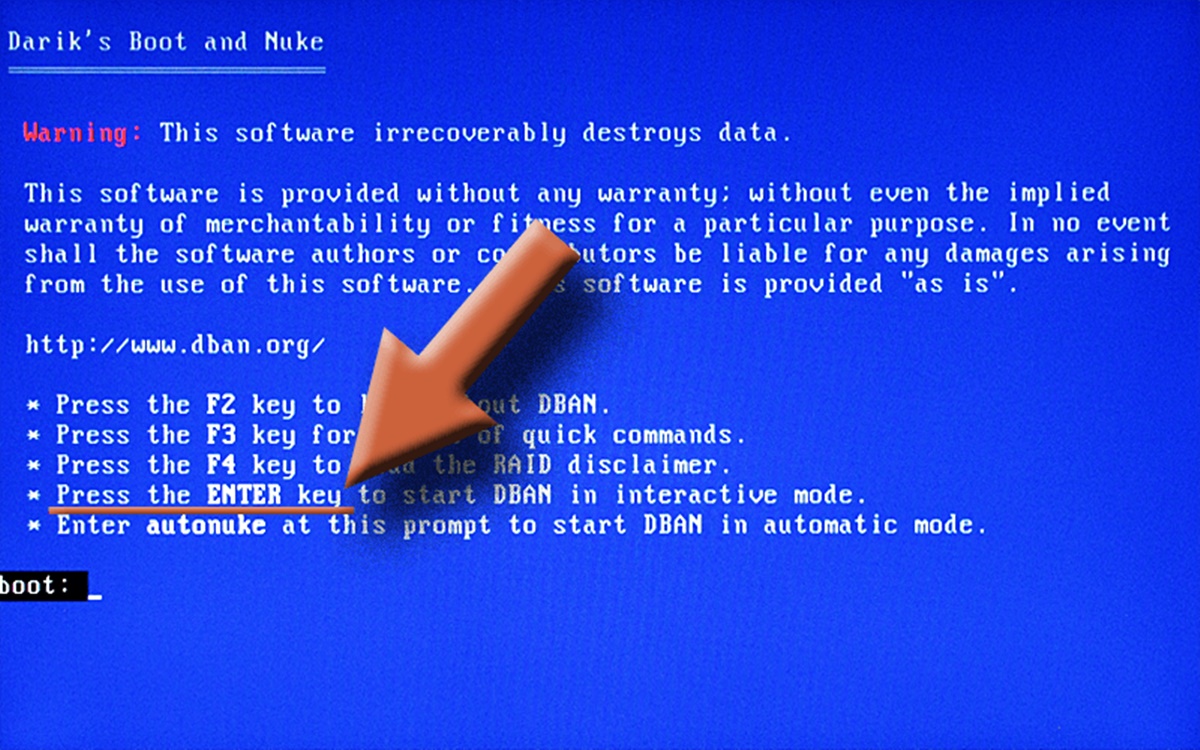
- Boot from the DBAN media: Insert the bootable USB or CD into your computer and restart it. You may need to change the boot order in your computer’s BIOS settings to ensure it boots from the DBAN media. Consult your computer’s documentation for instructions on how to access the BIOS settings.
- Select the hard drive: Once DBAN boots, it will display a list of detected hard drives. Use the arrow keys to navigate and select the hard drive you want to erase. Be careful to choose the correct hard drive, as the selected drive will be completely wiped.
- Choose the erasure method: DBAN offers various erasure methods, such as DoD 5220.22-M, Gutmann, and PRNG Stream. Select the method that best suits your needs. Keep in mind that more secure methods may take longer to complete.
- Start the erasure process: Once you have selected the hard drive and erasure method, confirm your choices and start the erasure process. DBAN will overwrite the data on the selected hard drive with random characters, ensuring that it is permanently destroyed.
- Monitor the progress: DBAN will provide you with real-time progress updates as it performs the erasure. Depending on the size of the hard drive and the chosen erasure method, the process can take several hours to complete. It is important to be patient and let DBAN finish its work.
- Verify the erasure: Once the erasure process is complete, DBAN will inform you of its success. To ensure that all data has been properly erased, it is recommended to run a verification process. This will confirm that the selected hard drive is completely clean and ready for disposal or reuse.
By following these steps, you can effectively use DBAN to securely and permanently erase data from your hard drive, protecting your privacy and ensuring that no sensitive information can be recovered.
Preparing for the Erase
Before you begin the erasure process using DBAN, it is important to take a few steps to properly prepare. This will ensure that you have a smooth experience and achieve the desired results. Here are some key considerations when preparing for the erase:
- Backup your data: Before initiating the erasure process, it is crucial to back up any important data that you want to keep. Once you start the erasure, all data on the selected hard drive will be permanently deleted and cannot be recovered.
- Disconnect external storage devices: If you have any external storage devices connected to your computer, such as USB drives or external hard drives, make sure to disconnect them before running DBAN. This will prevent accidental data deletion from these devices.
- Gather system information: Take note of important system information, such as the computer model and specifications. This information may be useful when reconfiguring or selling the device later on.
- Ensure power supply and battery: It is essential to have a stable power supply during the erasure process. Make sure your computer is connected to a reliable power source or use a fully charged battery if running DBAN on a laptop. A sudden power loss during erasure can result in incomplete data wiping.
- Disable Secure Boot and BitLocker: If your computer has Secure Boot or BitLocker enabled, you may need to disable these security features before running DBAN. Refer to your computer’s documentation or consult the manufacturer’s website for instructions on how to disable these features.
- Prepare bootable media: As mentioned earlier, DBAN requires a bootable USB or CD to initiate the erasure process. Ensure that you have created the bootable media using the DBAN software and that it is readily accessible when you are ready to start the process.
- Review DBAN documentation: Familiarize yourself with the DBAN user guide and documentation. This will provide you with valuable information on best practices, troubleshooting common issues, and understanding the different erasure methods available.
Taking these preparatory steps will help ensure a successful and efficient erasure process. By backing up important data, disconnecting external storage devices, and following any necessary system-specific instructions, you can proceed confidently when using DBAN to securely wipe your hard drive.
Choosing the Erase Method
When using DBAN to erase a hard drive, you have the option to choose from various erasure methods. These methods determine the level of security and duration of the erasure process. Here’s a closer look at some of the common erasure methods offered by DBAN:
- DoD 5220.22-M: This method, approved by the U.S. Department of Defense, involves overwriting the entire hard drive with a pattern of characters. The process is repeated three times, ensuring data security for most standard purposes. It is a reliable and widely-used method for general data sanitization.
- Gutmann: The Gutmann method is named after its creator, Peter Gutmann. This is a more comprehensive erasure method that involves overwriting the data on the hard drive 35 times with different character patterns. While this method provides a high level of security, it is considered overkill for most users and can significantly extend the erasure time.
- PRNG Stream: The Pseudorandom Number Generator (PRNG) Stream method offers a faster erasure process by using a random stream of characters to overwrite the data on the hard drive. While not as secure as the DoD 5220.22-M or Gutmann methods, it is suitable for general purposes where a shorter erasure time is desired.
- Quick Erase: DBAN also offers a Quick Erase option, which rapidly overwrites the beginning and end of the hard drive with zeros. While this method is faster, it is less secure and may not completely erase all data on the drive. Use the Quick Erase method with caution, as it may not be suitable for scenarios where a higher level of data security is required.
When choosing an erasure method, consider the sensitivity of the data stored on your hard drive and the time you have available for the erasure process. If you are erasing a hard drive with highly sensitive information or dealing with strict compliance requirements, it may be advisable to use a more secure method like DoD 5220.22-M or Gutmann. However, if you are erasing a personal hard drive without critical data, a faster method like PRNG Stream or Quick Erase may be sufficient.
It is important to emphasize that the choice of erasure method should align with your specific needs and requirements. Be sure to take into account the level of security necessary and the time you have available. Properly selecting the erasure method will ensure that you achieve the desired level of data sanitization without unnecessary delays or compromising data security.
Running DBAN
Once you have prepared for the erasure and chosen the appropriate method in DBAN, you are ready to run the software and initiate the data wiping process. Follow these steps to run DBAN effectively:
- Boot from the DBAN media: Insert the bootable USB or CD containing DBAN into the computer from which you want to erase the hard drive. Restart the computer and enter the BIOS settings to ensure that the computer boots from the DBAN media. The method for accessing the BIOS settings may vary depending on the computer manufacturer, so refer to the device’s manual or website for instructions.
- Select the hard drive to erase: After successfully booting from the DBAN media, you will see a menu of detected hard drives. Use the arrow keys to select the appropriate hard drive that you want to erase. Be cautious and double-check the drive selection to avoid accidentally overwriting the wrong drive and potentially losing important data.
- Choose the erasure method: DBAN offers different erasure methods, depending on your security requirements and time constraints. Select the desired method from the list provided. Take into account that more secure methods, such as DoD 5220.22-M or Gutmann, may take longer to complete.
- Start the erasure process: Once you have selected the hard drive and erasure method, confirm your choices and initiate the erasure process. DBAN will begin overwriting the data on the selected hard drive with random characters as per the chosen method. The progress will be displayed on the screen, allowing you to monitor the status of the erasure.
- Monitor and wait for completion: Depending on the size of the hard drive and the selected erasure method, the process can take a considerable amount of time. It is essential to exercise patience and allow the software to complete the erasure process uninterrupted. Multiple passes and more secure methods may extend the duration further, but they offer higher data sanitization levels.
- Review the verification results: Once the erasure process is complete, DBAN will display a notification indicating the success of the operation. At this stage, it is recommended to run a verification process to ensure that all data on the hard drive has been properly overwritten. This step provides reassurance that the erased data is irrecoverable.
By following these steps carefully, you can successfully run DBAN and ensure the secure erasure of your hard drive. Remember to exercise caution when selecting the hard drive and erasure method, and allow enough time for the process to complete. The thoroughness of the erasure process will depend on the chosen method, so choose wisely based on your specific requirements.
Confirmation and Verification
Once the DBAN erasure process is complete, it is essential to confirm that the data on the hard drive has been successfully deleted beyond recovery. Follow these steps to ensure verification and provide peace of mind:
- DBAN verification: DBAN offers a built-in verification feature that allows you to confirm the success of the erasure process. During this step, DBAN compares the overwritten data on the drive with the original data to ensure that they match. This verification process provides assurance that the selected hard drive has been thoroughly sanitized.
- Physical inspection: After the DBAN verification, physically inspect the drive to ensure that it is free from any visible traces of data. Look for any remaining labels or stickers that may contain sensitive information. If necessary, use a cleaning solution or alcohol wipes to remove any residual markings.
- Secondary data wipe: Consider performing a secondary level of data wiping using another software tool or method. This extra step can provide an added layer of security and ensure that the erased data is irretrievable. There are specialized software programs available that can perform additional data wiping procedures on the hard drive.
- Professional data recovery service: If you have concerns about the effectiveness of the erasure process or have critical data that must not fall into the wrong hands, you can engage the services of a professional data recovery company. These experts possess advanced techniques and tools to inspect and recover data from hard drives. By seeking their assistance, you can obtain a comprehensive assessment of the erasure process and ensure data security.
- Documentation: It is crucial to document the erasure process for future reference or audit purposes. Record details such as the date and time of the erasure, the specific steps followed, and any verification results obtained. This documentation provides evidence that you have taken the necessary measures to properly sanitize the hard drive.
By following these verification steps, you can have confidence that the data on the hard drive has been successfully erased and is beyond recovery. Whether it is performing the DBAN verification, physically inspecting the drive, implementing an additional data wipe, or seeking the assistance of professionals, taking these measures ensures the security and irreversibility of the erasure process.
Safety Measures
When it comes to using DBAN or any data erasure tool, it is crucial to prioritize safety. Here are some important safety measures to consider during the erasure process:
- Backup important data: Before proceeding with the erasure, make sure to back up any critical data that you want to keep. This ensures that you have a copy of important files and documents in case of accidental data loss during the erasure process.
- Double-check the hard drive selection: Before initiating the erasure process, carefully review and verify the hard drive you have selected. Ensure that you have chosen the correct drive to prevent accidental deletion of important data on other drives.
- Disconnect external devices: Prior to running DBAN, disconnect any external devices, such as USB drives or external hard drives. This prevents accidental data deletion from these devices and ensures that only the intended hard drive is affected by the erasure process.
- Prevent power interruptions: A sudden power failure during the erasure process can have detrimental consequences. To avoid this, ensure that your computer is connected to a stable power source or use a fully charged battery if running DBAN on a laptop.
- Protect against malware: Before using DBAN, ensure that your computer is free from any malware or viruses. Run a full system scan with reliable antivirus software to mitigate the risk of infecting or spreading malicious software during the erasure process.
- Properly dispose of the hard drive: After completing the erasure process and verifying its success, it is important to dispose of the hard drive properly. If the drive is no longer needed, consider recycling it through authorized electronic waste disposal facilities to ensure that it is handled responsibly and in an eco-friendly manner.
- Seek professional assistance if needed: If you are unsure about any aspect of the erasure process or if you have complex requirements, it is advisable to seek professional assistance. Engaging the services of an experienced data recovery specialist or IT professional can help ensure that the erasure is carried out correctly and in accordance with data security best practices.
By following these safety measures, you can minimize the risk of data loss, power interruptions, and other potential issues during the DBAN erasure process. Taking these precautions demonstrates a responsible and secure approach to data sanitization, protecting your data and ensuring a smooth and successful erasure.
What to Do After Erasing the Hard Drive
Once you have successfully erased the hard drive using DBAN, there are several important steps to take to ensure data security and proper handling of the device. Here are some key actions to consider after the erasure process:
- Verify the erasure: After completing the DBAN process, carefully review the verification results to confirm that the data on the hard drive has been successfully wiped beyond recovery. This step provides reassurance that the erasure process was effective in removing all sensitive information.
- Securely store backup data: If you created a backup of important data prior to the erasure, ensure that the backed-up files are securely stored and protected. Whether it is on another storage device, cloud storage, or physical copies, take steps to keep the backup data safe and accessible as needed.
- Dispose of or repurpose the hard drive: Once the hard drive has been thoroughly erased and is no longer needed, consider your options for disposal or repurposing. If the drive is no longer functional or suitable for reuse, dispose of it following proper electronic waste disposal practices to protect the environment and prevent potential data breaches.
- Reinstall the operating system (if necessary): If you plan to reuse the device or sell it, you may need to reinstall the operating system. This ensures a clean and fresh start for the system and eliminates any residual traces of data that may still exist on the hard drive.
- Consider data recovery prevention measures: To mitigate the risk of unauthorized data recovery, consider taking additional steps to prevent data retrieval from the wiped hard drive. This may include physically destroying the drive, using disk shredding services, or implementing encryption on new storage devices.
- Update your security measures: After erasing and disposing of a hard drive, it is a good practice to review and update your overall security measures. This may involve changing passwords, updating antivirus software, and implementing strong encryption to safeguard your digital assets.
By following these post-erasure steps, you can ensure that the data on the hard drive remains secure and that you have taken the necessary precautions to protect your information. Proper disposal and updating security measures will help safeguard your privacy and prevent any potential data breaches.