
Step 1: Restart your computer
To enter the BIOS setup utility on most computers, the first step is to restart your computer. This will allow you to access the BIOS menu and make any necessary changes to your system’s settings. Restarting your computer is a simple process, and it can be done in a few different ways depending on your operating system.
If you are using Windows, you can easily restart your computer by clicking on the Start menu, selecting the power icon, and choosing the restart option. Alternatively, you can press the Windows key + R on your keyboard, type “shutdown /r” (without quotes), and press Enter. This will initiate a restart of your computer.
On a Mac computer, you can restart by clicking on the Apple menu in the top-left corner of your screen, selecting the Restart option, and confirming your choice. Another method is to press the Control + Command + Power buttons simultaneously on your keyboard.
Regardless of your operating system, make sure to save any unsaved work before proceeding with the restart, as it will close all open applications and restart your computer. Once you’ve taken these precautions, proceed to the next step to continue accessing the BIOS setup utility.
Step 2: Look for the key
After restarting your computer, you will need to identify the key that allows you to enter the BIOS setup utility. The specific key may vary depending on the manufacturer and model of your computer. Some common keys used to access the BIOS include F2, Del, Esc, F10, and F12. During startup, pay close attention to the screen for any prompts or messages that indicate the key to press.
Most computers display a message like “Press [key] to enter setup” or “Enter BIOS by pressing [key]” during the initial boot process. This message is typically shown on the bottom or top corner of the screen, but it can vary depending on the computer’s BIOS version. If you don’t see a message, you may need to consult the user manual or the manufacturer’s website for guidance.
Additionally, some computers provide the option to choose the boot device by pressing a specific key during startup. This key is often different from the one used to access the BIOS setup utility, so be sure to look for both options if you’re unsure.
If you can’t find the specific key for your computer, a quick internet search using your computer’s make and model should provide the information you need. Remember to verify the accuracy of the information by referring to reliable sources, such as the manufacturer’s official documentation.
Once you have determined the correct key to enter the BIOS setup utility, proceed to the next step to access the BIOS menu and make any necessary changes to your system.
Step 3: Press the key during startup
Now that you have identified the key to access the BIOS setup utility, it’s time to press the key during the startup process. As soon as you see the manufacturer’s logo or the initial startup screen, start pressing the designated key repeatedly. Be sure to press the key before the operating system begins to load.
It’s essential to press the key at the right moment to successfully enter the BIOS setup utility. Timing is crucial, as pressing the key too early or too late may cause your computer to ignore the input and continue booting into the operating system. If you miss the correct timing, simply restart your computer and try again until you are able to enter the BIOS setup utility.
Keep in mind that some computers may require you to hold down the key rather than repeatedly pressing it. This is usually specified in the manufacturer’s instructions. If you’re unsure, consult the user manual or the manufacturer’s website for more detailed instructions specific to your computer.
As you press the key, you may notice that the screen briefly flickers or displays a different message before loading the BIOS setup utility. This indicates that you have successfully entered the BIOS menu and can proceed to the next step.
By pressing the designated key during startup, you have now gained access to the BIOS setup utility. It’s time to explore the various settings and configurations that are available to you.
Step 4: Enter the BIOS setup utility
After successfully pressing the key during startup, you will enter the BIOS setup utility. The BIOS (Basic Input/Output System) is a software component embedded in your computer’s motherboard that allows you to configure various hardware settings and parameters.
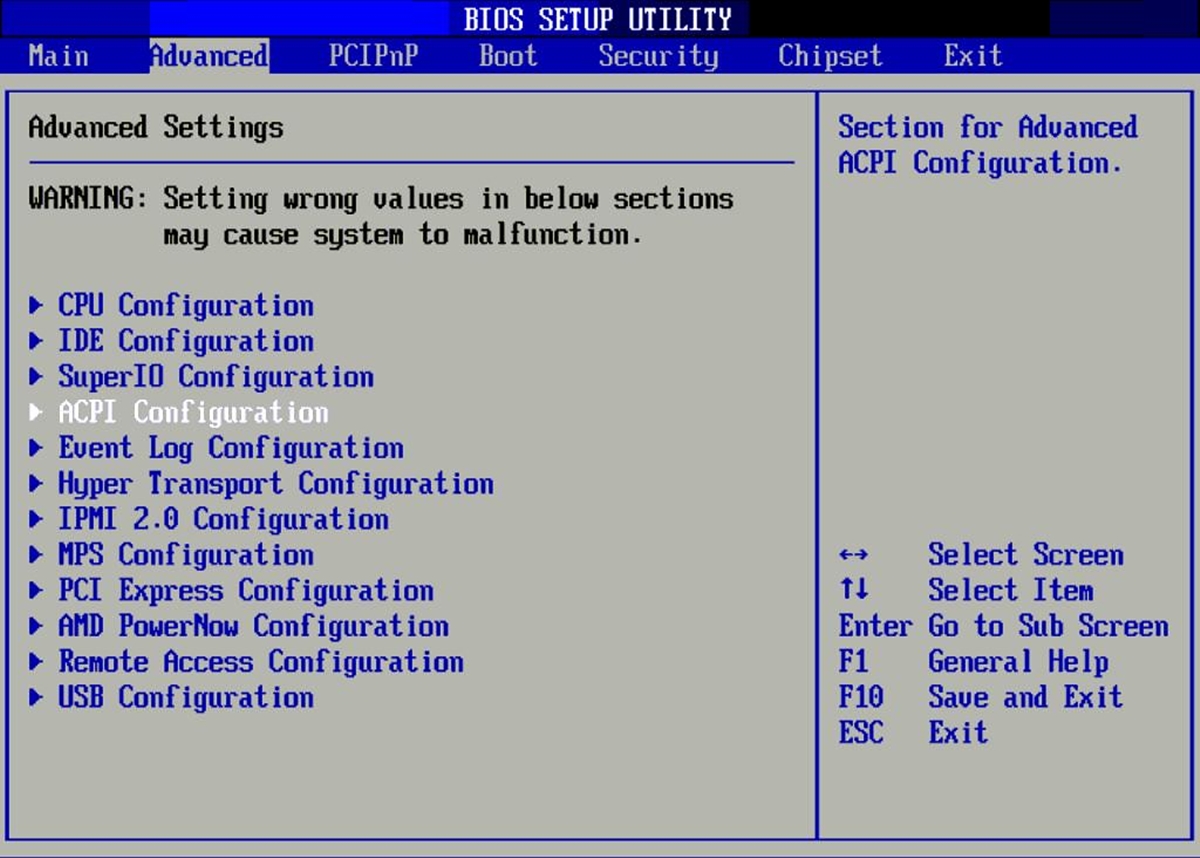
Once you enter the BIOS setup utility, you will be presented with a graphical or textual interface that displays the available options and settings. The exact layout and design of the BIOS may vary depending on the manufacturer and version.
Use the arrow keys on your keyboard to navigate through the different menus and options within the BIOS setup utility. Typically, you will find options related to the boot sequence, hardware configurations, system date and time, power management, security settings, and more.
Take your time to explore the different sections and options within the BIOS setup utility. Familiarize yourself with the available settings and make note of any specific configurations that you may need to change or adjust for your particular requirements.
However, it’s important to exercise caution while making changes in the BIOS setup utility, as improper configurations can lead to system instability or even data loss. If you’re unsure about a particular setting, it’s recommended to consult the manufacturer’s documentation or seek professional advice before making any adjustments.
Remember that the BIOS setup utility is a powerful tool that gives you control over important aspects of your computer’s hardware. Use it wisely and make changes only when necessary.
Once you have explored the BIOS settings and made any desired changes, proceed to the next step to save your configurations and exit the BIOS setup utility.
Step 5: Explore the BIOS settings
Now that you have entered the BIOS setup utility, it’s time to delve into the various settings and configurations it offers. These settings allow you to customize and optimize your computer’s hardware according to your specific needs and preferences.
Each BIOS interface may differ in terms of layout and organization, but the key settings are generally categorized into different sections or tabs. You can navigate through these sections using the arrow keys on your keyboard.
Some common BIOS settings you may encounter include:
- Boot sequence: This determines the order in which your computer attempts to boot from different devices, such as the hard drive, CD/DVD drive, USB drive, or network.
- System date and time: Here, you can set the current date and time for your computer.
- Hardware configurations: These settings allow you to manage and configure various hardware components such as the processor, memory, storage devices, and graphics card.
- Power management: This section provides options for adjusting power-saving settings and controlling how your computer behaves in different power states.
- Security settings: Here, you can set passwords to restrict access to the BIOS setup utility or prevent unauthorized booting from external devices.
Take your time to explore each section and sub-menu within the BIOS settings. Read the descriptions and instructions carefully to understand the purpose and functionality of each setting. This will help you make informed decisions when adjusting the configurations.
It’s worth noting that not all options within the BIOS setup utility may be applicable or editable depending on your computer’s hardware and BIOS version. Some advanced features may only be available in specific models or versions as well.
Again, exercise caution when making changes to the BIOS settings. It’s recommended to take note of the default settings or take screenshots of the original configurations before making any modifications. This will allow you to revert back to the original settings if needed.
Once you have explored and adjusted the desired BIOS settings, move on to the next step to save your changes and exit the BIOS setup utility.
Step 6: Save and exit the BIOS setup utility
After exploring and making any necessary changes to the BIOS settings, it’s important to save your modifications before exiting the BIOS setup utility. Saving ensures that your customized configurations will be applied every time you start your computer.
To save the changes, locate the option within the BIOS interface that allows you to save the settings. It is often labeled as “Save and Exit” or something similar. Use the arrow keys on your keyboard to navigate to this option.
Once you have selected the “Save and Exit” option, the BIOS will prompt you to confirm your choice. Make sure to double-check your changes and verify that you want to save them. Press Enter or follow the on-screen instructions to confirm and save your modifications.
After saving the changes, you will be prompted to exit the BIOS setup utility. Select the “Exit” option or any similar option provided. This will initiate the restart of your computer with the new BIOS configurations.
During the restart, your computer will go through its usual boot process, and the updated BIOS settings will take effect. You should see any changes you made reflected in the way your computer operates or interacts with hardware devices.
It’s important to note that if you encounter any issues with the modified BIOS settings, you can always revert back to the default settings. Most BIOS interfaces provide an option to load the default settings, often labeled as “Load Defaults” or similar. This option will restore the original configurations.
Once your computer has restarted with the saved BIOS settings, you can continue using your system as usual. It’s a good practice to periodically review and update the BIOS settings as needed to ensure your computer is running optimally.
By following the steps outlined in this guide, you now know how to enter the BIOS setup utility on most computers and make necessary changes to the BIOS settings. This newfound knowledge gives you greater control over your hardware configurations and allows you to tailor your computer to best suit your needs.