
Why Encrypt Your Time Machine Backups?
Time Machine, the built-in backup solution for Mac computers, offers a convenient way to safeguard your important files and ensure they can be easily restored in case of data loss or system failure. However, simply relying on Time Machine backups without encrypting them leaves your sensitive information vulnerable to unauthorized access.
Encrypting your Time Machine backups adds an extra layer of security, protecting your data from prying eyes and potential breaches. Here are a few key reasons why encrypting your Time Machine backups is crucial:
- Protection against theft: If your Mac or external hard drive containing your Time Machine backups is stolen, encryption ensures that no one can access your confidential files without the encryption passphrase.
- Privacy from unauthorized users: Encrypting your backups shields your data from unauthorized access by individuals who might gain physical or remote access to your backup storage device.
- Compliance with privacy regulations: If you handle sensitive information related to clients, customers, or employees, encrypting your Time Machine backups helps ensure compliance with various privacy regulations, such as the General Data Protection Regulation (GDPR).
- Protecting against data breaches: In the unfortunate event of a data breach, encrypted Time Machine backups make it extremely difficult for hackers to access and exploit your sensitive data.
By encrypting your Time Machine backups, you can enjoy peace of mind, knowing that your valuable data is protected even if your backups fall into the wrong hands.
Next, we will delve into the process of enabling encryption for new Time Machine backups, as well as how to encrypt existing Time Machine backups to ensure the security of your data.
What is Time Machine?
Time Machine is a backup software application developed by Apple Inc. for Mac devices. It is built into the macOS operating system and provides a convenient and reliable way to back up and restore your important files, documents, applications, and system settings.
With Time Machine, you can set up automatic, incremental backups of your entire system or selected files/folders to an external storage device, such as an external hard drive or network-attached storage (NAS).
Here are some key features and benefits of Time Machine:
- Automatic backups: Time Machine runs in the background, automatically backing up your data at regular intervals, ensuring that you have the most recent version of your files at any given time.
- Incremental backups: Rather than creating a complete backup every time, Time Machine only backs up the changes made to your files since the last backup. This saves storage space and reduces backup time.
- Easy restore functionality: Time Machine allows you to easily restore individual files, folders, or your entire system to a previous state. You can browse your backups visually and choose the specific items you want to restore.
- Time-based snapshots: Time Machine creates snapshots of your system at regular intervals, allowing you to “go back in time” and access versions of files from specific dates or times.
- Seamless integration and user-friendly interface: Time Machine seamlessly integrates with the macOS Finder, providing a straightforward and intuitive interface for configuring backups and restoring files.
Time Machine is designed to be simple and user-friendly, making it accessible to users of all levels of technical expertise. Whether you’re a casual user who wants to protect your personal documents or a power user who relies on their Mac for work, Time Machine offers a reliable and straightforward backup solution.
In the next section, we will explore how Time Machine functions and how it performs backups of your data to help you understand its inner workings.
How Does Time Machine Back Up Your Data?
Time Machine uses a clever and efficient method to back up your data while ensuring that backups are both accessible and easy to restore. It employs the concept of incremental backups and leverages macOS’s underlying file system to perform its backup operations.
Here’s a simplified explanation of how Time Machine backs up your data:
- Initial Backup: When you set up Time Machine for the first time, it creates an initial backup of your entire system or the selected files/folders. This initial backup ensures that all your data is securely stored on the destination storage device.
- Incremental Backups: After the initial backup, Time Machine performs incremental backups, which means it only backs up the changes made to your files since the last backup. This approach saves time and storage space by avoiding duplicate copies of unchanged files.
- File System Integration: Time Machine works closely with macOS’s file system to track changes in files and folders. It creates a record called a “fsevents” (file system events) database, which keeps track of the changes made to files and directories.
- Snapshots: Time Machine creates periodic snapshots of your system, capturing a “snapshot” of your entire file system at specific intervals. These snapshots allow you to go back in time and access previous versions of your files.
- Backup Intervals: By default, Time Machine performs backups every hour. However, if your Mac is not powered on or connected to the backup disk, Time Machine will perform the backup as soon as it becomes available.
- Backup Disk Usage: Time Machine manages disk space intelligently, deleting older backups as necessary to make room for newer ones. This ensures that you don’t run out of storage space on your backup disk.
Time Machine’s seamless integration with the macOS file system and its incremental backup approach make it an efficient and reliable solution for protecting your valuable data. Its ability to go back in time with snapshots also adds an extra layer of convenience and peace of mind.
Next, we will explore the importance of encrypting your Time Machine backups and how to enable encryption for both new and existing backups.
The Importance of Encrypting Your Backups
When it comes to protecting your sensitive information, encrypting your backups is of utmost importance. Whether you use Time Machine or any other backup solution, encrypting your backups offers several key benefits:
- Data Security: Encrypting your backups ensures that your data is protected even if your backup storage devices fall into the wrong hands. Without the encryption passphrase, unauthorized individuals will be unable to access and view your confidential information.
- Compliance with Privacy Regulations: Many industries and jurisdictions have strict data protection regulations in place. Encrypting your backups helps ensure compliance with these regulations, such as the General Data Protection Regulation (GDPR), which mandates the protection of personal data.
- Protection from Theft or Loss: If your backup storage device, such as an external hard drive or NAS, is stolen, lost, or misplaced, encryption provides an extra layer of protection. Even if someone gains physical access to your backups, they won’t be able to access the data without the encryption passphrase.
- Privacy from Unauthorized Access: Encrypting your backups safeguards your data from unauthorized access by individuals who might gain remote access to your backup storage device. This is particularly important if you use cloud-based backup solutions or remote network storage.
- Protection against Data Breaches: In the unfortunate event of a data breach, encrypted backups make it significantly more difficult for hackers to access and exploit your sensitive data. This can help mitigate the potential damage caused by a breach and protect your reputation.
By encrypting your backups, you take a proactive step in ensuring the security and privacy of your sensitive information. It provides peace of mind, knowing that your data is protected even if your backups are compromised or accessed without authorization.
Next, we will explore the process of enabling encryption for new Time Machine backups, as well as encrypting existing Time Machine backups to enhance the security of your data.
Enabling Encryption for New Time Machine Backups
Enabling encryption for new Time Machine backups is a straightforward process that ensures the security and privacy of your data. To enable encryption for new Time Machine backups, follow these steps:
- Step 1: Connect your backup storage device, such as an external hard drive, to your Mac.
- Step 2: Open the “Time Machine” preferences by clicking on the Apple menu, selecting “System Preferences,” and then clicking on “Time Machine.”
- Step 3: In the Time Machine preferences window, click on the “Select Backup Disk” button.
- Step 4: Choose your backup storage device from the list of available options and click on the “Use Disk” button.
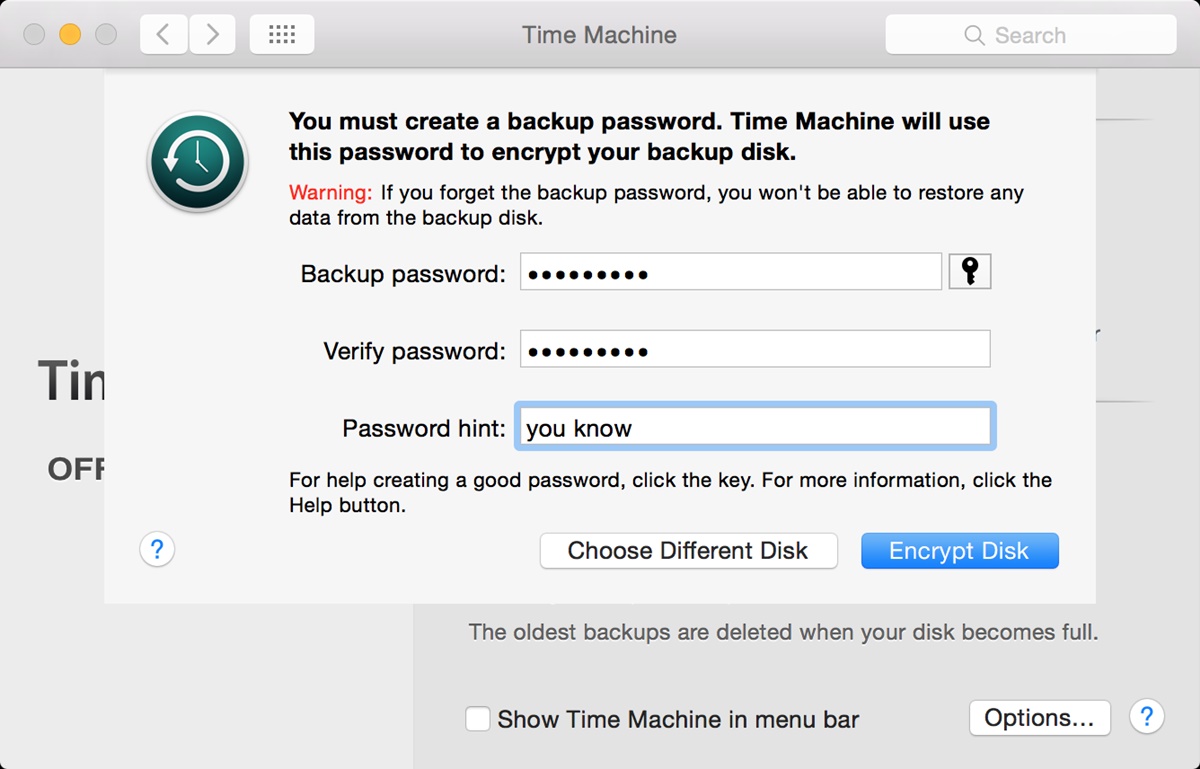
- Step 5: Check the box that says “Encrypt backups” to enable encryption for your Time Machine backups.
- Step 6: Enter a strong, unique encryption passphrase when prompted. Make sure to choose a passphrase that is easy for you to remember but difficult for others to guess or crack.
- Step 7: Click on the “Encrypt Disk” button to start the encryption process. This process may take some time, depending on the size of the backup and the speed of your system.
- Step 8: Once the encryption process is complete, your new Time Machine backups will be protected with encryption, and you can rest assured that your data is secure and accessible only with the encryption passphrase.
Enabling encryption for new Time Machine backups is a crucial step in safeguarding your valuable data. It ensures that even if your backup storage device is lost, stolen, or accessed by unauthorized individuals, your data remains protected.
In the next section, we will explore how to encrypt existing Time Machine backups to maintain the security of your archived data.
Encrypting Existing Time Machine Backups
If you have already been using Time Machine without encryption, you can still take the necessary steps to encrypt your existing Time Machine backups. Here’s how you can encrypt your backups:
- Step 1: Connect your Time Machine backup drive to your Mac.
- Step 2: Open the Time Machine application by clicking on the Time Machine icon in the menu bar or by accessing it through the System Preferences.
- Step 3: From the Time Machine menu, choose “Open Time Machine Preferences.”
- Step 4: In the Time Machine preferences window, select your backup disk from the list of available disks.
- Step 5: Click on the “Encrypt backups” box to enable encryption for your existing Time Machine backups.
- Step 6: Enter a strong, unique encryption passphrase when prompted. It is important to choose a passphrase that is not easily guessable and to avoid using common words or personal information.
- Step 7: Click on the “Encrypt Disk” button to start the encryption process. The existing backups on your Time Machine drive will now be encrypted, ensuring the security of your archived data.
- Step 8: The encryption process may take some time to complete, depending on the size of your backups and the speed of your system. Be patient and let the encryption process finish.
- Step 9: Once the encryption process is complete, your existing Time Machine backups will be protected with encryption, and you can have peace of mind knowing that your data is secure and accessible only with the encryption passphrase.
By encrypting your existing Time Machine backups, you add an extra layer of protection to your archived data. This ensures that even if your backup drive is misplaced or falls into the wrong hands, your sensitive information remains confidential.
In the next section, we will explore how to set a password for encryption to further enhance the security of your Time Machine backups.
Setting a Password for Encryption
When encrypting your Time Machine backups, it is essential to set a strong password to enhance the security of your data. Follow these steps to set a password for encryption:
- Step 1: Open the Time Machine preferences by clicking on the Apple menu, selecting “System Preferences,” and then clicking on “Time Machine.”
- Step 2: In the Time Machine preferences window, select your backup disk from the list of available disks.
- Step 3: Check the box that says “Encrypt backups” if it is not already checked to enable encryption.
- Step 4: Click on the “Change Disk Password” button to set a new password for encryption.
- Step 5: Enter your current password when prompted, or if you have not set a password previously, leave the field blank.
- Step 6: Set a strong password for encryption. Make sure to use a combination of uppercase and lowercase letters, numbers, and special characters. Avoid using common words or personal information as your password.
- Step 7: Confirm the password by typing it again in the “Verify” field.
- Step 8: Click on the “Change Password” button to save your new password.
- Step 9: Your Time Machine backups are now protected with the new password for encryption. Make sure to remember and safely store your password, as it is essential for accessing the encrypted backups.
Setting a strong password for encryption adds an extra layer of security to your Time Machine backups. It prevents unauthorized access and ensures that your data remains confidential, even if your backup storage device is compromised.
It is crucial to choose a unique and complex password and avoid sharing it with anyone. Regularly update your password to maintain the security of your encrypted Time Machine backups.
In the next section, we will explore how to delete an encrypted Time Machine backup when it is no longer needed.
Deleting an Encrypted Time Machine Backup
If you no longer require an encrypted Time Machine backup and want to delete it to free up storage space or ensure the complete removal of sensitive data, follow these steps:
- Step 1: Make sure your Time Machine backup drive is connected to your Mac.
- Step 2: Open the Finder on your Mac by clicking on the Finder icon in the dock.
- Step 3: From the Finder menu, select “Applications,” then open the “Utilities” folder, and launch “Terminal.”
- Step 4: In the Terminal window, type the command
tmutil listbackupsand press Enter. This command will display a list of all Time Machine backups. - Step 5: Identify the backup that you want to delete from the list of backups displayed in the Terminal.
- Step 6: In the Terminal, type the command
sudo tmutil deletefollowed by the path of the backup you want to delete. For example,sudo tmutil delete /Volumes/TimeMachineBackup/2022-01-01-123456. Press Enter to execute the command. - Step 7: You will be prompted to enter your administrator password. Enter your password and press Enter to confirm the deletion.
- Step 8: The selected encrypted Time Machine backup will be deleted. Note that this action is irreversible, so make sure you are deleting the correct backup.
By following these steps, you can securely and permanently delete an encrypted Time Machine backup that you no longer need. This ensures that your sensitive data is completely removed and cannot be accessed or restored from the backup.
It’s important to exercise caution when deleting backups, as they contain valuable data. Double-check the backup you are deleting to avoid any unintentional loss of important files.
In the next section, we will discuss some common encryption issues that users may encounter when using Time Machine and how to troubleshoot them.
Troubleshooting Common Encryption Issues
While encrypting your Time Machine backups adds an extra layer of security, you may encounter some common issues during the encryption process or when accessing encrypted backups. Here are a few common encryption issues and troubleshooting steps to resolve them:
- Forgotten Encryption Passphrase: If you forget the encryption passphrase for your Time Machine backups, there is no way to recover it. Make sure to store your passphrase in a safe and accessible location to avoid this issue. Without the passphrase, you will not be able to access or restore your encrypted backups.
- Slow Backup Performance: Encrypting backups can introduce additional overhead and may result in slower backup performance. If you experience significant delays in the backup process, consider connecting your backup storage device directly to your Mac using a fast and reliable connection, such as USB 3 or Thunderbolt.
- Error Messages during Encryption: If you encounter error messages during the encryption process, such as “Encryption Failed” or “Unable to Encrypt Backup,” make sure your backup drive has enough free space to accommodate the encrypted backups. Additionally, check if your backup drive supports encryption and if it is formatted correctly for macOS.
- Incompatibility Issues: Some older backup drives or NAS devices may not support encryption or may have limited compatibility with macOS. Before attempting to encrypt your backups, check the manufacturer’s documentation or website to ensure that your storage device is compatible with encryption and meets the necessary system requirements.
- Intermittent Backup Failures: In rare cases, encryption can contribute to intermittent backup failures. If you experience frequent backup interruptions or failures after enabling encryption, try restarting your Mac and reconnecting the backup drive. You can also try formatting and reconfiguring the backup drive to resolve any underlying issues.
If you continue to experience encryption-related issues, it may be helpful to consult Apple Support or visit the Apple Support Communities for further assistance. They can provide specific guidance based on your system and any error messages you encounter.
Remember to regularly test the restore capability of your encrypted backups to ensure they are working correctly. This will help verify that your encrypted backups are accessible when you need them most.
Now that you have an understanding of common encryption issues, you can proceed confidently in securing and managing your Time Machine backups.