
What is IMAP?
IMAP, which stands for Internet Message Access Protocol, is a widely used email retrieval protocol. It allows users to access and manage their email messages stored on a remote mail server. Unlike POP3 (Post Office Protocol 3), which downloads emails to a local device, IMAP allows users to view, organize, and synchronize email messages across multiple devices while keeping them stored on the server.
With IMAP, your email client maintains a constant connection with the mail server, providing real-time access to your email messages. This means that any actions you take on one device, such as reading, replying, or deleting emails, will be automatically reflected on all other devices connected to the same IMAP account.
IMAP offers several advantages over other email retrieval protocols:
- Flexible access: IMAP allows you to access your email from anywhere with an internet connection. Whether you’re using a computer, smartphone, or tablet, you can easily connect to your email account and manage your messages.
- Synchronization: IMAP keeps your email messages synchronized across all devices. When you read an email on your phone, it will be marked as read on your computer as well. Likewise, any changes you make to folders, labels, or message status will be instantly updated.
- Server-based storage: With IMAP, your email messages remain stored on the mail server. This ensures that you have a backup of your emails and can access them from any device, even if you lose or replace your device.
- Efficient storage usage: IMAP only downloads the email header and body when you open a message, saving storage space on your device. Attachments are only downloaded when you choose to view or save them.
Overall, IMAP provides a seamless and convenient way to manage your email across multiple devices while keeping your messages secure on the server. By enabling IMAP access in your Zoho Mail account, you can take full advantage of these benefits and have a more efficient email management experience.
Why Use IMAP in Zoho Mail?
IMAP is a valuable feature in Zoho Mail that offers numerous advantages for email users. By enabling IMAP access in your Zoho Mail account, you can harness the following benefits:
- Access from Multiple Devices: With IMAP, you can access your Zoho Mail account from various devices, including computers, smartphones, and tablets. Whether you’re at work, at home, or on the go, you’ll have consistent access to your emails.
- Real-time Synchronization: IMAP ensures that any changes made to your email account are instantly reflected across all devices. When you read, delete, or move an email on one device, it will be reflected on all other devices connected to your Zoho Mail account.
- Organizational Efficiency: IMAP allows you to create and manage folders, labels, and subfolders directly from your email client. This enables you to organize your emails in a way that suits your needs, making it easier to locate and manage specific messages or conversations.
- Backup and Recovery: By using IMAP in Zoho Mail, your emails are stored on the mail server rather than being downloaded to individual devices. This ensures that even if your device gets lost, stolen, or damaged, your emails will still be accessible when you log in to your Zoho Mail account from a different device.
- Storage Optimization: With IMAP, only the email headers and bodies are downloaded to your device. Attachments are only fetched when you choose to view or save them. This helps to optimize storage space on your devices and ensures efficient use of available resources.
- Collaboration and Teamwork: IMAP allows multiple team members to access and manage a shared mailbox or folder. This is particularly useful for businesses or organizations where team members need to collaborate on emails and stay updated in real-time.
By utilizing IMAP in Zoho Mail, you can experience enhanced productivity and convenience in managing your emails. The seamless synchronization and accessibility provided by IMAP ensure that you stay connected and in control of your messages, regardless of the device you use or your physical location.
Step-by-Step Guide to Enable IMAP in Zoho Mail
If you want to enable IMAP access in your Zoho Mail account, follow these simple steps:
- Login to your Zoho Mail account: Visit the Zoho Mail website (mail.zoho.com) and enter your Zoho username and password to log in.
- Go to Mail Settings: Once you’re logged in, click on the gear icon located on the top-right corner of the screen. From the drop-down menu, select Settings.
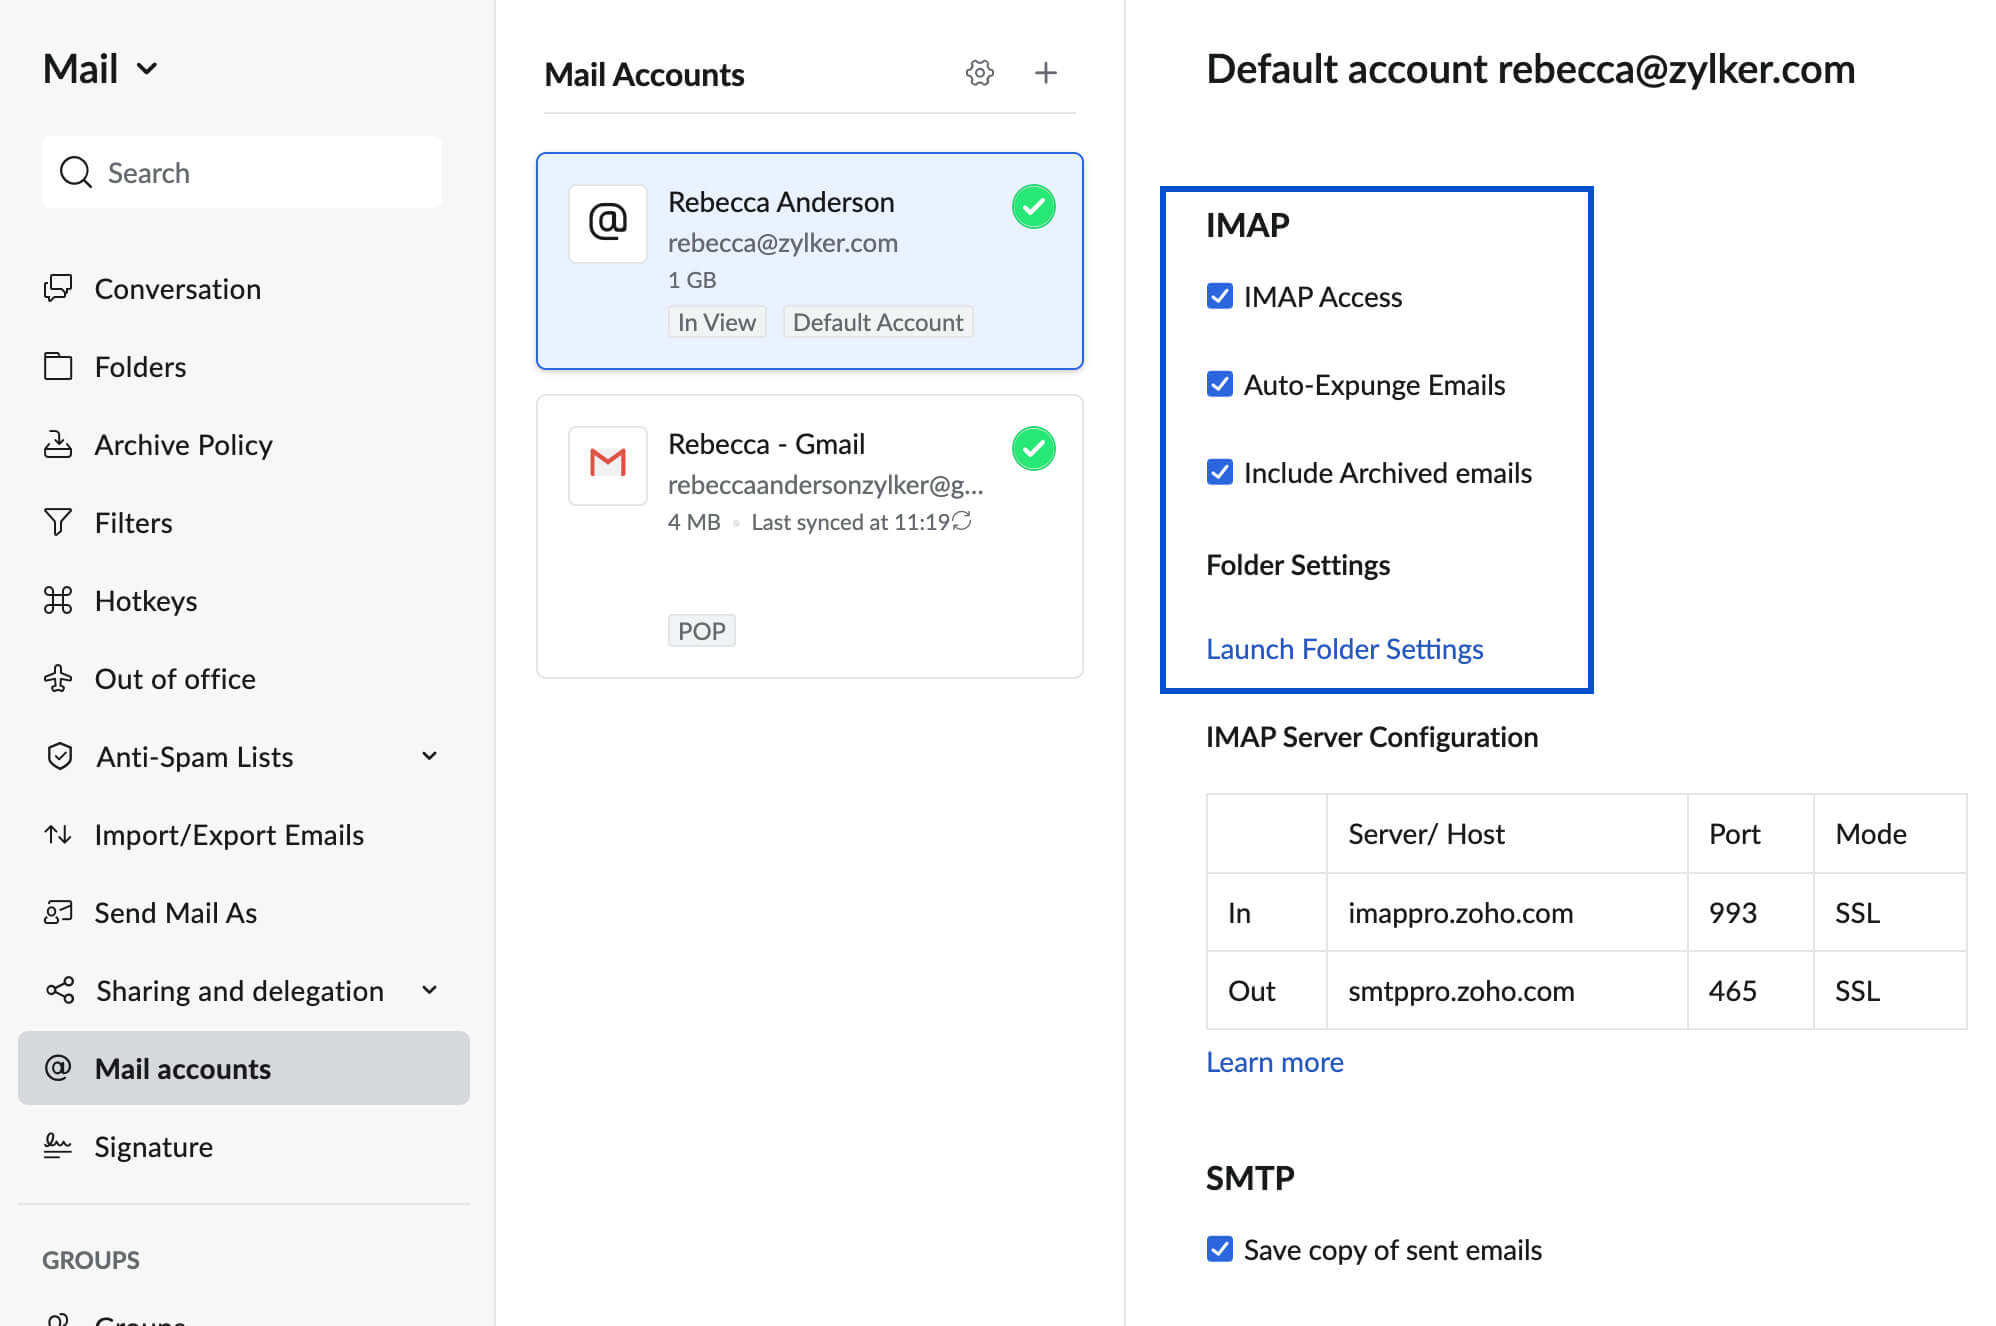
- Navigate to the IMAP Access tab: In the Settings page, you will see a list of tabs on the left-hand side. Click on the Mail Accounts tab, and then select the IMAP Access sub-tab.
- Enable IMAP Access: On the IMAP Access page, you will find a toggle switch labeled Enable IMAP. Click on the switch to turn it on.
- Save the changes: After enabling IMAP access, scroll down to the bottom of the page and click on the Save button to apply the changes.
- Configure email client with IMAP settings: To access your Zoho Mail account using an email client, such as Microsoft Outlook or Mozilla Thunderbird, you will need to configure the client with the IMAP settings provided by Zoho. These settings include the incoming server, outgoing server, port numbers, and authentication details.
- Test the IMAP connection: Once you have configured your email client with the correct IMAP settings, you can test the connection by sending a test email to your Zoho Mail account and verifying that it appears in your email client’s inbox.
By following these steps, you can successfully enable IMAP access in your Zoho Mail account and start enjoying the benefits of real-time email synchronization and remote access across multiple devices.
Step 1: Login to your Zoho Mail account
The first step to enable IMAP access in your Zoho Mail account is to log in to your account. Here’s how you can do it:
- Open the Zoho Mail website: Launch a web browser and visit the Zoho Mail website at mail.zoho.com.
- Enter your Zoho username and password: On the Zoho Mail homepage, you will find the login section. Enter your Zoho Mail username in the designated field. This is usually your complete email address, such as yourname@example.com. Then, enter your Zoho Mail account password in the password field.
- Click on the “Sign in” button: After entering your credentials, click on the “Sign in” button to proceed.
Upon successful login, you will be directed to your Zoho Mail inbox. Here, you can access your received and archived emails, compose new messages, and manage your email settings.
It is important to ensure that you enter the correct username and password to log in to your Zoho Mail account. If you encounter any login issues, verify that your login credentials are accurate and try again. If you’ve forgotten your password, you can reset it using the “Forgot Password” option available on the login page.
Once you’ve successfully logged in to your Zoho Mail account, you can proceed to the next step to enable IMAP access and enjoy the benefits of synchronizing your emails across multiple devices.
Step 2: Go to Mail Settings
After logging in to your Zoho Mail account, the next step to enable IMAP access is to navigate to the Mail Settings. Here’s how you can do it:
- Locate the gear icon: On the Zoho Mail homepage, look for the gear icon located on the top-right corner of the screen. This gear icon represents the settings menu.
- Click on the gear icon: Once you have located the gear icon, click on it to access the settings menu.
- Select “Settings”: From the dropdown menu that appears after clicking the gear icon, select “Settings”. This will open the Mail Settings page.
By clicking on the gear icon and selecting “Settings”, you will be directed to the settings page where you can customize various aspects of your Zoho Mail account. This page provides options for managing email filters, setting up autoresponders, configuring display preferences, and more.
Accessing the Mail Settings page is an essential step in enabling IMAP access because it is within this page that you can find the necessary options to configure IMAP settings and enable IMAP access for your Zoho Mail account.
Once you have successfully reached the Mail Settings page, you can proceed to the next step to enable IMAP access and start enjoying the benefits of synchronizing your emails across devices.
Step 3: Navigate to the IMAP Access tab
After accessing the Mail Settings in your Zoho Mail account, the next step to enable IMAP access is to navigate to the IMAP Access tab. Here’s how you can do it:
- Look for the “Mail Accounts” tab: On the left-hand side of the Mail Settings page, you will find a list of tabs. Locate and click on the “Mail Accounts” tab. This tab contains various options related to managing your mail accounts.
- Select the IMAP Access sub-tab: Within the “Mail Accounts” tab, you will see a sub-tab labeled “IMAP Access”. Click on this sub-tab to proceed.
By clicking on the “Mail Accounts” tab and selecting the “IMAP Access” sub-tab, you will be directed to the specific settings page where you can configure the IMAP access settings for your Zoho Mail account.
The IMAP Access tab provides you with options to enable or disable IMAP access, as well as other related settings such as setting up concurrent sessions and specifying the inactivity timeout period. Enabling IMAP access is essential to ensure that you can securely access and manage your Zoho Mail account using email clients or apps that support the IMAP protocol.
At this stage, you are one step closer to enabling IMAP access in your Zoho Mail account. Proceed to the next step to enable IMAP access and start enjoying the convenience and flexibility of accessing your emails across multiple devices.
Step 4: Enable IMAP Access
Once you have navigated to the IMAP Access tab in your Zoho Mail account’s Mail Settings, the next step is to enable IMAP access. Follow these steps to enable IMAP access:
- Locate the “Enable IMAP” toggle switch: On the IMAP Access page, you will find a toggle switch labeled “Enable IMAP”. This switch allows you to enable or disable IMAP access for your Zoho Mail account.
- Toggle on the “Enable IMAP” switch: Click on the toggle switch to turn on IMAP access. Once the switch is toggled on, it will turn green or display as “Enabled”, indicating that IMAP access is now enabled for your Zoho Mail account.
Enabling IMAP access is an important step as it allows you to retrieve and manage your Zoho Mail messages using external email clients or apps that support the IMAP protocol.
By enabling IMAP access, you are granting permission for your email client or app to connect securely to your Zoho Mail account, retrieve your email messages, and synchronize them across multiple devices. This ensures that you have real-time access to your emails and can manage them seamlessly.
Once you have successfully enabled IMAP access, proceed to the next step to save the changes and finalize the setup process.
Step 5: Save the Changes
After enabling IMAP access in your Zoho Mail account, the next step is to save the changes you have made. Follow these steps to save the changes:
- Scroll down to the bottom of the page: On the IMAP Access page, scroll down until you reach the bottom of the page. Here, you will find the “Save” button.
- Click on the “Save” button: Once you have located the “Save” button, click on it to save the changes you have made to the IMAP access settings.
By clicking on the “Save” button, the changes you made to enable IMAP access will be saved and applied to your Zoho Mail account. This ensures that you can connect to your Zoho Mail account using an email client or app that supports the IMAP protocol.
It is essential to save the changes to enable IMAP access successfully. Remember to wait for the confirmation message or status update that indicates the changes have been saved. This ensures that the IMAP settings are in effect and ready to be used for accessing your Zoho Mail account.
With the changes saved, you can proceed to the next step, which involves configuring your email client with the necessary IMAP settings to connect to your Zoho Mail account.
Step 6: Configure Email Client with IMAP Settings
Once you have enabled IMAP access in your Zoho Mail account, the next step is to configure your email client with the IMAP settings. Follow these steps to configure your email client:
- Open your email client: Launch the email client or app that you want to use to access your Zoho Mail account. Popular email clients include Microsoft Outlook, Mozilla Thunderbird, and Apple Mail.
- Locate the account settings: In your email client, find the account settings or preferences section. This location may vary depending on the email client you are using.
- Add a new email account: Within the account settings, look for an option to add a new email account. Click on this option to begin the setup process.
- Enter your account information: Provide your name and the email address associated with your Zoho Mail account. Make sure to use the full email address, such as yourname@example.com.
- Choose IMAP as the account type: In the account setup process, select IMAP as the account type. This option is typically available in a dropdown menu or a list of account types.
- Enter the IMAP server settings: Enter the IMAP server settings provided by Zoho Mail. These settings usually include the incoming mail server, port number, and SSL/TLS encryption details. You can find these settings on the Zoho Mail website or by contacting Zoho support.
- Provide authentication details: Enter your Zoho Mail account username and password to authenticate your account on the email client. This ensures that you can securely connect to your Zoho Mail account and access your emails.
- Finish the setup process: Once you have entered all the required information and authenticated your account, complete the setup process in your email client. This may involve additional steps specific to your email client, such as configuring outgoing SMTP server settings.
By configuring your email client with the correct IMAP settings, you can establish a connection between your email client and your Zoho Mail account. This enables you to access, manage, and synchronize your Zoho Mail emails using the email client of your choice.
Make sure to double-check the accuracy of the IMAP server settings to ensure a successful configuration. If you encounter any issues during the setup process, refer to the email client’s documentation or contact their support for further assistance.
Once your email client is successfully configured with the IMAP settings, you can move on to the next step, which involves testing the IMAP connection to ensure everything is set up correctly.
Step 7: Test the IMAP Connection
After configuring your email client with the IMAP settings for your Zoho Mail account, the final step is to test the IMAP connection. Follow these steps to ensure that the connection is working properly:
- Open your email client: Launch your email client and navigate to the inbox for the Zoho Mail account you just configured.
- Send a test email: Compose a new email from within your email client and send it to your Zoho Mail account.
- Check for email synchronization: Once the test email is sent, check your Zoho Mail account’s inbox from both the email client and the Zoho Mail web interface. Ensure that the test email appears in both locations.
- Perform actions on email: Read, delete, or move the test email within your email client and verify that the changes are synchronized and reflected in your Zoho Mail account’s web interface.
- Verify two-way synchronization: Perform actions on the test email within your Zoho Mail account’s web interface and verify that those changes are also synchronized and reflected in your email client.
Testing the IMAP connection is crucial to ensure that your email client is properly connected to your Zoho Mail account and that email synchronization is working as expected.
If the test email appears in both the email client and the Zoho Mail web interface and any changes made to the email are synchronized in both directions, then the IMAP connection is functioning correctly.
If you encounter any issues during the testing process, double-check the IMAP settings in your email client to ensure they are accurate. Additionally, ensure that you have a stable internet connection to properly establish and maintain the IMAP connection.
By successfully testing the IMAP connection, you can confidently use your preferred email client to access and manage your Zoho Mail account, ensuring a seamless and synchronized email management experience.
Troubleshooting Common Issues with IMAP in Zoho Mail
While enabling and using IMAP in Zoho Mail provides numerous benefits, there may be instances where you encounter problems or experience issues. Here are some common troubleshooting tips to help you resolve these issues:
- Incorrect IMAP settings: Double-check that you have entered the correct IMAP server settings, including the server address, port number, and encryption details. Ensure that the incoming server settings match the ones provided by Zoho Mail.
- Authentication errors: Verify that you are using the correct username and password for your Zoho Mail account. Typos or incorrect credentials can lead to authentication failures.
- Firewall or antivirus software: Check if your firewall or antivirus software is blocking the IMAP connection. Temporarily disable these applications and try reconnecting to see if the issue is resolved.
- Network connectivity: Ensure that you have a stable internet connection. Unstable or intermittent internet connectivity can cause disruptions in the IMAP connection. Try switching to a different Wi-Fi network or using a wired connection.
- Quota limitations: Check if you have reached the storage quota limit in your Zoho Mail account. If you have exceeded the maximum storage capacity, it can affect the IMAP synchronization process. Delete unnecessary emails or upgrade your storage plan to resolve this issue.
- Device compatibility: Verify that your email client or app supports IMAP protocol and is compatible with Zoho Mail. Ensure that you are using the latest version of the email client and update it if necessary.
- Application-specific passwords: If you have enabled two-factor authentication (2FA) for your Zoho Mail account, generate an application-specific password to use in your email client. This provides enhanced security and resolves any password compatibility issues.
- IMAP server maintenance: Occasionally, Zoho Mail may perform server maintenance, leading to temporary disruptions in the IMAP connection. Check the Zoho Mail status page or contact support to inquire about any ongoing maintenance activities.
If you continue to experience issues with IMAP in Zoho Mail, consider reaching out to Zoho Mail support for further assistance. They can provide specific guidance based on your account and help resolve any persistent problems you may encounter.
By troubleshooting these common issues, you can ensure a smooth and uninterrupted IMAP experience in Zoho Mail, allowing you to efficiently manage your emails across devices.