
Why edit your email signature?
Your email signature is an important component of your professional communication. It is the digital equivalent of a business card and gives recipients a glimpse into your professional identity. By taking the time to edit and customize your email signature, you can make a lasting impression and add a personal touch to your emails.
Here are a few reasons why you should consider editing your email signature:
- Branding: Your email signature is an opportunity to showcase your brand. By including your company logo, colors, or tagline, you can create a consistent visual identity that aligns with your business image.
- Professionalism: A well-crafted email signature enhances your professionalism. It provides essential contact information such as your name, job title, phone number, and website, making it easier for recipients to connect with you.
- Contact Details: Having an updated email signature ensures that your recipients have the most accurate and current contact information. This is especially crucial if you have changed phone numbers, job roles, or updated your website or social media profiles.
- Marketing Opportunities: With a strategically designed email signature, you can promote your products, services, or upcoming events. Consider adding a call-to-action, such as a link to your latest blog post or a promotional offer, to drive engagement and generate leads.
- Personal Touch: Customizing your email signature allows you to inject a bit of your personality into your emails. It creates a memorable impression and helps build rapport with your recipients.
Now that you understand the importance of editing your email signature, let’s dive into the step-by-step process to make the necessary changes.
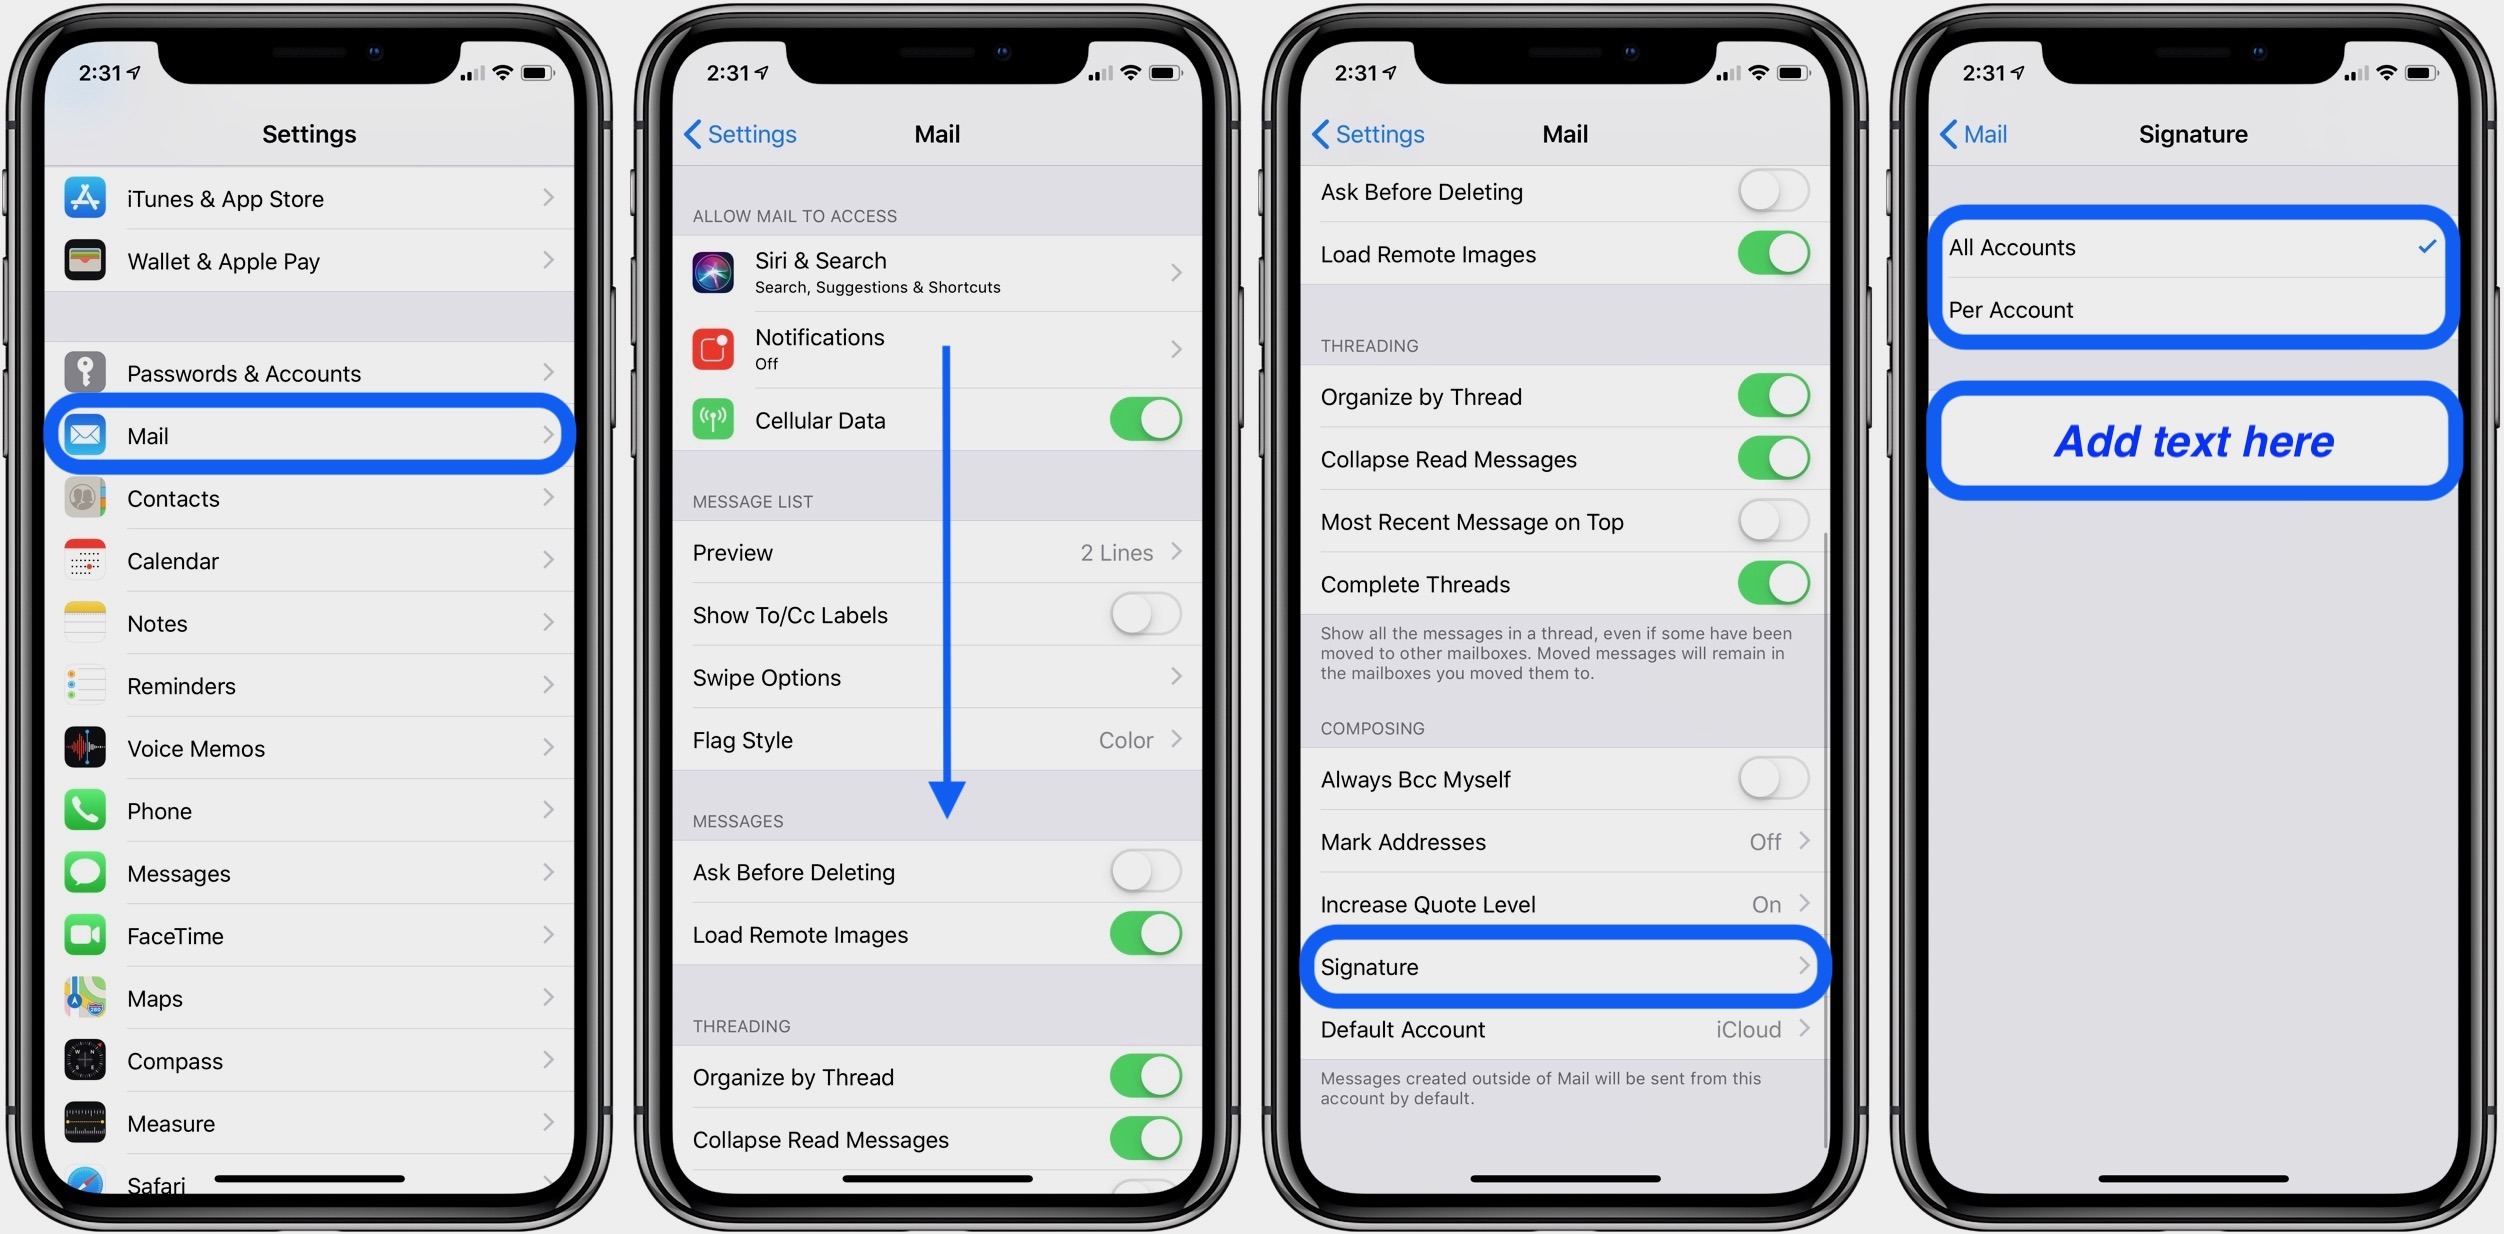
Step 1: Open the “Settings” app
To edit your email signature on your iPhone or iPad, start by opening the “Settings” app. The “Settings” app is a gear-shaped icon typically found on your device’s home screen. Tap on it to proceed.
Once you’re in the “Settings” app, scroll down until you see various sections listed. Look for the section labeled “Mail” and tap on it to access your email settings.
On newer versions of iOS, you may need to search for “Mail” using the search bar at the top of the “Settings” app.
When you tap on “Mail,” you’ll be presented with several options related to your email accounts. This is where you will find the settings to edit your email signature.
If you have multiple email accounts set up on your device, you will see a list of those accounts. Each account can have its own unique email signature. Tap on the email account that you want to edit the signature for.
If you only have one email account configured on your device, you will not see a list of accounts. Instead, you will be taken directly to the email signature settings for that account.
Now that you’ve opened the “Settings” app and accessed the email settings, you’re ready to proceed to the next step and learn how to customize your email signature.
Step 2: Scroll down and tap “Mail”
After opening the “Settings” app and accessing the email settings, it’s time to navigate to the “Mail” section. To do this, simply scroll down on the settings screen until you see the option for “Mail.” Tap on it to proceed.
By tapping on “Mail,” you will be taken to a new screen where you can configure various settings related to your email accounts.
On this screen, you’ll find options such as “Accounts,” “Compose,” “Signature,” and more. We’re specifically interested in the “Signature” option, which allows you to customize your email signature.
If you have multiple email accounts configured on your device, you may see an “Accounts” section on this screen. In that case, you can tap on the specific email account you want to edit the signature for.
For devices with only one email account, you may not see the “Accounts” section. Instead, you will see the “Signature” directly on this screen.
Remember, if you want to customize the email signature for a specific account, make sure to tap on that account in the “Accounts” section before proceeding to the next step.
Now that you’ve tapped on “Mail” and accessed the appropriate section, continue to the next step to learn how to make changes to your email signature.
Step 3: Tap “Signature”
Once you have accessed the email settings in the “Mail” section, it’s time to find and tap on the “Signature” option. This option allows you to make changes to your email signature.
On the “Mail” settings screen, scroll down until you see the “Signature” option. It is usually indicated by the icon of a pen on paper. Tap on it to proceed.
When you tap on “Signature,” you will be taken to the email signature editor screen. Here, you can view and modify your current email signature, as well as create a new one.
If you have multiple email accounts set up on your device and you tapped on a specific account in the previous step, you will see the signature editor screen for that particular account. If you have only one email account, you will see the overall signature editor screen.
Keep in mind that any changes you make to your email signature will be applied to all outgoing emails from the selected account(s).
The editor screen allows you to enter text, add images, or format your email signature using basic formatting options. You can customize the font, size, style, and color of your text to create a signature that reflects your personal or business brand.
Take your time to edit and perfect your email signature in a way that aligns with your professional image and goals.
Now that you’ve tapped on “Signature” and accessed the editor screen, it’s time to move on to the next step and learn how to make specific changes to your email signature.
Step 4: Choose an email account to edit
After tapping on the “Signature” option, you will be taken to the email signature editor screen. If you have multiple email accounts configured on your device, you may need to choose a specific account to edit the signature for.
On the signature editor screen, you will see a dropdown menu or a list of email accounts. This allows you to select the account that you want to edit the email signature for.
If you have only one email account set up on your device, you may not see a dropdown menu or a list. In this case, you will automatically be editing the signature for the account you are currently using.
Identify the email account you want to modify the signature for and select it from the dropdown menu or the list of accounts.
Keep in mind that any changes you make to the email signature will only apply to the selected account. If you want to edit the signature for multiple accounts, you will need to repeat the process for each account.
Choosing the right email account is crucial, especially if you’re using your device for both personal and professional purposes. Make sure you edit the signature for the correct account to ensure that your email signature reflects the right information and maintains a professional appearance.
Now that you’ve chosen the email account you want to edit the signature for, let’s move on to the next step and learn how to make the desired changes to your email signature.
Step 5: Edit the email signature
Now that you’ve selected the email account you want to edit the signature for, it’s time to make the necessary changes to your email signature.
On the email signature editor screen, you’ll find a text box where you can enter or modify your signature. Here are a few tips on how to effectively edit your email signature:
- Keep it concise: Your email signature should not be excessively long. Include only essential information such as your name, job title, and contact details.
- Include contact information: Make sure to include your phone number, email address, and website (if applicable). This makes it easy for recipients to reach out to you.
- Add a professional closing: Consider adding a polite and professional closing, such as “Best regards” or “Sincerely,” followed by your name.
- Consider adding a call-to-action: If relevant, you can include a call-to-action to promote your products, services, or social media profiles. For example, you can add a link to your latest blog post or a social media handle.
- Use proper formatting: Format your signature to make it visually appealing. You can use bold or italicized fonts, different font sizes or colors, and even include your company logo or a headshot.
Take your time to refine and perfect your email signature until it matches your professional image and objectives.
Remember, the email signature should be both visually appealing and easy to read. Test your signature on different devices and email clients to ensure it displays correctly.
Once you’re satisfied with the changes you’ve made, save your email signature and exit the editor. Your new email signature will now be applied to all outgoing emails from the selected account.
Now that you’ve successfully edited your email signature, let’s move on to the next step to learn how to add a different signature for each email account you have.
Step 6: Add a different signature for each email account
If you have multiple email accounts configured on your device, you may want to create a unique email signature for each account. This allows you to customize the signature based on the specific purpose or audience of each account.
To add a different signature for each email account, follow these steps:
- After editing the email signature for the first account (as explained in the previous steps), save and exit the editor.
- Go back to the email settings screen by tapping the back button or navigating to the previous screen.
- Select another email account from the dropdown menu or the list of accounts.
- Tap on the “Signature” option to access the email signature editor for the selected account.
- Now, you can proceed to edit the signature specifically for the second email account, following the same instructions mentioned earlier.
- Repeat the process for any additional email accounts you have, creating a unique signature for each.
By customizing the email signature for each account, you can tailor the information to fit the purpose or context of that specific account. For example, you may want to include different job titles or contact numbers depending on whether it’s a personal or professional account.
Remember to keep the signature concise, professional, and relevant to the specific email account. By personalizing your email signatures, you can maintain consistency in your branding while addressing the unique needs of different recipients.
After adding a different signature for each email account, save and exit the editor for each account. Your device will now automatically apply the corresponding signature to the respective email accounts when composing new emails.
Now that you’ve added different signatures for each email account, let’s proceed to the next step to learn how to test the new email signature.
Step 7: Test your new email signature
After making changes to your email signature, it’s important to test it to ensure that it appears correctly when sent to recipients. Testing your new email signature helps you avoid any formatting issues or missing information.
Here are a few steps you can take to test your new email signature:
- Send a test email to yourself: Compose a new email and send it to your own email address. This allows you to see firsthand how the signature appears in the recipient’s inbox.
- Send a test email to a colleague or friend: Ask a trusted individual to review and provide feedback on how the email signature displays on their device. They can let you know if any elements are missing, distorted, or difficult to read.
- Test on different devices and email clients: Send test emails to various devices and email clients, such as smartphones, tablets, and desktops, using different operating systems and email applications. This helps ensure that your email signature looks consistent across different platforms.
- Check for responsiveness: Test how your email signature adjusts to different screen sizes and orientations by accessing your emails on mobile devices in both portrait and landscape modes.
- Review formatting and links: Verify that all formatting, such as bold or italicized text, colors, and font sizes, appear as intended. Additionally, click on any links included in the signature to ensure they direct to the correct webpages or profiles.
By thoroughly testing your new email signature, you can identify and resolve any issues before sending emails to clients, colleagues, or potential customers.
If you encounter any problems during the testing phase, revisit the email signature settings and make the necessary adjustments until you achieve the desired appearance and functionality.
Once you’re confident that your new email signature looks and functions as intended, you’re ready to proceed with using it for day-to-day email communication.
Now that you’ve tested your new email signature, let’s move on to the next step to explore how to disable the email signature for specific emails if needed.
Step 8: Disable the email signature for specific emails
In certain situations, you may want to disable your email signature for specific emails. This could be necessary when replying to a thread where the signature is not relevant, or when sending a personal email where a formal signature might not be appropriate.
To disable the email signature for specific emails, follow these steps:
- When composing a new email, scroll down to the body of the email where you type your message.
- Tap to place the cursor at the beginning of your email message, before any text or content.
- Swipe left on the screen with two fingers or tap the screen with two fingers simultaneously. This action will trigger a pop-up toolbar.
- On the toolbar, you will see an option for “Insert Signature.” Tap on it to disable the email signature for that specific email.
Disabling the email signature for a specific email allows you to maintain a more personalized or casual tone, which can be ideal for certain situations.
Keep in mind that this method disables the email signature for the current email only. If you want to disable it for all emails sent from a specific email account, you will need to adjust the signature settings in your device’s email settings.
By selectively disabling the email signature, you have the flexibility to adapt and customize your email communication based on the specific context and recipient.
Now that you’ve learned how to disable the email signature for specific emails, let’s move on to the next step and explore how to use HTML formatting in your email signature.
Step 9: Use HTML formatting in your email signature
If you want to take your email signature customization to the next level, you can incorporate HTML formatting. Using HTML allows you to add more advanced styling, images, links, and even interactive elements to your email signature.
Here are some steps to consider when using HTML formatting in your email signature:
- Create your HTML signature: Design and code your desired email signature using HTML tags and CSS styling. You can use a text editor or HTML editor to create and refine your signature.
- Save your HTML signature: Once your HTML signature is complete, save it as an HTML file. Make sure to test the signature in different email clients to ensure it displays correctly.
- Copy the HTML code: Open the HTML file in a text editor and copy the entire HTML code of your signature.
- Access the email signature settings: Follow the steps discussed earlier to access the email signature settings of the specific email account you want to edit.
- Paste the HTML code: In the signature editor, delete the existing signature (if any) and paste the HTML code of your signature in its place. Make sure to remove any unwanted code or tags.
- Save and test: Save your changes and send a test email to ensure that your HTML-formatted signature appears as expected in the recipient’s email client.
Using HTML formatting in your email signature allows you to create a more visually appealing and dynamic signature. You can add images of your company logo, social media icons, and even links to your website or latest promotions.
However, keep in mind that not all email clients support HTML formatting, and some may strip away certain elements or modify the appearance of your signature. Test your HTML-formatted signature on multiple devices and email clients to ensure it displays correctly for most recipients.
Now that you’ve learned how to use HTML formatting in your email signature, let’s move on to the final step and explore how to remove the email signature completely, if needed.
Step 10: Remove the email signature completely
If you no longer wish to have an email signature attached to your outgoing emails, you have the option to remove the signature entirely. Here’s how you can remove the email signature:
- Access the email signature settings of the specific email account you want to edit (follow the steps mentioned earlier).
- Delete the existing signature text or HTML code in the signature editor. Remove any image files or links as well.
- Save your changes and exit the signature editor.
By removing the email signature, your outgoing emails will no longer contain any added signature text or formatting.
Removing the email signature can be useful in certain situations. For instance, if you want to send a more informal or personal email without any professional branding, or if you need to comply with specific email guidelines or restrictions set by an organization.
It’s important to note that removing the email signature completely means that there will be no contact information or branding added automatically to your emails. Make sure to include any necessary contact information or closing statements manually when needed.
Now that you have learned how to remove the email signature completely, you are ready to customize your email signature, test its appearance, and make any necessary adjustments to suit your professional or personal requirements.