
Using Preview to Edit a PDF on a Mac
When it comes to editing PDF files on a Mac, one of the most convenient and versatile options available is using the built-in Preview application. Preview offers a range of powerful tools that allow you to modify, annotate, and manipulate your PDF documents with ease. In this section, we will explore how to use Preview to edit PDF files on a Mac.
To begin, locate the PDF file you want to edit and open it in Preview. You can do this by simply double-clicking on the file, or by right-clicking and selecting “Open With” followed by “Preview”. Once the PDF file is open, you will have access to a wide array of editing options.
Preview allows you to add text, annotations, highlight and underline text, insert or delete pages, rotate and rearrange pages, crop and resize pages, edit images, add signatures, and export the edited PDF. With these features at your fingertips, you have the flexibility to make the necessary changes to your PDF files without the need for expensive third-party software.
This powerful editing tool offers a user-friendly interface that makes it simple to navigate and utilize its various functionalities. Whether you need to make minor adjustments to text or images, or completely overhaul the content of your PDF, Preview provides the necessary tools to accomplish these tasks.
Using Preview, you can edit PDFs with efficiency and precision. The ability to add, delete, and manipulate pages allows you to customize the structure and order of your document. The options to crop and resize pages are particularly useful for removing unwanted margins or adjusting the dimensions of images within the PDF.
Additionally, Preview enables you to highlight and underline text, making it easier to emphasize important information or make notes for future reference. You can also insert annotations, such as comments or shapes, to provide further context or clarification within the document. These features enhance the readability and interactivity of your PDF files.
In the next sections, we will explore these editing capabilities in more detail. We will walk you through the step-by-step process of performing each action using Preview on your Mac. By the end of this guide, you will have a solid understanding of how to effectively edit PDF files on your Mac using Preview.
Adding Text and Annotations with Preview
When it comes to editing PDF files, the ability to add text and annotations is crucial in order to convey information and provide additional context. With Preview on your Mac, you can effortlessly insert text and annotations into your PDF documents. In this section, we will guide you through the process of adding text and annotations using Preview.
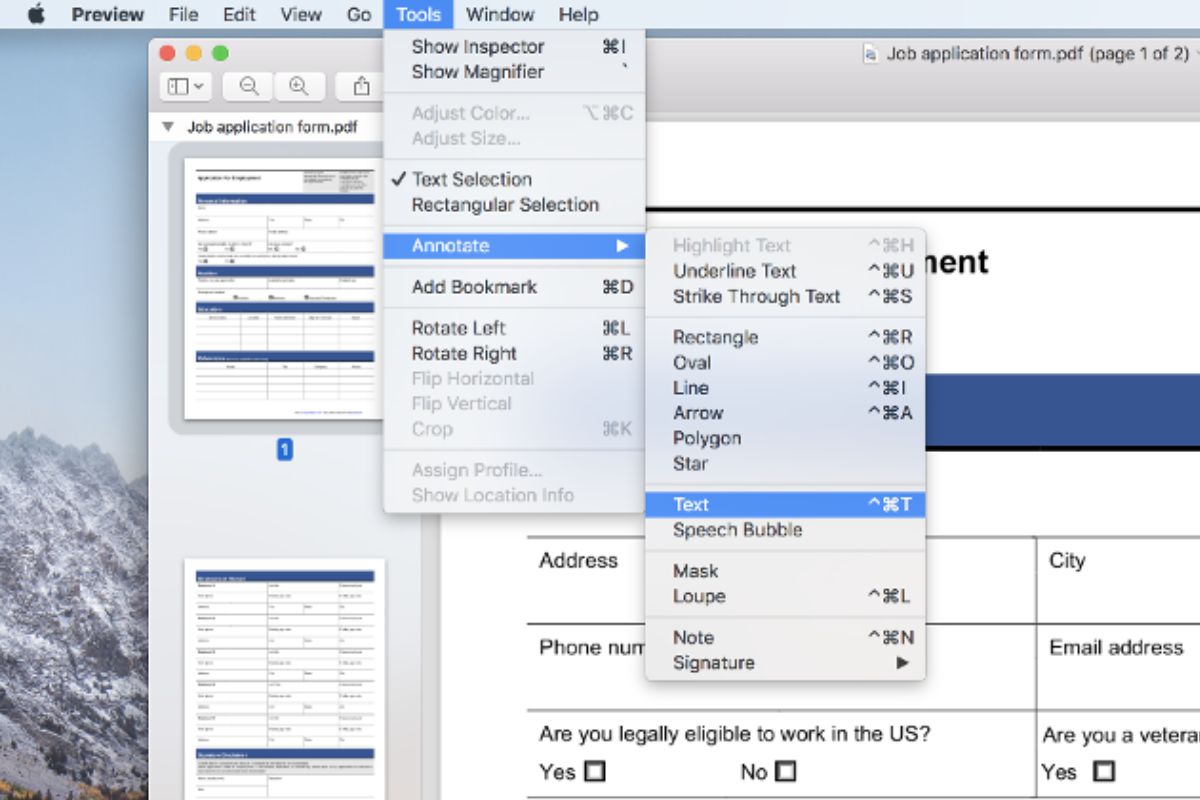
To add text, simply open your PDF file in Preview and click on the “Text” icon in the toolbar. This will activate the text tool, allowing you to click anywhere on the document and start typing. You can easily resize and reposition the text box to fit your needs. Preview offers various fonts, colors, and formatting options to customize the appearance of your text.
In addition to adding plain text, Preview also enables you to insert annotations such as comments, shapes, and arrows. To do this, click on the “Markup” icon in the toolbar and select the desired annotation tool. You can then click and drag on the document to create the annotation. These annotations can be resized, repositioned, and customized to match your preferences.
Annotations are useful for providing additional information, highlighting key points, or drawing attention to specific areas of the document. Whether you need to make editorial comments, underline important text, or mark up diagrams, Preview’s annotation tools offer the flexibility to do so.
One of the useful annotation tools in Preview is the ability to add a signature to a PDF document. If you need to sign a contract, form, or any other type of document, Preview allows you to create a digital signature by using your trackpad or webcam. This saves you the hassle of having to print, sign, and scan a physical document.
By utilizing the text and annotation features in Preview, you can enhance the clarity and comprehension of your PDF files. Whether you are editing a business report, academic paper, or personal document, Preview provides the tools necessary to add text and annotations with ease and precision.
In the next sections, we will delve into other editing capabilities offered by Preview on a Mac. We will explore how to highlight and underline text, insert and delete pages, rotate and rearrange pages, crop and resize pages, edit images, and export the edited PDF. Each feature will be explained in detail to equip you with the knowledge to effectively edit PDF files using Preview on your Mac.
Highlighting and Underlining Text in a PDF with Preview
Highlighting and underlining text is a common editing task when working with PDF documents. Preview on a Mac offers a simple and effective way to emphasize important information within your PDF files. In this section, we will guide you through the process of highlighting and underlining text using Preview.
To highlight text, open your PDF file in Preview and select the “Highlight” tool from the toolbar. This tool resembles a colored marker. Once the tool is activated, simply click and drag over the text you want to highlight. The selected text will be marked with a semi-transparent color overlay. You can choose various colors for highlighting by clicking on the color swatch in the toolbar.
Underlining text in Preview is just as easy. Select the “Underline” tool from the toolbar, which looks like a line with a small curve underneath. Click and drag over the text you want to underline. The selected text will have a solid line underneath it, indicating that it has been underlined.
The ability to highlight and underline text is particularly useful when reviewing, studying, or annotating PDF files. You can mark important sections, key points, or passages that require further attention. This allows you to quickly identify and reference significant information within the document.
Preview also allows you to remove highlighting or underlining from text. To do this, simply select the text with the corresponding annotation, right-click, and choose “Remove Highlight” or “Remove Underline” from the context menu. Alternatively, you can use the “Eraser” tool in the toolbar to remove the annotation completely.
With the ability to highlight and underline text in Preview, you can enhance the readability and organization of your PDF files. Whether you are preparing a research paper, analyzing a legal document, or simply studying for an exam, these tools help you focus on the most important aspects of the text.
In the following sections, we will explore other editing capabilities offered by Preview on a Mac. We will cover how to insert and delete pages, rotate and rearrange pages, crop and resize pages, edit images, add a signature, and export the edited PDF file. Each feature will be explained step-by-step to empower you with the knowledge to effectively edit PDF files using Preview on your Mac.
Inserting and Deleting Pages in a PDF with Preview
Whether you need to rearrange the order of pages or add new ones to your PDF document, Preview on a Mac makes it easy to insert and delete pages. These features allow you to customize the structure and content of your PDF files as needed. In this section, we will walk you through the process of inserting and deleting pages using Preview.
To insert a new page into your PDF, open the file in Preview and go to the page where you want to insert the new page. Click on the “View” menu and select “Thumbnails” or use the shortcut key “Command + Option + 2”. This will display a sidebar with thumbnail previews of each page in the document.
Next, select the page that will precede the new page and click on the “Edit” menu. From the drop-down menu, choose “Insert” followed by “Blank Page” or use the shortcut key “Shift + Command + N”. A new blank page will be inserted before the selected page in the sidebar.
To add content to the new blank page, you can simply click on the “Text” or “Markup” tool in the toolbar and start adding text or annotations. This allows you to create new content or make changes to existing pages within your PDF file.
On the other hand, if you need to delete a page from your PDF, open the document in Preview and go to the thumbnail view as described earlier. Select the page you want to delete by clicking on it in the sidebar. Then, click on the “Edit” menu and choose “Delete” or use the shortcut key “Command + Backspace”.
A confirmation dialog will appear asking if you want to delete the selected page. Click on the “Delete” button to proceed. The page will be removed from the PDF, and the remaining pages will automatically renumber to maintain the correct sequence.
The ability to insert and delete pages in Preview provides you with the flexibility to organize and customize your PDF documents. Whether you need to add a cover page, reorder sections, or remove unnecessary pages, Preview allows you to make these modifications quickly and easily.
In the next sections, we will explore other powerful editing capabilities offered by Preview on a Mac. We will cover how to rotate and rearrange pages, crop and resize pages, edit images, add a signature, highlight and underline text, and export the edited PDF file. Each feature will be explained step-by-step to equip you with the knowledge to effectively edit PDF files using Preview on your Mac.
Rotating and Rearranging Pages in a PDF with Preview
When working with PDF files, it’s not uncommon to need to rotate or rearrange pages to ensure the correct orientation or sequence of the content. With Preview on a Mac, you can easily rotate and rearrange pages within your PDF documents. In this section, we will guide you through the process of rotating and rearranging pages using Preview.
To rotate a page in Preview, open your PDF file and go to the thumbnail view by clicking on the “View” menu and selecting “Thumbnails” or using the shortcut key “Command + Option + 2”. In the sidebar, locate the page you want to rotate and select it by clicking on it.
Next, click on the “Tools” menu and choose the “Rotate Left” or “Rotate Right” option, or use the shortcut keys “Command + [” to rotate left or “Command + ]” to rotate right. The selected page will be rotated in the specified direction by 90 degrees.
If you need to rotate multiple pages, you can hold down the “Shift” key and click on each page to select them all. Then, follow the same steps to rotate them simultaneously. This feature is particularly useful when you have pages that need to be adjusted to a different orientation.
In addition to rotating pages, Preview allows you to rearrange the order of your PDF pages. To do this, go to the thumbnail view as described earlier and click and drag a page to a new position in the sidebar. Release the mouse button to drop the page into the new location. The other pages will automatically adjust to accommodate the change.
If you want to move multiple pages, select them by holding down the “Command” key and clicking on each page. Then, click and drag the selected pages to the desired position. Again, the other pages will adjust accordingly to maintain the correct sequence.
The option to rotate and rearrange pages in Preview gives you greater control over the layout and presentation of your PDF files. Whether you are working with a document that needs a specific orientation or reorganizing the order of sections, Preview allows you to make these modifications effortlessly.
In the following sections, we will explore other editing capabilities offered by Preview on a Mac. We will explain how to crop and resize pages, edit images, add a signature, highlight and underline text, insert and delete pages, and export the edited PDF file. Each feature will be presented in a step-by-step process to equip you with the knowledge to effectively edit PDF files using Preview on your Mac.
Cropping and Resizing Pages in a PDF with Preview
Cropping and resizing pages in a PDF can be necessary when you want to remove unwanted areas or adjust the dimensions of the content. With Preview on a Mac, you have the ability to crop and resize pages within your PDF documents. In this section, we will guide you through the process of cropping and resizing pages using Preview.
To crop a page in Preview, open your PDF file and go to the thumbnail view by clicking on the “View” menu and selecting “Thumbnails” or using the shortcut key “Command + Option + 2”. In the sidebar, locate the page you want to crop and click on it to select it.
Next, click on the “Tools” menu and choose the “Rectangular Selection” tool, or press the shortcut key “Command + Shift + A”. Click and drag to create a rectangular selection around the area you want to keep. Anything outside the selection will be cropped out.
Once you have made the selection, go to the “Tools” menu again, hover over the “Crop” option, and click “Crop” or use the shortcut key “Command + K”. The page will be cropped according to the selected area, and the excess content will be removed.
In addition to cropping, Preview allows you to resize pages to adjust their dimensions. To do this, open your PDF file and go to the thumbnail view as described earlier. Select the page you want to resize by clicking on it in the sidebar.
Next, go to the “Tools” menu and choose the “Adjust Size” option, or use the shortcut key “Command + Option + I”. A dialog box will appear, allowing you to specify the desired width, height, and resolution for the selected page. You can choose to maintain the aspect ratio or manually enter the dimensions.
After entering the desired values, click on the “OK” button to resize the page accordingly. The content within the page will adjust to fit the new dimensions while maintaining the proportions.
The option to crop and resize pages in Preview empowers you to customize the visual appearance and layout of your PDF files. Whether you need to remove unwanted margins, adjust the size of images, or create a specific page dimension, Preview provides the tools to accomplish these tasks.
In the next sections, we will explore other powerful editing capabilities offered by Preview on a Mac. We will cover how to edit images, add a signature, highlight and underline text, insert and delete pages, rotate and rearrange pages, and export the edited PDF file. Each feature will be explained step-by-step to equip you with the knowledge to effectively edit PDF files using Preview on your Mac.
Editing Images in a PDF with Preview
Images play a crucial role in many PDF documents, and being able to edit and enhance them can greatly improve the overall quality and impact of your files. With Preview on a Mac, you can easily edit images within your PDF documents. In this section, we will guide you through the process of editing images using Preview.
To begin editing an image in Preview, open your PDF file and locate the page that contains the image you want to edit. If the image is embedded within the document, you can simply click on it to select it. If the image is part of a scanned PDF, you may need to use the “Select” or “Rectangular Selection” tool to specify the area around the image.
Once the image is selected, go to the “Tools” menu and choose the “Adjust Color” option. This will open the image editing panel where you can make various adjustments to the image’s brightness, contrast, exposure, saturation, and more. You can use the sliders or input specific values to fine-tune the desired changes.
In addition to adjusting the color, Preview also allows you to crop or resize the image if needed. To crop an image, select the image and go to the “Tools” menu. Choose the “Crop” option, or use the shortcut key “Command + K”. Click and drag to create a rectangular selection around the area you want to keep, and then click “Crop” to finalize the changes.
To resize an image, select the image and go to the “Tools” menu. Choose the “Adjust Size” option, or use the shortcut key “Command + Option + I”. In the dialog box that appears, you can specify the desired width, height, and resolution for the image. Once you enter the values, click “OK” to resize the image accordingly.
The ability to edit images within PDF documents using Preview gives you the power to enhance visuals, correct imperfections, and optimize the overall appearance of your files. Whether you are working with photographs, illustrations, or diagrams, Preview provides the tools necessary to bring out the best in your images.
In the following sections, we will explore other powerful editing capabilities offered by Preview on a Mac. We will explain how to add a signature, highlight and underline text, insert and delete pages, rotate and rearrange pages, crop and resize pages, and export the edited PDF file. Each feature will be presented in a step-by-step process to equip you with the knowledge to effectively edit PDF files using Preview on your Mac.
Adding Signature to a PDF with Preview
Signing PDF documents is a common requirement for many business and legal processes, and Preview on a Mac provides a seamless solution for adding digital signatures to your PDF files. In this section, we will guide you through the process of adding a signature using Preview.
To begin, open the PDF file that requires your signature in Preview. Next, click on the “Markup” icon in the toolbar, which resembles a pen tip inside a box. From the drop-down menu that appears, select the “Signature” option.
If you have already created a signature in Preview, you can choose it from the available options. Alternatively, you can create a new signature by selecting “Create Signature…”. This will open a dialog box where you can input your signature using your trackpad or by signing a piece of paper and using your Mac’s camera to capture the signature. After creating or selecting your signature, it will appear in a floating window.
To add your signature to the PDF, simply click on the signature in the floating window and drag it to the desired position on the document. You can resize, reposition, or delete the signature as needed by clicking and dragging its corners or clicking on the “x” button in the top left corner of the signature window.
Adding a digital signature to your PDF provides an efficient and secure way to authenticate your documents. It allows you to sign contracts, agreements, or any other type of PDF file without the need for printing, signing, and scanning. Preview ensures that your signatures are seamlessly integrated with your documents, saving you time and eliminating the hassle of traditional paper-based processes.
In the following sections, we will explore other powerful editing capabilities offered by Preview on a Mac. We will explain how to highlight and underline text, insert and delete pages, rotate and rearrange pages, crop and resize pages, edit images, and export the edited PDF file. Each feature will be explained step-by-step to equip you with the knowledge to effectively edit PDF files using Preview on your Mac.
Exporting and Saving the Edited PDF with Preview
Once you have finished editing your PDF file using Preview on your Mac, it’s important to save and export the edited version to ensure your changes are preserved. In this section, we will guide you through the process of exporting and saving the edited PDF using Preview.
To export and save the edited PDF, go to the “File” menu in Preview and select the “Export…” option. Alternatively, you can use the shortcut key “Command + Shift + S”. This will open a dialog box where you can specify the file name, location, and format for the exported PDF.
Choose a location on your computer where you want to save the edited PDF file. You can select the existing PDF file and overwrite it with the edited version or specify a new file name to create a separate file. The format options for exporting include PDF, PDF (encrypted), JPEG, PNG, and TIFF.
If you select the PDF format, the exported file will be a new PDF document with all the edits and changes you have made in Preview. If you choose one of the image formats (JPEG, PNG, TIFF), Preview will export each page of the PDF as a separate image file in the selected format.
After specifying the file name, location, and format, click on the “Save” button to export and save the edited PDF. Preview will process the file and generate the exported version based on your chosen settings. Once the export is complete, you can access the edited PDF or image files in the designated folder on your computer.
Exporting and saving the edited PDF with Preview ensures that your changes are preserved and can be accessed or shared with others. It is recommended to keep a backup of the original PDF file in case you need to make further modifications or reference the original version in the future.
In the previous sections, we explored various editing capabilities offered by Preview on a Mac. We learned how to highlight and underline text, insert and delete pages, rotate and rearrange pages, crop and resize pages, edit images, add a signature, and export the edited PDF. With these powerful tools, you have the ability to efficiently and effectively modify PDF files according to your needs.
The Limitations of Editing PDFs with Preview
While Preview on a Mac offers a range of powerful editing capabilities for PDF files, it is important to be aware of the limitations of using Preview as your primary editing tool. In this section, we will discuss some of the limitations you may encounter when editing PDFs with Preview.
One limitation of Preview is its limited support for advanced editing features. While you can add text, annotations, and signatures, the options for advanced editing, such as reflowing text or editing the underlying structure of the document, are not available in Preview. If you require more advanced edits, you may need to consider using specialized PDF editing software.
Another limitation is the inability to edit the content within a PDF that is not text-based. For example, if your PDF contains scanned images or non-editable text, you will not be able to make changes to the actual content of these elements using Preview alone. You may need to use optical character recognition (OCR) software to convert scanned images into editable text before making changes.
Additionally, Preview may not handle complex layouts or formatting consistently. If your PDF has intricate tables, columns, or complex formatting, you may experience limitations in accurately maintaining the formatting and layout during editing. This can result in unexpected changes or inconsistencies within the document.
Furthermore, Preview’s editing capabilities are specific to the macOS platform, meaning that the features and functionality may not be available on other operating systems. If you need to collaborate with individuals using different platforms or share your edited PDFs with others, it’s important to ensure compatibility to avoid any issues or loss of data.
Lastly, the performance of Preview can be affected by the size and complexity of the PDF file you are editing. Large files or files with many pages, high-resolution images, or complex graphics may cause Preview to slow down or become unresponsive. It’s recommended to have sufficient system resources and consider using dedicated PDF editing software for handling such files.
Despite these limitations, Preview remains a convenient and accessible option for basic PDF editing tasks on a Mac. It provides essential features for adding annotations, signatures, and making simple edits to text and images. If you require more advanced editing capabilities or frequently work with complex PDFs, exploring dedicated PDF editing software may be a more suitable solution.
In the previous sections, we explored the various editing capabilities offered by Preview on a Mac. By leveraging these tools, you can efficiently modify and enhance your PDF files according to your specific needs.