
Finding Fonts on the App Store
When it comes to finding and downloading fonts for your iPhone, the App Store is the go-to destination. With a multitude of font apps available, you have plenty of options to choose from. The key is knowing where to start and how to navigate through the vast selection of fonts.
To begin your font-hunting journey, open the App Store on your iPhone. Tap on the search icon and type in “font apps” or “fonts” in the search bar. This will bring up a list of font apps that you can explore. Make sure to read the reviews and check the ratings to find the most reliable and highly recommended apps.
Once you have found a font app that catches your interest, tap on it to open the app’s page. Here, you will find a description of the app, screenshots, and user reviews. Take some time to read through the description and check out the screenshots to get a sense of the fonts available and the app’s functionality.
Additionally, pay attention to the app’s features. Some font apps may offer a wide range of font styles, while others might specialize in specific categories such as handwritten or calligraphy fonts. Consider your preferences and the type of projects you’re working on to choose an app that aligns with your needs.
Furthermore, take note of any in-app purchases or subscription options. While many font apps offer a selection of free fonts, some may have premium features or font packs that require a purchase. Be mindful of your budget and choose an app that fits within your financial constraints.
Once you have decided on an app, tap on the “Get” or “Download” button to start the installation process. Wait for the app to download and install on your iPhone – note that this may take a few moments depending on your internet connection speed. Once the app is installed, you can open it and begin exploring the world of fonts.
Remember, the App Store is constantly updated with new font apps, so make sure to check back regularly to discover fresh options and expand your font collection. Keep in mind that while browsing different apps, you may come across font bundles or special promotions which can provide even more value for your font-searching endeavors.
With the multitude of font options available on the App Store, you’re sure to find the perfect fonts to add creativity and personal touch to your iPhone’s visual experience. So dive into the App Store, explore the myriad of font apps, and let your imagination run wild with typography!
Installing a Font App on Your iPhone
Installing a font app on your iPhone is a straightforward process that allows you to unleash your creativity and personalize your device’s visual aesthetics. Whether you’re a graphic designer, a social media enthusiast, or simply love experimenting with different fonts, here is a step-by-step guide to help you easily install a font app on your iPhone.
Step 1: Open the App Store
To begin, locate the App Store on your iPhone’s home screen and tap on it. The App Store icon is a blue icon with a white “A” inside a white circle.
Step 2: Search for a Font App
Once you’re in the App Store, tap on the search icon in the bottom right corner. In the search bar at the top, type in “font app” or the specific name of the font app you want to install. As you type, the App Store will start displaying relevant search suggestions. Tap on the app you want from the suggestions or complete your search by tapping the search button on the keyboard.
Step 3: Select and Install the Font App
From the search results, find the font app you want to install and tap on its icon to open the app page. On the app page, you will see a description of the app, screenshots, and reviews. Take a moment to read through the details and user feedback to make an informed decision. If you’re satisfied with the app, tap on the “Get” or “Download” button located next to the app icon.
Step 4: Authenticate with Face ID, Touch ID, or Password
Once you tap on the download button, your iPhone might prompt you to authenticate the installation using Face ID, Touch ID, or your device password. Follow the on-screen instructions to complete the authentication process.
Step 5: Wait for the Installation
After authenticating, your iPhone will start downloading and installing the font app. The speed of the installation will depend on your internet connection. You can monitor the progress of the installation by keeping an eye on the app’s icon on your home screen.
Step 6: Open the Font App
When the installation is complete, locate the font app’s icon on your home screen and tap on it to open the app. Once inside, you can explore the various fonts, preview them, and customize your device’s typography.
Installing a font app on your iPhone opens up a world of possibilities for personalization and creative expression. By following these simple steps, you’ll be able to install a font app of your choice and embark on a typography adventure, making your iPhone truly unique.
Browsing and Previewing Fonts
Once you have installed a font app on your iPhone, you can begin the exciting process of browsing and previewing an extensive array of fonts. This allows you to find the perfect typography to enhance your creative projects or personalize your device. Here’s a guide on how to browse and preview fonts within a font app:
Step 1: Open the Font App
Locate the font app’s icon on your iPhone’s home screen and tap on it to open the app. The app will load, presenting you with a gallery or library of available fonts.
Step 2: Explore Font Categories and Filters
Depending on the app, you may find different categories or filters to help you narrow down your font search. Common categories include serif, sans serif, script, handwritten, and decorative fonts. Take your time to explore these categories and filter options to find the style that best fits your project or personal preferences.
Step 3: Scroll and Preview Fonts
Scroll through the font collection to see the different options available. As you scroll, the fonts will be displayed with their names or a preview text. This allows you to get a glimpse of the style and appearance of each font. Take the time to read the font names and preview text to determine if it matches your desired aesthetic.
Step 4: Tap to Preview
If a font catches your eye, tap on it to get a closer look. This action will display a larger preview of the font, showcasing the individual characters, spacing, and overall design. Use this opportunity to examine the finer details of the font and visualize how it will appear in your projects.
Step 5: Customize the Sample Text
To get a better sense of how the font will look in real-world applications, many font apps allow you to customize the sample text. You can easily edit the text to your preferred phrases, words, or even your own name. This enables you to see how the font aligns with your specific creative needs.
Step 6: Compare and Save Favorites
While browsing and previewing fonts, you may come across multiple options that appeal to you. To help with decision-making, take advantage of any “favorite” or “save” features within the font app. This allows you to create a collection of your preferred fonts, making it easier to compare and select the perfect one for your projects.
Browsing and previewing fonts within a font app is an enjoyable and crucial step in finding the right typography for your iPhone or creative endeavors. Take your time to explore the variety of fonts, experiment with different styles, and envision how they can elevate your designs.
Choosing and Downloading Fonts
After browsing and previewing various fonts in a font app on your iPhone, it’s time to make the exciting decision of choosing and downloading the fonts that best suit your needs. Here’s a step-by-step guide to help you through the process:
Step 1: Select Your Preferred Font
Take your time to review the fonts you have previewed and consider how they align with your creative vision or personal taste. Consider factors such as readability, style, and overall aesthetic appeal. Once you have found a font that captures your attention, it’s time to select it for download.
Step 2: Tap on the Font
Tap on the font you wish to download, and you will be taken to a dedicated page or preview screen for that font. This screen may provide additional information about the font, such as the designer or font specifications.
Step 3: Check for Licensing Information
Before proceeding with the download, it’s crucial to check the licensing information for the font. Some fonts may be free for personal use only, while others may require a commercial license for business or professional purposes. Read the font’s terms of use or licensing agreement to ensure you’re complying with the designer’s requirements.
Step 4: Download the Font
On the font’s dedicated page or preview screen, there will be a prominent button or link to download the font. Tap on it, and the font will be downloaded to your iPhone.
Step 5: Install the Font
After the font has finished downloading, you may need to install it within the font app or follow the app’s instructions for using the font system-wide on your iPhone. These instructions may vary depending on the font app you’re using.
Step 6: Enjoy Your New Font
Once the font is successfully installed, you can start using it in various applications on your iPhone. Whether it’s designing graphics, creating social media posts, or adding a personal touch to your device’s interface, your chosen font will bring a new level of creativity and uniqueness to your projects.
Remember, the process of choosing and downloading fonts is subjective and depends on your specific preferences and goals. Take the time to experiment with different fonts and explore a variety of styles to find the fonts that resonate with your creative vision.
Managing Your Fonts
Once you have downloaded and installed fonts on your iPhone, it’s important to know how to effectively manage them to ensure easy access and organization. Here are some tips for managing your fonts:
1. Group Fonts
Consider grouping fonts based on categories or projects. For example, you can create folders within your font app to separate serif fonts from sans serif fonts or to keep track of fonts specifically for social media graphics. This can help you quickly locate the fonts you need for specific purposes.
2. Organize by Favorites
If the font app allows you to mark fonts as favorites, utilize this feature to create a curated list of your most frequently used or preferred fonts. This will save you time searching for fonts and ensure your go-to options are easily accessible.
3. Delete Unused Fonts
If you find yourself with a cluttered font library or running out of storage space on your device, consider deleting fonts that you no longer use or need. This helps streamline your font collection and keeps your font app running smoothly.
4. Update Fonts Regularly
Font apps often release updates or new font collections. Make it a habit to check for updates regularly to ensure you have the latest versions and access to any new fonts or features that might enhance your creative projects.
5. Use a Font Manager App
If you have a large collection of fonts or want more advanced font management capabilities, you can explore specialized font management apps available on the App Store. These apps allow you to organize, import, and manage fonts from various sources, giving you more control over your font library.
6. Backup Fonts
To safeguard your font collection, consider periodically backing up your fonts to external storage or cloud services. This ensures that even if you switch devices or encounter any unforeseen issues, you won’t lose access to your fonts.
7. Explore Font Pairings
Experiment with combining different fonts to create visually pleasing combinations. Many font apps provide recommendations or suggestions for font pairings, allowing you to create harmonious and cohesive designs.
Managing your fonts effectively will save you time and effort in the long run. By organizing, deleting unused fonts, and staying up to date with updates, you can ensure a streamlined and efficient font library that enhances your creative projects.
Using Fonts in Other Apps
Once you have downloaded and installed fonts on your iPhone, you can use them in various applications to add a personalized touch to your creations. The ability to use custom fonts in other apps on your device opens up endless possibilities for creative expression. Here’s how you can use your downloaded fonts in other apps:
1. Enable Font Access
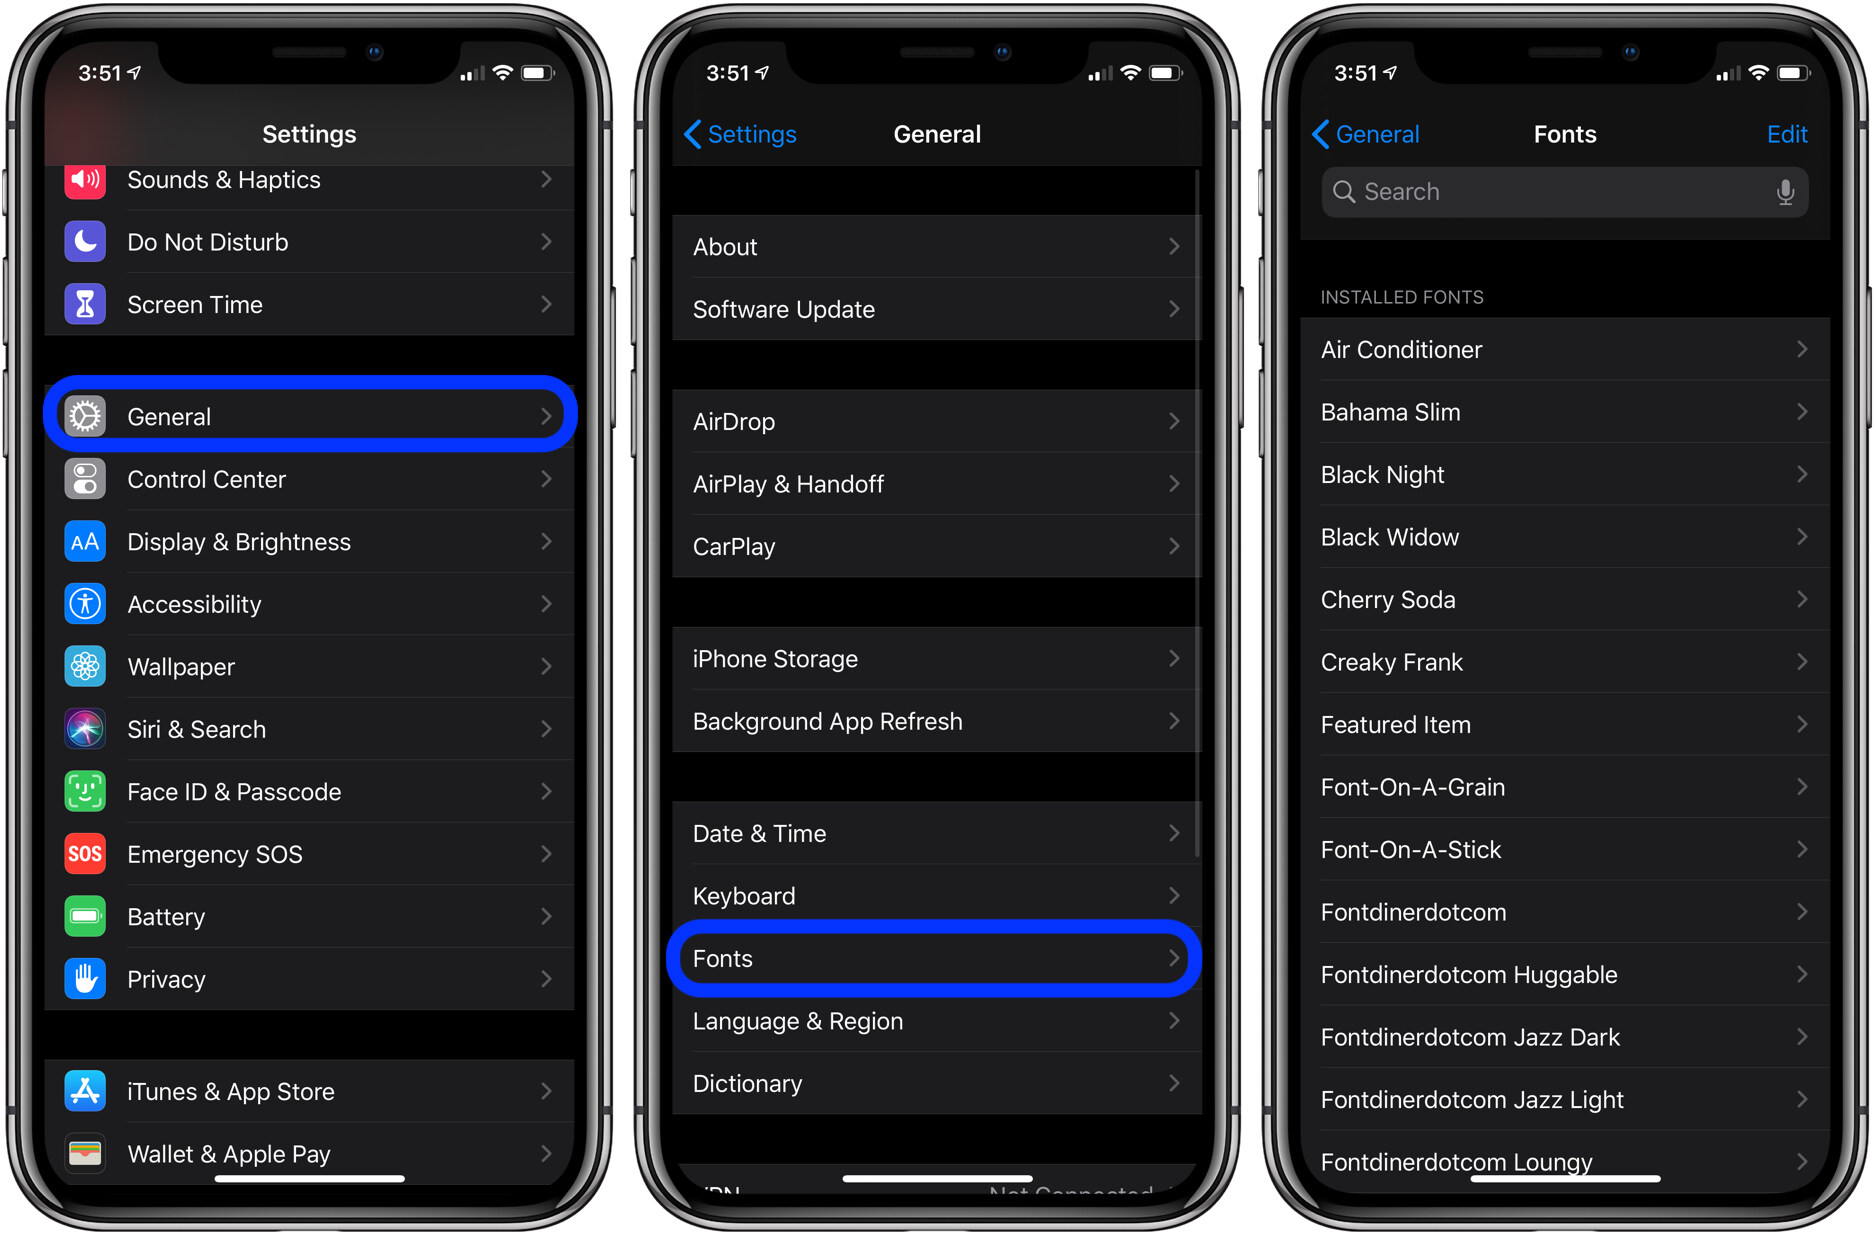
Before you can use your downloaded fonts in other apps, you’ll need to enable font access on your iPhone. To do this, go to “Settings” on your device, then navigate to “General” and select “Fonts”. Here, you’ll see a list of all the fonts installed on your device. Make sure the toggle next to each font you want to use in other apps is switched on.
2. Open the App You Want to Use the Font In
Once you’ve enabled font access for the desired fonts, open the app in which you want to use them. This could be a word processing app, a graphic design app, a photo editing app, or any other app that allows you to customize text.
3. Access Font Options
In most apps, you can access the font options by selecting the text you want to customize and looking for a font selection menu or text settings. This may be located in the toolbar, the formatting options, or in a separate text editor within the app.
4. Choose Your Downloaded Font
Within the font options, you’ll see a list of available fonts. Scroll through the list or use the search function to locate the font you want to use. Keep in mind that your downloaded fonts may be listed separately from the default system fonts.
5. Apply the Font to Your Text
Once you’ve selected your preferred font, apply it to the text you want to customize. This can be a single word, a sentence, a heading, or an entire document, depending on the capabilities of the app you’re using. You’ll see the text update in real-time with the new font applied.
6. Customize Further Settings
Depending on the app, you may have additional options to further customize the appearance of the text. This can include adjusting the font size, the style (bold, italic, underline), the color, and the alignment. Explore the app’s settings or formatting options to make the text truly your own.
7. Save or Share Your Creation
After customizing the text with your downloaded fonts, save your work within the app or share it directly with others. This could be a document, a graphic, a social media post, or any other type of content that showcases your creativity.
Using your downloaded fonts in other apps allows for seamless integration and customization, providing you with the flexibility to express your unique style and enhance your creations.
Troubleshooting Font Installation
While installing fonts on your iPhone is usually a smooth process, there may be instances where you encounter issues or face challenges. Here are some common troubleshooting steps to help you resolve font installation problems:
1. Check Compatibility
Before installing a font, ensure that it is compatible with your iPhone model and operating system version. Some fonts may only work with specific iOS versions or require a certain level of processing power. Check the font’s requirements and verify that your device meets them.
2. Restart the Font App
If you encounter difficulties with font installation, try closing the font app completely and reopening it. This simple action may fix minor glitches or refresh the app’s functionality, allowing you to proceed with the installation process smoothly.
3. Clear App Cache
To troubleshoot font installation issues, you can also try clearing the cache of the font app. Sometimes, excessive data or temporary files can disrupt the installation process. Clearing the app cache can help resolve any conflicts and allow for a fresh start.
4. Reinstall the Font App
If the font app continues to experience issues or if font installation remains problematic, consider uninstalling and reinstalling the font app. This can help resolve any underlying software issues and provide a clean slate for font installation.
5. Check Storage Space
Ensure that you have sufficient storage space available on your iPhone for font installation. If your device is running low on storage, it may affect the font installation process. Free up space by deleting unnecessary files or apps to create room for font installations.
6. Update iOS
Make sure you are running the latest version of iOS on your iPhone. Outdated operating systems may not support certain font apps or features. Updating to the latest version can resolve compatibility issues and provide a more seamless font installation experience.
7. Contact App Support
If you’ve exhausted all troubleshooting steps and are still unable to install fonts on your iPhone, it may be helpful to reach out to the font app’s support team. They can provide specific guidance and assistance tailored to the app you’re using, helping you overcome any installation obstacles.
Troubleshooting font installation issues may require a combination of these steps or even additional troubleshooting methods specific to your individual situation. Remember to be patient and persistent, as resolving font installation problems will ultimately enable you to enjoy a wider range of fonts on your iPhone.